


7
Connection with a plug
▯
Plug has to be conform with NEMA
CONFIGURATIONS FOR PLUGS AND
RECEPTACLES.
▯
The appliance must be properly grounded.
▯
Plug must be rated not less than type 6-20 P (2-pole
3-wire grounding).
▯
Only a qualified electrician should connect the
plug.
▯
Install a socket outlet earthed in accordance with
regulations approx. 27" (700 mm) above the floor
behind the appliance. The socket outlet must still
be accessible after installation.
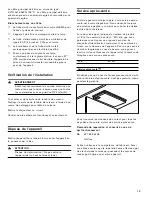
Check the Installation
9
WARNING
Before you plug in an electrical cord or turn on
power supply, make sure all controls are in the
OFF position.
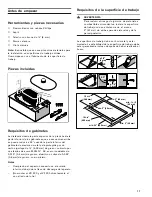
Remove everything from the cooktop surface. Clean
cooktop surface with cooktop cleaning creme.
Switch on the circuit breaker.
Verify that elements function properly.
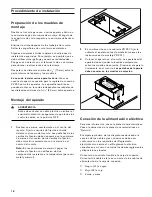
Removing appliance
Disconnect the appliance from the power supply. Push
out the appliance from below.
9
CAUTION
Damage to appliance! Don't lift device out from
above.
Customer Service
Customer Service
If your appliance needs repairs, our customer service is
there for you. We work hard to help solve problems
quickly and without unnecessary service calls, getting
your appliance back up and running correctly in the
least amount of time possible.
When you call, please indicate the product number
(E-Nr.) and serial number (FD-Nr.) so that we can
support you in a qualified manner. You will find the type
plate with these numbers on the bottom of the
appliance. To avoid having to search for a long time
when you need it, you can enter your appliance data and
the customer support telephone number here.
Please read the installation instructions and use and
care instructions provided with your appliance. Failure
to do so may result in an error in using the appliance.
This could result in a service call that instead of fixing a
mechanical issue is only needed for customer
education. Such calls are not covered by the appliance
warranty.
Please find the contact data of all countries in the
enclosed customer service list.
To book an engineer visit and product advice
You can rely on the manufacturer’s expertise. Rest
assured that the repair will be handled by trained
service technicians who have the original replacement
parts for your appliance.
E-Nr.
FD-Nr.
Customer Service
O
USA
877 442 4436
toll-free
CANADA
877 442 4436
toll-free


