background image

Familiarizing yourself with your appliance

 en-us

11

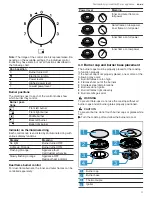
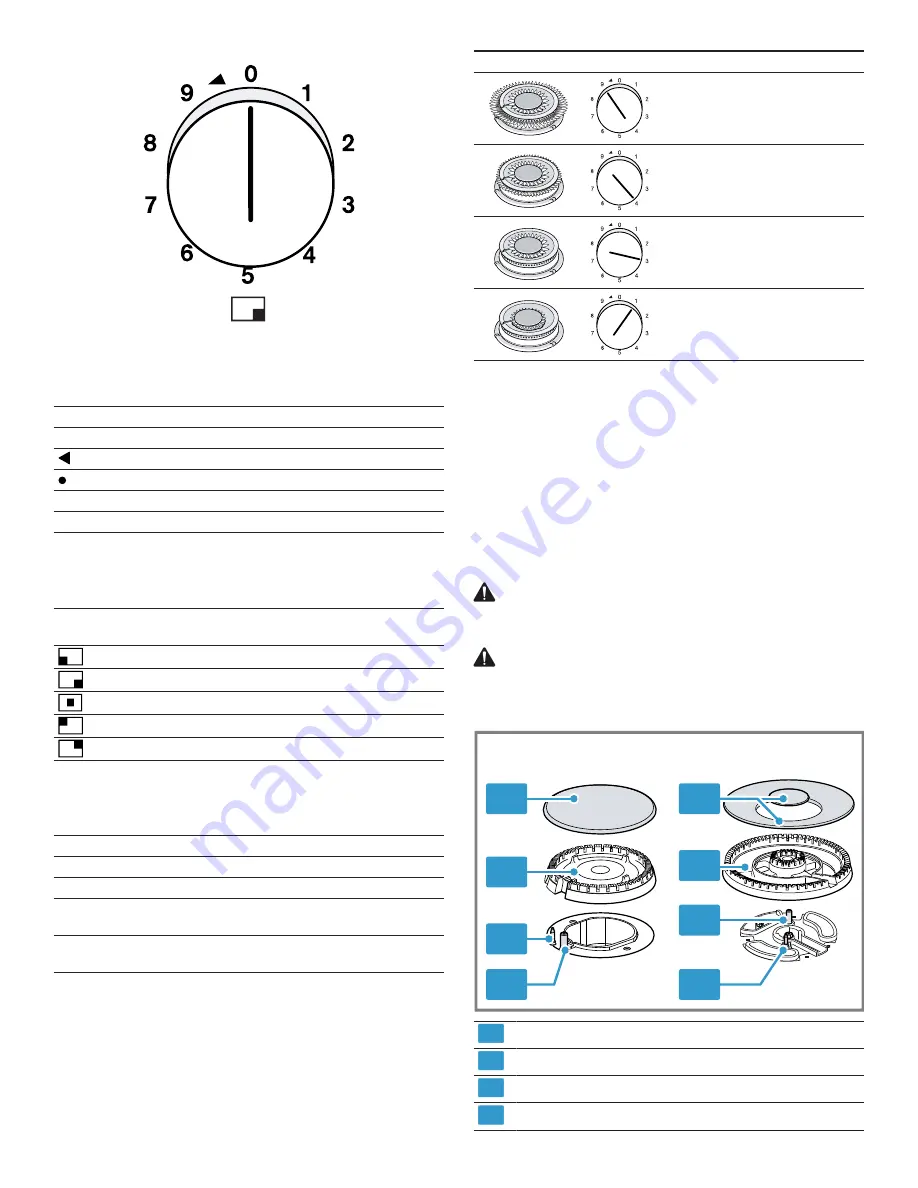
Note: The image of the control knob is representative. De-

pending on the available settings, the individual control

knobs may have some but not all functions described in

the following chart.

Knob position
0

Burner turned off
Electronic ignition
Power levels

9

Highest power level

1

Lowest power level

Burner positions

The markings next to each of the control knobs show

which burner they control.

Burner posi-

tions

Front left burner
Front right burner
Middle burner
Back left burner
Back right burner

Indicator on the illuminated ring

Each control knob is encircled by an illuminated ring with

various display functions.

Display

Meaning

No light

Burner turned OFF

Lights up: Orange

Burner turned ON

Flashing: Orange

Appliance fault

Call Customer Service

Slowly flashing: orange

Appliance OFF

Residual heat indicator

Dual flame burner control

For dual-flame burners, the inner and outer flames can be

controlled separately.

Power level

Meaning
Inner and outer flame on

full power

Outer flame on low power,

inner flame on full power

Inner flame on full power

Inner flame on low power

4.3 Burner cap and burner base placement

The burner caps must be properly placed for the cooktop

to function properly.

If the burner cap is not properly placed, one or more of the

following may occur:

¡

Burner flames are too high

¡

Flames shoot out of the burners

¡

Stainless steel discolorations

¡

Burners do not ignite

¡

Burner flames light unevenly

¡

Burner emits gas odor

WARNING

To prevent flare-ups do not use the cooktop without all

burner caps and all burner grates properly positioned.

CAUTION

To prevent burns, do not touch burner caps or grates while

hot.

Turn the cooktop off and allow the burners to cool.

1

2

3
4

4

3

2

1

1

Burner cap

2

Burner base

3

Thermocouple

4

Igniter

Содержание CG 280 211 CA

Страница 1: ...en us Use and Care Manual 2 fr ca Manuel d utilisation 27 CG 280 211 CA Gas cooktop Surface de cuisson au gaz Gaggenau...

Страница 2: ...13 5 2 Using cookware 13 5 3 Tips for using a wok 13 6 Operation 13 6 1 Turning on a burner 13 6 2 Manually igniting a burner 14 6 3 Flame failure safety system 14 6 4 Turning off a burner 14 6 5 Nor...

Страница 3: ...e precautions will reduce the risk of electrical shock fire and injury to persons When using kitchen appliances basic safety precautions must be followed including those in the following pages IMPORTA...

Страница 4: ...use by persons includ ing children with reduced physical sensory or mental ca pabilities or lack of experience and knowledge unless they have been given supervision or instruction concern ing use of...

Страница 5: ...are will expose a portion of the heating element or burner to direct contact and may result in ignition of clothing Proper relationship of cookware to heating element or burner will also im prove effi...

Страница 6: ...c ceramic earthenware or other glazed utensils are suitable for cooktop or range top service with out breaking due to the sudden change in temperature WARNING Moisture intrusion may cause an electric...

Страница 7: ...grate if the rubber feet are missing or damaged To prevent flare ups do not use the cooktop without all burner caps and all burner grates properly positioned WARNING Use this appliance only for its i...

Страница 8: ...ion above sea level For altitudes above 2 000 ft 610 m elevation above sea level burner flame adjustments may be necessary Burners should be checked at the lowest setting if the flame is not stable th...

Страница 9: ...protection and en ergy saving Environmental protection and energy saving 3 1 Disposal of packaging The packaging materials are environmentally compatible and can be recycled Sort the individual compon...

Страница 10: ...urner 6 000 BTU hr 1 75 kW 3 Dual flame burner 17 000 BTU h 5 00 kW 4 Large burner 10 300 BTU hr 3 0 kW 5 Small burner 3 400 BTU hr 1 0 kW 6 Control knobs Control the burner indicated next to the cont...

Страница 11: ...ice Slowly flashing orange Appliance OFF Residual heat indicator Dual flame burner control For dual flame burners the inner and outer flames can be controlled separately Power level Meaning Inner and...

Страница 12: ...our cooktop has sealed gas burners There are no burner parts under the cooktop to clean disassemble or adjust Your cooktop has four different burner sizes small medium large and dual flame Match every...

Страница 13: ...a thick flat base Do not cook without a lid Ensure that the lid does not move When cooking without a lid a large amount of the en ergy will escape Position the cookware in the middle of the burner ot...

Страница 14: ...ing off a burner Turn the control knob clockwise to 0 6 5 Normal behavior during operation The following behavior during operation is normal A soft whistling noise while the burner is operating Releas...

Страница 15: ...min utes Step 2 Continue boiling Switch to heat setting 1 for 5 8 minutes Step 2 Continue boiling Switch to heat setting 1 for 5 8 minutes Soups and creamy soups Food Burner Total time in min Step 1 C...

Страница 16: ...Hummus pur ed chickpeas Large 50 55 9 10 12 4 40 43 Dual flame 47 52 7 10 12 6 37 40 Medium 52 57 9 12 14 5 40 43 Mountain lentils Large 40 45 9 8 10 8 32 35 Medium 50 55 9 18 20 6 32 35 Dual flame 40...

Страница 17: ...hite sauce Stir constantly Small 10 15 1 6 2 4 1 6 8 11 Medium 10 15 1 5 2 4 1 5 8 11 Large 3 8 1 5 1 2 1 5 2 6 Blue cheese sauce Stir constantly Small 4 6 1 7 4 6 Medium 3 5 1 7 3 5 Dual flame 4 6 1...

Страница 18: ...Duck breast 1 piece Medium 6 8 1 7 6 8 Large 9 11 1 7 9 11 Dual flame 6 8 1 5 6 8 Beef tenderloin Stroganoff Large 8 13 1 9 8 13 Dual flame 5 10 1 7 5 10 Medium 12 17 1 9 12 17 Chicken breast fillets...

Страница 19: ...3 1 7 2 5 Frozen vegetables Stir constantly Large 7 12 1 9 7 12 Dual flame 5 10 1 9 5 10 Medium 10 15 1 9 10 15 Pizza 8 inch Dual flame 4 8 4 4 8 Large 16 20 1 16 20 1 Cook without lid Desserts Dish...

Страница 20: ...ve the control knobs when cleaning the ap pliance 1 Let the appliance cool down 2 Clean with a sponge water and soap 3 Dry with a soft cloth 8 2 Cleaning the burners Clean the surfaces of the burners...

Страница 21: ...thoroughly and make sure the burner cap is seated properly on the burner base after cleaning Control knobs and illu minated ring Non abrasive cleaners Dish soap and hot wa ter Dry thoroughly after cl...

Страница 22: ...surface for cleaning Blisters crazing or chips are common due to the extreme temperatures on the grate fin gers and rapid temperature changes Acidic and sugar laden spills deteriorate the enamel Remov...

Страница 23: ...rk ing Food remnants dirt or cleaning products are located between the igniters and the burners Clean the space between the igniter and the burner Burner parts are wet Carefully dry the burner parts T...

Страница 24: ...m www gaggenau ca 11 1 Model number E Nr and production number FD You can find the model number E Nr and the production number FD on the appliance s rating plate Making a note of your appliance s deta...

Страница 25: ...ll be fully liable and responsible for any travel time or other spe cial charges by the service company assuming they agree to make the service call 12 4 Out of warranty product Gaggenau is under no o...

Страница 26: ...USION OR LIMITATION OF INCIDEN TAL OR CONSEQUENTIAL DAMAGES AND SOME STATES DO NOT ALLOW LIMITATIONS ON HOW LONG AN IMPLIED WARRANTY LASTS SO THE ABOVE EX CLUSIONS OR LIMITATIONS MAY NOT APPLY TO YOU...

Страница 27: ...isine 39 5 1 Ustensile de cuisson convenable 39 5 2 Utilisation des ustensiles de cuisson 39 5 3 Conseils d utilisation d un wok 39 6 Fonctionnement 40 6 1 Allumer un br leur 40 6 2 Allumer manuelleme...

Страница 28: ...d lectrocution d incendie et de blessure pour les personnes utilisant l appareil Lorsque vous utilisez des appareils lectrom nagers il importe de suivre les pr cautions de s curit de base y compris c...

Страница 29: ...l n est pas destin tre utilis par des personnes y compris des enfants pr sentant des capacit s physiques sensorielles ou mentales r duites moins qu elles n aient t inform es de la mani re d utiliser l...

Страница 30: ...our r duire le risque de br lures d inflammation de mat riaux inflammables et de d versements dus un contact involontaire avec l ustensiles de cuisine la poign e d un ustensile doit tre positionn e de...

Страница 31: ...de cuisson Nettoyez autour du br leur et des orifices du br leur Apr s le nettoyage v rifiez le bon fonctionnement Avant d utiliser un ustensile de cuisson l inspecter la recherche de dommages ou d us...

Страница 32: ...curit des enfants AVERTISSEMENT Ne pas permettre aux enfants d utiliser cet appareil lectrom nager moins d tre troitement surveill s par un adulte Les enfants et les animaux domestiques ne doivent pa...

Страница 33: ...exposition ces substances les br leurs doivent tre r gl s par un installateur ou un organisme agr pour assurer une combustion ad quate Pour une bonne ventilation utilisez une fen tre ouverte un venti...

Страница 34: ...e est instable haussez la flamme de mijotage jusqu ce qu elle soit stable Vous pouvez le faire en r glant la vis de d rivation de la soupape Si la flamme r agit de mani re satisfaisante aucun ajusteme...

Страница 35: ...onomies 3 1 Mise au rebut de l emballage Les mat riaux d emballage sont cologiques et recyclables Veuillez liminer les pi ces d tach es apr s les avoir tri es par mati res 3 2 conomiser de l nergie Si...

Страница 36: ...flamme double 17 000 BTU h 5 00 kW 4 Grand br leur 10 300 BTU h 3 0 kW 5 Petit br leur 3 400 BTU h 1 0 kW 6 Boutons de commande Contr lez le br leur indiqu c t du bouton de commande 4 2 Boutons de co...

Страница 37: ...me Pour les br leurs flamme double les flammes internes et externes peuvent tre contr l es s par ment Niveau de puissance Signification Flammes internes et externes pleine puissance Flamme externe fai...

Страница 38: ...elle table de cuisson neuve dispose de br leurs gaz scell s Il n y a aucune pi ce de br leur nettoyer d monter ou r gler sous la table de cuisson La table de cuisson dispose de quatre diam tres de br...

Страница 39: ...la casserole est adapt e la taille du br leur N utilisez jamais de petits ustensiles de cuisine sur de gros br leurs Assurez vous que la flamme ne touche pas les c t s de la casserole N utilisez pas...

Страница 40: ...manuellement 1 Maintenez enfonc le bouton de commande du br leur s lectionn et tournez le dans le sens inverse des aiguilles d une montre jusqu au niveau de puissance le plus lev 2 Tenir une allumett...

Страница 41: ...M thodes de cuisson pr sent es dans le tableau de cuisson Porter bullition Poursuite de la cuisson Laisser la pression augmenter dans l autocuiseur Maintenir la pression de l autocuiseur Frire feu vi...

Страница 42: ...10 12 7 10 12 Flamme double 17 21 8 7 9 6 10 12 Riz Grand 17 22 9 5 7 2 12 15 Moyen 18 23 9 7 9 6 11 14 Flamme double 13 18 7 4 6 4 9 12 Ravioli Grand 9 14 9 4 6 6 5 8 Moyen 17 22 8 12 14 8 5 8 Flamm...

Страница 43: ...9 15 20 Moyen 25 30 1 9 25 30 1 Cuisinez sans couvercle ufs Plat Br leur Temps de cuisson total en minutes tape 1 La m thode de cuisson tape 1 R glage de chaleur tape 1 Dur e en minute tape 2 La m th...

Страница 44: ...16 19 Grand 13 18 1 9 1 3 1 8 12 15 Flamme double 13 18 1 7 1 3 1 5 12 15 Sauce carbonara Moyen 10 15 6 5 7 1 3 5 8 Grand 8 13 5 4 6 1 3 4 7 Flamme double 10 15 3 10 15 1 Cuisinez sans couvercle Pois...

Страница 45: ...6 5 8 Flamme double 7 12 1 9 3 5 1 6 5 8 Moyen 7 12 1 9 10 12 Viande hach e Grand 15 20 8 15 20 Moyen 20 25 9 20 25 Flamme double 15 20 6 15 20 1 Cuisinez sans couvercle Produits pr par s surgel s Pla...

Страница 46: ...Pizza 8 po Flamme double 4 8 4 4 8 Grand 16 20 1 16 20 1 Cuisinez sans couvercle Desserts Plat Br leur Temps de cuisson total en minutes tape 1 La m thode de cuisson tape 1 R glage de chaleur tape 1 D...

Страница 47: ...c une ponge de l eau et du savon 3 S chez avec un chiffon doux 8 2 Nettoyer les br leurs Nettoyez les surfaces des br leurs apr s chaque utilisation pour viter qu ils ne s incrustent AVIS Ne nettoyez...

Страница 48: ...crub 1 Pour les taches alimentaires nettoyants abrasifs tels que Zud 1 Barkeepers Friend 1 Rincer et s cher imm diatement Les claboussures d aliments acides et tr s sucr s d t riorent l mail Les clabo...

Страница 49: ...iments br l s avant de placer les grilles du br leur dans le lave vaisselle Placez les grilles du br leur sur le panier le plus bas du lave vaisselle et utilisez le d tergent recommand par le fabrican...

Страница 50: ...allumeurs et les br leurs Nettoyez l espace entre l allumeur et le br leur Les pi ces du br leur sont humides S chez soigneusement les pi ces du br leur Les pi ces du br leur ne sont pas correctement...

Страница 51: ...m ro de fabrication FD de l appareil USA 1 877 442 4436 www gaggenau com www gaggenau com us appliances eshop CA 1 877 442 4436 www gaggenau com www gaggenau ca 11 1 Num ro de mod le E Nr et num ro de...

Страница 52: ...miles d un centre de r paration autoris ou n est pas accessible de fa on raisonnable dans un environnement ou un local dangereux mena ant ou p rilleux dans une telle ventualit la demande du consommate...

Страница 53: ...SANS S Y LIMITER ABSENCE DU TRAVAIL FRAIS D H TEL ET OU FRAIS DE RESTAURANT FRAIS DE REMANIEMENT EN EXC DENT DES DOMMAGES DIRECTS QUI SONT D FINITIVEMENT CAUS S EXCLUSIVEMENT PAR GAGGENAU OU AUTREMEN...

Страница 54: ......

Страница 55: ......

Страница 56: ...BSH Home Appliances Corporation 1901 Main Street Suite 600 Irvine CA 92614 USA www gaggenau com 1 877 442 4436 2021 BSH Home Appliances Corporation 8001215962 8001215962 en us fr ca 011130...

Отзывы: