background image

33

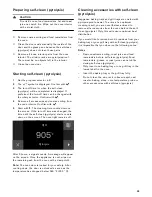
Preparing self-clean (pyrolysis)

9

CAUTION

Fire risk! Loose food remainders, fat and roast 
juice can catch fire. Wipe out the oven interior 
with a moist cloth.

Remove coarse soiling and food remainders from 
the oven.

Clean the door seals manually, the inside of the 
door and the glass pane because the self-clean 
(pyrolysis) does not clean these parts.

Remove all loose interior parts from the oven 
interior. The slide-in racks are pyrolysis-proof. 
There must be no objects left in the interior.

Close the oven door.

Starting self-clean (pyrolysis)

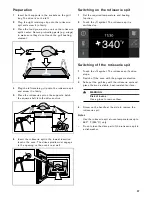
1

Set the program selector to 

S

.

2

The 

œ

 symbol is displayed. Confirm with 

.

3

The turn-off time for when the self-clean 
(pyrolysis) will be completed is displayed. If 
preferred, the turn-off time can be changed with 
the rotary selector. Confirm with 

.

4

Remove all accessories and coarse soiling from 
the oven interior. Confirm with 

.

5

Start with 

I

. The cleaning time counts down on 

the screen. If the turn-off time was changed, the 
time until the self-clean (pyrolysis) starts counts 
down on the screen. The oven light remains off.

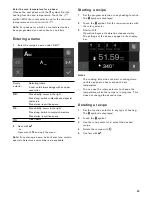
After 3 hours, a signal sounds. A message will appear 
on the screen. Once the appliance is cool, wipe out 
the remaining ash from the oven with a damp cloth.

Note: 

The oven door is locked for your safety. After 

cooling down, the door is unlocked as soon as the 
temperature has dropped below 390 °F (200 °C).

Cleaning accessories with self-clean 
(pyrolysis)

Gaggenau baking trays and grill trays are coated with 
pyrolysis-proof enamel. To arrive at an optimum 
cleaning result, you are nevertheless advised to 
remove all accessories from the oven before the self-
clean (pyrolysis). Only this will ensure optimum heat 
distribution.

If you would like to remove burnt-in residues from your 
baking tray or your grill tray with self-clean (pyrolysis), 
it is imperative that you observe the following notes:

Notes

Remove extreme soiling, roast juice and food 
remainders before self-clean (pyrolysis). Food 
remainders, grease or roast juice can catch fire 
during self-clean (pyrolysis).

Only insert one baking tray or one grill tray in the 
lowest shelf in the oven.

Insert the baking tray or the grill tray fully.

Do not clean the wire rack, rotisserie spit, cast 
roaster, baking stone, core temperature probe or 
other accessories with self-clean (pyrolysis).

3\URO\VLV

_

)

Содержание BO 480/481 6 series

Страница 1: ...Gaggenau Use and care manual BO 480 481 6 Built in oven ...

Страница 2: ... 15 Operating the appliance 16 Oven interior 16 Inserting accessories 16 Turning on 16 Quick heat 16 Safety lock 16 Timer functions 17 Launching the timer menu 17 Timer 17 Stopwatch 17 Cooking time 18 End of cooking time 19 Sabbath mode and Yom Tov mode 20 Sabbath mode 20 Yom Tov mode 21 Personal recipes 22 Recording a recipe 22 Programming a recipe 22 Entering a name 23 Starting a recipe 23 Delet...

Страница 3: ...ories replacement parts and services can be found at www gaggenau com and in the online shop www gaggenau eshop com Safety Definitions 9 WARNING This indicates that death or serious injuries may occur as a result of non observance of this warning 9 CAUTION This indicates that minor or moderate injuries may occur as a result of non observance of this warning NOTICE This indicates that damage to the...

Страница 4: ...nt of an error the display flashes and beeps continuously Disconnect appliance from the power supply and call a qualified technician WARNING When removing the door make sure oven is cool and power to the oven has been turned off before removing the door Failure to do so could result in burns The oven door is heavy and fragile Use both hands to remove the oven door The door front is glass Handle ca...

Страница 5: ...h to cause burns During and after use do not touch or let clothing potholders or other flammable materials contact heating elements or interior surfaces of oven until they have had sufficient time to cool Other surfaces of the appliance may become hot enough to cause burns Among these surfaces are oven vent openings surfaces near these openings and oven doors Exercise caution when opening the appl...

Страница 6: ... harm and requires businesses to warn customers of potential exposure to such substances The burning of gas cooking fuel and the elimination of soil during self cleaning can generate some by products which are on the list To minimize exposure to these substances always operate this unit according to the instructions contained in this booklet and provide good ventilation When self cleaning confirm ...

Страница 7: ...ll no longer close properly during operation if the door seal is highly soiled Adjoining furniture fronts may be damaged Always keep the door seal clean Appliance door as a seat or storage surface do not stand sit or hang on the appliance door Do not place any cookware or accessories on the appliance door Inserting accessories depending on the appliance type accessories can scratch the door pane w...

Страница 8: ...are informed about the oven interior and accessories Oven NOTICE Do not place food directly on oven bottom Do not obstruct oven vents 1 Door seal 2 Rotisserie spit drive 3 Grill heating element 4 Oven vents 5 Socket for additional heating element special acessory for baking stone and roaster 6 Socket for core temperature probe 7 Recessed handle ...

Страница 9: ...t the temperature and make other settings 4 Program selector With the program selector you can select the heating function the cleaning function or the basic settings Symbol Function I Start Ø Stop H Pause end Cancel Ž Delete Confirm save settings C Selection arrow Open appliance door Launching additional information Quick heating with status indicator i Launching personal recipes g Recording a me...

Страница 10: ...y and operation mode are occasionally shown automatically These messages either disappear automatically after a few seconds or must be confirmed with Cooling fan Your appliance has a cooling fan The cooling fan switches on during operation Depending on the appliance version the warm air escapes above or under the door After removing cooked food keep the door closed until the appliance cools down T...

Страница 11: ...fault temperature 340 F 170 C Targeted heat from above for example grilling cake topped with fruit and meringue 7 M Y top bottom heat 120 550 F 50 300 C Default temperature 340 F 170 C For cheesecake bread in loaf pans dishes in a water bath e g egg custard crème brûlée For roasting without a lid and warming up foods foods dry out less Very well suited for a situation when the food should be heate...

Страница 12: ...t temperature 360 F 180 C Roasting dish only available as a special acces sory Heatable cast iron roasting pan for large quanti ties of meat baked casseroles or holiday roasts 16 V Dough proofing 85 120 F 30 50 C Default temperature 100 F 38 C Proofing For yeast dough and sourdough Dough will proof considerably more quickly than at room temperature The optimal temperature setting for yeast dough i...

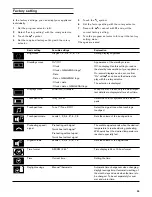
Страница 13: ...supply for several days After connection to the power the GAGGENAU logo first appears for about 30 seconds after which the First settings menu appears automatically You can change the settings at any time see the section entitled Basic setting Setting the language The default language appears in the display 1 Select the desired display language with the rotary selector 2 Confirm with Note When the...

Страница 14: ...required format with the rotary selector 2 Confirm with Setting the date The default date appears in the display The day setting is already active 1 Set the required day with the rotary selector 2 Switch to the month setting with the C symbol 3 Set the month with the rotary selector 4 Switch to the year setting with the C symbol 5 Set the year with the rotary selector 6 Confirm with Setting the te...

Страница 15: ...ol panel s brightness is reduced in the standby mode Notes There are various displays for the standby mode The GAGGENAU logo and the time are set by default Refer to the section entitled Factory setting if you would like to change the display The display s brightness depends on the vertical viewing angle You can adjust the display by way of the Brightness setting in the factory settings Activate a...

Страница 16: ...default temperature set the required temperature with the rotary selector The preheating symbol appears on the display The bar continuously shows the preheating status When the set temperature is reached a signal sounds and the preheating symbol goes off Note The oven interior lighting stays switched off at a temperature setting below 160 F 70 C Switching off Turn the function selector to 0 Quick ...

Страница 17: ... The symbol for the timer Š appears on the display and the time can be seen counting down A signal sounds once the time has elapsed The audible signal ceases if you touch the symbol You can exit the Timer menu at any time by touching the symbol This way the settings are lost Suspend timer Call up the Timer menu Select the Timer function with C select Š and touch the H symbol To let the timer run o...

Страница 18: ...the Stopwatch function p and touch the Ž symbol Cooking time If you set a cooking time for your meal the appliance switches off heating automatically after this time has elapsed You can set a cooking time from 1 minute to 23 59 hours Setting the cooking time You have set the heating function and temperature and you have placed your dish in the oven interior 1 Touch the M symbol 2 With C select the...

Страница 19: ...e electronic circuitry calculates the starting time The appliance starts automatically at 2 50 pm and switches off at 3 30 pm Note that easily perishable foodstuffs must not be left in the oven for too long Shifting the end of the cooking time You have set the heating function the temperature and the cooking time 1 Touch the M symbol 2 With C select the End of cooking time function 5 3 Set the req...

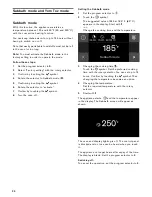
Страница 20: ...oven off Setting the Sabbath mode 1 Set the program selector to ž 2 Touch the symbol The suggested value of 24h at 185 F 85 C appears in the display Start with I or Change the cooking time and the temperature 3 Changing the cooking time 6 Touch the symbol Set the preferred cooking time with the rotary selector You can set up to 74 hours Confirm by touching the symbol Then changing the temperature ...

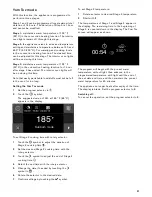
Страница 21: ...e suggested value of 24h at 185 F 85 C appears in the display To set Stage 2 cooking time with rotary selector 1 Touch the symbol to adjust the duration of Stage 2 cooking time 6 2 Set the desired Stage 2 cooking time with the rotary selector 3 Touch the C symbol to adjust the end of Stage 2 cooking time 5 4 Select the end time with the rotary selector 5 Change the date if needed by touching the C...

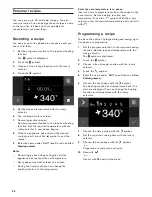
Страница 22: ...phase must last at least one minute During the first minute you can change the heating function or the temperature Enter the core temperature for a phase Insert the core temperature probe in the socket in the oven interior Set the heating function and temperature Touch the symbol With the rotary selector enter the required temperature and confirm it with Programming a recipe You have the option of...

Страница 23: ...th I Operation begins Its duration elapses visibly The settings of the phases appear in the display bar Notes The cooking time does not start counting down until the appliance has reached the set temperature You can use the rotary selector to change the temperature while the recipe is in progress This does not change the saved recipe Deleting a recipe 1 Set the function selector to any type of hea...

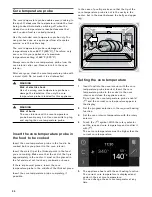
Страница 24: ...in the food to be cooked before you place it in the oven interior Insert the metal tip at the thickest point in the food you are cooking Make sure that the end of the tip is approximately in the center It must not be placed in the fat and must not touch any cookware or bones If there are several pieces insert the core temperature probe in the middle of the thickest piece Insert the core temperatur...

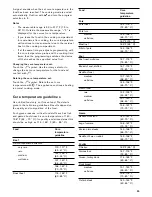
Страница 25: ...in the table are guidelines Results depend on the quality and composition of the food For hygiene reasons critical foodstuffs such as fish and game should reach a core temperature of 143 158 F 62 70 C for poultry and minced meat this should be as high as 176 185 F 80 85 C Food Core temperature guideline Beef Sirloin tenderloin entrecôte very rare rare medium well done 113 117 F 45 47 C 122 126 F 5...

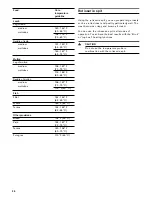
Страница 26: ...ture probe in combination with the rotisserie spit Lamb Leg of lamb medium well done 140 149 F 60 65 C 158 176 F 70 80 C Saddle of lamb medium well done 131 140 F 55 60 C 149 167 F 65 75 C Mutton Leg of mutton medium well done 158 167 F 70 75 C 176 185 F 80 85 C Saddle of mutton medium well done 158 167 F 70 75 C 176 F 80 C Fish Fillet 144 149 F 62 65 C Whole 149 F 65 C Terrine 144 149 F 62 65 C O...

Страница 27: ... lowest insertion level in the oven The drive spindle must engage in the opening on the oven s rear wall Switching on the rotisserie spit 1 Set the required temperature and heating function 2 Touch the m symbol The rotisserie spit is switched on Switching off the rotisserie spit 1 Touch the symbol The rotisserie spit s drive stops 2 Switch off the oven with the program selection 3 Take out the gri...

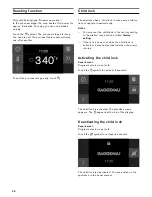
Страница 28: ...vertently Notes You must set the child lock in the factory setting to Available see section entitled Factory setting If there is a power cut while the child lock is activated it may be deactivated when the power returns Activating the child lock Requirement Program selector is set to 0 Touch the 0 symbol for at least 6 seconds The child lock is activated The standby screen appears The 0 appears at...

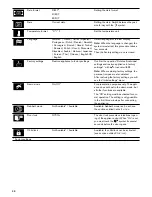
Страница 29: ...play with the rotary selector The selection is displayed Display screen Minimized Standard When Minimized is set only the most impor tant details are displayed after a short time Touchpad color Gray White Select the color of symbols on the touch pads Touchpad tone Tone 1 Tone 2 Off Select the signal tone when touching a touchpad Touchpad volume Levels 1 2 3 4 5 6 7 8 Sets the volume of the touchpa...

Страница 30: ...tore appliance to factory settings with or cancel with Note When restoring factory settings the personal recipes are also deleted After restoring the factory settings you will see the Initial settings menu Demo mode On Off For presentation purposes only The appli ance does not heat in the demo mode but all other functions are available The Off setting must be activated for nor mal operation The se...

Страница 31: ...scraper Display Wipe with a microfiber cloth or a slightly damp cloth Do not wipe off wet Stainless steel Hot soapy water Clean with a dish cloth and dry with a soft cloth Remove traces of limescale grease starch and albumin e g egg white immediately Corrosion can form under such resi dues Special stainless steel cleaning agents can be obtained from the after sales service or from specialist shops...

Страница 32: ...the interior Self clean pyrolysis takes three hours You can move the self clean switch off time for example if you would like it to run at night 9 WARNING During the elimination of soil during self cleaning small amounts of Carbon Monoxide can be created and the fiberglass insulation could give off very small amounts of formaldehyde during the first several cleaning cycles To minimize exposure to ...

Страница 33: ...ght remains off After 3 hours a signal sounds A message will appear on the screen Once the appliance is cool wipe out the remaining ash from the oven with a damp cloth Note The oven door is locked for your safety After cooling down the door is unlocked as soon as the temperature has dropped below 390 F 200 C Cleaning accessories with self clean pyrolysis Gaggenau baking trays and grill trays are c...

Страница 34: ...see section entitled Factory setting Disruption Possible cause Solution Appliance not working no display Plug not inserted Connect the appliance to the electricity mains Power failure Check whether other kitchen appliances are working Fuse defective Check in the fuse box whether the fuse for the appliance is in working order Operating error Switch off the fuse for the appliance in the fuse box and...

Страница 35: ...s cover The glass cover in the oven must be replaced if it is damaged You can obtain covers from after sales service Always specify the E number and the FD number of your appliance Customer service If your appliance needs repairs our customer service is there for you We work hard to help solve problems quickly and without unnecessary service calls getting your appliance back up and running correct...

Страница 36: ...tant cookware Place the cookware in the center of the wire rack For large roasts you can also use the grill or glass tray Do not crowd the wire rack and baking trays too tightly This guarantees optimal heat circulation For the preparation of bulky foods you can also remove the side slide in tray Place the wire rack directly on the bottom of the cooking compartment and place the food or the roastin...

Страница 37: ...ass grill tray 3 4 390 200 H I 30 Recipe tip carrots celery rutabagas red beets with oil season with oil gar lic salt and pepper 3 4 480 250 Q 15 20 Pumpkin pieces Glass grill tray 3 4 390 200 H 30 Recipe tip season with oil garlic gin ger cumin salt and pepper Antipasti Glass grill tray 3 4 390 200 H 30 Recipe tip as long as the vegetables are still hot drizzle with balsamic vine gar and season 3...

Страница 38: ...re cook blanch vegetables and other ingredients Veggie burgers frozen Baking tray grease proof paper 2 3 430 220 H I 12 15 Dish Accessories Level Temperature in F C Type of heating Cooking time in min Observations Turn food halfway through the cooking time ...

Страница 39: ...3 390 200 N 40 60 Fill ovenproof dish with 2 cm sea salt Place small unpeeled potatoes on top brush with olive oil Potato wedges Baking tray Grease proof paper 2 3 390 200 H 15 Recipe tip cut potatoes in wedge sea son with olive oil paprika and salt French fries fresh Baking tray Grease proof paper 3 4 390 200 H 15 20 Recipe tip oil slightly after cooking season with salt paprika or curry pow der ...

Страница 40: ... classic or vegetarian with grilled vegetables and Buffalo mozza rella Macaroni and cheese Ovenproof dish 2 3 355 430 180 220 H 10 20 For a cheesy crust increase the tem perature to 430 F 220 C after 10 min and let brown for 10 min Cheese spätzle Ovenproof dish 2 3 355 430 180 220 H 30 Gradually layer freshly cooked spätzle into the pan sprinkle each layer with cheese Finally top with cheese and r...

Страница 41: ...paper 2 3 480 250 H 7 Tarte flambee frozen Wire rack 2 3 390 200 H 10 12 2 3 445 230 N 8 10 Quiche Pie dish 2 3 390 200 N 20 20 Pre bake crust for 20 min pour mixture into the crust and bake another 20 min Onion tart Baking sheet 2 3 390 200 N 30 40 Dish Accessories Level Temperature in F C Type of heating Cooking time in min Observations Turn food halfway through the cooking time ...

Страница 42: ... 4 355 180 Q 10 Shrimp skewers frozen Wire rack Grill tray 3 4 355 180 Q 12 Fish kebabs Wire rack Grill tray 3 4 390 200 Q 12 Use firm types of fish e g salmon ocean perch cod Trout whole Baking sheet 3 4 390 430 200 220 Q 16 Recipe tip fill with lemon garlic and parsley Sea bream whole Wire rack Grill tray 3 4 390 430 200 220 Q 20 25 Recipe tip fill with lemon garlic and thyme or make it summery ...

Страница 43: ...l Temperature in F C Type of heating Cooking time in min Observations Beef Roast beef 1 5 kg Glass grill tray 2 3 355 180 H 90 120 Roast beef sirloin 1 kg rare Glass grill tray 2 3 445 355 230 180 H 25 35 Recipe tip tastes very good with Béar naise sauce or sliced cold with remou lade and roasted potatoes medium Glass grill tray 2 3 445 355 230 180 H 30 40 well done Glass grill tray 2 3 445 355 23...

Страница 44: ...p marinate in garlic rose mary olive oil and high qualitty bal samic vinegar Leg of lamb medium Glass grill tray roast ing dish 2 3 355 375 180 190 H 100 Recipe tip marinate overnight in olive oil garlic rosemary and lemon peel well done Glass grill tray roast ing dish 2 3 355 375 180 190 H 120 Knuckle of lamb Glass grill tray roast ing dish 2 3 355 390 180 200 H 35 45 Miscellaneous Meatballs 80 g...

Страница 45: ...core temperature 153 F 67 C Bacon strips thin Baking tray Grease proof paper 3 4 355 180 H 8 10 After taking out let drip on a paper towel Bacon strips thick Baking tray Grease proof paper 3 4 375 190 H 8 12 Stuffed peppers with ground meat Ovenproof dish roast ing dish 2 3 345 175 H I 55 60 Recipe tip fill with ground meat and cook in tomato sauce Dish Accessories Level Temperature in F C Type of...

Страница 46: ... 190 H I 110 130 Recipe tip fill with apples onions and marjoram and pierce 2 3 320 375 160 190 N 110 130 Turkey hen whole Wire rack Grill tray roasting dish 2 3 320 375 160 190 H I 120 180 2 3 320 375 160 190 N 120 180 Chicken whole Wire rack Grill tray 2 3 355 180 H 45 60 Baste with oil salt pepper paprika and curry 2 3 355 180 Z 45 50 Chicken legs and thighs Wire rack Grill tray 3 4 430 220 Q 3...

Страница 47: ... Z 18 20 Shish kebab Wire rack Grill tray 3 4 375 190 Z 16 Bratwurst Wire rack Grill tray 3 4 520 270 Q 10 Merguez grilling sausage Wire rack Grill tray 3 4 480 250 Z 12 Spare ribs pre cooked Wire rack Grill tray 3 4 390 430 200 220 Q 24 3 4 390 430 200 220 Z 24 Spare ribs raw Wire rack Grill tray 3 4 430 220 Q 40 Recipe tip put in oil mustard balsamic vinegar honey garlic Worcester sauce tomato p...

Страница 48: ...t in the hot oven again and remove the cookies while they are still warm If the cake does not come out of the pan when yhou turn it over use a knife to loosen the cake around the edges Turn the cake pan upside down again and cover it several times with a cold wet cloth Next time grease the pan well and sprinkle some bread crumbs into it Always follow the manufacturer s instructions for pre cooked ...

Страница 49: ... bacon 2 3 330 165 N 30 35 Fruit cake on a shortcake base Pie dish 2 3 330 165 H I 40 50 Recipe tip top with strawberries or with apricots and marzipan 2 3 340 170 N 40 50 2 3 330 165 K 45 55 Tart Pie dish 2 3 330 165 H I 30 40 French cake with shortcake base e g tarte aux pommes tarte tatin tarte au chocolat tarte au citron 2 3 340 170 N 30 40 2 3 330 165 K 40 45 2 3 340 170 M 45 50 For light tar...

Страница 50: ...py sugar topping Puff pastry rods Baking tray Grease proof paper 3 4 390 200 H I 15 Recipe tip with ham cheese nuts Puff pastry slices Baking tray Grease proof paper 2 3 390 200 H I 15 20 Recipe tip with pudding fruit Hippengebäck cookies Baking tray Grease proof paper 2 3 285 140 H 8 10 Shape before cooling e g into horns or rolls for dessert Breadsticks Baking tray Grease proof paper 2 3 320 160...

Страница 51: ...paper 2 3 390 340 200 170 H I 40 50 2 3 390 340 200 170 N 40 50 2 3 390 330 200 165 O 45 50 Sourdough bread Baking sheet 2 3 390 355 200 180 N 50 60 Olive tomato bread Baking sheet 2 3 390 340 200 170 N 40 50 Bread in loaf pan Loaf pan 2 3 345 175 N 40 45 Baguettes pre baked Baking tray Grease proof paper 2 3 430 220 N 10 12 Ciabatta pre baked Baking tray Grease proof paper 2 3 375 190 N 12 14 2 3...

Страница 52: ... 2 3 390 200 H I 8 10 Rolls frozen Baking tray Grease proof paper 2 3 355 180 H I 10 12 2 3 390 200 N 10 12 Rolls fresh 50 g each Baking tray Grease proof paper 2 3 480 390 250 200 N 15 20 Lye pastries frozen Baking tray Grease proof paper 2 3 390 200 H I 10 12 Croissants frozen Baking tray Grease proof paper 2 3 340 170 N 15 25 Dish Accessories Level Temperature in F C Type of heating Cooking tim...

Страница 53: ...umble Ovenproof dish 2 3 390 200 H I 35 40 Apple casserole with streusel also tastes very good when made with ber ries or mirabelles 2 3 390 200 O 25 30 For soft types of apples 2 3 390 200 M 25 30 For firm types of apples Baked apples Ovenproof dish 2 3 375 390 190 200 H I 20 30 Recommendation use cooking apples e g Boskop These are especially well suited for cooking and baking Summer variant fil...

Страница 54: ...ch faster to defrost such foods in the steam oven 9 WARNING Health risk When defrosting food from animal sources you must remove the liquid that escapes during defrosting It must never come into contact with other food Bacteria could be transferred Slide the glass grill tray under the food Pour away the excess liquid collected from the meat and poultry Then clean the sink and rinse with plenty of ...

Страница 55: ...a storage room Use up already opened jars quickly and keep them in the refrigerator Disinfecting Before canning the jars should be disinfected in the oven in order to prevent spoilage Only this way is it possible to store canned goods for a longer time and outside the refrigerator Disinfect empty jars at 212 F 100 C hot air for at least 20 minutes The lids and seals for the jars can be disinfected...

Страница 56: ...ation depends on the thickness of the food and the natural moisture in the food since drying tomatoes takes longer than drying mushrooms If you would like to dry on two levels simultaneously use levels 1 and 3 or 2 and 4 Dish Accessories Level Temperature in F C Type of heating Cooking time in hours Observations Sliced mushrooms Wire rack greaseproof paper 2 3 120 140 50 60 H I 3 4 Apple rings Wir...

Страница 57: ...ines Always follow the manufacturer s instructions for pre cooked and frozen products Dish Accessories Level Temperature in F C Type of heating Cooking time in min Observations Rolls fresh 50 g each Baking stone 1 480 390 250 200 T 15 20 Flatbread Baking stone 1 410 210 T 15 Cooking time depends on the size and thickness of the flatbread Foccacia Baking stone 1 410 210 T 15 Top with various ingred...

Страница 58: ... for this Pour in liquid and turn heat down depending on the type of meat cook for 60 120 min utes Ossobuco Roasting dish 1 430 285 220 140 U Searing 60 90 Sear meat and vegetables use the roasting setting for this Pour in liquid and turn heat down cook covered for 60 90 minutes Turn once Viennese boiled beef Roasting dish 1 430 265 220 130 U Searing 210 240 Sear halved onions add vegetables brief...

Страница 59: ...Searing 60 90 Dish Accessories Level Temperature in F C Type of heating Cooking time in min Observations Brown the meat at high temperature switch back to a lower temperature for further cooking Tips for keeping acrylamide to a mini mum when preparing food General Keep cooking times to a minimum Cook meals until they are golden brown but not too dark Large thick pieces of food contain less acrylam...

Страница 60: ...H Home Appliance Corporation 1901 Main Street Suite 600 Irvine CA 92614 1 877 442 4436 USA www gaggenau usa com Gaggenau Hausgeräte GmbH Carl Wery Straße 34 81739 München GERMANY 9000866756 9000866756 en us 941210 ...

Отзывы:

Похожие инструкции для BO 480/481 6 series