background image

Gaggenau Hausgeräte GmbH

Carl-Wery-Straße 34
81739 München
GERMANY
www.gaggenau.com

*9000914261*  


9000914261 en (960301)

Содержание BO 470/471

Страница 1: ...Gaggenau Instruction manual BOP 220 221 Oven ...

Страница 2: ...mer 14 Stopwatch 14 Cooking time 15 End of cooking time 16 Long term timer 16 Setting the long term timer 16 Individual recipes 17 Recording a recipe 17 Programming a recipe 18 Entering names 18 Starting recipes 18 Change recipe 19 Deleting recipes 19 Child lock 19 Activate the child lock 19 Deactivating the child lock 19 Basic settings 20 Cleaning and maintenance 22 Cleaning agents 22 Removing sl...

Страница 3: ...tment correctly See description of accessories in the instruction manual Risk of fire Combustible items stored in the cooking compartment may catch fire Never store combustible items in the cooking compartment Never open the appliance door if there is smoke inside Switch off the appliance and unplug it from the mains or switch off the circuit breaker in the fuse box Risk of fire A draught is creat...

Страница 4: ...e Unplug the appliance from the mains or switch off the circuit breaker in the fuse box Contact the after sales service Risk of fire Loose food residues grease and meat juices may catch fire during pyrolytic cleaning Remove coarse dirt from the cooking compartment and from the accessories before every pyrolytic cleaning cycle Risk of fire The appliance will become very hot on the outside during th...

Страница 5: ...e door seal clean Appliance door as a seat shelf or worktop Do not sit on the appliance door or place or hang anything on it Do not place any cookware or accessories on the appliance door Inserting accessories depending on the appliance model accessories can scratch the door panel when closing the appliance door Always insert the accessories into the cooking compartment as far as they will go Carr...

Страница 6: ... your new appliance The control panel and the individual operating controls are explained You will find information on the cooking compartment and the accessories Oven 1 Door seal 2 Grill heating element 3 Socket for additional heating element special accessory for baking stone ...

Страница 7: ...le current settings and options 3 Rotary selector You can use the rotary selector to set the temperature and to make further settings 4 Function selector The function selector is used to select the type of heating the cleaning function or the basic settings Symbol Function I Start Ø Stop H Pause End Cancel Ž Delete Confirm save settings C Selection arrow Call up additional information Rapid heatin...

Страница 8: ...iance has a cooling fan The cooling fan switches on during operation Depending on the appliance version the hot air escapes above or under the door After removing cooked food keep the door closed until the appliance cools down The appliance door must not be left ajar as adjoining kitchen furniture may be damaged The cooling fan continues to run for a certain time after operation and then switches ...

Страница 9: ...C Default temperature 170 C For the final baking stage such as for moist fruit cakes for preserving for dishes in a bain marie 7 K Hot air bottom heat 50 300 C Default temperature 170 C Additional heat from below for moist cakes such as fruitcake 8 Z Full surface grill circulated air 50 300 C Default temperature 220 C Even all round heating for meat poultry and whole fish 9 Q Full surface grill 50...

Страница 10: ...e has been connected to a power supply and switched on for the first time or if the appliance has not been connected to a power supply for a number of days Once the appliance has been connected to a power supply the GAGGENAU logo will appear first for approximately 30 seconds The Initial settings menu will then appear automatically You can change the settings at any time see section entitled Basic...

Страница 11: ...ears in the display The day setting is already active 1 Set the day using the rotary selector 2 Touch the C symbol to switch to the month setting 3 Set the month using the rotary selector 4 Touch the C symbol to switch to the year setting 5 Set the year using the rotary selector 6 Confirm with Setting the temperature format The two possible formats C and F appear in the display The default setting...

Страница 12: ...fferent displays are available for standby mode The default setting is the GAGGENAU logo and the clock To change the display refer to the Basic settings section The brightness of the display depends on the vertical viewing angle You can adjust the display using the Brightness setting in the basic settings Activating the appliance To exit standby mode you can either Turn the function selector Touch...

Страница 13: ...If you want to change the default temperature set the required temperature with the rotary selector The preheating symbol appears on the display The bar continuously shows the preheating status When the set temperature is reached a signal sounds and the preheating symbol goes off Note The oven interior lighting stays switched off at a temperature setting below 70 C Switching off Turn the function ...

Страница 14: ...loses and the time begins to count down The Š symbol and the countdown appear in the display A signal sounds once the time has elapsed Touch the symbol to silence You can exit the timer menu at any time by pressing the symbol This erases the settings To stop the timer Call up timer menu Touch C to select the Timer Š function and touch the H symbol To allow the timer to continue counting down touch...

Страница 15: ...our dish in the oven 1 Touch the M symbol 2 Use C to select the 6 Cooking time function 3 Set the desired cooking time using the rotary selector 4 Press I to start The appliance starts The timer menu is closed The settings for temperature heating mode elapsing time and cooking time end are shown in the display During the last minute of the cooking time the remaining time is displayed in an enlarge...

Страница 16: ...oor or set the function selector to 0 To change the cooking time end Call up the timer menu Use C to select the 5 Cooking time end function Set the desired cooking time end using the rotary selector Press I to start To terminate the whole procedure Set the function selector to 0 Long term timer With this function the appliance maintains a temperature between 50 und 230 C with the Hot air heating f...

Страница 17: ...ame time 1 Select the required heating mode using the function selector The i symbol is displayed 2 Touch the i symbol 3 Select a free memory location by turning the rotary selector 4 Touch the g symbol 5 Select the required temperature using the rotary selector 6 The cooking time is recorded 7 To record another phase Select the required heating mode using the function selector Set the temperature...

Страница 18: ...tion is complete finish making entries 10 Save with or Cancel with and exit the menu Entering names 1 Enter the name of the recipe in ABC 2 Save with or Cancel with and exit the menu Note For entering a name Latin characters certain special characters and numbers are available Starting recipes 1 Set the function selector to any heating mode The i symbol is displayed 2 Touch the i symbol Use the ro...

Страница 19: ... Set the function selector to any type of heating The i symbol is displayed 2 Touch the i symbol 3 Use the rotary selector to select the desired recipe 4 Delete the recipe with Ž 5 Confirm with Child lock The appliance has a childproof lock to prevent children operating it accidentally Notes You need to set the childproof lock to available in the basic settings see section entitled Basic settings ...

Страница 20: ...ced setting has been selected only the most important information will be shown on the display after a short time Touch field colour Grey White Selects the colour of the symbols on the touch fields Touch field tone Tone 1 Tone 2 Off Selects an audible signal for when a touch field is touched Touch field tone vol ume Level 1 2 3 4 5 6 7 8 Sets the volume of the touch field tone Heating up time audi...

Страница 21: ...ividual settings made and reset to factory settings by pressing or cancel by pressing Note Individual recipes will also be deleted if the appliance is restored to factory settings After restoring factory settings the Initial settings menu is displayed Demo mode On Off Only for presentation purposes The appliance does not heat up in demo mode all other functions are available The Off setting must b...

Страница 22: ...loth Do not use a glass scraper Display Wipe down using a microfibre cloth or a slightly damp cloth Do not wipe with a wet cloth Stainless steel Hot soapy water Clean using a dish cloth and then dry with a soft cloth Remove flecks of limescale grease starch and albumin e g egg white immediately Corrosion can form under these patches or splashes Special stainless steel cleaning agents are available...

Страница 23: ...d from the accessories before every pyrolytic cleaning cycle m Risk of fire The appliance will become very hot on the outside during the pyrolytic cleaning cycle Never hang combustible objects e g tea towels on the door handle Do not place anything against the front of the oven Keep children at a safe distance m Risk of serious damage to health The appliance will become very hot during the pyrolyt...

Страница 24: ... when the temperature drops below 200 C Cleaning accessories with pyrolytic self cleaning Gaggenau baking trays and grill trays are coated with pyrolysis proof enamel To arrive at an optimum cleaning result you are nevertheless advised to remove all accessories from the oven before the pyrolytic cleaning process Only this will ensure optimum heat distribution If you would like to remove burnt in r...

Страница 25: ...led Basic settings Disruption Possible cause Solution Appliance not working no display Plug not inserted Connect the appliance to the electricity mains Power failure Check whether other kitchen appliances are working Fuse defective Check in the fuse box whether the fuse for the appliance is in working order Operating error Switch off the fuse for the appliance in the fuse box and switch it on agai...

Страница 26: ...ice is there for you if your appliance needs to be repaired We will always find an appropriate solution also in order to avoid after sales personnel having to make unnecessary visits E number and FD number When calling us please give the full product number E no and the production number FD no so that we can provide you with the correct advice The rating plate bearing these numbers can be found wh...

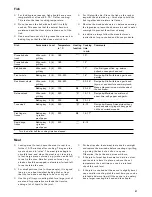
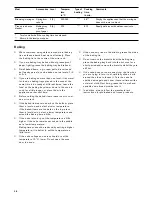
Страница 27: ...ass cookware out of the oven set it down on a dry trivet or heat proof mat never set it down on a cold or wet surface Otherwise the glass may crack Some operating modes are not available on all oven models or are only available as an optional accessory Vegetables Oven roasted or oven baked vegetables are a good alternative to pan fried vegetables The different flavours become more concentrated and...

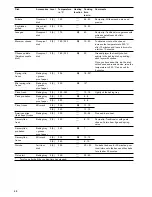
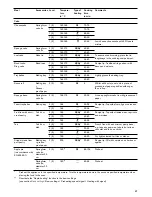
Страница 28: ...grill tray 3 4 200 H 30 Recipe tip Drizzle balsamic vinegar over the vegetables whilst they are still hot and season them 3 4 250 Q 15 20 Escalivada Mediterranean oven grilled vegetables Ovenproof dish 4 5 250 Q 15 Recipe tip Aubergines onions tomatoes peppers oil Delicious hot or cold Ratatouille Glass dish grill tray 3 4 200 N 30 40 Recipe tip Sprinkle with parmesan just before serving Oven roas...

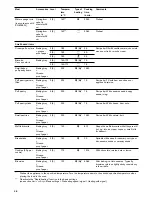
Страница 29: ...0 H 8 10 Either goats cheese or goats camem bert can be used 3 4 220 Q 8 10 Goats cheese with honey Glass dish baking tray 2 3 200 H 8 Recipe tip Drizzle lavender honey over the goats cheese or goats camembert and sprinkle with pine nuts 3 4 200 Q 8 Baked camembert coated with breadcrumbs fresh Baking tray grease proof paper 2 3 180 H I 15 20 Bake until the breadcrumb coating rises in the centre B...

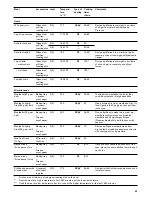
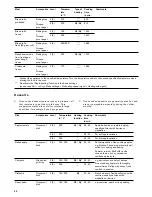
Страница 30: ...y grease proof paper 2 3 225 H 18 20 Mini spring rolls frozen Baking tray grease proof paper 2 3 225 H 10 Pizza fresh Baking tray 2 3 230 250 N 10 15 Lightly oil the baking tray Pizza pre baked Baking tray grease proof paper 2 3 230 H 6 8 2 3 230 N 6 8 Pizza frozen Wire rack 2 3 200 H 11 13 2 3 220 N 11 13 American pizza thick base frozen Baking tray 2 3 200 N 20 24 No need to pre heat Savoury fla...

Страница 31: ... joint For best results leave meat to marinate overnight and remove the marinade before roasting or grilling e g using the back of a knife or a spoon Otherwise the herbs and spices will burn If the joint of meat has become too dark in colour and the skin is burnt in places reduce the set temperature the next time you cook a joint and check the rack level If the joint is cooked but the sauce is sli...

Страница 32: ...nt of pork neck 1 5 kg Glass dish grill tray 2 3 230 180 H I 85 95 2 3 230 180 Z 70 80 Joint of pork with crispy skin roast pork with crackling 1 5 kg Wire rack Grill tray 2 3 180 200 Z 60 70 Knuckle of pork Wire rack Grill tray 2 3 150 200 Z 40 45 Score the skin diagonally in both directions so that it is cross hatched This makes it nice and crispy Smoked pork 1 kg Glass dish grill tray 2 3 180 1...

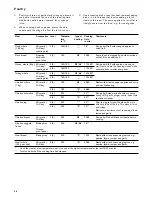
Страница 33: ...ls First fry them lightly in the frying pan then put them in the oven Meatballs 25 g per ball Baking tray Grease proof paper 2 3 200 H I 25 30 Recipe tip Easy to make into a meal e g meatballs with tomato sauce Swedish meatballs and Königsberger Klopse Prussian meatballs in a white sauce with capers Meatballs lightly fried 25 g per ball Baking tray Grease proof paper 2 3 200 H I 15 Recipe tip Plac...

Страница 34: ...3 160 190 N 110 130 Turkey whole Wire rack Grill tray roasting dish 2 3 160 190 H I 120 180 2 3 160 190 N 120 180 Chicken whole 1 kg Wire rack Grill tray 2 3 180 H 45 60 Baste with oil salt pepper paprika and curry powder Preheating 2 3 180 Z 45 50 Chicken drumstick Wire rack Grill tray 3 4 220 Q 30 Recipe tip Asian marinade with soy sauce honey chilli garlic ginger cumin sweet lime zest and coria...

Страница 35: ... sliced Wire rack Grill tray 2 3 230 Q 18 20 2 3 230 Z 18 20 Shish kebab Wire rack Grill tray 3 4 190 Z 16 Bratwurst German sausage Wire rack Grill tray 3 4 270 Q 10 Merguez sausage Wire rack Grill tray 3 4 250 Z 12 Spare ribs pre cooked Wire rack Grill tray 3 4 200 220 Q 24 3 4 200 220 Z 24 Spare ribs raw Wire rack Grill tray 3 4 220 Q 40 Recipe tip Place in a mixture of oil mustard balsamic vine...

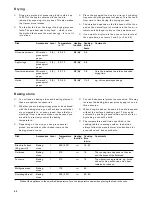
Страница 36: ...mperature Baking times cannot be reduced by setting a higher temperature it is better to set the temperature a little lower If the cake collapses use less liquid or set the temperature 10 C lower Do not open the oven door too soon If the cake only rises in the middle grease the sides of the baking tin Do not remove the biscuits from the baking tray place the baking tray back into the hot oven for ...

Страница 37: ... springform cake tin with greaseproof paper Yeast tray bakes Baking tray 2 3 165 H 30 35 Recipe tip Top with plums figs or onion and ham 2 3 165 N 30 35 Fruit flan with short crust pastry Tart tin or dish 2 3 165 H I 40 50 Recipe tip Top with strawberries or apricots and marzipan 2 3 170 N 40 50 2 3 165 K 45 55 Tart Tart tin or dish 2 3 190 H I 30 40 French flan with a shortcrust pastry base e g t...

Страница 38: ...uts Small pastries Baking tray Grease proof paper 2 3 200 H I 15 20 Recipe tip With custard fruit Waffle biscuits Baking tray Grease proof paper 2 3 140 H 8 10 Shape the waffle biscuits whilst they are still hot e g into ice cream cones or small rolls for dessert Breadsticks Baking tray Grease proof paper 2 3 160 H 30 Sprinkle with sea salt rosemary curry pow der sesame seeds or caraway seeds Cook...

Страница 39: ...2 3 220 N 10 12 Ciabatta pre baked Baking tray Grease proof paper 2 3 190 N 12 14 2 3 180 H I 12 14 Flatbread Baking tray Grease proof paper 2 3 200 H I 15 20 The cooking time depends on the size and thickness of the flatbread 2 3 210 N 15 20 Foccacia Baking tray Grease proof paper 2 3 210 N 15 20 Top with various ingredients e g herbs sea salt olives anchovies onion ham tomatoes or cheese Garlic ...

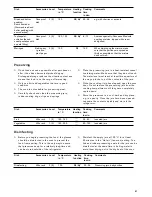
Страница 40: ... placing the food in the oven Deactivate the Rapid heating function in the basic settings see section Basic settings Basic settings Preheating speed signal Heating with signal Dish Accessories Level Temperature in C Heating function Cooking time in min Comments Apple crumble Ovenproof dish 2 3 200 H I 35 40 Apple bake with a crumble topping equally delicious with berries or mirabelles 2 3 200 O 25...

Страница 41: ... keep for a relatively long time and can be stored outside of the refrigerator Disinfect the empty jars at 100 C for at least 20 minutes in the Hot air fan oven setting The lids and rubber preserving seals for the jars can be disinfected at the same time in boiling water to avoid them drying out in the dry heat of the oven Bread and butter pudding Kirschenmichel German bread and butter pudding wit...

Страница 42: ...s in succession This may increase the baking time per pizza by approx one to three minutes When dough is baked it needs to be able to expand without the surface breaking apart This can be achieved by pricking it several times with a fork or by making a cut with a knife The temperatures and times specified in the cooking table are average values In addition always follow the manufacturer s instruct...

Страница 43: ...ne 1 300 T 3 4 Recipe tip Traditional or with goats cheese Parma ham figs and spring onion Savoury flan frozen Baking stone 1 250 T 4 5 Dish Accessories Level Temperature in C Heating function Cooking time in min Comments Preheat the appliance to the specified temperature Turn the temperature down when placing the food in the oven Tips for keeping acrylamide to a minimum when preparing food Genera...

Страница 44: ...Gaggenau Hausgeräte GmbH Carl Wery Straße 34 81739 München GERMANY www gaggenau com 9000914261 9000914261 en 960301 ...

Отзывы: