


USER GUIDE |
USB BACKUP HSM
Page
7
of 31
[3.5] FORMATTING THE USB BACKUP HSM
Windows 10
1. Wake the device by pressing
.
2. Unlock the device by entering the Admin PIN, followed by
. If the PIN is correct, the
green
LED should
blink three times, then will illuminate.
3. Insert the device into a USB port.
4. A window should open, revealing the device's contents. Right click on the device in the window's left-
hand navigation section, and choose Format.
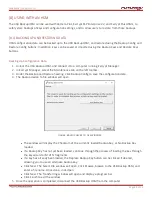
5. Specify settings in the Format window. By default, the file system should be FAT32.
6. In the Volume label field, fill in a name for the device.
7. Click Start, then confirm through the warning message that appears. The drive will be formatted and
can now be used.
Mac OS X
The USB Backup HSM comes preformatted in FAT32 for complete cross-platform compatibility, and is ready
for use. For a strictly Mac OS environment, the user must first reformat the device to Mac OS Extended
(Journaled).
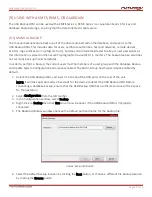
Once the device is unlocked and inserted into a USB port, open the Mac Disk Utility from
Applications/Utilities/Disk Utilities and do the following:
1. Select the USB Backup HSM from the list of drives and volumes.
2. Click the Erase tab.
3. Enter a name for the device. The name will eventually appear on the desktop.
4. Select a volume format to use. The Volume Format dropdown menu lists the available drive formats
that the Mac supports. The recommended format type is Mac OS Extended (Journaled).
5. Click the Erase button. Disk Utility will unmount the volume from the desktop, erase it, and then
remount it on the desktop.


