background image

3-1

3.

TRACKS

3.1

Tracks Overview

Your boat’s track is plotted on the display with position information fed from the inter-
nal GPS navigator, or from the NMEA2000 network (requires position data input from 
the NMEA2000 network). 

3.2

How to Show/Hide All Tracks

Swipe the Plotter screen from the bottom upwards to show the layered menu, then tap 
[Show All Tracks] to toggle between [ON] and [OFF].

Note: 

The current track is not hidden when [OFF] is selected, only past tracks are hid-

den.

3.3

Track Recording

From the pop up menu

Tap the own ship icon to show the pop up menu, then tap the toggle box at [Record 
Track] to show [ON]. To stop recording tracks, tap the toggle box to show [OFF].

From the [Settings] menu

1. From the [Home] screen, tap [Settings] => [Ship and Tracks] => [Track]. The track 

settings appear in the right-hand side of the screen.

2. At [Track Recording], tap the [Record Tracks] toggle box to show [ON]. To stop 

recording tracks, tap the toggle box to show [OFF].

3. Tap the [x] at the top-right corner of the menu to close the menu.

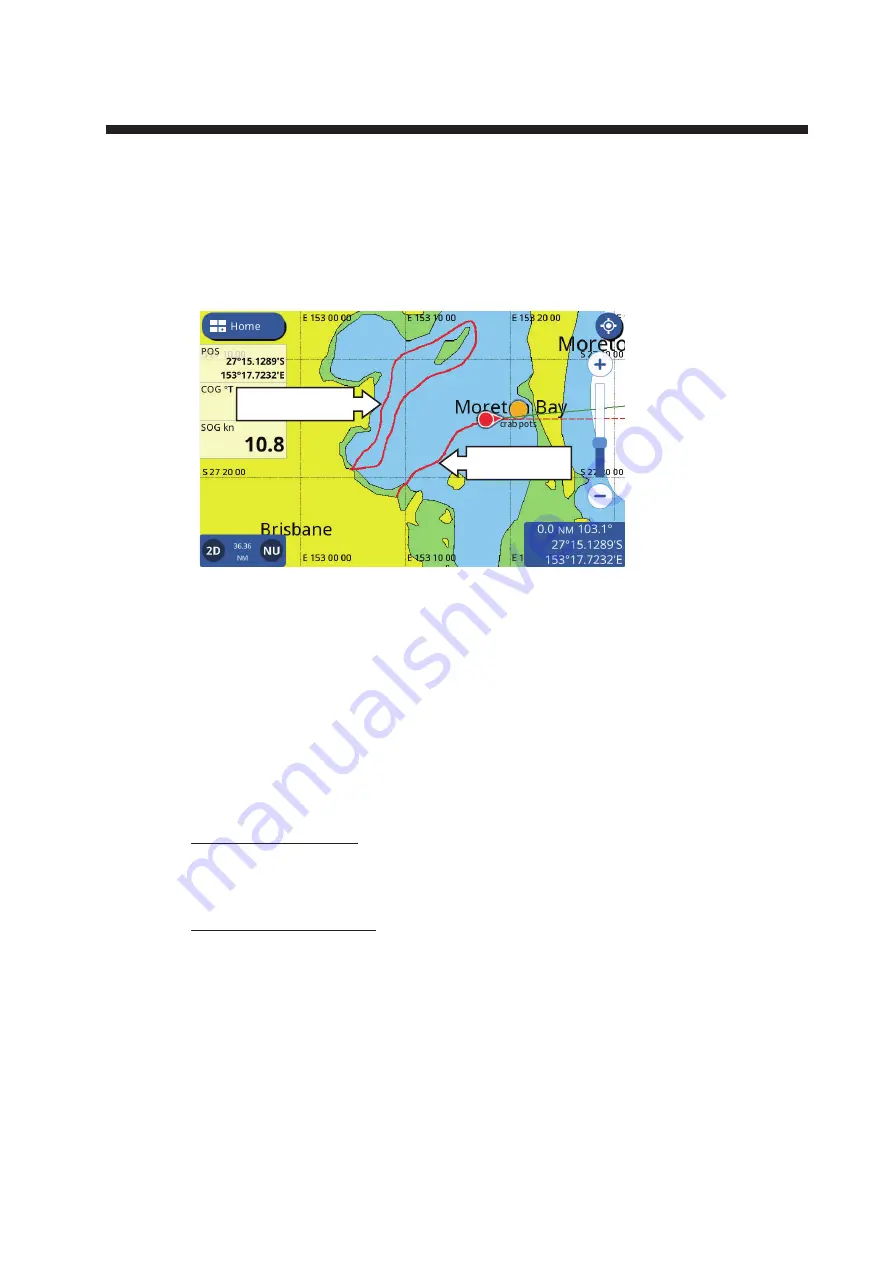
Current track

Previous track

Содержание GP-1871F

Страница 1: ......

Страница 2: ...ire is coming from the equipment Failure to turn off the equipment can cause fire or electrical shock Do not open the equipment Only qualified persons can work inside the equipment The fish finder picture is not refreshed when the picture advance setting is OFF Do not steer the boat according to the depth indication in this state to prevent grounding and damage to boat or crew CAUTIO CAUTION The f...

Страница 3: ...ation Mode 1 9 2 PLOTTER 2 1 2 1 Plotter Overview 2 1 2 2 How to Select a Chart Type 2 1 2 3 Changing the Display Range 2 2 2 4 Orientation Modes 2 2 2 5 How to Move the Charts 2 2 2 6 Own Ship Icon Display Settings 2 2 2 6 1 COG vector settings 2 3 2 6 2 How to show hide the heading line 2 3 2 6 3 How to change the own ship icon 2 3 2 6 4 How to offset the own ship icon 2 4 2 6 5 How to restore f...

Страница 4: ...s List 4 3 4 6 3 How to delete all points or specified points 4 4 4 7 How to Edit Points 4 4 4 7 1 How to edit a point on screen 4 4 4 7 2 How to edit a point from the Points list 4 5 4 8 How to Show or Hide All Points 4 5 4 9 What is a Polyline 4 5 4 10 How to Create a Polyline 4 6 4 11 Polyline List 4 6 4 12 Polyline Color Setup 4 7 4 13 Finding Polylines on the Map 4 7 4 14 How to Delete Polyli...

Страница 5: ...ingle dual frequency displays and zoom displays 6 2 6 4 2 A scope display 6 2 6 4 3 Bottom discrimination display 6 3 6 5 Automatic Fish Finder 6 4 6 5 1 How to select the automatic mode 6 4 6 5 2 How to adjust the gain in the auto mode 6 4 6 5 3 How to offset the bottom echo 6 5 6 6 Manual Fish Finder Operation 6 5 6 6 1 How to select the manual mode 6 5 6 6 2 How to select a display range 6 5 6 ...

Страница 6: ...etup 7 6 7 16 Radar Initial Setup Menu 7 6 7 17 Restoring Factory Defaults 7 7 8 AIS DSC OPERATIONS 8 1 8 1 AIS Overview 8 1 8 2 AIS Target Information 8 1 8 3 AIS Target Symbols 8 1 8 4 AIS Activation Range 8 1 8 5 How to Ignore Slow Targets 8 2 8 6 How to Show AIS Target Data 8 2 8 7 Show Hide the AIS Target ID 8 2 8 8 AIS List Overview 8 2 8 8 1 How to show the AIS target list 8 2 8 8 2 How to ...

Страница 7: ...10 4 10 3 9 Sheer notification 10 4 10 4 Tank Notifications 10 4 10 5 Wind Notifications 10 5 10 6 Restoring Notification Defaults 10 5 10 7 Notifications List 10 5 10 7 1 How to view the notifications list 10 6 10 7 2 Notification types 10 6 10 7 3 How to filter the notifications list 10 6 10 7 4 How to save the notifications list to a microSD card 10 6 10 8 Notification Messages 10 7 11 OTHER SE...

Страница 8: ...es abbreviated operating procedures for the GP1871F GP 1971F Text ap pears at the center of the screen The table of contents appears on the left panel The back but ton at the top left corner goes to the previously viewed screen The names of menu items and on screen indications appear in brackets For example the Set tings menu is shown as Settings menu The words tap and select are interchangeable I...

Страница 9: ...FOREWORD viii This page is intentionally left blank ...

Страница 10: ...turn the power off press and hold the power button A pop up window with a countdown timer appears and a three second countdown begins Keep the power but ton pressed until the countdown ends Note If one of the following error messages appears when you start the system con sult your local dealer to purchase updated charts Your current charts are old and should be updated OBSOLETE CHART BASE SEGMENT ...

Страница 11: ...he Home screen or from the Quick Page list From the Home screen Tap the Home icon to show the Home screen then tap the icon for the page you want view If the icon you want is not visible drag the screen to the left From the Quick Page list To show the Quick Page list swipe the upper edge of the screen downwards The Quick Page list appears Tap the page you want to view or drag the list left or righ...

Страница 12: ...on 1 4 3 for how to remove pages 3 Referring to the figure below set up the page 1 4 3 How to edit and delete pages You can edit and delete pages from the Home screen Long tap the icon for the page you wish to edit or delete then tap the appropriate icon see figure below Pin tool icon Tap to save the selected page in the Quick Page list Edit contents icon Tap to customize the page contents See sec...

Страница 13: ...e The active screen is indicated with a orange colored highlight around the screen edges 1 5 Menu Overview This equipment has four types of menus slide out menu layered menu pop up menu and the Settings menu The following example shows the plotter screen and related menus Note A Note A full menu tree is included at the back of the installation manual for reference Settings menu Slide menu Layered ...

Страница 14: ...ap the to show the sub menu Items which are not available appear in gray color Note Layered menus are available for all pages For pages with more than one sec tion tap the page you want the layered menu for then show the layered menu To close the layered menu tap anywhere on the display other than the layered menu or swipe the layered menu downwards If there is no operation detected within seven s...

Страница 15: ...t selection is indicated by a filled circle to the left of the setting or option Slide bar or keyboard icon Drag the slider solid circle on the slider bar to set a value For the software keyboard appears after you tap the keyboard icon tap the keyboard to input a value or character then tap OK Numeric keyboard Alphanumeric keyboard Tap Top layer of the menu Menu items for the selected top layer me...

Страница 16: ...twards To edit the contents of a data box long tap the data box You can now edit delete or add data boxes See the figure below for an example Cancel input and close the keyboard Tap to toggle between numeric and alphabet Move the cursor left or right Backspace Deletes the character to the left of the cursor Confirm and apply the value or setting Space bar Back button Cursor Delete data box Tap the...

Страница 17: ...e 3 Tap the function you want to set as a shortcut 4 Tap the u icon at the top right corner of the menu to close the menu 1 9 Man Overboard MOB The MOB mark denotes man overboard position Enter the mark when someone falls overboard to automatically create a route to the man overboard position Only one mark can be displayed The MOB mark appears on both the Plotter and Radar pages 1 9 1 How to mark ...

Страница 18: ... strongly recommend using a wireless LAN with encrypted connection Other wise unauthorized access by a third party can occur which can cause loss of data or system crash We recommend changing the initial password when using a local wireless network 1 Tap the Home icon to show the Home screen then tap Settings General Wireless LAN 2 Tap the toggle box inside the Wireless LAN Connection section to s...

Страница 19: ...and Speed for the simulation To set these items either drag the slider bar or tap the keyboard icon to manually enter a value 7 To set Date and Time tap the item in the menu to show the software keyboard Enter the desired date time for the simulation then tap the icon to go back to the simulation settings 8 At Fish Finder tap the desired setting for the simulation then tap the icon to go back to t...

Страница 20: ...type list 5 Swipe the layered menu downwards to close the menu Home icon COG Vector red dashed line Heading line green solid line Cursor data box Orientation mode Data area Display range 2D 3D icon Note When the unit for Depth see section 11 2 is set to pb or HR the following changes are also applied to the displayed depth values The depth value shown in the data area and on the fish finder screen...

Страница 21: ...estination at the top of the screen This mode is useful when navigating a short voyage North Up Charts are oriented with North at the top of the screen and the own ship icon moves rotates in relation to the current heading and course This mode is useful for long voyages 2 5 How to Move the Charts You can move the charts to place points and view other areas which are not shown on screen Drag the ch...

Страница 22: ...ector line 7 Tap the x icon at the top right of the menu to close the menu 2 6 2 How to show hide the heading line From the pop up menu Tap the own ship icon to show the pop up menu then tap the Heading Line toggle box To show the heading line set to ON to hide the heading line set to OFF From the Ship and Tracks menu 1 From the Home screen tap Settings Ship and Tracks Ship 2 Tap the toggle box at...

Страница 23: ...e ap pears 3 Tap Yes to restore the factory default settings or tap No to keep the current set tings 2 7 Cursor Data You can tap a chart object to place the cursor on the object Information for the cursor location latitude longitude bearing and distance from own ship appears in the cursor data box at the bottom right of the screen 2 8 Point to Point Measurements You can use the Ruler function from...

Страница 24: ...either birds eye view 2D or at a user defined angle PS or 3D Note If your chart card has 3D imagery the PS indication is replaced with 3D To switch between the 2D chart and PS 3D chart drag the chart upwards with two fingers You can also press the 2D 3D icon at the bottom left corner of the screen To change the viewing angle in either PS or 3D swipe the chart left or right with two fingers 2 10 C ...

Страница 25: ...y The radar overlay has the radar echo image overlaid on the plotter display requires connection to a radar sensor and heading sensor To activate the radar overlay fea ture swipe the bottom of the plotter screen upwards to show the layered menu then tap the Radar Overlay toggle box to show ON To deactivate the overlay feature tap the Radar Overlay toggle box to show OFF 2 12 NAVpilot Operations Wh...

Страница 26: ...ot to show ON When a new route destination is selected the message Use the NAVpi lot for navigation appears Tap Yes to use the autopilot or tap No to use the GP 1x71F plotter for navigation 2 13 Weather Overlay Note This feature requires internet connection To set up a wireless LAN connection see Wireless LAN Setup in chapter 1 The weather overlay feature shows the forecast weather overlaid on the...

Страница 27: ...the slide out menu or from the Home screen Weather data update status Fill check box to show tide stations Playback or pause the weather forecast Time scale 24 hr format Drag the slider yellow circle to adjust the time shown on screen Show previous day Weather conditions for currently selected time at the cursor location Sky conditions Waves Currents Air temperature Humidity Winds Visibility Curre...

Страница 28: ... the left side of the screen Drag the list to show chart objects which are not displayed on the screen Tap Tide Height Station Graph to show the tide in formation for the selected chart area See section 2 10 2 14 2 How to view tidal current information Provided your chart card has tidal current information you can view current informa tion on the plotter screen If you do not have a chart card you ...

Страница 29: ...dal current icon Standard chart tidal current icon C Weather icon The number of tails on the arrow increases to indicate faster speeds Arrow color changes from blue weak to moderate to purple strong Standard icon Icon type Current s speed indication Current s strength indication Size increases as current speed increases Color changes as follows Yellow Weak Orange Moderate Red Strong The current s ...

Страница 30: ...ot hidden when OFF is selected only past tracks are hid den 3 3 Track Recording From the pop up menu Tap the own ship icon to show the pop up menu then tap the toggle box at Record Track to show ON To stop recording tracks tap the toggle box to show OFF From the Settings menu 1 From the Home screen tap Settings Ship and Tracks Track The track settings appear in the right hand side of the screen 2 ...

Страница 31: ...difference at which the track color changes The avail able setting range is 0 2 knots to 2 0 knots in 0 2 knot steps Bottom Discrimination Track color changes in direct relation to detected sea bed composition Mud dark orange Sand yellow Gravel steel blue Rock dark gray 9 If you selected Temperature or Speed at step 5 slide the slider bar or tap the keyboard icon for direct input to adjust the set...

Страница 32: ...ive tracks Up to Here Delete all sections of the track up to the selected point 4 Tap Yes in the confirmation pop up to delete the selected section s or tap No to cancel 3 5 3 How to delete tracks automatically When the tracks memory becomes full you can use the Auto Track Delete function to delete the oldest track automatically 1 From the Home screen tap Settings Ship Tracks 2 Tap Track to show t...

Страница 33: ...3 TRACKS 3 4 This page is intentionally left blank ...

Страница 34: ...e bearing etc are saved to the Points List You can show or hide the points and the default setting shows all points You can edit a point on the screen or from the Points List 4 2 Points Event Marks Setup You can set the color shape size and other characteristics for points and event marks from the menu 1 From the Home screen tap Settings Points The settings appear in section on the right hand side...

Страница 35: ...reen using two fingers simultaneously Note The Function Gesture feature must be set beforehand to Event from the Home Settings General Function Gestures menu From the slide out menu Swipe the right hand side of the screen leftwards to show the slide out menu then tap Event 4 4 Points List Overview 4 4 1 How to view the points list From the Home screen tap List Points Tap to sort the list by Name D...

Страница 36: ...ptions 2 Tap the filter you want to apply The listed points change accordingly To show all points for either filter tap All 4 5 How to Move a Point You can move a point two ways on screen or edit the point location from the Points List To edit a point location from the Points list see section 4 7 To move a point on screen follow the procedure below 1 Tap the point to show the pop up menu The point...

Страница 37: ...ssage appears 4 Tap Yes to delete all listed points 4 7 How to Edit Points You can edit the characteristics for any point from the Points list or from the pop up menu 4 7 1 How to edit a point on screen 1 Tap the point you want to edit The pop up menu appears 2 To change the location of the point tap Edit Position Enter the new coordinates for the point then tap OK 3 To change the name of the poin...

Страница 38: ...Show or Hide All Points You can show or hide all points on the screen from the layered menu Swipe the bottom of the screen upwards to show the layered menu then tap the toggle box at Show Points to show ON show or OFF hide as required 4 9 What is a Polyline A polyline is a user defined line made up of at least two points The most common use for polylines is to indicate where nets are or to indicat...

Страница 39: ...List To show the information for a polyline from the Home screen tap Lists Polylines Tap to sort list Search button Polyline length Number of vertices in polyline Polyline name color created date and time Tap to delete listed filtered items Editing window Editing window Vertex list Detail Show each vertex of the selected line and vertex details Color Change polyline color Delete Delete the selecte...

Страница 40: ...nter of the screen 4 14 How to Delete Polylines To delete an individual polyline follow the procedure below 1 From the Home screen tap List Polylines 2 Tap the line you want to delete The polyline information window appears 3 Tap Delete A confirmation window appears 4 Tap Yes to delete the selected polyline 5 Tap the x at the top right corner of the menu to close the menu To delete all polylines f...

Страница 41: ...D POLYLINES 4 8 4 Tap any vertex to show the vertex information 5 Tap Delete A confirmation window appears 6 Tap Yes to delete the selected vertex 7 Tap the x at the top right corner of the menu to close the menu ...

Страница 42: ...create a temporary route Tap a location on the chart or tap a point then tap Go To in the pop up menu The selected point location is set as a destination and the route line is shown as a dotted red line The route line also shows arrows in the navigational direction Note Quick routes are not saved in the Routes list and the destination point is not saved in the Points list 5 2 2 Planned routes with...

Страница 43: ... Easy Routing can be initiated on points on route legs inactive routes only on a cartographic object and on the chart You simply set a destination This can be newly entered points or any of the points mentioned above that are currently on the screen The total distance can not be lon ger than 100 NM Easy Routing then analyzes the path between your current position and the selected point and creates...

Страница 44: ...rn it on to honor this distance 7 Turn off Respect Draught if you want to disregard the depths that are shallower than the Safe Depth setting How to create a route with Easy Routing 1 Tap the point to use as the Easy Route destination The context menu appears 2 Select Easy Routing The system checks if there is an active route and if the des tination is within the 100 NM distance limit If a route i...

Страница 45: ... the route from the Routes list then tap Details Editing a route from the Routes list Name Tap the name field to edit the route name Comment Tap the comment field to edit the comment Start Nav Tap to start navigation the route Note If a route is already active a confirmation message appears Tap Yes to stop the active route and switch to the selected route Detail Tap to show the route details This ...

Страница 46: ...route point Locate on Map Shows the selected route point at the center of the screen 5 5 Extending Routes On screen You can extend a route from the last route point on the route This is useful when you want to travel beyond the last point in a route 1 Tap any leg of the route The pop up menu appears 2 Select Extend A new route point is added at the end of the route at a distance equal to the last ...

Страница 47: ... point 5 8 2 How to delete a route point from the menu 1 From the Home screen tap List Routes to show the Routes list 2 Tap the route which contains the route point you want to delete then tap Detail in the options window The route point list appears Note The route point list shows all points used in the route 3 Tap the route point you want to delete then tap Delete A confirmation pop up appears 4...

Страница 48: ...ons appear in the right hand side of the screen 2 Tap Delete All Routes from the menu options A confirmation message appears 3 Tap Yes to delete all routes 4 Tap the x at the top right corner of the menu to close the menu 5 10 Route Calculation Speed Setup 1 From the Home screen tap Routes Routes The menu options appear in the right hand side of the screen 2 At Route Planning Speed in the menu opt...

Страница 49: ...the direc tion of navigation 5 12 3 How to navigate from a specified point in a route 1 Tap the location in the route you want to start navigation from The pop up menu appears 2 Tap Start Here Route navigation starts with the selected point as the first route point 5 13 Changing Route Navigation 5 13 1 How to restart navigation When you steer to keep away from an obstruction or your boat drifts yo...

Страница 50: ...he pop up menu then tap Stop Nav 5 13 4 How to set the XTE off course width The XTE lines give you an indication as to how far off course you may be at any given time The port side line appears as a red dotted line and the starboard side line appear as a green dotted line When you drift outside the XTE width an alert can be released see 10 3 4 1 From the Home screen tap Settings Routes Routes The ...

Страница 51: ... up message appears to inform you that the route is completed Note If you set Arriving at Destination to ON in the Notifications menu an audible alert is also released when you reach the preset distance from the destination 1 From the Home screen tap Settings Routes Routes The route menu options appear in the right hand side of the screen 2 Tap the toggle box at End Route Notification to show ON o...

Страница 52: ...here outside the menu or tap the icon at the top left corner of the menu This chapter uses the term Close the menu to refer to both methods 6 2 How to Set Up the Transducer To set up the transducer follow the procedure below Note This procedure is not required for transducers with a TD ID 1 From the Home screen tap Settings 2 Tap Fish Finder Initial Setup Transducer 3 Select the transducer you hav...

Страница 53: ...ghted by the cursor zoom marker is shown zoomed in the left hand side of the screen Bottom Zoom Shows the Single Frequency display on the right hand side of the screen and the seabed area is shown zoomed in the left hand side of the screen Bottom Lock Shows the Single Frequency display on the right hand side of the screen and a set distance from seabed area is shown zoomed in the left hand side of...

Страница 54: ...tion is required See the installation manual for a full list of transducers which can be connected to your GP 1x71F CHIRP transducers are NOT compatible with the Bottom Discrimination feature There are two bottom discrimination displays graphic and probability A scope display Fish echo Single frequency display Strong reflection bottom Weak reflection small fish or noise The probability bar indicat...

Страница 55: ...tely 6 5 Automatic Fish Finder Your fish finder can be adjusted automatically allowing you to do other tasks The automatic fish finder function automatically adjusts the gain clutter TVG and echo offset The main features of the automatic mode are as shown below There are two types of automatic fish finder modes Cruising and Fishing Cruising tracks the bottom and Fishing searches for schools of fis...

Страница 56: ...of the width of the display 4 Close the menu 6 6 Manual Fish Finder Operation Use the manual operation to see schools of fish and the bottom echo with a fixed gain setting 6 6 1 How to select the manual mode To select the manual mode tap the cogwheel icon to open the Settings menu then tap Manual 6 6 2 How to select a display range Range can be selected automatically or manually Tap the cogwheel i...

Страница 57: ...reduces more noise however weak echoes small targets may also be removed 6 8 How to Reduce Interference Interference from other fish finders and electrical equipment appears on the screen as broken vertical lines When this type of interference appears on the screen use the interference rejector to reduce the interference Three levels are available Turn off the interference rejector when there is n...

Страница 58: ... depth so that echoes of the same strength at different depths are shown in the same colors 1 Tap the cogwheel icon at the bottom left of the fish finder screen The quick set tings menu appears 2 Drag the slide bar at TVG Range or tap the keyboard icon to input a value 3 Close the menu 6 12 Zero Line The zero line rejection feature helps to find fish near the surface often hidden by the transmissi...

Страница 59: ...ops picture advance and is useful for taking a screenshot or photo 6 14 Depth Time Measurements You can measure the depth to an object with the VRM Also you can measure the time from the right edge to a location For example you can measure how many minutes ago the echo appeared To measure the time to a location or the depth to an object tap the object loca tion The VRM cross hairs move to the tapp...

Страница 60: ...ay fish marks and fish size using a 1 kW transducer the integrated trans ducer 50 200 1T or 526TID HDD is recommended Echo intensity depends on fish species and can cause a difference between the in dicated length and the actual length When the indicated fish length differs from the actual length you can compensate for the difference on the Fish Finder menu in the Home Settings menu When ACCU FISH...

Страница 61: ...the fish length is revised for reference 100 Two times the detected length 50 1 5 times the detected length 50 Half the detected length 80 1 5 of the detected length 6 17 4 How to filter the ACCU FISH display You can set filters for the ACCU FISH feature so that only fish which meet your con ditions are shown on the screen 1 Tap Home Settings Fish Finder then tap ACCU FISH 2 At ACCU FISH Filter 1 ...

Страница 62: ...til the offending alarm is disabled or the condition that caused the alarm has ended 6 19 1 How to set the detection level Detection level determines the echo strength at which an echo is interpreted as a school Echoes which are estimated to be a school trigger the fish detection alarm 1 Tap Home Settings Notifications Fish and Bottom 2 At Fish Detection Level tap the echo strength you want to set...

Страница 63: ...s you an estimate of the seabed composition and you can set an alarm to inform you when a certain composition is detected 1 Tap Home Settings Notifications Fish and Bottom 2 At Bottom Discrimination tap the toggle box for Notification to show ON The composition types Sand Mud Rock Gravel are now active and selectable 3 Select the composition type you want to trigger the alarm 4 Set the Probability...

Страница 64: ...nitial Setup The menu op tions appear in the right hand side of the screen 2 Tap the toggle box at Auto Tuning to show ON or OFF as required The setting is effective once the menu is closed 3 Tap the x at the top right corner of the menu to close the menu 7 4 How to Reduce Clutter Rain and snow can cause clutter when reflecting the radar beam Clutter appears similar to white noise on the radar scr...

Страница 65: ...t the top of the screen and the heading line course line move in accordance with your ship s movements Non mov ing targets are displayed in the same manner as shown on a chart This orientation is best suited for open seas and route monitoring The picture is not affected when turn ing or yawing Note North Up orientation required heading data If heading data input is interrupted or lost while North ...

Страница 66: ...ayered menu then tap the toggle box at Show EBL VRM to show ON 2 Close the layered menu 3 Tap any location on the radar screen other than echoes or indications The pop up menu appears 4 Tap EBL VRM The pop up menu closes The EBL Electronic Bearing Line and VRM Variable Range Marker are now adjustable 5 To measure the bearing to a target drag the EBL line until it intersects the tar get To measure ...

Страница 67: ... see and is available on any range To use the echo stretch feature follow the procedure below 1 Tap any location on the radar screen other than echoes or indications The pop up menu appears 2 Tap Echo Stretch The echo stretch settings appear 3 Set echo stretch referring to the options below Off Disable the echo stretch feature Low Targets are stretched by a small amount High Targets are stretched ...

Страница 68: ... Notifications appear only when a target exits the sentry zone If you selected IN or OUT the sentry zone outline changes from dashed lines to solid lines Note You can only hide a sentry zone by setting the zone to OFF from the layered menu 7 13 How to Change Echo Colors You can change the color for radar echoes 1 From the Home screen tap Settings Radar General The menu op tions appear in the right...

Страница 69: ...n with the display orientation Where display orientation is set to Head Up True The heading line always shown pointing to the top of the screen and the scale moves in relation to your heading Relative 0 degrees bearing is always shown at the top of the screen Where display orientation is set to North Up True 0 degrees bearing is always shown at the top of the screen Relative The scale moves in rel...

Страница 70: ...harpness for radar echoes This menu option is only available when a radar antenna is connected Antenna Heading Align Aligns the antenna heading This setting is done at in stallation and should not be changed during normal use 3 Tap the x at the top right corner of the menu to close the menu 7 17 Restoring Factory Defaults You can restore the Radar menu to factory default settings with the followin...

Страница 71: ...7 RADAR 7 8 This page is intentionally left blank ...

Страница 72: ...mation Swipe the bottom of the screen upwards to show the layered menu then tap the toggle box at AIS DSC Targets to show ON 8 3 AIS Target Symbols 8 4 AIS Activation Range The default AIS activation range is 5 0 NM Any AIS target that is within 5 0 NM of your boat is automatically activated To change the activation range follow the procedure below 1 From the Home screen tap Settings AIS and DSC 2...

Страница 73: ...tion The information appears at the bottom right of the screen 8 7 Show Hide the AIS Target ID You can show the AIS target s identification below the AIS symbol 1 From the Home screen tap Settings AIS and DSC 2 Tap the toggle box at Target ID to show ON or OFF as required 3 Close the menu 8 8 AIS List Overview 8 8 1 How to show the AIS target list From the Home screen tap List AIS 8 8 2 How to sor...

Страница 74: ...ime to Closest Point of Approach alarm alerts you when an AIS transponder equipped vessel is with in the time you specify 1 From the Home screen tap Settings Notifications AIS 2 Tap the CPA toggle box to show ON The settings for this alert become active 3 Drag the slider to set the CPA or tap the keyboard icon to enter a value 4 Tap the TCPA toggle box to show ON The settings for this alert become...

Страница 75: ...ou have received a DSC position request or a DSC distress call via VHF If you are not on the plotter display a notification appears Select Yes if you want to go to the plotter display Distress Calls are indicated as a hexagonal icon with the letter D at the center Position Requests are indicated as a square icon with the letter P at the center Note This feature requires connection of a DSC capable...

Страница 76: ...formation Tap a DSC icon to show the DSC message information 8 16 Show Hide the DSC Target ID You can show the AIS target s identification below the AIS symbol 1 From the Home screen tap Settings AIS and DSC 2 Tap the toggle box at Target ID to show ON or OFF as required 3 Close the menu Vessel name callsign and MMSI where available Time date message was sent distance and bearing to sender Sender ...

Страница 77: ...SC list sub menu operations You can tap a DSC target in the list to show the sub menu Go To Set the DSC target as a Quick Route destination Locate On Map Move the plotter radar screen to show the selected DSC target at the center of the screen New Point Place a point at the DSC target s location Tap a sorting method to sort the list Tap the Refresh button to update the list Drag the scrollbar to s...

Страница 78: ... DSC messages The system can store up to 100 DSC messages You can selected when to delete messages 1 From the Home screen tap Settings AIS and DSC 2 Tap the setting at DSC Calls List to show the options then tap the desired option 3 Close the menu ...

Страница 79: ...8 AIS DSC OPERATIONS 8 8 This page is intentionally left blank ...

Страница 80: ...n tap the Instrument Display page you want to show 9 3 Multi Instrument Display You can set one or both of the smaller split windows as Multi Instrument Displays The settings and information selected to display is shared between the windows if you se lect both 9 3 1 How to set up and edit the Multi Instrument Display You can save up to seven pages of Instrument Displays To set up the Multi Instru ...

Страница 81: ...rent window tap the Add Page button then select the instrument you want to add 6 Repeat steps 4 and 5 to add further instruments You can have up to 7 instruments assigned to the instrument display Depending on your selection further options can be set for the instrument See section 9 3 4 for details 7 Tap the icon at the top left corner of the editing menu to close the menu Add Page button Instrum...

Страница 82: ...ru ment has changeable information the editing menu appears at the left hand side of the screen 2 Tap the information you want to display 3 Tap the icon at the top left corner of the editing menu to close the menu 9 3 5 How to delete an instrument page To delete an instrument page tap the trash can icon from the editing menu then tap Yes in the confirmation pop up window If you have the same instr...

Страница 83: ... distance is also displayed Note that trip distance is not reset when you tap the Reset button Stopwatch Shows a stopwatch with lap feature Tap Start to begin start the stopwatch Tap Lap to take a lap time tap Stop to stop the timer tap Reset to reset the stopwatch Note that the lap time is not reset when you tap Reset 4 Tap anywhere outside the settings options to close the settings 9 3 7 How to ...

Страница 84: ...otifications menu open the Home screen then tap Settings Notifications The menu is separated into the following tabs General Set up the audible alert buzzer Fish and Bottom Set up Fish Finder related alerts See section 7 19 Navigation Set up navigational alerts Tanks Set up tank related alerts Wind Set up wind related alerts AIS Set up CPA TCPA alerts See section 8 9 10 2 Notification Buzzer Setup...

Страница 85: ...ected depth is deeper than the start depth and within the set range the notification is triggered 10 3 3 Anchor notification The anchor notification alerts you when your vessel drift beyond the preset range 1 Open the Notifications menu then select Navigation 2 At the Anchor toggle box select ON to activate the anchor notification The set tings for the notification become active 3 Drag the slide b...

Страница 86: ...ication is triggered 10 3 6 Speed notification The speed notification alerts you when your speed is above or below the preset 1 Open the Notifications menu then select Navigation 2 At the Speed toggle box select ON to activate the speed notification The set tings for the notification become active 3 Tap Within Range or Outside Range to select the type of speed notification Within Range When your b...

Страница 87: ...Temperature set the maximum and minimum temperatures for the notification 10 3 9 Sheer notification The sheer notification alerts when a sudden temperature change sheer of more than the preset is detected 1 Open the Notifications menu then select Navigation 2 At the Temperature Sheer toggle box select ON to activate the sheer notifica tion The settings for the notification become active 3 Drag the...

Страница 88: ... side wind speed exceeds this setting the no tification is triggered 10 6 Restoring Notification Defaults You can restore the default settings for the Notifications menu at any time This pro cedure does not affect any other settings Open the Notifications menu then tap Factory Default Settings Reset to Factory Defaults A confirmation message appears Tap Yes to restore the default settings or tap N...

Страница 89: ...d System Messages 2 Tap the Menu button at the top right of the list The filter settings appear 3 At Show by Type select the filter type you want to use All shows all notifications unfiltered Notifications shows only alert notifications System shows only system notifications 4 At From select the start date from which you want to view notifications 5 At To select the date up to which you want to vi...

Страница 90: ... is engaged AutoPilot is disengaged TWS is higher than the preset Depth is less than the preset there may be a danger of grounding Arriving at Destination Anchor Watch Exceeded Cross Track Distance Exceeded Ship Speed Outside Preset Range Trip Distance Reached Water Temp Outside Preset Range Depth Outside Preset Range Grounding Possibility Detected Fish Detected Seabed Fish Detected Seabed Type De...

Страница 91: ...G signal Disconnected from the radar or signal is stopped interrupted MOB Navigation Mode NAVpilot STBY NAVpilot Auto NAVpilot Nav Maximum No of QPs Reached Maximum No of Points Reached Maximum No of Routes Reached Max No of Route Points Reached Maximum No of Tracks Reached No Chart Detected SD Card Full Simulation Mode Active MOB function is active A route Quick or Planned is active NAVpilot is i...

Страница 92: ... menu Resets the General menu to factory default settings A confirmation message appears when you tap Reset to Factory Defaults Tap Yes to reset the menu tap No to cancel 11 2 Units Menu To show the Units menu tap the Home icon Settings Units Units sub menu Tap an item to show the available units of measurement then tap the desired unit Fuel sub menu Tap the desired unit or measurement for fuel co...

Страница 93: ... up message 6 Tap the u at the top right corner of the screen to close the menu 11 3 2 How to load points routes and tracks from a microSD card 1 Insert a microSD card the card must have appropriate data saved into one of the card slots 2 From the Home screen tap Settings Files User Data 3 Tap Import from SD at Routes and Points or Tracks as required A list of com patible files appears in a slide ...

Страница 94: ...he Home screen tap Settings Files Notifications Log 3 Tap Export to SD CSV A pop up message appears indicating that system is saving the log When the save is complete a new pop up message appears in forming you that the save was successful Note Log data is saved only in csv format No other file format are available 4 Tap OK to close the pop up message 5 Tap the u at the top right corner of the scr...

Страница 95: ...message To delete screenshots from the internal memory see section 11 5 2 11 5 1 How to save screenshots to the microSD card You can move screenshots from the internal memory to the microSD card 1 Insert a microSD card chart cards excluded into one of the card slots 2 From the Home screen tap Settings Files Screenshots 3 Tap Export to SD A pop up message appears indicating that system is saving th...

Страница 96: ...a dichiarazione di conformità UE è disponibile al seguente indirizzo Internet Ar šo Furuno Electric Co Ltd deklarƝ ka augstƗk minƝts radioiekƗrta atbilst DirektƯvai 2014 53 ES GP 1871F 1971F ELi vastavusdeklaratsiooni täielik tekst on kättesaadav järgmisel internetiaadressil ɋ ɧɚɫɬɨɹɳɨɬɨ Furuno Electric Co Ltd ɞɟɤɥɚɪɢɪɚ ɱɟ ɝɨɪɟɫɩɨɦɟɧɚɬ ɬɢɩ ɪɚɞɢɨɫɴɨɪɴɠɟɧɢɟ ɟ ɜ ɫɴɨɬɜɟɬɫɬɜɢɟ ɫ Ⱦɢɪɟɤɬɢɜɚ 2014 53 ȿɋ ɐɹ...

Страница 97: ... o skladnosti je na voljo na naslednjem spletnem naslovu O texto integral da declaração de conformidade está disponível no seguinte endereço de Internet Aš Furuno Electric Co Ltd patvirtinu kad pirmiau minơta radijo Ƴrenginiǐ tipas atitinka Direktyvą 2014 53 ES Visas ES atitikties deklaracijos tekstas prieinamas šiuo interneto adresu Furuno Electric Co Ltd igazolja hogy fent említett típusú rádiób...

Отзывы: