


18
3.
SETTINGS AND ADJUSTMENTS
3.1
Starting the Setup Procedure
When the system is powered on the first time, the [Initial Setup] is displayed immedi-
ately after the startup tests are completed.
Once these settings are completed, this menu does not appear again. These settings
can also be changed from the [Settings] menu on the [Home] page (see section 3.2).
To set the [Initial Setup] menu, follow the procedure below.
1. Tap [Language] to show the available display languages, then tap the language
you want to use.
2. Tap [Units of Measure] to show the [Units] menu.
3. Tap the unit you want to set. The settings options window appears.
4. Tap the unit of measurement you want to use, then tap the [<] at the top-left of the
settings options window.
5. Tap the [<] at the top-left of the [Units] menu to go back to the [Initial Setup] menu.
6. Tap [Time Zone]. The time offset window appears.
7. Select the appropriate time offset, then tap the [<] at the top-left of the offset win-
dow to go back to the [Initial Setup] menu.
8. Tap [Engines]. The engine selection window appears.
9. Select the number of engines on the boat, then tap the [<] at the top-left of the se-
lection window to go back to the [Initial Setup] menu.
10. Tap [OK] to save and apply the settings. The system takes a few seconds to apply
the settings, then the [Plotter] page appears.
Note:
The menu items [GPS Simulation] and [Fish Finder Simulation] are intended for
promotional purposes. Make sure both these menu items are set to [OFF].
3. SETTINGS AND ADJUSTMENTS
19
3.2
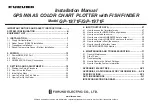
How to Use the Menu
The [Settings] menu contains customizing options for this equipment. To access the
[Settings] menu, follow the procedure below.
1. Tap the [Home] icon to show the [Home] screen.
2. Tap [Settings]. The [Settings] menu appears.
3. Tap the menu you want to access. Drag the menu to show menu items which do
not appear on-screen.
4. Tap the menu item you want to set; the available settings and options appear in
the right-side of the screen. Tap the [>] icon to show sub-menu items.
5. Depending on the menu item selected, do one of the following:
•
[ON]/[OFF] toggle boxes:
Select [ON] to activate the function or feature, select
[OFF] to deactivate the function or feature.
•
Settings and options:
Tap the desired setting or option. The current selection
is indicated by a filled circle to the left of the setting or option.
•
Slide-bar or keyboard icon:
Drag the slider (solid circle) on the slider-bar to
set a value. For the software keyboard (appears after you tap the keyboard
icon), tap the keyboard to input a value, then tap [OK].
6. Tap the [
u
] icon at the top-right corner of the menu to close the menu.
Drag the menu to
show the menu items
which are not
displayed on-screen.
Tap
Top layer of
the menu
Menu items for the selected
top layer menu appear here.
Menu options for sub-menu items
appear in an overlaid window.
Selected menu item
appears in the title bar
Cancel input and
close the keyboard.
Move the cursor left or right.
Keyboard icon
Tap
Backspace
Deletes the
character to the
left of the cursor.
Confirm and
apply the value
or setting.
Содержание GP-1871F
Страница 27: ...D 1 11 Sep 2017 H MAKI 11 Sep 2017 H MAKI ...
Страница 28: ...D 2 11 Sep 2017 H MAKI 11 Sep 2017 H MAKI ...
Страница 29: ...D 3 11 Sep 2017 H MAKI 11 Sep 2017 H MAKI ...
Страница 30: ...D 4 11 Sep 2017 H MAKI 11 Sep 2017 H MAKI ...


