background image

2.  HORIZONTAL MODE

2-40

2.23

How to Interpret the Horizontal Display

2.23.1

Bottom and school of fish echoes

Bottom echoes

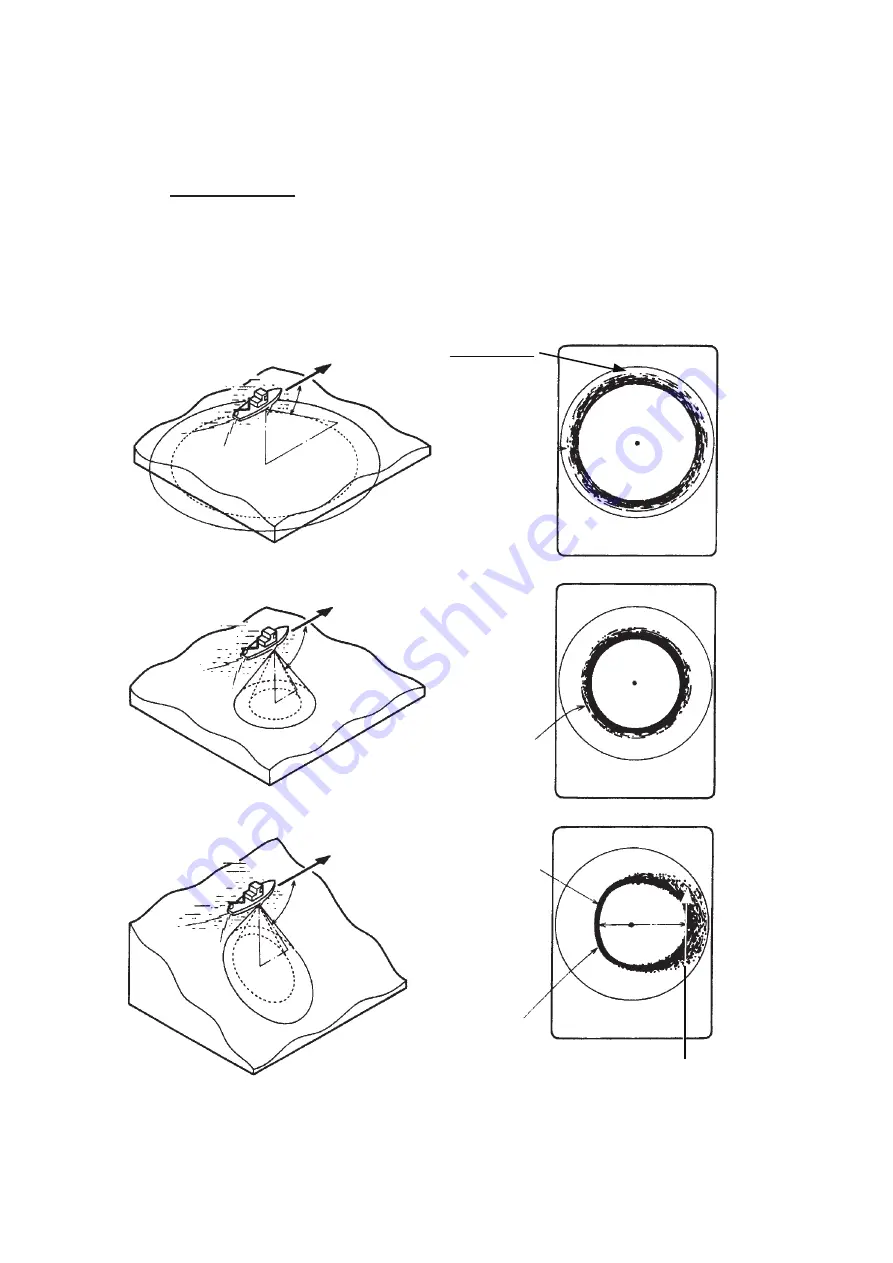
When the tilt angle is changed, the bottom echo illustrated below will appear on the 
display. When the tilt is decreased (toward 0°), the bottom trace becomes wider and 
weaker. By observing the bottom condition on the display, the skipper can prevent net 
damage.

(A) Flat bottom

      Tilt angle: 10° to 15°

(B) Flat bottom

      Tilt angle: 20° or more

(C) Sloping bottom

      Tilt angle: 20° or more

Bottom

Shallow bottom
is displayed in
a strong color
and with a 
short tail

Bottom is displayed
narrower and in
stronger colors when
compared to (A).

Bottom echo
The bottom 
echo is cap-
tured by the 
entire beam. 
The bottom 
echo in the 
foreground is 
strong; weak
on the 
periphery.

The deeper, sloping
 bottom echo is displayed
in a weak color and
with a long tail.

Содержание FSV-2S

Страница 1: ...COLOR SCANNING SONAR FSV 25 FSV 25S OPERATOR S MANUAL www furuno com Model ...

Страница 2: ...7KH SDSHU XVHG LQ WKLV PDQXDO LV HOHPHQWDO FKORULQH IUHH 85812 XWKRUL HG LVWULEXWRU HDOHU VKLKDUD FKR 1LVKLQRPL D 3 1 0 3ULQWHG LQ DSDQ OO ULJKWV UHVHUYHG 3XE 1R 20 27 69 6 ...

Страница 3: ...ed trademarks or service marks of their respective holders How to discard this product Discard this product according to local regulations for the disposal of industrial waste For disposal in the USA see the homepage of the Electronics Industries Alliance http www eiae org for the correct method of disposal How to discard a used battery Some FURUNO products have a battery ies To see if your produc...

Страница 4: ...e operator of this equipment must read the safety instructions before attempting to operate the equipment Keep away from raise lower shaft in hull unit when the shaft is moving Gears in hull unit will cause serious injury Immediately turn off the power at the switchboard if water leaks into the equipment or something is dropped into the equipment Continued use of the equipment can cause fire or el...

Страница 5: ...ss of transducer An LCD is made of glass Rough handling can break the glass Handle the LCD carefully to prevent injury WARNING LABELS Warning labels are attached to the units of the system Do not remove the labels If a label is missing or damaged contact a FURUNO agent or dealer about replacement Name Warning Label Type 10 079 7 6144 Code No 100 310 880 10 Name Warning Label Type 10 089 5548 1 Cod...

Страница 6: ...nnot be raised or lowered The transducer is also stopped when the ratchet wrench in the hull unit which is used to manually raise the transducer is re moved from its holder To release the emergency stop condition first confirm that no one is near the hull unit Then do the following To release the EMERGENCY STOP button turn the button in the direction of the arrow on the button Return the ratchet w...

Страница 7: ... 1 2 2 Indications and Markers 2 2 2 2 1 Horizontal mode full screen display 2 2 2 2 2 Horizontal2 mode 2 3 2 3 Display Range 2 4 2 4 Tilt Angle 2 4 2 4 1 How to set the tilt angle 2 4 2 4 2 Automatic tilt 2 5 2 4 3 Relation between bottom echo and tilt angle 2 6 2 4 4 Tilt angle for surface fish 2 7 2 4 5 Suitable tilt angle 2 8 2 5 How to Measure Range and Bearing to a Target 2 8 2 6 How to Elim...

Страница 8: ...ish 2 30 2 17 1 How to measure the speed of a school of fish 2 30 2 17 2 How to delete fish marks 2 31 2 18 Event Mark Own Ship Position Mark 2 32 2 18 1 How to enter an event mark 2 32 2 18 2 How to enter an own ship position mark 2 33 2 18 3 How to erase an event mark own ship position mark 2 33 2 19 Select Mark Window 2 33 2 20 Net Course Mark 2 34 2 21 Net Behavior 2 35 2 22 Other Menu Items 2...

Страница 9: ... to erase programs 5 5 5 2 5 How to program the function keys of remote controller 5 6 5 3 USER PROG Control 5 7 5 3 1 How to select a user program 5 7 5 3 2 How to program the USER PROG control 5 7 6 OTHERS MENU 6 1 6 1 Erase Marks Menu 6 1 6 2 Wheel Setting Menu 6 2 6 3 Display Setting Menu 6 3 6 4 Alarm Audio Menu 6 5 6 5 Register Menu 6 6 6 6 Initial Setting Menu 6 7 7 RECORD RECALL OPERATION ...

Страница 10: ...enu 8 11 8 11 2 Operation test 8 12 8 11 3 Board test 8 13 8 11 4 Panel test 8 14 8 11 5 Test pattern 8 15 8 11 6 Fan monitor test 8 15 8 12 How to Raise the Transducer from the Hull Unit 8 16 8 12 1 How to raise the transducer automatically 8 16 8 12 2 How to raise the transducer manually 8 18 8 13 How to Check the Brake in the Hull Unit 8 19 8 13 1 How to check the brake in the raise lower contr...

Страница 11: ...tects and displays schools of fish on the monitor of your choice The main features of the FSV 25 FSV 25S are Menu driven operation Vivid 32 color echo strength dependent display for improved recognition of bottom fish school concentration distribution and volume Dual Display mode Schools of fish can be searched from horizontal range direction vertical depth direction with vertical features Pitchin...

Страница 12: ...difference between the two models is the range FSV 25 60 m to 5000 m FSV 25S 60 m to 10000 m Unless noted otherwise click means to push the left button CE declaration With regards to CE declarations please refer to our website www furuno com for further infor mation about RoHS conformity declarations ...

Страница 13: ...ice Junction box FI 5002 External speaker Sub control unit FSV 853 Control unit FSV 2501 Remote controller FSV 2504 Remote controller FSV 2504 Hull unit FSV 253 254 Raise Lower control box FSV 2530 Junction box FSV 2550 12 24 VDC Rectifier unit RU 1746B 2 100 110 115 220 230 VAC 1ø 50 60 Hz 100 110 115 220 230 VAC 1ø 50 60 Hz Interface unit FSV 8502 Transceiver unit FSV 251 Power supply unit FSV 2...

Страница 14: ...SYSTEM CONFIGURATION xii This page is intentionally left blank ...

Страница 15: ...ducer full protrusion Enters the net shooting mark or own ship mark Sets vertical cross section bearing Automatic transducer train width on audio bearing mark horizontal mode ver tical bearing mark vertical mode Off centers own ship s position horizontal mode Displays range and bearing marks horizontal mode Sets the audio bearing Deletes trackball selected mark DOWN STOP Trackball Trackball unit S...

Страница 16: ... Long push Closes all menus Sets auto tilt angle Selects display mode Selects the mode tab on the menu Selects mode to adjust sensitivity select range set tilt and user program number Execute assigned program Selects user programmed settings Adjusts gain for horizontal vertical scans Selects the display range for horizontal and vertical scans Sets transducer tilt angle for horizontal scans Key Fun...

Страница 17: ...e circle cursor Push long Shows the Select Mark window Right button 1 Push short Shows pop up menu confirms the selected item Enters event mark 1 3 Push long Cancel the off center 1 Left click right click means push the left button push the right button respectively 2 Drag and drop means to hold down the left button while dragging the cursor and releasing the button at desired drop point 3 The rig...

Страница 18: ...the breaker on the hull unit is turned on after the transducer is raised or low ered from the control unit beware of the moving hull unit No Function on control unit 1 Same as F1 F2 and F3 key 2 Same as key 3 Same as right button 4 Same as the left button 5 Same as EVENT ESTIMATE TARGET LOCK and FISH keys 6 Same as trackball 7 Same as OFF CENTER key 8 Same as USER PROG control 9 Same as GAIN contr...

Страница 19: ...the transducer is being raised and lights steadily when it is fully raised Note While raising the transducer the ship speed must be not exceed the limits posted below to prevent damage to the transducer and hull unit projected length not more than 1100 mm 14 5 kn projected length 1100 mm 1300 mm 13 5 kn projected length Over 1300 12 kn 2 After the key lights steadily press the POWER OFF switch unt...

Страница 20: ...being raised or lowered the transducer stops at the fixed position The fixed position can be set by clicking the transducer position marker See the next page Any Position The transducer starts lowering when the key is operated The low ering is stopped when the key is operated To raise or lower the transducer from the current position use the or key The key does not control lowering or raising of t...

Страница 21: ...he transducer is projecting The Transducer Position Mark which appears at the top left corner lets you check how far the transducer is projecting You can show or hide the marker by doing the following operation Menu Initial Settings Change confirmation window Mark Display TD Position Mark Notes The color of the indicator changes according to transducer position and operation state Green The transd...

Страница 22: ...ontrol unit Use the associated control on the monitor 1 5 2 Panel dimmer 1 Press the MENU ESC key to open the main menu 2 Roll the trackball to select Others then push the left button Note Hereafter the use of the trackball and the left button are only implied For example the sentence in step 2 would be written as Click Others Quit Cancel 5 5 95 Mid protrusion Menu Quit TX RX Setting Gain Setting ...

Страница 23: ...Quit Display Setting Mode Selection Mode Key Echo Display Area Within Range H2 Display Landscape 2nd Monitor Setting Portrait V Scan Aspect Ratio Fixed V Scan Dpt Rng 100 Presentation Mode Head Up TM Disp Range 1 6R Full Screen Area 1 6R Tilt lever Tilt Gain Knob Setting Execute Gain Control Step 0 5 Auto Tilt Narrow Net Course Mark Execute Dimmer 7 Key Beep Volume 5 Timer Display OFF Circle Curso...

Страница 24: ...w you have two choices with which to show the echo display See page 6 6 for how to select the display method For the numeric graphic data display see chapter 4 N N W E 2 1 1 85 1 H1 Main monitor N W S E 3 300 2 3 1 H2 Sub monitor Echo picture display Within Range Echo picture display Within Range Echo picture display Within Range Echo picture display Full Screen Echo picture display Full Screen Ec...

Страница 25: ...stead of a conven tional menu 1 Push the right button on the numeric graphic data display 2 Click Display Mode 3 Click the mode to use 1 6 2 Display mode picture examples Below are typical pictures For sake of brevity indications and marks are not shown Horizontal mode This mode provides 360 degree coverage around the vessel and it is useful for gen eral search For further details see chapter 2 Ho...

Страница 26: ...tical bearing mark on the horizontal display The vertical 2 mode provides two vertical slic es For further details see chapter 3 Vertical mode NUMERIC GRAPHIC DATA DISPLAY NUMERIC GRAPHIC DATA DISPLAY N W E 2 1 1 N W E 2 1 1 85 1 H1 H2 N W S E 3 300 2 3 1 3 2 1 N W S E 3 2 1 3 2 1 1 3 2 2 1 3 2000 2 3 1 3 2 1 1 85 1 2 NUMERIC GRAPHIC DATA DISPLAY H1 H2 LANDSCAPE PORTRAIT INSET Zoom out window N S ...

Страница 27: ... the horizontal and vertical modes are active press the H V S key to show the range and gain indications of the mode you wish to adjust Pressing the H V S key changes the color of the range and gain indications to orange H1 H2 Horizontal1 or horizontal2 V1 V2 H or V display 142m 45m B 115 H R 400m AUTO 17 T 21 G 1 0 H UP B 330 210m 48m 148m 148m N W S E C 256 S 12 3kn 230m 70m 3 2 1 1 2 P 8 B 290 ...

Страница 28: ...rating information 1 Press the MENU ESC key to open the main menu Note You can also show the main menu by pushing the right button to show the pop up menu See page 1 16 2 Operate the trackball to place the arrow cursor on the item you want to select The yellow cursor marks the current selection You can also use the scrollwheel to select a menu item 17 T H UP P 8 40 50 H R 400m G 1 0 Put the cursor...

Страница 29: ... by selecting Quit on the active menu and long pushing the left button You can relocate menu windows Use the trackball to put the arrow cursor on the menu title blue when menu is active push the left button drag the window to new location then release the left button The position of the menu windows is saved Note 1 You can move the menu to a desired location by drag and drop Left click the title b...

Страница 30: ...e menu item may cause restriction to another menu item In this case the equipment ignores both set tings to use different ones or invalidates the setting of the item encountering restric tion The invalid setting value or menu item is shown in gray Pop up menu operation Push the right button on the numeric graphic data display to show the pop up menu These items can also be accessed from the main m...

Страница 31: ...en horizontal or vertical or horizontal1 or horizontal2 to adjust gain and range 6 Adjust gain 7 Set tilt angle 1 Turn on power 2 Lower transducer Full protrusion Mid protrusion key programmed to Fixed Position Transducer stops at mid protrusion position Mid protrusion key programmed to Any Position Transducer stops at desired position DOWN STOP ...

Страница 32: ...entry Relative bearing or True bearing Latest event marks Cursor Target lock mark Event mark Bearing scale Range ring Own ship mark Heading mark Net sonde mark Net shoot mark Ship s track Target lock fish movement data Horizontal range Depth Speed Course Latest fish mark Fish mark Fish estimate mark no Fish estimate mark Fish estimate mark data North mark Current tide mark Range mark and audio bea...

Страница 33: ...ting 4 Click H2 Display 5 Click the desired option 6 Click Quit on the setting box to close the box 7 Long push the MENU ESC key to close all menus Note Range tilt angle gain and program keys can be adjusted separately for each horizontal display Quit Display Setting Mode Selection Mode Key Echo Display Area Within Range H2 Display Landscape 2nd Monitor Setting Portrait V Scan Aspect Ratio Fixed V...

Страница 34: ... in yellow then roll the scrollwheel Note 2 In the target lock function the range is automatically changed according to target position if Tilt Interlock on the Target Lock menu is selected to Tilt Range 2 4 Tilt Angle The tilt angle shows the direction to which the sound wave is emitted When the sound wave is emitted horizontally the tilt angle is said to be 0 and when vertically 90 The tilt angl...

Страница 35: ...al mode 2 4 2 Automatic tilt The AUTO TILT key automatically scans the tilt angle within the selected width This is useful when you want to find the center depth of a school of fish Wide tilt angle is activated from the Auto Tilt on the Others Display Setting menu 1 Press the AUTO TILT key to select auto tilt angle desired Each time the key is pressed the auto tilt angle changes in the following s...

Страница 36: ...0 This tilt angle will display the entire bottom since it is captured by the full width of the beam The school of fish is obscured by the bottom Case 2 Tilt angle 10 to 20 This tilt angle will only display half the bottom since it is captured by only the lower half of the beam The school of fish is located above the bottom Case 3 Tilt angle 0 to 5 This tilt angle may or may not capture the bottom ...

Страница 37: ...et to 0 the centerline is parallel with the sea surface and one half of the emitted sound goes upward toward the sea surface This causes one half of the emitted sound to be reflected toward the transducer and displayed on the screen as sea surface reflections When the sea is calm since the sound is reflected just like a light hitting a mirror at a low incident angle it prop agates away and the sea...

Страница 38: ... be shown in latitude and longitude For further de tails see page 6 12 Note 2 The bearing display is available in four formats See page 6 12 Vertical width of sonar beam Depth m Tilt angle setting relationship between tilt angle and detection range Tilt 0 0 5 Tilt 5 0 10 5 Tilt 15 9 5 20 5 Tilt 15 4 5 15 5 In grey Range m 100 200 200 400 300 600 400 800 20 40 40 80 60 120 80 160 100 200 200 400 10...

Страница 39: ...ayed in the similar intensities irrespec tive of the ranges to them 2 6 1 Change sensitivity of TVG curve Four TVG curves are available and they vary the gain from large to small 1 Press the MENU ESC key to open the main menu 2 Click Gain Setting 3 Press the H V S key to select the H1 or H2 tab 4 Select TVG Curve 5 Click S or T to select a suitable Log value The smaller the number the gentler the ...

Страница 40: ...ing 5 does not correct the gain Use a setting lower than 4 to lower the gain or use a setting higher than 5 to raise the gain 9 Click Quit on the setting box 10 Long push the MENU ESC key to close all menus Note When a school of fish is located on a long range setting about 800 meters and is approaching own ship do as follows 1 Adjust the tilt to keep the school of fish in the center of the sonar ...

Страница 41: ... 2 Click Gain Setting 3 Press the H V S key to select the H1 or H2 4 Click AGC Distance to show the setting box 5 Click S or T to change the setting The setting range is 20 5000 m in 20 m increments 6 Click Quit on the setting box to close the box 7 Click AGC Near or AGC Far to show the setting box AGC Near Suppress gain in area closer than the AGC Distance setting AGC Far Suppress gain in area th...

Страница 42: ... on the setting box to close the box 7 Long push the MENU ESC key to close all menus 2 7 3 How to suppress unwanted echoes This sonar s noise suppressor removes weak echoes such as sea surface reflections plankton weak echoes from distant bottom echoes and screw noise from other ships Because the noise suppressor does not work against strong echoes it is useful for detecting schools of fish Screw ...

Страница 43: ...x power instead of turning down the gain The pic ture becomes clearer when the output power is reduced rather than when the gain is decreased as illustrated below 1 Press the MENU ESC key to show the main menu 2 Click TX RX Setting 3 Press the H V S key to select the H1 or H2 tab 4 Click TX Power 5 Click S or T to change the setting The setting range is 0 to 9 The higher the setting the greater th...

Страница 44: ...se is speed dependent If neither of the above two steps has effect on the picture adjust one of the following 2 9 2 Change TX interval When other sonars nearby are oper ating the same transmission interval as that of own ship s sonar rings of interference appears on the display To remove the rings from the screen do the following 1 Press the MENU ESC key to show the main menu 2 Click TX RX Setting...

Страница 45: ...ion in ascending strength is 2 1 3 0 disables the interference rejector Int Reject ES Use this item to suppress interference from other acoustic sounding equipment The degree of rejection in ascending strength is 1 2 3 0 disables the interference rejector 6 Click Quit on the setting box to close the box 7 Long push the MENU ESC key to close all menus 2 9 4 Shift TX frequency If the interference ca...

Страница 46: ...key to show the main menu 2 Click Display Setting 3 Press H V S key to select the H1 or H2 tab 4 Click Noise Limiter 5 Click S or T to change setting The setting range is 0 to 10 The higher the setting the greater the degree of the suppres sion 6 Click Quit to close the box 7 Long push the MENU ESC key to close all menus Display Setting Quit 2 P1 H 1 P1 H V P1 H Scan Color1 Setting H Scan Color Cu...

Страница 47: ...ins on the screen longer as the setting is increased 2 9 8 2nd echo rejection A target that is farther than the repetition interval of transmission may appear as a vir tual image on the screen one time later This is called secondary echo Reflections from tracks are so strong that secondary echoes appear easily To remove secondary echoes set 2nd Echo Rej located on the H1 tab of the Picture Setting...

Страница 48: ... shown on the applicable display The target lock mark does not appear on the displays where it can not be inscribed 2 11 1 How to select the target lock mode Note that the target lock mode cannot be changed while the target lock mode is dis played 1 Press the MENU ESC key to show the main menu 2 Click Others 3 Click Initial Setting 4 Click Changeable 5 Click Target Lock Vector Length Speed of move...

Страница 49: ...ET LOCK key The target lock mark with vector is put on the school of fish The color of the mark is initially red and turns white when the echo is recognized as a school of fish The vector shows the speed and direction of movement of the school of fish The tip of the vector is the estimated position of the school of fish when the vector time elapses The target lock mark appears on the vertical disp...

Страница 50: ...e section 4 1 Off disables the histogram display and fish information for estimate mark 1 Estimate Mark displays the histogram display for estimate mark 1 Est Fish Info displays the histogram display and fish information for estimate mark 1 Tracking Data Selects which target lock tracking data to use horizontal or both hor izontal and vertical Threshold Selects the minimum signal level to use in t...

Страница 51: ...t the top of the screen Own ship posi tion is fixed at the screen center and own ship mark pivots with ship s movement Echoes from fish and the bottom move on the screen relative to own ship s movement Course up The display is oriented according to course Own ship position is fixed at the screen center Echoes from fish and the bottom move on the screen relative to own ship s movement Targets are d...

Страница 52: ... fish and bottom through the external speaker 2 13 1 How to set the bearing In the default setting the audio function is on and the audio sector is 30 1 Operate the trackball to place the cursor on the direction you want to monitor through the speaker 2 Press the R B AUDIO key The monitoring section is set on the bearing selected in a 30 60 90 180 or 330 sector centering the audio bearing mark Ech...

Страница 53: ...NU ESC key to show the main menu 2 Click Others 3 Click Alarm Audio 4 Click Audio Sector 5 Click desired sector 6 Click Quit on the setting box to close the box 7 Long push the MENU ESC key to close all menus Quit Alarm Audio Fish Alarm ON Alarm Level Alarm Zone Ship SPD Alarm ON Audio ON Audio Volume Audio Sector 30 Reverberation 0 Quit Cancel 30 60 90 180 330 ...

Страница 54: ...ect Off at step 2 to stop the training 2 13 4 Reverberation for audio signal You may select the length of reverberation of the audio signal with Reverberation on the Alarm Audio menu The larger the value the longer the reverberation which makes it easier to hear the audio signal The setting range is 0 to 9 and the default setting is 0 2 14 Fish Alarm The fish alarm sounds the aural alarm when a fi...

Страница 55: ...Note 1 There must be at least 3 difference between the starting and ending points to get a fan shaped alarm zone as shown in a and b below Otherwise the unit paints a 360 alarm zone as in c where there is less than 3 between the starting and ending points Alarm Zone Move trackball cursor to origin of alarm zone and left click Press R B key or right click to cancel Alarm Zone Move cursor to the end...

Страница 56: ...U ESC key to show the main menu 2 Click Others 3 Click Alarm Audio 4 Click Fish Alarm Level 5 Click the weakest color that is to trigger the fish alarm Echoes equal to or stronger than the color selected will trigger the fish alarm 6 Click Quit on the setting box to close the box 7 Long push the MENU ESC key to close all menus Quit Cancel ...

Страница 57: ... to compare with the fish estimate mark You can get an estimate of the volume of two schools of fish by using the two ESTI MATE keys as follows 1 Operate the trackball to place the cursor on a school of fish and then press the ESTIMATE 1 key The estimate mark 1 appears on the school of fish Relative volume is shown by a figure between 0 and 100 below the estimate mark When the area inside the mark...

Страница 58: ...on top of the other as below The horizontal axis shows signal strength in 16 colors and the vertical axis shows the concentration of a school of fish inside the fish estimate mark For the fish estimate mark inscribed on the horizontal display the graph shows the average movement in five scans to increase accuracy Note The histogram display is redrawn five transmissions after a fish estimate mark i...

Страница 59: ...h in the circle cursor to estimate correctly The diameter of the circle cursor is displayed below the circle cursor Note The last digit is rounded of when the diameter is greater than 100 m 4 Place the circle cursor on another school of fish to estimate the volume You can compare the volume of two schools of fish with the diameter of the school of fish 5 Right click to quit the measurement The cir...

Страница 60: ...and any earlier fish marks are shown with an X The distance between the two fish marks and speed course and bearing of the school of fish appear at the bottom right hand corner of the horizontal display ar ea Note 1 The time and distance between each press of the FISH key should be as long as possible to increase accuracy of measurement For best results repeat the procedure two or three times Note...

Страница 61: ...LETE MARK key to delete the fish mark How to delete fish marks from the menu 1 Push the right button on the numeric graphic data display to show the pop up menu 2 Click Erase Marks 3 Click Fish Mark Each click deletes the earliest fish mark 4 Long push the MENU ESC key to close all menus Note The default function of the F5 key deletes the earliest fish mark twice three times four times FISH key pr...

Страница 62: ...ark 1 can also be entered by pushing the right button With speed and heading data the mark follows own ship s movements In the True Mo tion mode the event mark is stationary When the tilt angle is changed the present depth to event mark changes Note however that the mark s position does not change when automatic tilt is active the tilt center angle is used to position the mark Plotting an event ma...

Страница 63: ...ete the mark Delete an event mark own ship position mark from the menu 1 Push the right button on the numeric graphic data display to show the pop up menu 2 Click Erase Marks 3 Click Event Mark1 Event Mark2 or Own Ship Pos Mark Each click deletes the oldest event mark or own ship mark 4 Long push the MENU ESC key to close all menus Note The default function of the F3 for event mark 1 F4 for event ...

Страница 64: ...ain menu 2 Click Others 3 Click the Display Setting 4 Click the Net Course Mark 5 Use the trackball to position the net course mark which is shown by a dashed cir cle 6 Push the left button to set and the dashed circle changes to a solid one 7 Long push the MENU ESC key to close all menus Note 1 To delete the net course mark select Delete at step 4 Note 2 The default function of the F9 key deletes...

Страница 65: ...on throwing the net into the water The following ac tions occur 2 To erase the net sonde mark and associated data press the SHOOT key again Note To turn the current mark on off see page 6 13 Net shoot mark appears at own ship position Net shoot data appears at top of the display Net sonde mark is inscribed Net depth data is displayed 1 2 Net sonde data Net shoot data Net shoot mark Net depth Range...

Страница 66: ...ay be erased in order of strength The setting range is 0 to 31 0 corresponds to the weakest color Color Selects color arrangement to use The default setting is Color 1 to 4 Color Response Defines reflected echo strength versus color level conversion You can select one of four color response tables Display Setting Quit H1 P1 H2 P1 V P1 H Scan Color1 Setting H Scan Color Curve1 Setting Noise Limiter...

Страница 67: ...color from COL or Custom colors 3 Click Quit 4 Repeat steps 1 through 3 to set other colors 5 Click the Apply button Note To restore default color setting select Default on the window then push the left button Select with trackball H Scan Color1 Setting Default Cancel Apply COL Default colors Custom colors Color s created with Add Color Edit Colors12 Quit COL Custom colors OK Cancel Define Custom ...

Страница 68: ...ethod Setting method 1 Place the trackball at the point desired then push the left button On the horizontal axis input level relative value is shown in the range from 0 to 100 The setting range for input level is 0 100 in increments of 10 and output level is 0 100 in any value The input horizontal axis has 16 settable points and the output vertical axis can be set anywhere Setting method 2 Place t...

Страница 69: ... Copy the color 1 4 and color curve 1 4 set at tab H1 to the corre sponding items on the H2 and V tabs In order to copy color data from the H1 tab the color and color curve settings between the H1 and H2 or V tabs must be identical For example if the H2 tab s color setting is 2 and its color curve is 2 the same settings must be set on the H1 tab Cancel Cancel setting Apply Apply setting H Scan Col...

Страница 70: ...ndition on the display the skipper can prevent net damage A Flat bottom Tilt angle 10 to 15 B Flat bottom Tilt angle 20 or more C Sloping bottom Tilt angle 20 or more Bottom Shallow bottom is displayed in a strong color and with a short tail Bottom is displayed narrower and in stronger colors when compared to A Bottom echo The bottom echo is cap tured by the entire beam The bottom echo in the fore...

Страница 71: ...er bottom fish Tilt angle 30 or more Fish echo which appears before bottom can be detected Tilt angle 0 to 20 Fish echo which appears together with or after bottom can be detected Bottom Sea surface reflections School of fish Bottom echo not displayed because of decreased tilt angle Sea surface reflections are present Bottom When the tilt angle is shallow the reflection echo from bottom is weak an...

Страница 72: ... by own ship or another ship can be a strong reflecting object when a decreased tilt angle is used As the wake appears as a thick continuous line it can be easily distinguished from a school of fish A wake contains many air bubbles which attenuate ultrasonic energy making it difficult to sound beyond the wake Sea surface Sea surface 10 Tilt angle indication Sea surface reflections Tilt 0 Tilt 4 5 ...

Страница 73: ...d on other boats will show itself on the display as in A in the figure below This interference can be suppressed by changing the TX interval with TX Interval on the H Scan Setting menu Noise from marine life shows itself on the displays as in B in the figure below This type of noise can be suppressed with the interference rejector on the Picture Setting menu School of fish Bottom Ring of interfere...

Страница 74: ...2 HORIZONTAL MODE 2 44 This page is intentionally left blank ...

Страница 75: ...al or vertical to adjust gain and range 8 Adjust gain 4 Adjust postion of vertical bearing mark 1 Turn on power 5 Press appropriate key 2 Lower transducer Full protrusion Mid protrusion key programmed to Fixed Position Transducer stops at mid protrusion position Mid protrusion key programmed to Any Position Transducer stops at desired position DOWN STOP ...

Страница 76: ...age 3 3 If both vertical displays are activated 1 or 2 is inscribed at the tip of a vertical bearing marker Note 1 The vertical bearing can also adjusted from the range indication Put the cur sor on the vertical bearing indication to highlight it in yellow then roll the scrollwheel Note 2 The TILT control functions as a bearing setting lever for the vertical display1 in the conditions mentioned be...

Страница 77: ...eft to right Vertical Bearing V Range R Gain G User program number P Tilt angle mark Detection aspect in vertical direction at horizontal display Range scale Target lock mark Entered on horizontal display Vertical bearing mark Cursor position reference mark Trackball data Slant range Horizontal range Vertical range Angle to cursor from horizontal Vertical display 1 Trackball mark cursor 1000 R 200...

Страница 78: ...g on the menu See page 6 3 The tilt mark is a solid and dashed line which shows in the vertical display the tilt angle set on the horizontal display The meaning of the solid and dashed lines are as shown in the table below Gain See section 1 8 Vertical bearing See paragraph 3 2 2 User program See section 5 3 Display range See section 3 5 Auto train See section 3 4 Solid line Dash Vertical bearing ...

Страница 79: ...sector of 12 24 and 36 Press and hold down the AUTO TRAIN key while pressing the V1 S or V2 key to select the auto train sector desired Selected sector appears in large characters for five seconds for your confirmation To cancel auto train repeat the above procedure to select OFF Note If both the auto train and the target lock are active in a vertical mode the follow ing restrictions apply V1 mode...

Страница 80: ...or on the range indication to highlight it in yellow then roll the scrollwheel 3 6 How to Measure the Range Bearing to a Target Operate the trackball to place the cursor on the vertical 1 or vertical 2 display The range to the location selected is shown at the top left corner Note To show the cursor position in L L see page 6 12 Range No 1 2 3 4 5 6 7 8 Detection range 200 400 600 1000 1600 2000 3...

Страница 81: ...played in the similar intensities irrespective of the ranges to them 3 7 1 Change sensitivity of TVG curve Four TVG curves are available and they vary the gain from large to small 1 Press the MENU ESC key to open the main menu 2 Click Gain Setting 3 Press the H V S key to select the V tab 4 Click TVG Curve 5 Click S or T to select a suitable Log value The smaller the number the gentler the gain ch...

Страница 82: ... box 10 Long push the MENU ESC key to close all menus 3 8 How to Adjust Strong Weak Echoes 3 8 1 AGC Near AGC Far AGC Distance The AGC function automatically reduces the receiver gain only against strong echoes such as the bottom or a large school of fish Since the AGC function does not affect weak echoes a small school of fish becomes easier to detect The FSV 25 has three types of AGC settings AG...

Страница 83: ...idwater fish in which bottom reflections are not so strong use the longest pulse length 9 1 Press the MENU ESC key to show the main menu 2 Click TX RX Setting 3 Press the H V S key to select the V tab 4 Click TX Pulse Length 5 Click S or T to change the setting The setting range is 0 9 The higher the setting the longer the pulse length 6 Click Quit on the setting box to close the box 7 Long push t...

Страница 84: ...hat noise is just eliminated Do not use an unnecessarily high setting since it may also reject small wanted echoes 1 Press the MENU ESC key to show the main menu 2 Click Picture Setting 3 Press the H V S key to select the V tab 4 Click Int Reject or Int Reject ES Int Reject Use this item to sup press sea surface reflections and sea surface reflections Int Reject ES Use this item to suppress interf...

Страница 85: ...is dirty plankton layers exists or due to ship s noise The noise limiter can reduce the effects of these unwanted reflections Raising the setting causes unwanted reflections to be displayed in colors of blue to background color 1 Press the MENU ESC key to show the main menu 2 Click Display Setting 3 Press the H V S key to select the V tab Display Setting Quit 2 P1 H 1 P1 H V Scan Color1 Setting V ...

Страница 86: ...gnal remains on the screen This feature can be useful for watching echo movement The setting range is 0 to 11 Setting between 1 and 7 Echoes are gradually displayed and afterglow remains on the screen longer as the setting is increased Setting between 8 and 11 Echoes are quickly displayed and afterglow remains on the screen longer as the setting is increased 3 10 How to Adjust Beam Width The width...

Страница 87: ...ponds to the weakest color Color Select color arrangement to use V Scan Color 1 2 to 4 Setting Customizes colors For details see page 2 37 V Scan Color Curve Setting Adjusts reflected echo strength versus echo color lev el for currently selected color response number To adjust the curve see page 2 37 Display Setting Quit 2 P1 H 1 P1 H V Scan Color1 Setting V Scan Color Curve1 Setting Noise Limiter...

Страница 88: ...to 5 The higher the setting the greater the smoothing Smooth Echo CIR Selects echo smoothing level in the circular direction The set ting range is 0 to 4 The higher the setting the greater the smoothing Picture Setting Quit H1 P1 H2 P1 V P1 Echo Average 3 Int Reject 2 Int Reject ES 2 Smooth Echo RNG 2 Smooth Echo CIR 0 2nd Echo Rej 0 ...

Страница 89: ...P 8 12 10 0 10 20MIN Heading Course Speed Navigator type in brackets DGPS Differrential GPS KGPS Kinematic GPS FGPS Floating GPS GPS GPS LC Loran C DR Dead Reckoniong Position error Water current speed and direction for three layers Net sonde depth data Also available in graph Fish histogram See section 2 16 Water temperature Water temperature graph Position format 32 52 150N 132 12 150E Depth Req...

Страница 90: ...si tion data is lost the last entered position is shown in red Lat 90 00 000S to 90 00 000N Lon 179 59 999W to 179 59 999E 180 00 00 0 00 000 Lat Lon Position sensor The position sensor type is displayed in brackets When the posi tion sensor is not connected the brackets are left blank DGPS KGPS FGPS GPS LC DR Note is dis played when the posi tioning error occurs GPS Loran C DR AUTO System menu De...

Страница 91: ...ime 20 min 1h 6h 12h 24h Vertical axis Temp 4 C 8 F fixed width auto shift C F Data Display menu Info on school of fish Shows informa tion about school of fish during target lock operation Length Distance to school of fish in range direction Width Distance to school of fish in bearing direction Height Vertical distance Dimensions Horizontal dimension of school of fish Volume Estimated volume of sc...

Страница 92: ...4 NUMERIC GRAPHIC DATA DISPLAY 4 4 This page is intentionally left blank ...

Страница 93: ...menu tree on page AP 1 to AP 5 for items which can be pro grammed 1 Push the right button on the numeric graphic data display to show the pop up menu 2 Click Wheel Setting User menu items User menu items Item programmed to tab H1 H2 for H2 tab V for V tab Menu Quit TX RX Setting Gain Setting Display Setting Picture Setting Others Shortcut Menu Menu Quit TX RX Setting Gain Setting Display Setting P...

Страница 94: ...y to close this message 5 Long push the MENU ESC key to close all menus 5 1 2 How to remove items from the user menu You can remove items from the user menu 1 Press the MENU ESC key to open the main menu 2 Click T Shortcut Menu 3 Click the item to delete then push the left button more than three seconds The message window shown below appears 4 Click Remove to delete 5 Long push the MENU ESC key to...

Страница 95: ...ich can be programmed for function keys Note 2 Some menu items are shown in red This means these items are locked to prevent accidental change of setting see page 1 15 However these items can be programmed to the function key the confirmation message does not appear when you execute a program with the function key 1 Press the MENU ESC key to open the menu and select de sired menu item When you wan...

Страница 96: ...ograms 1 Press the MENU ESC key to open the main menu 2 Click Others 3 Click Register Replace the function to new setting Press the key again to proceed Function Key Registration Registration completed Function Key Registration Menu item Timer indication TX RX Setting Quit H1 P1 H2 P1 V P1 TX Interval 9 TX Pulse Length 9 TX Power 9 Reverberation 0 Freq Shift 0 Hor Beam Wid 4 Ver Beam Wid 4 F1 Regi...

Страница 97: ...menu 2 Click Others 3 Click Register 4 Click Clear F KEY Setting Record Still Image Event Mark1 Fish Mark Ship s Track Net Course Mark F1 F3 F5 F7 F9 Play Still Image Event Mark2 Own Ship Pos Mark Stabilization Gain Knob Setting F2 F4 F6 F8 F10 Confirm Register Quit Display Mode Sel User Prog H V Individual Assign User Prog Assign User Prog H Assign User Prog V F KEY List Clear F KEY Setting H Sca...

Страница 98: ...e default setting of the F1 to F4 key is the same as those on the control unit To change a setting do as follows 1 Press the F8 F9 and F10 keys in order while pressing the MENU ESC key to ac tivate the program registration mode on the remote controller 2 Press the MENU ESC key to close the menu 3 Press and hold down the applicable key on the control unit and then press a func tion key on the remot...

Страница 99: ...lso be adjusted from the user program no indica tion 5 3 2 How to program the USER PROG control 1 Set the display appropriately When a combination mode is shown press H V S key to select the display to pro gram 2 Press the MENU ESC key to show the main menu 3 Click Others 4 Click Register H V Interlock Effective on both H and V displays H V Individual Select the display to use with the H V S key 1...

Страница 100: ...Changeable One of the following displays appears depending on your se lection 7 Click a program no 8 Click Quit on the setting box to close the box 9 Long push the MENU ESC key to close all menus User Prog H Assign User Prog User Prog V Quit Cancel P1 H P2 H P3 H P4 H P5 H P6 H P7 H P8 H P9 H P10 H Quit Cancel P1 V P2 V P3 V P4 V P5 V P6 V P7 V P8 V P9 V P10 V Quit Cancel P1 P2 P3 P4 P5 P6 P7 P8 P...

Страница 101: ... ship s track approximately 10 of the track is erased with each push of the left button 3 To continue erasing marks push the left button 4 Long push the MENU ESC key to close all menus Note The default function of the F3 for event mark 1 F4 for event mark 2 F5 fish mark and F6 for own ship position keys delete the oldest event mark fish mark own ship mark The default function of the F7 key erases ...

Страница 102: ... menu can be also opened from the pop up menu 2 Click H Mode or V Mode 3 Click the function to assign to the scrollwheel 4 Click Quit on the setting box to close the box 5 Click Wheel 6 Select Forward or Reverse as required Normal Upward scrolling decreases value downward scrolling increases val ue Reverse Reverse results of Forward 7 Click Quit on the setting box to close the box 8 Long push the ...

Страница 103: ... horizontal to vertical ratio to use on the V display Fixed or Flexible V Scan Dpt Rng Sets the ratio to reduce the display range of the depth direc tion in the vertical display The setting range is 20 100 Adjustment is disabled grayed out in menu when V Scan Aspect Ratio is set to Fixed Presentation Mode Selects the presentation mode Head up North up Course up and true motion requires ship s spee...

Страница 104: ...sted in increments of 0 2 0 5 Gain is adjusted in increments of 0 5 Auto Tilt Selects the auto tilt angle Wide 2 to 10 4 to 16 6 to 20 or Narrow 1 to 4 2 to 6 3 to 8 Net Course Mark Inscribes deletes the net course mark For details see section 2 20 Dimmer Adjusts the backlighting setting 0 7 for the keys on the control unit Key Beep Volume Sets the volume of the beep which sounds for key operation...

Страница 105: ...how this menu open the main menu then click Others and Alarm Audio in suc cession Fish Alarm Turns the fish alarm function on or off The default setting is OFF Alarm Level Sets the minimum echo color which triggers the fish alarm Alarm Zone Sets fish alarm zone For details see section 2 14 Ship SPD Alarm The default setting is ON The alarm is released if ship s speed exceeds the following speeds A...

Страница 106: ...Clear F KEY Setting Erases program assigned to a function key H Scan Range Presets the horizontal mode ranges as selected with the RANGE control The setting range is 60 to 5000 m V Scan Range Presets the vertical scan ranges as selected with the RANGE con trol The setting range is the same as that for H Scan Range Register Quit Display Mode Sel User Prog H V Individual Assign User Prog Assign User...

Страница 107: ... Select Initial Setting then push the left button 4 Select Changeable then push the left button For Target Lock and Test see page 2 18 and page 8 11 respectively Note Alpha blending technology is used for transparency effects Remote BOX LED Turns ON OFF the LED of the remote controller option For serviceman Quit Initial Setting Language English Remote BOX LED ON Menu Box Transp OFF TVG Monitor Tra...

Страница 108: ... in the combination dis play mode Monitor Resolution Selects the monitor resolution among Auto SXGA UX GA WUXGA Reset the power to apply setting The vertical size and display position are changed If necessary adjust the display Data Box menu The Data Box menu sets the readout format for the marks on the display Click Data Box on the Initial Setting menu to show the Box menu This menu is also shown...

Страница 109: ...erval See Range Ring Interval on page 6 11 Bearing Scale The bearing scale is the concentric solid circle at the edge of the display It provides an estimate of the bearing to a target The scale can be turned on or off and its degree of division selected Coarse Puts a division mark every 10 and has no numer ic indication Fine Puts a division mark every 1 and has numeric indi cation every 10 Own Shi...

Страница 110: ...rack Plot Traces target movement in target lock Requires speed and course data EVENT Key Selects the key to enter the own ship s posi tion mark Event key Shoot key Histogram Disp Shows signal strength distribution for the school s of fish marked with an estimate mark on the horizontal display Mark Color Selects the color of the event fish school and fish estimate marks Settings White Light blue Bl...

Страница 111: ...You may show the net shoot mark in normal large or small size Estimate On Scan Selects the size of the fish estimate mark on the horizontal dis play for small or large Current Vector The length of the current vector may be set to short long short thick or long thick Range Ring Interval Selects the range ring interval 1 4R Ring interval is 1 4 of the detection range 1 2R Ring interval is 1 4 of the...

Страница 112: ... port direction xxx 1 to 180 Heading sen sor is required to set to 360 True 32 CMPS shows bearing with alphabet indication for example N N E NNE NE N etc Current Data Selects how to display tidal current data 32 CMPS 32 compass points 360 True true bearing 360 360 Relative 180 180 Relative Event Mark Selects how to display event mark data 32 CMPS 32 compass points 360 True true bearing 360 360 Rel...

Страница 113: ... the current mark on the net shoot mark Current Flow Dir Selects how to display current data FROM shows from what di rection the current is flowing TO shows the direction the current is heading Requires connection of a current indicator Wind Selects wind display OFF relative wind data or true wind data Select Water Current Selects the water current layer s to use Layer 1 to Layer 5 You can select ...

Страница 114: ...0 m The minimum value changes according to Number of XMTR and XMTR Distance Depth Display Selects which sonde depth data to show a shown in the right figure Select this item and push the left button to select net sondes The check mark shows current selection Max 3 Display Style Selects the display format of the net depth Nu meric or Graph Depth Graph Range Sets the depth range of the SONDE graph T...

Страница 115: ...ference among layers consider ing net sea conditions etc If 50 is set for example the net movement plot mark moves at speed of 50 of water current speed Stabilization menu The Stabilization menu compensates for the affects of pitching and rolling Click Sta bilization on Initial Setting menu to show the Stabilization menu Requires a motion sensor Stabilization Turns stabilization on off Note The de...

Страница 116: ...te 1 The settings for Save Ship s Org are not affected when default settings are restored Note 2 The transducer position setting is also set to default and the message UNREGISTERED appears See the Installation Manual for how to enter transducer position Item Attribution Locks unlocks protected menu settings Asterisk marked items on this page and Ship Speed in the Alarm Audio menu cannot be adjuste...

Страница 117: ...ce on the Destination To Save window Note The capacity of the D drive may be changed 5 Specify the location where to save the still image from the pull down menu D drive saves a still image to a folder whose name is automatically given the cur rent data yyyy mm dd 6 Click the OK button 7 Long push the MENU ESC key to close all menus Quit Record Recall Still Image Motion Image Setting File Delete D...

Страница 118: ... pushed is shown on the display preview If you checked the box for Insert Comments the software keyboard appears If you did not check the box for Insert Comments the preview disappears after four seconds 6 Click the character or symbol to enter the comment max 20 characters or sym bols 7 Click Enter to close the software keyboard and the still image preview 8 Click Quit on the Still Image window t...

Страница 119: ...iew Note 1 The default function of the F1 key saves the still image Note 2 You can select how long to show the preview display Contact your dealer for details Dual display Select the monitor on which to capture the still image 1 main monitor 2 sub monitor 1 Right click the numeric graphic data display to show the pop up menu 2 Click Record Recall 3 Click Still Image 4 Select the monitor on which t...

Страница 120: ...he pop up menu 2 Click Record Recall 3 Click Play Still Image The latest still image is shown on the display Note The window can be resized and moved by drag and drop Also you can zoom in out with the scrollwheel 4 Click Quit to close the window Note The default function of the F2 key displays the recalled still image window 2013_10_10_23_56_24 png Quit TX OFF Still Image Error Code Heading Ship C...

Страница 121: ...ge 1 Main monitor 2 Sub monitor 5 Click the button with a red circle to start the saving 6 Click the button with a red circle to stop the saving The file is saved to the location specified in section 7 1 The file name is automatically saved in the following for mat yyyy_mm_dd_hh_mm_ss avi Note When the size of the image is greater than 2GB the image is saved in divi sions of 2GB In this case the d...

Страница 122: ...rag drop operation Also you can change the window size Controls for stopping playback fast forwarding and so on are provided on the Re play Movie or Motion Image window Operation bar at the bottom of the Replay Movie window Shown only for program version no 105 0926 XX XX Motion Image window Monitor list File name list Motion Image Disk Info Monitor File Name 1 Quit Stop playback Fast forward No u...

Страница 123: ...ontrol 1 Right click the numeric graphic data display to show the pop up menu 2 Click the Record Recall 3 Click Setting File 4 Click Save The file name which appears in the File Name box is automatically assigned as shown below FSV25_yyyy_mm_dd_hh_mm_ss ini 5 Select where to saved the save data from the destination list 6 Click the Save button The progress bar advances as the saving progresses Af ...

Страница 124: ...ck Record Recall 3 Click Setting File 4 Click Load 5 Select the file to load 6 Check the scan mode H1 V2 V to which to load data 7 Click the Load button The progress bar shows the loading progress The Setting File menu appears when the saving is completed 8 Long press the MENU ESC key to close all menus Destination list FSV25_2011_10_10_18_24_01 ini Progress bar Load Local Disc D File Location Loa...

Страница 125: ... User Program to load list 7 Click the setting number to load on the User Program to set list 8 Check the scan mode H1 V2 V to which to load user program 9 Click the Load button The progress bar shows the loading progress The Setting File menu appears when the saving is completed 10 Long press the MENU ESC key to close all menus Progress bar User Program to load list Destination list User Program ...

Страница 126: ...e file to delete 5 Click the Delete button The message Are you sure to delete appears 6 Click the OK button The file selected at step 4 is deleted 7 Click the Cancel button to return to the Record Recall menu 8 Long press the MENU ESC key to close all menus 2011_10_10_17_21_00 jpg 2011_10_10_17_21_11 jpg FSV25_2011_10_10_18_24_01 ini Destination list Progress bar Delete Data Local Disc D File Loca...

Страница 127: ...t Clean if necessary Cleaning the cabinet of equipment Remove the dust or dirt from the equipment with a soft dry cloth Do not use chemical cleaners to clean the equipment because they can remove paint and markings WARNING NOTICE Do not apply paint anti corrosive sealant or contact spray to plastic parts or equipment coating Those items contain products that can damage plastic parts and equipment ...

Страница 128: ...es yearly See section 8 2 3 Replace gasket if water is leaking from the main shaft See section 8 2 2 Coat the drive shaft with Daphne Eponex Grease No 2 IDEMITSU KOSAN CO LTD 1 every six months Raise transducer and coat main shaft with Daphne Eponex Grease No 2 IDEMITSU KOSAN CO LTD 1 every six months Dry dock ship and clean transducer face yearly Apply single coat of SEATENDER 20 2 anti foulant t...

Страница 129: ... How to replace the gasket If water is leaking from the main shaft replace the gasket A spare gasket is provided on the cover of the main shaft 1 Unfasten four hex head bolts to remove two seal support plates 2 Cut and remove the gasket 3 Take the spare gasket from the cover of the main shaft cover and set it to the main shaft 4 Fasten the two seal support plates removed at step 1 Gear cover windo...

Страница 130: ...olts 4 Coat the holes for the hex head bolts with silicone seal ant CAUTION Replace the anti corrosion zinc plates year ly Corrosion may result allowing water leakage and or loss of transducer The clearance between the hull and the ground or deck must be more than 900 mm Hex head bolt Washer Seal support plate Main shaft cover MAIN SHAFT Spare gasket Anti corrosion zinc p plate Hex head bo olt Was...

Страница 131: ...ck the voltage regularly by doing the Operation Test on page 8 12 When the voltage is 2 9 V or less the error code 322 appears Have a qualified tech nician replace the battery Note 2 Dispose of the battery in accordance with local regulations Tape the and terminals of the battery before disposal to prevent short circuit which could cause a fire Unit Type Code No Remarks Processor unit FGBO1 250V 2...

Страница 132: ...ning ring on the track ball 45 2 Remove the retaining ring and ball 3 Clean the ball with a soft lint free cloth 4 Blow carefully into the ball cage to dislodge dust and lint Look for a build up of dirt on the metal rollers If dirty clean the rollers with a cotton swab moistened lightly with isopropyl rubbing alcohol 5 Make sure that fluff from the swab is not left on the rollers 6 Replace the bal...

Страница 133: ... of TVG is necessary after the gain is adjust ed Color is abnormal Brilliance setting too low Increase brightness of the monitor Cannot operate the equipment Application error Long push the power switch on the control unit approx 10 seconds to turn off the power Turn on the power and check function Picture contains noise Equipment not grounded properly Check equipment ground Power cable is too clo...

Страница 134: ... breaker s trip again have a qualified technician check the set ELECTRIC CHARGE RETRACT TRANSDUCER AND TURN OFF POWER PRESS R B KEY TO TURN OFF ALARM Meaning The B voltage of capacitors in the transceiver unit could not be charged to specified voltage within the prescribed time Remedy Silence the buzzer with the R B AUDIO key and turn off the power Have a qualified technician check the set OVER TE...

Страница 135: ...restore the ratchet wrench to enable raising lowering operations TD RECOVERED THE HALT CONDITION TD RECOVERED THE HALT CONDITION PRESS KEY IF SAFETY IS ENSURED PRESS THE R B KEY TO CLOSE THE WINDOW Meaning The emergency stop condition at the hull unit was released Remedy Silence the buzzer with the R B AUDIO key SHIP SPD ALARM TD IS KEPT EXTENDED MAX ALLOWABLE SPEED FOR EXTENDED TRANSDUCER IS XX X...

Страница 136: ...de number to your dealer 8 10 Status Messages Status messages appear at the screen center to alert the operator These are as be low Status messages and their meanings Not displayed when TX is OFF Error Code 003 006 108 Status message Meaning TX OFF Transmission turned off from the menu RAISE LOWER TEST Raise lower command received from the control unit in normal opera tion to manually test raise l...

Страница 137: ...ears in the test results for any test contact your dealer for advice 8 11 1 How to display the Test menu 1 Press the MENU ESC key to show the main menu 2 Click Others 3 Click Initial Setting 4 Click Changeable 5 Click Test Note The menu item TX turns transmission on or off Turn off transmission to iden tify the source of noise for example For technician Test Quit Operation Test Execute Board Test ...

Страница 138: ...lts OK Normal NG Error XX Version No BOARD TEST FSV 2503 TRCPU 0 105 0926 XX XX 105 0894 XX XX K O M O R K O M A R RAM OK DATA OK Press MENU ESC key to cancel INC TRX TEST OK PITCH 12 3 ROLL 2 5 PWR 12V 12 1V 0000000000 USB USB Monitor1 1280x1024 Monitor2 HDD PCI CPU Temperature 32 0 C BOARD Temperature 20 0 C CPU Fan Speed 4800rpm BATTERY 3 2V LAN MAC address FSV 2501 105 XXXX XX XX 105 XXXX XX X...

Страница 139: ...uit boards in the system Select Board Test from the Test menu to do this test For any NG contact your dealer for advice How to read the test results No Description 1 TRCPU board program no 2 TRX board program no OK Normal NG Error XX Version No Press MENU ESC key to cancel 㻮㻻㻭㻾㻰㻌㼀㻱㻿㼀 䐟 䐠 ...

Страница 140: ...ontrol one by one A control is normal if Clockwise rotation Positive value Counterclockwise rotation Negative value No rotation 0 Lever check Press the lever upward or downward Normal conditions are 1 for up ward and 2 for downward Trackball check Operate the trackball X Y coordinates of trackball position are dis played Normal conditions are as follows Rightward X positive Leftward X negative Upw...

Страница 141: ... system for proper rotation speed Select FAN MONITOR from the Test menu to do this test Press MENU ESC key to cancel Press MODE key to change test pattern BLACK RED BLUE GREEN Black WHITE FAN MONITOR HCTL Fan1_L Speed rpm Fan2_R Speed rpm TRCPU FanUnit_UpTRCPU Speed rpm FanUnit_L Speed rpm FanUnit_Mid Speed rpm FanUnit_ Bin Speed rpm FanUnit_UpTRX Speed rpm FanUnit_R Speed rpm FanUnit_PWR Speed rp...

Страница 142: ...hen the L SW_LED on the raise lower control box flashes the raise lower func tion may be abnormal Do the following steps to raise the transducer then contact your dealer When you can not check the LEDs go to step 2 2 Turn off the switchboard transceiver unit and hull unit from the ship s mains breaker To force a system shut down press and hold the POWER ON I switch for ap prox 10 seconds 3 Check i...

Страница 143: ...p 8 9 Turn on the system from the control unit 10 Press the key on the control unit to raise the transducer If the transducer cannot be raised the shaft may be bent In this case raise it manually with the ratchet wrench following the instructions in the next section RESET button Push RESET button Protection circuit activated Protection circuit deactivated normal Green when protection circuit is de...

Страница 144: ...Note Hold the ratchet wrench when releasing the brake to prevent the transduc er from falling 5 Turn the ratchet wrench clockwise to raise the transducer See d 6 After retracting the transducer into the tank set the release lever to the holder See e 7 Remove the ratchet wrench and return it to its holder Restore the motor brake to its normal position Note Be sure to return the ratchet wrench to it...

Страница 145: ...segment LEDs on the circuit board does not change If the main shaft lowers or the LED lighting pattern changes release the brake release push switch The drive shaft brake is abnormal check the drive shaft brake 5 Set the toggle switch to the ABRAKE side 6 Check that the Brake LED on the circuit board is lit The LED does not light when the drive shaft gear brake control circuit is abnormal If the L...

Страница 146: ...er toward you then push the lever upward 2 Use a radio pincers to remove two circlips from the brake release lever 3 Remove the brake release lever 4 Unfasten three bolts from the motor brake cover Brake release lever Motor Brake HULL UNIT Brake release lever circlip 2 pcs left right Motor brake cover Bolt 3 pcs ...

Страница 147: ...rs to remove two lock pins left right 6 Remove the motor brake cover 7 Unfasten two bolts left right to access the waterproofing gasket Remove the gasket 8 Loosen a set screw to remove the fan Lock pin 䋨2 pcs left right䋩 Waterproofing gasket Set screw Fan ...

Страница 148: ...to remove spacer gap adjustment shim bolt assy and fixing plate Note Be careful not to loose the gap adjustment shim 2 Reduce the amount of gap adjustment shims thickness of shim approx 0 2 mm then install the spacer gap adjustment shim bolt assy and fixing plate 3 Measure the gap The gap must be between 0 3 and 0 4 mm Confirm that the 0 3 mm leaf can be inserted but the 0 4 mm leaf cannot 12 Reas...

Страница 149: ...at step 2 is approx 0 65 mm do the following to reduce the gap If the 0 6 mm leaf can be inserted do steps 1 to 5 below 1 Check that the motor brake release lever is locked 2 Loosen hex nut 2 3 places so the gap between the moving core and fixed core is 0 15 to 0 3 mm 3 Tighten hex nut 1 3 places so the gap is 0 15 to 0 30 mm Confirm that the 0 2 mm leaf can be inserted but the 0 3 mm leaf cannot ...

Страница 150: ...8 MAINTENANCE TROUBLESHOOTING 8 24 Note Be sure the cover gas ket is correctly seated when fastening the drive shaft gear cover Cover gasket ...

Страница 151: ...Distance 20 5000 20m H1 H2 V U Yes F Yes Noise Suppress 0 0 10 0 2 0 H1 H2 V U Yes F Yes Noise Supp SHIP 0 0 10 0 0 0 H1 H2 V U Yes F Yes Display Setting U No F Yes Noise Limiter 0 10 0 H1 H2 V U Yes F Yes Signal Level 0 31 4 H1 H2 V U Yes F Yes Color Color 1 Color 2 Color 3 Color 4 H1 H2 V U Yes F Yes Color Response Color Curve 1 Color Curve 2 Color Curve 3 Color Curve 4 H1 H2 V U Yes F Yes Color...

Страница 152: ...F No Net Course Mark Execute Delete U No F Yes Dimmer 0 7 7 U Yes F Yes Key Beep Volume 0 7 5 U No F No Timer Display OFF ON U No F No Circle Cursor Diameter 10 5000 200 U No F Yes Alarm Audio U No F Yes Fish Alarm OFF ON U No F No Alarm Level U No F No Alarm Zone U No F No Ship SPD Alarm OFF ON U No F No Audio OFF ON U No F No Audio Volume U No F No Audio Sector 30 60 90 180 330 U No F No Reverbe...

Страница 153: ...istogram Disp OFF ON U No F No Mark Color White Light Blue Blue Yellow Purple Green U No F No TD Position Mark OFF ON U No F No Mark Size U No F Yes Trackball Mark Small Large U No F No Target Lock Mark Normal Small Large U No F No Target Vector Short Normal Long U No F No Event Mark Normal Large Small U No F No Fish Mark Normal Large Small U No F No Own Ship Pos Mark Normal Large Small U No F No ...

Страница 154: ... No F Yes Select Water Current Layer 1 Layer 5 Net SONDE Setting U No F Yes Number Of XMTR 0 10 3 U No F No XMTR Distance U No F No End Of Net To S1 0 1000m 400m U No F No S1 S2 0 1000m 400m U No F No S2 S3 0 1000m 400m U No F No S3 S4 0 1000m 400m U No F No S4 S5 0 1000m 400m U No F No S5 S6 0 1000m 400m U No F No S6 S7 0 1000m 400m U No F No S7 S8 0 1000m 400m U No F No S8 S9 0 1000m 400m U No F...

Страница 155: ...t 1000m2 25t 1000m2 U No F No Volume Setup 0 100t 1000m3 25t 1000m3 U Yes F No Stabilization U No F Yes Stabilization OFF ON U No F Yes Pitch Angle Cor 10 0 10 0 0 0 U No F No Roll Angle Cor 10 0 10 0 0 0 U No F No Reg TD Position Execute U No F No Test U No F Yes Operation Test Execute U No F No Board Test Execute U No F No Panel Test Execute U No F No Test Pattern Execute U No F No RX Test Execu...

Страница 156: ... reduce the gap then check again Check that the Brake LED on the circuit board is lit in red Check that the main shaft does not lower and the 7 segment LEDs on the circuit board does not change Check that the main shaft does not lower and the 7 segment LEDs on the circuit board does not change Check that the 0 7 mm leaf can be inserted at three places Check that the 0 3 mm leaf can be inserted at ...

Страница 157: ... m Basic range m Range m Off center OFF Off center ON Off center OFF Off center ON 60 0 60 0 96 2000 0 2000 0 3200 100 0 100 0 160 2500 0 2500 0 4000 150 0 150 0 240 3000 0 3000 0 4800 200 0 200 0 320 3500 0 3500 0 5600 300 0 300 0 480 4000 0 4000 0 6400 400 0 400 0 640 5000 0 5000 0 8000 500 0 500 0 800 6000 0 6000 0 9600 600 0 600 0 960 7000 0 7000 0 10000 800 0 800 0 1280 8000 0 8000 0 10000 10...

Страница 158: ...ownward 3 6 Vertical search range 0 to 60 downward 4 HULL UNIT 4 1 Raise lower period full projection FSV 253 1200 mm travel 12 s FSV 254 1600 mm travel 16 s 4 2 Ship s speed allowance Projection of transducer mm Stable Raise lower operation 1100 or less 20 kn 14 5 kn 1100 to 1300 18 kn 13 5 kn Over 1300 16 kn 12 kn 5 INTERFACE 5 1 Number of port IEC61162 1 2 3 ports NMEA0183 Ver1 5 2 0 3 0 CIF 2 ...

Страница 159: ... ENVIRONMENTAL CONDITIONS 7 1 Ambient temperature Processor unit 0 C to 45 C Hull unit 0 C to 35 C Others 0 C to 50 C 7 2 Relative humidity 93 or less at 40 C 7 3 Degree of protection Control unit IP22 panel IP20 chassis Processor unit Interface unit Remote control unit IP20 Transceiver unit Power supply unit Junction box IP22 Hull unit IPX2 Transducer IPX8 7 4 Vibration IEC 60945 Ed 4 8 UNIT COLO...

Страница 160: ...horizontal display 2 36 vertical display 3 13 E Echo average horizontal display 2 17 vertical display 3 12 Erase Marks menu 2 31 6 1 Error codes 8 10 ESTIMATE keys 2 27 EVENT key 2 32 Event mark deleting 2 33 entering 2 32 F Fan motor test 8 15 Fish alarm alarm level 2 26 6 5 setting 2 24 FISH key 2 30 Fish marks connecting 6 10 deleting 2 31 entering 2 30 measuring speed with 2 30 Frequency shift...

Страница 161: ...6 vertical display 3 13 Smoothing horizontal display 2 39 vertical display 3 14 Stabilization menu 6 15 Status messages 8 10 T Target lock dimensions 2 21 fish mode 2 19 fish track plot 6 10 mark interlock 2 20 mode selection 2 18 smoothing 2 20 target lock window 2 20 target mark mode 2 20 target speed limit 2 20 target speed update 2 20 threshold 2 20 tilt interlock 2 20 tracking data 2 20 volum...

Страница 162: ...3 10 4 10 5 10 8 and 10 9 incl Corr 1 2008 IEC 60945 Ed 3 0 1996 clauses 10 2 and 10 3 title and or number and date of issue of the standard s or other normative document s For assessment see EMC Test Report FLI 12 13 156 March 12 2014 prepared by Furuno Labotech International Co Ltd This declaration is issued according to the Directive 2014 30 EU of the European Parliament and of the Council of 2...

Отзывы: