background image

13

English

Before Operation

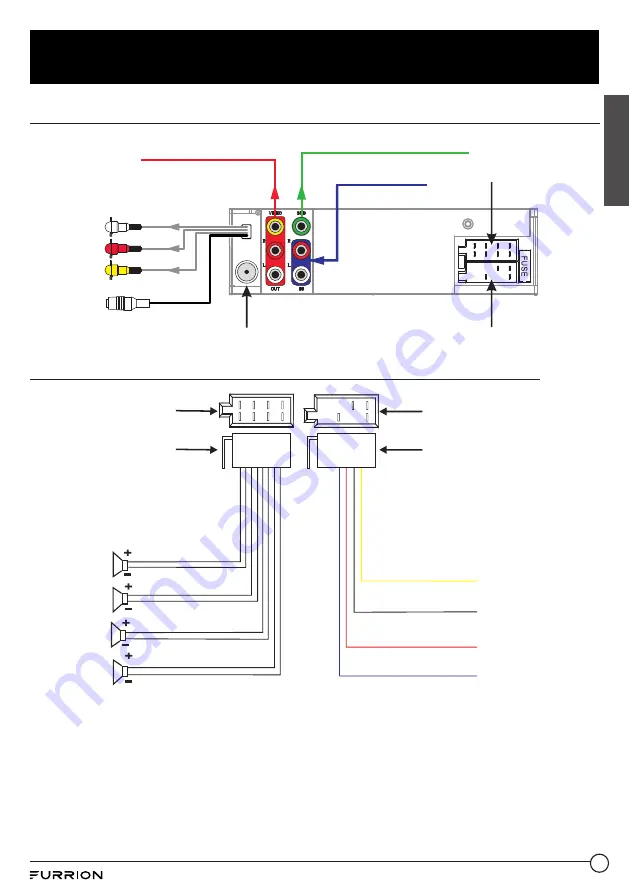
Wiring Diagram

WIRING SOCKET B

WIRING SOCKET A

SUBWOOFER OUTPUT

AV OUTPUT 1

AV OUTPUT 2

YELLOW VIDEO

RED R

WHITE L

BLACK

IR REMOTE JACK

ANTENNA JACK

AUDIO INPUT

The Description of the Wiring Diagram for Socket A and Socket B

WIRING SOCKET A

WIRING HARNESS A

LEFT (A)

SPEAKER

WHITE

YELLOW

MEMORY B+

GROUND

IGNITION SWITCH

AUTO ANTENNA

BLACK

RED

BLUE

GREY

GREEN

PURPLE

WHITE/BLACK

GREY/BLACK

GREEN/BLACK

PURPLE/BLACK

LEFT (B)

SPEAKER

RIGHT (A)
SPEAKER

RIGHT (B)
SPEAKER

WIRING SOCKET B

WIRING HARNESS B

Содержание DV3100S

Страница 1: ...Entertainment System Instruction Manual Model DV3100S Product picture is for reference only...

Страница 2: ...installation and maintenance of the product Please keep this instruction manual in a safe place for future reference This will ensure safe use and reduce the risk of injury Be sure to pass on this ma...

Страница 3: ...ormat 8 Functional Overview 9 Control Panel 9 Remote Control 10 Before Operation 13 Wiring Diagram 13 Mounting Installation 16 Prepare the Remote Control 17 Operation 18 Quick Reference Guide 18 Commo...

Страница 4: ...when you do not intend to use the unit for a prolonged period of time Before moving the unit remove the disc from the unit tray first 4 Do not open the cover or touch any of the components inside of...

Страница 5: ...te the receiving antenna Increase the separation between equipment and receiver Connect the equipment into an outlet on a circuit different from that to which the receiver is connected Consult the dea...

Страница 6: ...r antenna or transmitter All registered and unregistered trademarks are property of their respective owners Changes or modifications not expressly approved by the party responsible for compliance coul...

Страница 7: ...ock Avoid inserting foreign objects into the disc loading slot of the unit as this will cause malfunction Do not expose this unit to moisture or wet environments If condensation is present on the scre...

Страница 8: ...3 LPCM MPEG Audio MP1 MP2 MP3 720 x 480 30fps 720 x 576 30fps dat DAT MPEG 1 MPEG 2 Dolby Digital AC3 LPCM MPEG Audio MP1 MP2 MP3 720 x 480 30fps 720 x 576 30fps vob VOB MPEG 1 MPEG 2 Dolby Digital AC...

Страница 9: ...ct to the HDMI output socket on an AV device 7 Switch to the Bluetooth sound source 8 INPUT MODE Select the corresponding sound source AM FM DISC USB BT AV IN HDMI IN or AUX 9 Built in microphone 10 R...

Страница 10: ...29 30 31 1 Turn on the unit or switch to standby mode 2 Eject the loaded disc 3 DVD USB Switch to the DVD USB sound source 4 AM FM Switch to the AM FM sound source 5 SEL Select various system settings...

Страница 11: ...dness effect 20 STEP Play a DVD VCD frame by frame Accept or make a call 21 TITLE PBC Display the title list during DVD VCD playback Turn on off PBC PlayBack Control of a disc if available 22 SUBT RED...

Страница 12: ...E 2 Lights up when ZONE 2 speakers are selected 10 FOLDER Lights up when a connected USB storage device contains more than 2 folders with playable files 11 Lights up during disc or USB playback 12 Lig...

Страница 13: ...ACK ANTENNA JACK AUDIO INPUT The Description of the Wiring Diagram for Socket A and Socket B WIRING SOCKET A WIRING HARNESS A LEFT A SPEAKER WHITE YELLOW MEMORY B GROUND IGNITION SWITCH AUTO ANTENNA B...

Страница 14: ...r 3 Grey Right A Speaker 4 Grey Black Right A Speaker 5 White Left A Speaker 6 White Black Left A Speaker 7 Green Left B Speaker 8 Green Black Left B Speaker 1 3 5 7 4 6 8 2 Wiring Connecting Socket B...

Страница 15: ...15 Before Operation English WIRES FROM RV BOAT OR TRUCK POWER AND SPEAKER WIRES FROM STEREO CONNECTOR ANTENNA BLUE wire...

Страница 16: ...und the rear of the unit for cooling 3 Ensure when the stereo is mounted in the cut out that the wires at the rear of the unit are not pressed against the heat sink Installing the unit 1 Before finall...

Страница 17: ...arrow Fig 2 Fig 2 3 Replace the old battery with a new battery with polarity side upward Fig 3 4 Insert the battery holder to the original position in remote control Fig 3 side up Fig 3 Remote contro...

Страница 18: ...once or more directly or push the VOLUME knob on the front panel once or more to activate EQ mode and then rotate the VOLUME knob to select EQ CINEMA ROCK CLASSIC or FLAT The sound effect will change...

Страница 19: ...on the remote control or on the front panel to scan presets 1 6 on the current band LOC Press LOC on the remote control to turn on off the LOC local function Stereo mono In FM mode press on the remote...

Страница 20: ...AV IN HDMI Press this button on the remote control to scroll through the AV IN HDMI inputs available for the unit AV IN Connection on the rear of the unit to connect an external audio source HDMI Con...

Страница 21: ...select your desired radio region EUROPE USA1 USA2 or AUSTRALIA Select AM FM band In RADIO mode press and hold button on the front panel or briefly press on the remote control to select your desired ra...

Страница 22: ...s LOC on the remote control to turn on the LOC function and then re tune to the local stations if required Basic Disc USB Operation Start playback 1 Press to turn on the unit 2 Turn on the TV set from...

Страница 23: ...orward backward for MP3 only Select a chapter track from the root PBC menu if available For DVD 1 Press TITLE on the remote control to display the title list 2 Press the navigation buttons to select y...

Страница 24: ...ing VCD playback 3 During MP3 playback Press RPT to select REP ONE REP DIR REP ALL or OFF Repeat A B Use this function if you want to repeat a specific segment on a disc that you define 1 Press A B at...

Страница 25: ...for VCD MP3 CD discs Change the audio language When playing DVDs press AUDIO on the remote control once or more to select the desired language type if available When playing VCD discs press AUDIO on...

Страница 26: ...cted file or play the selected sort of files only In the root menu you can also use the number buttons to select a file for playback After selecting the JPEG file sort icon and entering the folder you...

Страница 27: ...ess to select a setup item on the selected setup page 4 Press to enter the setup item 5 Press to select an option for the setup item and then press OK to confirm Press to return to the upper level Pre...

Страница 28: ...ation buttons to select your desired rating level and then press OK to confirm Select PASSWORD again and then press to enter the setup item Input the password and then press OK to lock the new rating...

Страница 29: ...and right channels of signal It is mainly for Karaoke of Ac3 There are 4 modes in all STEREO MONO L MONO R MIX MONO About Parental Control Q After insertion of a DVD into the disc slot a dialogue box...

Страница 30: ...e world into 6 regions and allocated every region a code named the region code The region codes and the countries or areas represented by the region codes are as follows Region I America Canada East P...

Страница 31: ...one number You can press CLEAR to cancel a wrong input if necessary Press to call out 3 To redial a number Press to show the last dialed number on the LCD and call out 4 To accept a call When there is...

Страница 32: ...using 3 Do not expose the disc to direct sunlight or nearby heat sources such as caliduct or leave it in a car parked in direct sunlight where there can be a considerable rise in temperature 4 Put the...

Страница 33: ...picture but sound OK Ensure that the video output of the unit is in good connection with the TV s video input Ensure that you have turned your TV to the AV input channel connecting to the unit Check...

Страница 34: ...control and IR sensor Some function buttons do not work Turn off the power then turn on again Reset the unit then turn on again Remove the front panel from the unit then put it back and turn on again...

Страница 35: ...tion Video type 16 9 and 4 3 Video output level Composite 1 0 0 2Vp p Load impedance 75 ohms Horizontal resolution 600 Audio specification Audio output Analog audio 2 0 0 1 0Vrms Frequency response 20...

Страница 36: ...dependence Ct Elkhart IN 46514 USA Toll free 1 800 789 3341 Email support furrion com 2007 2020 Furrion Ltd Furrion and the Furrion logo are trademarks licensed for use by Furrion Ltd and registered i...

Отзывы: