background image

Connecting external devices

Connecting an external monitor

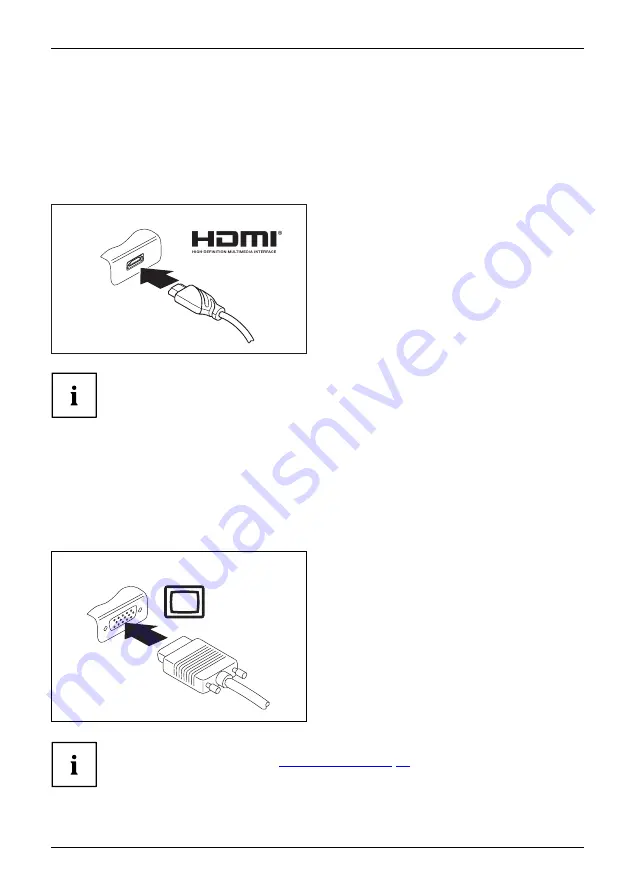
HDMI port (only performance docking cradle and
keyboard docking station)

HDMIport

The HDMI port can be used to connect an external ampli

fi

er, LCD TV or a

plasma TV with an HDMI connection.

Connect the data cable to the
external device.

Connect the data cable to the HDMI port.

Some LCD televisions have only two speakers/speaker ports and therefore
cannot reproduce Dolby Digital or DTS. To play back HDMI sound, you
must change the HDMI sound settings accordingly.

You can

fi

nd the settings under

Control Panel - Hardware and Sound

. Deactivate the

settings for DTS Audio and Dolby Digital to enable playback of HDMI sound.

External monitor port (VGA) (only performance docking
cradle and keyboard docking station)

An analog monitor is connected to the analog external monitor port (VGA). Screen output
is limited to a maximum of two screens at the same time.

Monitor

VGAport

Screenconnection

Monitorconnection

Switch off the Tablet PC and the
external monitor.

Plug the data cable of the external
monitor into the monitor port.

First switch on the external monitor and
then switch on the Tablet PC.

You can also switch back and forth between the external monitor and the LCD
screen of the Tablet PC, see

"Touchscreen", Page 24

.

You can display the same image on the external monitor and on the LCD
screen of the Tablet PC at the same time.

Fujitsu

69

Содержание STYLISTIC Q704

Страница 1: ...System Operating Manual FUJITSU Tablet STYLISTIC Q704 ...

Страница 2: ...Avenue Sunnyvale CA 94085 3470 U S A Telephone 800 831 3183 or 408 746 6000 http solutions us fujitsu com http solutions us fujitsu com contact Have a question Email us at AskFujitsu us fujitsu com Copyright 2 0 1 5 Fujitsu America Inc All rights reserved B5FK 2461 03ENZ0 ...

Страница 3: ...ontrols 9 Important notes 12 First time setup of your device 17 Working with the Tablet PC 21 Accessories for your Tablet PC optional 43 Security functions 61 Connecting external devices 68 Settings in BIOS Setup Utility 72 Troubleshooting and tips 75 Technical data 82 Manufacturer s notes 88 Appendix 94 Index 109 ...

Страница 4: ...demark or registered trademark of Google Incorporated Bluetooth is a trademark of Bluetooth SIG Inc USA OmniPass is a trademark of Softex Inc Roxio is a trademark of Roxio a division of Sonic Solutions PowerDirector PowerDVD YouCam and MakeDisc are trademarks of CyberLink Corp Adobe Acrobat and Adobe Reader are either a reg istered trademarks or trademarks of Adobe Systems Incorporated in the Unit...

Страница 5: ... Tablet PC 21 Status indicators 21 Switching the Tablet PC on 22 Programing the ON OFF button 22 Switching the Tablet PC off 23 Handwriting recognition 23 Touchscreen 24 Select display orientation portrait or landscape format 25 Using fingers 25 Calibrate the Dual Digitizer for finger based operation of the device 25 Actions with one finger Windows 8 1 Pro 26 Actions with one finger Windows 7 Wind...

Страница 6: ...d docking station 53 Separating the Tablet PC from the keyboard docking station 54 VESA mounting attachment optional 55 Hand strap optional 56 Shoulder strap optional 57 Folio case optional 58 Micro USB adapters 59 Security functions 61 Configuring the fingerprint sensor 62 Configuring password protection in BIOS Setup Utility 63 Protecting BIOS Setup Utility supervisor HDD password and user HDD p...

Страница 7: ...rsor does not correctly follow the stylus movements 77 Stylus input not working 78 The Tablet PC does not start after switch on 78 The Tablet PC stops working 78 The printer does not print 79 The wireless connection to a network does not work 79 The battery discharges too quickly 79 Smart Card reader is not recognized 80 Acoustic warning 80 Error messages on the screen 80 Technical data 82 Tablet ...

Страница 8: ...ating a Backup of Bootable Disk and Recovery Image 100 RECOVER YOUR SYSTEM WHEN THE HARD DRIVE IS STILL ACCESSIBLE 101 Using the Recovery and Utility Tools 101 Restore the Recovery Image from Hidden Partition 103 RECOVER YOUR SYSTEM WHEN THE HARD DRIVE IS NOT BOOTABLE 104 Restore the Recovery Image for Full Hard Drive 104 Recovering Your Recovery Image Using Recovery and Utility for new hard drive...

Страница 9: ...e Please go to http www shopfujitsu com store Maintaining Latest Configuration To ensure that you always have the most current driver updates related to your system you should occasionally access the Fujitsu Software Download Manager FSDM utility The FSDM utility is available from the Fujitsu Support site FSDM will allow you to view a list of the most current drivers utilities and applications to ...

Страница 10: ...3 or a command used to start a program start exe This font Indicates information that is displayed on the screen by a program e g Installation is complete This font Indicates terms and texts used in a software interface e g Click on Save names of programs or files e g Windows or setup exe This font Indicates cross references to another section e g Safety information cross references to an external...

Страница 11: ...e indicators and connections of the device Please familiarize yourself with these items before you start to work with the device Front 1 2 3 5 6 4 7 5 6 7 8 8 1 Touchscreen 2 Webcam 3 Webcam LED 4 Ambient light sensor 5 Speaker 6 Mechanical mounting for keyboard docking station keyboard cover cradle 7 Docking port 8 Air inlet Fujitsu 9 ...

Страница 12: ... 5 Shortcut button 6 Power on indicator 7 Battery charging indicator Right hand side 1 2 3 4 5 6 7 1 SIM card slot format micro SIM protected by cover 2 Storage card slot format micro SD protected by cover 3 Micro USB port protected by cover 4 USB port USB 3 0 protected by cover 5 Headphones port 6 Stylus holder 7 Eyelet for stylus cord 10 Fujitsu ...

Страница 13: ...smart card shell 4 3 2 1 6 5 5 5 5 4 3 2 1 7 7 1 Fingerprint sensor 2 Camera light 3 Webcam 4 Webcam LED 5 Screw holes device dependent for securing accessories 6 Smart Card reader device dependent 7 NFC Near Field Communication device dependent Fujitsu 11 ...

Страница 14: ...al data Page 82 chapter and the information in the First time setup of your device Page 17 chapter before preparing your Tablet PC for use and switching it on for the first time When cleaning the device please observe the relevant notes in the section Pay attention to the additional safety notes for devices with wireless components provided in the Safety Regulations manual When handling this devic...

Страница 15: ... on your device configuration where applicable your device is not waterproof In this event do not pour liquids onto the device and do not wash it with a wet cloth Do not place items on the top of the display or damage may occur During normal use of the device small particles from the environment can become embedded in the stylus tip and scratch the screen The warranty does not cover a scratched sc...

Страница 16: ...C Do not use any other voltage converter Check whether the local AC voltage and the AC cable are compatible If this is not the case buy an AC cable that suits the local conditions Enquire with the appropriate government office of the country you will be traveling in as to whether you may there operate the wireless component integrated in your Tablet PC Take the necessary travel adapters with you w...

Страница 17: ...and bumps use a suitable Tablet PC carrying case to transport your Tablet PC Storing your Tablet PC If storing your Tablet PC for a month or longer turn it off fully charge the battery then remove and store all Lithium Polymer batteries Store your Tablet PC in a cool dry location Temperatures should remain between 13ºF 25ºC and 140ºF 60ºC Store your Tablet PC and batteries separately If you store ...

Страница 18: ... Tablet PC has a Smart Card slot be very careful to avoid any liquid entering the slot as this can damage the unit Cleaning guidelines using recommended off the shelf cleaners Computer exterior To clean the exterior use one of the following off the shelf products Office Depot 154 616 b Cleaning Kit Meridrew Enterprises Klear Screen Wipes 3M CL563 Cleaner Wipes After cleaning with one of these prod...

Страница 19: ...he instructions on the screen NEVER switch off your device during the first time setup process The battery must be charged if you want to operate your device using the battery When used on the move the built in battery provides the device with the necessary power You can increase the operating time by using the available energy saving functions For instructions on how to connect external devices e...

Страница 20: ...e that the rubber feet of the device may mark certain types of delicate surfaces Keep other objects at least 100 mm 4 inches away from the device and its AC adapter to ensure adequate ventilation Do not expose the device to extreme environmental conditions Protect the device against dust humidity and heat Connecting the AC adapter Makingreadytouse ACadapter Observe the safety notes in the enclosed...

Страница 21: ... the device on The power on indicator 2 lights up whenever the system is switched on During the installation process follow the on screen instructions You can find information and help on the Windows operating system functions online at http windows microsoft com If a Windows 8 1 operating system is installed on your Tablet PC a tutorial is automatically started when a new user logs on for the fir...

Страница 22: ...e applications you wish to install by selecting the checkbox adjacent to your selection or Click Select All if you would like to install all available applications To confirm your selection click Install Note that in some cases depending upon which application was selected for installation after installation completes the system will prompt you to reboot There are also cases in which if multiple a...

Страница 23: ...2 Status indicator Description Power on indicator Indicator lights up blue The Tablet PC is switched on The indicator flashes The Tablet PC is in sleep mode Save to RAM The indicator lights up alternating between blue and white The Tablet PC is in S3 mode and the wireless component Wi Fi or WWAN is switched on The indicator lights up white The Tablet PC is in S4 or S5 mode and the wireless compone...

Страница 24: ...s switched on Programing the ON OFF button You can program the ON OFF button Operating system Menu Windows 7 Start Settings Control Panel System and Security Power Options Windows 8 1 Windows 8 1 Desktop Control Panel Hardware and Sound Power Options If you have assigned a password you must enter this when requested to do so in order to start the operating system Detailed information can be found ...

Страница 25: ...d information on handwriting recognition see the documentation for your operating system At present handwriting recognition under Windows 7 or Window 8 1 supports the following languages English German French Italian Japanese Korean Chinese traditional and simplified Dutch Portuguese Spanish Brazilian Norwegian Bokmål and Nynorsk Swedish Finnish Danish Polish Rumanian Serbian Cyrillic and Latin sc...

Страница 26: ...e adaptive brightness setting is deactivated To change the ambient light sensor settings select Control Panel System and Security Power Options Change plan settings Change advanced power settings Display Activate adaptive brightness setting Select On to activate the adaptive brightness setting with the help of the ambient light sensor Synchronizing the display on the touchscreen and an external mo...

Страница 27: ...C but also on external monitors that are connected Using fingers You can execute certain commands by using your finger tip on the touchscreen of your device Alternatively everything which you can select or activate using your finger tip can also be selected or activated using the stylus Calibrate the Dual Digitizer for finger based operation of the device If Windows 8 1 is installed on your Tablet...

Страница 28: ...er over the screen from the left hand edge Switch between the most recently used applications equivalent to pressing the Windows button Ctrl Space Working with the mouse Position the mouse pointer at the bottom left hand edge of the screen Wipe your finger over the screen from the top or bottom edge Open the App commands equivalent to pressing the Windows button Z button Wipe from the top to the b...

Страница 29: ... menu with further options Tap on an object Tap your finger on an object on the screen to open an App or a link or to execute a command Working with the mouse Left click on the object Scroll Move object Swivel object Use this function to scroll through lists or websites or to swivel or move an object Working with the mouse Left click on the object keep the mouse button pressed and move swivel the ...

Страница 30: ...n the program symbol Moving objects windows while holding the left mouse button pressed drag drop Place your finger on the object window keep your fingertip pressed against the touchscreen and move the desired object window Opening a context menu click with the right mouse button Tap your finger on the desired item Keep your fingertip pressed against the touchscreen The context menu appears Moving...

Страница 31: ...ktop Action Description Scrolling Place two fingers on the touchscreen Move the fingers up to scroll up or Move the fingers down to scroll down Rotating Position your thumb on the touchscreen and rotate the image clockwise or counter clockwise using your index finger Fujitsu 29 ...

Страница 32: ...ingers on the touch screen and move them apart to increase the size of the view or Put two fingers on the touch screen and move them together to decrease the size of the view Lock context sensitive menus Use two fingers to tap twice in quick succession on the touchscreen 30 Fujitsu ...

Страница 33: ...the stylus with care Our recommendations for proper handling of the stylus are as follows Do not gesture with the stylus Do not use the stylus as a pointer Do not use the stylus on surfaces other than the screen of the Tablet PC Do not try to turn the grip of the stylus The grip is used to put the stylus into its slot and to take it out of its slot Never store the stylus with its weight on the tip...

Страница 34: ...d object or window Opening a context menu Click with the right mouse button Tap on the desired element with the stylus and keep the stylus pressed against the screen Moving the cursor Place the tip of the stylus directly on the screen Stylus location On delivery the stylus is located in the stylus garage 1 Adjusting the stylus Operating system Menu Windows 7 Under Hardware and Sound Pen and Input ...

Страница 35: ... should also always repeat the calibration if the coordination between the stylus and the cursor movement deteriorates Operating system Menu Windows 7 Windows 8 1 Desktop To calibrate run the Hardware and Sound Tablet PC Settings function in the Control Panel You need to calibrate both portrait and landscape formats Installing a stylus tether You can attach the stylus with a stylus tether to preve...

Страница 36: ...you can use your webcam to take pictures record video clips or take part in web chats The picture quality depends on the lighting conditions and the software being used You can only operate the webcam with a particular application e g an Internet telephony program or a video conferencing program which supports a webcam When using the webcam the support of the Tablet PC must not wobble The webcam a...

Страница 37: ...intaining the battery Battery Battery The Tablet PC battery can only be charged when the ambient temperature is between 5 C 41 F and max 35 C 95 F You can charge the battery by connecting the Tablet PC to the AC adapter see Connecting the AC adapter Page 18 If the battery is running low you will hear a warning alarm If you do not connect the AC adapter within five minutes of hearing the warning al...

Страница 38: ...energy saving functions in your Control Panel Set the screen saver in your Control Panel or Keep a finger pressed on the desktop to display the context menu Configure the screen saver under Change screen saver If you need further information about an option you can get help with most settings by pressing the symbol in the upper right of the screen to open Microsoft Help When the Tablet PC is in a ...

Страница 39: ...en handling the memory cards Memorycard Supported formats The following formats are supported Micro Secure Digital Micro SDTM Card Micro SDHC Micro SDXC Inserting the memory card 2 1 Open the slot cover 1 Carefully slide the storage card into the slot 2 The label area must be facing upward Do not apply any force otherwise the delicate contact surfaces could be damaged Memorycard Close the slot cov...

Страница 40: ...y card Memorycard To avoid any loss of data always follow the correct procedure for removing the card see the documentation for your operating system Open the slot cover 1 2 Pull the storage card out of the slot 1 Close the slot cover 2 38 Fujitsu ...

Страница 41: ...he SIM card Please note that the SIM card format must be micro SIM 3FF Other SIM card formats such as full size 1FF mini SIM 2FF or nano SIM 4FF do not fit in the SIM card slot of your Tablet PC Please do not insert any other format of SIM card as they may become twisted they could even damage the system Inserting a SIM card 2 1 2 Open the slot cover 1 Carefully push the SIM card into the slot 2 u...

Страница 42: ...nstallation of wireless components not approved by Fujitsu will invalidate the certifications issued for this device Switching the wireless components on and off The wireless components are switched on and off using the appropriate functions of the operating system To switch wireless components on and off individually select Settings Change PC settings Network Airplane mode 40 Fujitsu ...

Страница 43: ...lly equipped with an integrated NFC chip Near Field Communication allows a contactless wireless exchange of data at a short distance a few centemetres Ethernet and LAN only with performance docking cradle or keyboard docking station EthernetLAN The internal network module of your Tablet PC supports Ethernet LAN You can use it to establish a connection to a local network LAN Local Area Network 2 1 ...

Страница 44: ...Working with the Tablet PC GPS GPS Whether your device has this function depends on the chosen equipment level 42 Fujitsu ...

Страница 45: ...lable for your Tablet PC Performance docking cradle for charging the Tablet PC and with additional ports Keyboard cover Keyboard docking station VESA mounting attachment and hand strap Shoulder strap Folio case Micro USB adapters The following sections provide more information on handling the accessories Fujitsu 43 ...

Страница 46: ...ect your Tablet PC to your peripherals such as a monitor keyboard mouse etc You only need to dock the Tablet PC to be able to work with your peripheral devices Cradle components Ports Ports Cradle 1 2 3 3 4 5 6 7 2 1 Connector on the cradle for the docking port of the Tablet PC 2 USB port 3 0 3 USB port 3 0 4 External monitor port VGA 5 HDMI 6 LAN port 7 DC jack socket DC IN 44 Fujitsu ...

Страница 47: ...rom the Tablet PC before connecting the Tablet PC to the cradle When the Tablet PC is connected to the cradle you must connect the AC adapter to the cradle Information for using the performance docking cradle If your Tablet PC is connected to the performance docking cradle the micro USB port of the Tablet PC cannot be used Use the alternative ports of the cradle The HDMI and VGA ports of the perfo...

Страница 48: ... the surface of the cradle Push the Tablet PC on to the cradle in the direction of the arrow 1 until you feel it engage on the connector Plug the AC adapter cable into the DC jack DC IN on the cradle 2 Connect the AC cable to the AC adapter 3 Plug the AC cable into the power outlet 4 46 Fujitsu ...

Страница 49: ...sories for your Tablet PC optional Disconnecting the Tablet PC from the cradle 1 While holding down the lower part of the cradle lift the Tablet PC from the cradle in the direction of the arrow 1 Fujitsu 47 ...

Страница 50: ...ed for the convenient input of text It only needs to be docked with the Tablet PC Keyboard cover components Keyboardcover Components 2 4 1 3 1 Slide out button 2 Extending stand in extended state 3 Docking connector for the Tablet PC 4 Status indicators Num Lock Caps Lock Scroll Lock 48 Fujitsu ...

Страница 51: ...To prevent the Tablet PC from tipping over and becoming damaged always make sure that the stand is fully extended when you use the keyboard cover Completely pull out the extending stand 1 Press the slide out button 2 until it firmly remains in pressed position red marking visible Push the Tablet PC onto the keyboard cover in the direction of the arrow until you feel it engage on the connector 3 Fu...

Страница 52: ...es for your Tablet PC optional Separating the Tablet PC from the keyboard cover 1 2 Keep the slide out button pressed 1 Lift the Tablet PC away from the keyboard cover in the direction of the arrow 2 50 Fujitsu ...

Страница 53: ...o be connected It only needs to be docked with the Tablet PC Ports on the keyboard docking station keyboarddockingstation Ports 2 3 1 6 5 4 7 8 9 10 1 Slide out button 2 Docking port for the Tablet PC 3 Status indicators Num Lock Caps Lock Scroll Lock 4 External monitor port VGA 5 USB port USB 3 0 6 LAN port 7 HDMI port 8 USB port USB 3 0 9 Battery indicator 10 Battery charging indicator Fujitsu 5...

Страница 54: ...battery is between 13 and 49 charged The indicator lights up red The battery is between 0 and 12 charged Battery charging indicator The battery charging indicator shows whether the battery is being charged The indicator lights up red The AC adapter is connected and the battery is being charged The indicator lights up white The AC adapter is connected and the battery is fully charged is not being c...

Страница 55: ... the Tablet PC to the keyboard docking station keyboarddockingstation Position the keyboard docking station as shown Push the Tablet PC onto the keyboard docking station in the direction of the arrow until you feel it engage on the connector Fujitsu 53 ...

Страница 56: ...r Tablet PC optional Separating the Tablet PC from the keyboard docking station 1 2 Keep the unlocking button pressed 1 Lift the Tablet PC away from the keyboard docking station in the direction of the arrow 2 54 Fujitsu ...

Страница 57: ... of the correct size when securing the screws Use a No 0 cross slot screwdriver Keep the screws out of the reach of children 1 1 1 1 2 3 3 3 3 Remove the 4 screws 1 Position the VESA mounting attachment on the Tablet PC 2 Make sure that the screw holes of the VESA mounting attachment and of the Tablet PC lie exactly on top of each other Secure the VESA mounting attachment using the screws 3 Fujits...

Страница 58: ...screws out of the reach of children Do not shake the device too much when you are holding it on the hand strap otherwise it may fall down 1 2 2 Position the hand strap on the Tablet PC 1 Make sure that the screw holes of the hand strap and of the Tablet PC lie exactly on top of each other Secure the hand strap with the screws 2 56 Fujitsu ...

Страница 59: ...iate tool of the correct size when securing the screws Keep the screws and mountings out of the reach of children Do not use motorized screw driver so to not damage the screws 1 1 3 2 3 2 Remove the screws 1 Position the fittings 2 Secure the fittings using the screws 3 Fujitsu 57 ...

Страница 60: ...closed Make sure the unit is firmly fitted into the folio case fasteners so it will not fall out This folio case is only designed to contain and carry this unit Do not use it for any other purpose Do not put the folio case in a direct sunlight or expose to high temperature and humidity Position the Tablet PC on the folio case as shown Engage the top edge and then press it down The following illust...

Страница 61: ...Accessories for your Tablet PC optional Micro USB adapters 5 USB adapters are available for the device Micro USB to USB adapter Micro USB to HDMI adapter Fujitsu 59 ...

Страница 62: ...sories for your Tablet PC optional Micro USB to VGA adapter Micro USB to Display Port adapter Micro USB to LAN adapter For technical specifications see chapter Micro USB adapters optional Page 87 60 Fujitsu ...

Страница 63: ...e forgetting your password you may be locked out of the system and unable to access your data Therefore please note the following information Back up your data on external data carriers at regular intervals Some security functions need you to choose passwords Make a note of the passwords and keep them in a safe place If you forget your passwords you will need to contact our Service Desk Deletion o...

Страница 64: ...cord the image of a fingerprint With additional fingerprint software this image can be processed and used instead of a password 1 1 Install the fingerprint software to be able to use the fingerprint sensor 1 You can obtain further information on the fingerprint sensor in the appendix Miscellaneous Information 62 Fujitsu ...

Страница 65: ...DD password will only give you access to some of the functions You can only set a user HDD password when a supervisor HDD password has already been assigned Calling and using the BIOS Setup Utility is described in the chapter Settings in BIOS Setup Utility Page 72 Assigning the supervisor and user passwords Start the BIOS Setup Utility and go to the Security menu Select the Set Supervisor Password...

Страница 66: ...PC is rebooted and the password is removed Removing the supervisor password simultaneously deactivates the user password Password protection for booting the operating system You can also prevent booting of the operating system with the supervisor HDD password you have set in the BIOS Setup Utility see section Assigning the supervisor and user passwords Page 63 Operatingsystem Activating system pro...

Страница 67: ...e way as for the set up of the first hard disk Drive0 The field Password Entry on Boot is set to Enabled by default You can exit the BIOS Setup once you have finished changing the settings From the Exit menu choose the option Exit Saving Changes Press the Enter key and select Yes The Tablet PC reboots and your hard disk is now protected with a password The password prompt is enabled as soon as the...

Страница 68: ...you In order to be able to take advantage of all the security features of your Tablet PC you will need a CardOS Smart Card from Fujitsu The Smart Card can only be used with a PIN so maximum protection is maintained even when the Smart Card is lost In order to maximize your security the CardOS Smart Card is disabled if three incorrect attempts are made to enter the PIN During first time use of your...

Страница 69: ...ar the holder in the TPM using Clear Security Chip With Enabled all secret keys e g SRK Storage Root Keys AIK Attestation Identity Keys etc generated by applications are deleted Take note that you can then no longer access the data you have encrypted on the holder based keys Select the Exit Saving Changes option in the Exit menu Press the Enter key and select Yes The Tablet PC restarts and the TPM...

Страница 70: ...ed to be switched off please refer to the documentation supplied with your external device Some of the external devices require special drivers see the operating system and external device documentation Connecting devices to the Tablet PC or to the cradle keyboard docking station 1 Switch off the Tablet PC and all the external devices 2 Disconnect the AC plugs for the Tablet PC and all the affecte...

Страница 71: ...te the settings for DTS Audio and Dolby Digital to enable playback of HDMI sound External monitor port VGA only performance docking cradle and keyboard docking station An analog monitor is connected to the analog external monitor port VGA Screen output is limited to a maximum of two screens at the same time Monitor VGAport Screenconnection Monitorconnection Switch off the Tablet PC and the externa...

Страница 72: ...al information can be found in the documentation for the USB devices Connect the data cable to the external device Connect the data cable to a USB port Tablet PC keyboard docking station or cradle or micro USB port only on Tablet PC Device drivers USB devices will be automatically recognized and installed by your operating system How to remove USB devices correctly Always correctly remove the devi...

Страница 73: ...adphone port Connect the audio cable to the external device Connect the audio cable to the headphone port of the Tablet PC The internal speakers are disabled If you buy a cable from a retailer please note the following information The headphone port on your Tablet PC is a 3 5 mm 1 8 jack socket If you want to connect headphones or speakers you will need a 3 5 mm 1 8 jack plug Fujitsu 71 ...

Страница 74: ...ave and exit the BIOS Setup Utility The BIOS Setup Utility program contains the following menus About Displays information relating to the BIOS processor and Tablet PC System Advanced system settings Advanced Configuration of various hardware components such as mouse keyboard processor Security Password settings and security functions Boot Configuration of the start up sequence Exit Exits the BIOS...

Страница 75: ...d window of the BIOS Setup Utility With the F9 key you can load the default settings of the BIOS Setup Utility Use the cursor keys or to select the menu you wish to access to make changes The menu is displayed on the screen Select the option you want to change with the cursor keys or Press the Enter key Press the ESC key to exit the selected menu For future reference make a note of the changes you...

Страница 76: ...ndard entries for all menus of the BIOS Setup Utility choose Load Setup Defaults and Yes Discard Changes Discard Changes without exiting BIOS Setup Utility To discard the changes you have made select Discard Changes and Yes The settings in place when BIOS Setup Utility was called remain effective You can now make additional settings in the BIOS Setup Utility If you want to exit the BIOS Setup Util...

Страница 77: ...ct Our notebooks have been designed primarily with mobile applications in mind This means that considerable effort has been made to optimize components and equipment in terms of weight space and energy requirements Depending on the particular configuration you have purchased it is possible that functionality may be slightly reduced compared to a desktop PC if you are running processor intensive ga...

Страница 78: ...ttery is discharged Charge the battery or Connect the Tablet PC to a power outlet using the AC adapter The Tablet PC s touchscreen remains dark Touchscreen darktouchscreen Cause Troubleshooting Touchscreen is switched off Press a key external keyboard or tap on the touchscreen External monitor or television set connected Check whether the graphics driver settings are correct or whether an external...

Страница 79: ...et PC and the external monitor if it is plugged in with a connector Switch on the external monitor and the Tablet PC The external monitor is blank or the image is unstable Monitor Monitor Cause Troubleshooting The wrong external monitor has been selected or the wrong screen resolution has been set for the application program Terminate the application program in Windows If the error persists after ...

Страница 80: ... is discharged Charge the battery or Connect the AC adapter to the Tablet PC The AC adapter is not properly connected Check whether the AC adapter is properly connected to the Tablet PC Switch the Tablet PC on The Tablet PC stops working TabletPC Ending Cause Troubleshooting The Tablet PC is in energy saving mode End energy saving mode An application program has caused the malfunction Close the ap...

Страница 81: ...ing the wireless components on and off Page 40 The wireless component is switched on Despite this the wireless connection to a network does not work Check whether the wireless connection is enabled by the software Further information on using the wireless component can be found in the help files The battery discharges too quickly Battery Cause Troubleshooting The battery is either too hot or too c...

Страница 82: ...d 4 Acoustic warning Acousticwarnings Errors Cause Troubleshooting A beep sounds every few seconds The battery is almost flat Charge the battery Error messages on the screen Errormessagesonthescreen Errors This section describes the error messages generated by the BIOS Setup Error messages displayed by the operating system or programs are described in the documentation for these programs If the er...

Страница 83: ...let PC off with the ON OFF button Wait 3 5 seconds and switch the Tablet PC on again Keyboard error If you use an external keyboard Check the connection and reboot the Tablet PC nn Stuck key Make sure that no key is pressed Operating system not found Check in the BIOS Setup whether your hard disk has been set correctly Make sure that the operating system is installed on the corresponding drive Pre...

Страница 84: ...ual digitizer with Glare touch screen Cameras Front HD camera Back 8 megapixels autofocus mobile light Graphics card Chip Intel HD Graphics 4400 Maximum resolution of external display 1920 x 1080 Dimensions Width x Depth x Height Standard Shell tablet only 12 19 x 7 85 x 0 47 inches 309 6 x 199 3 x 11 9 mm Standard Shell tablet w keyboard cover 12 19 x 7 85 x 0 79 inches 309 6 x 199 3 x 20 mm Stan...

Страница 85: ...s Smart Card Shell tablet w keyboard docking station 4 94 lbs 2 24 kgs Input devices Tablet buttons 3 keys Stylus Active stylus with one press button Slots Storage card slot 1 x Micro SD SIM card slot 1 x Micro SIM Ports Headphones port 3 5 mm 1 8 stereo mini jack Docking port 1 x USB Universal Serial Bus 1 x USB 3 0 1 x micro USB 2 0 Ambient conditions Environment class DIN IEC 721 7K1 Mechanism ...

Страница 86: ... their respective frequencies Number of channels 802 11a 8 independent channels 802 11b g 11 channels 3 non overlapping channels 802 11n Channel bonding takes two of the non overlapping 20MHz channels and combines it into one 40MHz channel It is actually 12 non overlapping channels with channel bonding and 24 without Also it is 1 non overlapping channel in 2 4GHz when channel bonding is used Secur...

Страница 87: ... x Depth x Height 9 89 x 4 24 x 2 48 in 251 x 108 x 63 1 mm Weight approx 0 88 lbs 400 g Ports USB Universal Serial Bus 4 x USB 3 0 Docking port 40 pin External monitor port VGA 1 x max resolution supported 1920 x 1080 Full HD LAN port 1 x HDMI port 1 x max resolution supported 1920 x 1080 Full HD Ambient conditions Environment class DIN IEC 721 7K1 Mechanism class DIN IEC 721 7M2 Operating temper...

Страница 88: ... F 140 F Keyboard docking station optional The battery of the keyboard docking station is not user replaceable Electrical data Safety regulations complied with CE Protection class II Battery 46 Wh Dimensions Width x Depth x Height 12 189 x 8 46 x 1 78 in 309 6 x 214 8 x 29 9 mm Weight approx 2 56 lbs 1 16 kg Ports Docking port 16 pin USB Universal Serial Bus 2 x USB 3 0 External monitor port VGA 1...

Страница 89: ...n x 0 51 in Weight approx 30 g 0 066 lbs Shoulder strap optional Dimensions Length x Depth x Height approx 1270 mm x 25 mm x 5 mm 50 in x 0 98 in x 0 19 in Weight approx 25 g 0 055 lbs Micro USB adapters optional Adapter Length Max resolution Micro USB to USB adapter 6 inches N A Micro USB to HDMI adapter 6 inches 1920 x 1080 Micro USB to VGA adapter 6 inches 1920 x 1080 Micro USB to Display Port ...

Страница 90: ...you RBRC has drop off points at tens of thousands of locations throughout the United States and Canada To find the location nearest you go to www RBRC org or call 1 800 822 8837 If there are no convenient RBRC locations near you you can also go to the EIA Consumer Education Initiative website http EIAE org and search for a convenient disposal location Remember protecting the environment is a coope...

Страница 91: ... not use this product near water for example near a bathtub washbowl kitchen sink or laundry tub in a wet basement or near a swimming pool Use only the power cord and batteries indicated in this manual Do not dispose of batteries in a fire They may explode Check with local codes for possible special disposal instructions SAVE THESE INSTRUCTIONS For Authorized Repair Technicians Only CAUTION For co...

Страница 92: ...alf as much electricity as standard equipment saving half in utility costs But more than that ENERGY STAR also makes a difference for the environment Did you know that the average house can be responsible for twice the greenhouse gas emissions as the average car That s because every time you flip on a light switch run your dishwasher or turn on your PC you use energy which means more greenhouse ga...

Страница 93: ...sion interference caused by unauthorized modification of this device or the substitution or attachment of connecting cables and equipment other than those specified by the manufacturer It is the responsibility of the user to correct any interference caused by such unauthorized modification substitution or attachment The manufacturer and its authorized resellers or distributors will assume no liabi...

Страница 94: ...e have not found any biological effects Some studies have suggested that some biological effects might occur but such findings have not been confirmed by additional research The wireless LAN radio device has been tested and found to comply with FCC radiation exposure limits set forth for an uncontrolled equipment and meets the FCC radio frequency RF Exposure Guidelines in Supplement C to OET65 The...

Страница 95: ...comply with the e i r p limit as stated in A9 2 of RSS210 In addition users are cautioned to take note that high power radars are allocated as primary users meaning they have priority of 5250 5350 MHz and 5650 5850 MHz and these radars could cause interference and or damage to LE LAN devices Avis pour le Canada Le matériel destiné à un usage sur la bande 5 150 5 250 MHz doit être utilisé uniquemen...

Страница 96: ...of the mobile computer The WLAN devices operate in license free RF bands eliminating the need to procure an FCC operating license The WLAN operates in the 2 4GHz Industrial Scientific and Medical ISM RF band and the lower middle and upper bands of the 5GHz Unlicensed National Information Infrastructure UNII bands The WLAN devices are capable of four operating modes IEEE802 11a IEEE802 11b IEEE802 ...

Страница 97: ...n as Access Point s Connectivity is accomplished using only client devices in a peer to peer fashion That is why Ad Hoc networks are also known as peer to peer networks Ad Hoc networks are an easy and inexpensive method for establishing network connectivity between multiple computers Ad Hoc mode requires that the SSID network authentication and encryption key settings are identically configured on...

Страница 98: ...GHz lower middle and upper UNII bands Microwave ovens may interfere with the operation of WLAN devices since they operate in the same 2 4 GHz frequency range as IEEE802 11b g n devices Interference by microwaves does not occur with IEEE802 11a radio which operates in the 5 GHz RF band Wireless devices that transmit in the 2 4 GHz range may interfere with operation of WLAN devices in IEEE802 11b g ...

Страница 99: ...n this software Pre defined parameters will be required for this procedure Please consult with your network administrator for these parameters Connection to the network After you have configured your computer you can connect to an active network by performing the following steps 1 Click on the WLAN icon in the system tray 2 Select Connect to a network 3 Select a network from the list that appears ...

Страница 100: ...ss Point Infrastructure connection set the network name SSID and network key to the same values as those of the access point Set the Network Authentication value identically to that of the Access Point Please consult your network administrator for this value if necessary Unavailable network connection Weak received signal strength and or link quality Ad hoc connection Retry connection after shorte...

Страница 101: ...erlapping RF channels can cause interference with the operation of the WLAN device Change the channel of your Access Point to a channel that does not overlap with the interfering device Wireless network authentication has failed Re check your Network Authentication Encryption and Security settings Incorrectly configured security settings such as an incorrectly typed WEP key a mis configured LEAP u...

Страница 102: ...he essential access software using Fujitsu Software Auto Installer To make a copy of the recovery image to DVD disks you will need three or four blank disks to create the copy After creating the copy be sure to label the disks and keep them in a safe place to ensure they do not get damaged Note If your system does not have an internal writable DVD drive connect your system to an external drive bef...

Страница 103: ...save the software packages to the external writable media or drive 4 Click on the Save Packages button 5 Fujitsu Software Extractor copies the zipped software packages and Readme files and extracts the Auto Installer folder to the selected location Note The extracted Auto Installer will later be used to install the software automatically on the system in the event of generic image restoration when...

Страница 104: ...ity to proceed 5 Three tool options appear Diagnostics Recovery and Utility refer to the Recovery and Utility tools section below for instructions on how to use these tools 6 If this was successful please skip the next step and go to Recovery and Utility tools 7 If this was NOT successful please go to the next step Running Recovery and Utility from the Bootable disk To verify change the boot up pr...

Страница 105: ... Recovery tool The Recovery tool contains two options Restore C Drive Restore recovery image only C drive Restore Full Hard Drive Restore recovery image full hard drive You can use these tools to restore the Recovery Image from the hidden partition and perform a full hard drive recovery Please refer to instructions above for details on how to create a Recovery Image Restore the Recovery Image from...

Страница 106: ...disk including all partitions To delete hard disk data 1 Click the Hard Disk Data Delete button The progress bar appears followed by the EULA screen 2 Agree to the EULA and click Next 3 Choose the hard disk from which the data should be deleted in the list of hard disks and click Next The Partition Creation utility is used to change the C and D drive partition sizes To run this utility This is not...

Страница 107: ...ecting Agree option and clicking Next 9 Click Next on the Recovery Disk Check screen to verify that the bootable disk has been inserted into the optical drive 10 The Checking for Recovery Disk screen appears followed by the prompt to insert the first disk Click OK to continue Repeat this step for all disks After all recovery disks have been checked and the check has been completed click Next 11 Fo...

Страница 108: ... for Fujitsu Software Auto Installer accept the EULA otherwise continue 5 Then Fujitsu Software Auto Installer user interface will be launched providing ability to auto install the essential access software on the system 6 It is recommended that you install all the software in the listed order You can Select All to install the software in the order listed 7 Click Install to start the installation ...

Страница 109: ...lation support for the software downloaded from support website 1 Download FSDM Fujitsu Software Download Manager from the support site and download all the drivers applicable to the model and OS using FSDM if they are not downloaded yet 2 When the software packages are downloaded from web it is important to download the Auto Installer Software package and the model language specific Readme file i...

Страница 110: ... allow you to view and download a list of the most current drivers utilities and applications to determine whether you have the latest versions To download the FSDM Utility go to the Support Site http support fujitsupc com CS Portal support do srch DOWNLOADS If you are planning on downgrading upgrading or changing versions of your operating system during this process please see the User s Guide fo...

Страница 111: ...dle 44 Connecting a Tablet PC 45 D dark touchscreen 76 Date not correct 76 Declaration of conformity 90 Devices connecting 68 disconnecting 68 Display orientation select 25 DOC INDUSTRY CANADA NOTICES 88 E Ending energy saving mode 78 Energy Energy consumption 36 Energy saving 13 Energy saving functions 36 Energy saving 13 Error messages on the screen 80 Errors Acoustic warnings 80 Screen messages...

Страница 112: ...1 Power on Power on indicator 22 Printer does not print 79 R Rechargeable battery see battery 35 S Safety information 12 Screen connection see VGA port 69 Security functions 61 Smart Card 66 SystemLock 66 Service life battery 35 Set up Device 18 Setup see BIOS Setup Utility 72 Slot Memory cards 37 Status indicators 21 Summer time 76 Supervisor HDD password changing 64 Supervisor password entering ...

Страница 113: ...k 14 Troubleshooting 75 Trusted Platform Module 67 U USB ports 70 User HDD password changing 64 User password entering 63 removing 64 V VGA port 69 W Webcam 34 Winter time 76 wireless components Safety notes 13 Wireless LAN Safety notes 13 Wrong date time 76 Fujitsu 111 ...

Отзывы: