


U41271-J-Z156-2-76
31
Installation
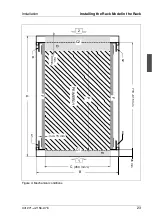
Installing the Rack Model in the Rack
Ê
Secure the telescopic rail without bracket (HL) with two screws M5 each in
the rack at the right support uprights.
Please note that the guide nubs of the telescopic rail next to the spring nuts
must fit into the holes in the support uprights.
Ê
Mount the DataCenter Rack cable management (articulated cable guide) as
described in the Technical Manual of the DataCenter Rack.
Ê
Mount the server (see section “Installing the Server” on page 38).
Ê
Route the cables with the inserted server as described in the Technical
Manual of the DataCenter Rack.
Ê
Place the cage nuts for fastening the front panel in the corresponding holes
at the marked points of the front support uprights and fasten the server using
four knurled screws (see figure 18 on page 39).
3.4.4
Mounting in the Classic Rack
For mounting the server in the Classic (19-inch) Rack the following parts from
the rack mounting kit are necessary:
–
two telescopic rails (assembled)
–
protective hose for fibre channel optical waveguide cable
Ê
Refer to the assembly instructions in the Technical Manual for the Classic
(19-inch) Rack (see “Related publications” on page 85).
Ê
Using the mounting aid (stencil) mark the position of the attachment points
for the telescopic rails and for the server (front panel) on the support uprights
(five height units).
Refer to the information on the mounting aid.
Ê
Place the spring nuts to fasten the telescopic rails in the groove of the
support uprights at the marked attachment points.
Ê
If necessary, adjust the position of the nuts in the groove until they lock into
the correct position.