background image

12 | 

3. Daily Care 


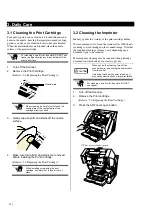
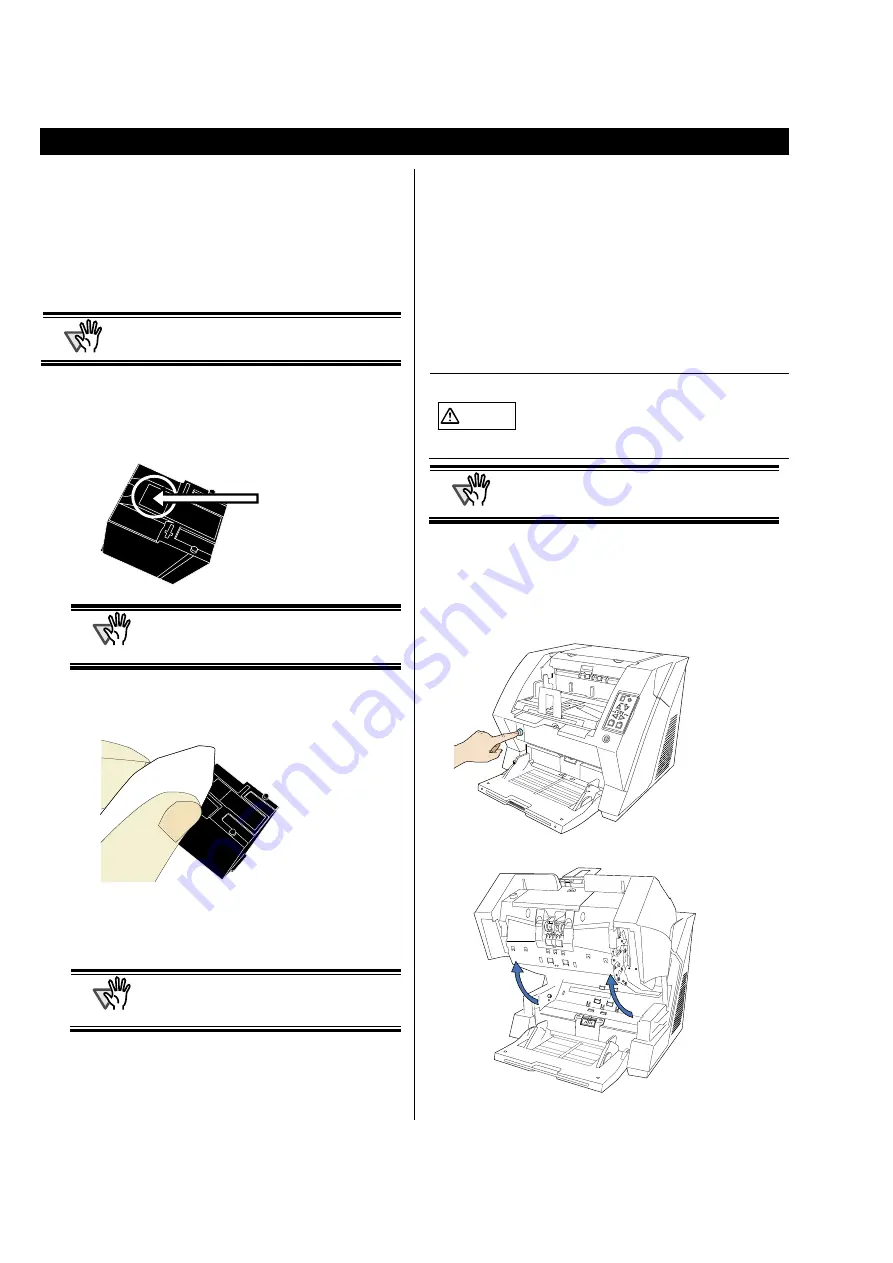
3.1 Cleaning the Print Cartridge 

Poor quality prints can occur due to blocked ink emission 
holes in the nozzle. Leaving the imprinter unused for long 
periods can also cause emission holes to become blocked. 
When the emission holes are blocked, clean the nozzle 
surface of the print cartridge. 
 

ATTENTION


For cleaning, use a dry lint-free cloth (DO NOT use 
tissue), and gently wipe any dirt and stains off the 
nozzle’s surface. 


1.  Turn off the Scanner. 

2.  Remove the Print Cartridge. 

(Refer to "2.6 Replacing the Print Cartridge"


ATTENTION


When cleaning, be careful not to touch the 
nozzle plate or the contact parts of the 
cartridge directly by hand.  


3.  Gently wipe any dirt and stains off the nozzle 

surface.  


4.  Make sure that all dirt and stains are removed, 

before installing the Print Cartridge.  

(Refer to “2.6 Replacing the Print Cartridge”) 

ATTENTION


When installing or replacing the print 
cartridge, be careful not to insert it out of 
place. 


3.2 Cleaning the Imprinter 

Ink may spatter the vicinity of the print cartridge holder. 

We recommend you to clean the scanner after 5000 sheets 
scanning to avoid smudge on the scanned image. Note that 
the required cleaning cycle may vary depending upon 
document type to be scanned. 

More frequent cleaning may be required when printing a 
document on which ink does not easily get dry. 

CAUTION


When you do the cleaning, turn off the 
scanner power, and unplug the power cable 
from the outlet. 

If cleaning is done with power turned on, it 
may cause electric shock or imprinter failure. 


ATTENTION


For cleaning, use a dry lint-free cloth (DO NOT 
use tissue). 


1.  Turn off the Scanner. 

2.  Remove the Print cartridge. 

(Refer to “2.6 Replacing the Print Cartridge”

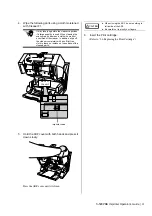
3.  Press the ADF cover open button. 


Ö


The cover is slowly opened. 


Nozzle plate


Содержание fi-590PRB

Страница 1: ......

Страница 2: ... CORRECTLY UNEXPECTED INJURY MAY BE CAUSED TO USERS OR BYSTANDERS While all efforts have been made to ensure the accuracy of all information in this manual PFU LIMITED assumes no liability to any party for any damage caused by errors or omissions or by statements of any kind in this manual its updates or supplements whether such errors are omissions or statements resulting from negligence accident...

Страница 3: ...ndard x64 Edition Windows Server 2003 Windows Vista Home Basic 32 64 bit Windows Vista Home Premium 32 64 bit Windows Vista Business 32 64 bit Windows Vista Enterprise 32 64 bit Windows Vista Ultimate 32 64 bit Windows Vista Windows 1 Windows Server 2008 Standard 32 64 bit Windows Server 2008 R2 Standard Windows Server 2008 Windows 7 Home Premium 32 64 bit Windows 7 Professional 32 64 bit Windows ...

Страница 4: ...suring safety in such high safety applications PFU LIMITED assumes no liability whatsoever for damages arising from use of this product by the user in high safety applications and for any claims or compensation for damages by the user or a third party Conventions Warning Indications Used In This Manual WARNING This indication alerts operators to an operation that if not strictly observed may resul...

Страница 5: ...is might cause problems such as an equipment failure or an electric shock Do not install in places that are damp or subject to smoke steam or dust as this may cause a fire or electric shock Do not install the scanner in the following locations which are subject to high temperature humidity less ventilation or dust If placed in an area subject to high temperature the cover may become overheated and...

Страница 6: ...le otherwise it may fall or collapse and cause injuries Install the scanner away from strong magnetic fields and other sources of electronic noise Protect the scanner against any static electricity and choose a static free place to install the scanner Static electricity can cause the scanner to malfunction If there is an electrical storm disconnect the power cable from the AC outlet Lightening can...

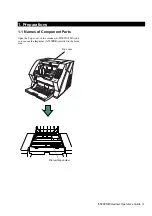
Страница 7: ...ons 1 1 Names of Component Parts Open the Top cover of the scanner fi 5900C fi 5950 and you can see the Imprinter fi 590PRB installed in the front side Print cartridge holder Top cover Sen d to Scan Pow er Thic kness Hopp er Height Function Thic k Thin ...

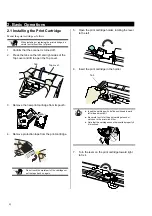
Страница 8: ... pouch 4 Remove protection tape from the print cartridge ATTENTION Do not touch the metal part of the cartridge nor put the tape back on again 5 Open the print cartridge holder rotating the lever to the left 6 Insert the print cartridge in the holder HINT Insert the cartridge with its Tab positioned toward left side and install it Be careful not to let the print cartridge touch or catch on to the ...

Страница 9: ... test Ö Paper will be fed into ADF and the Imprinter will print out the Print Test Characters starting at 5mm 4mm from the paper s edge HINT Print test patterns Test pattern 1 Horizontal ABCDEFGHIJKLMNOPQRSTUVWXYZ _ 00000000 Test pattern 2 Horizontal abcdefghijklmnopqrstuvwxyz 00000000 Test pattern 3 Horizontal 0123456789 00000000 Test pattern 4 Vertical ABCDEFGHIJKLMNOPQRSTUVWXYZ _ 00000000 Test ...

Страница 10: ...int cartridge within the printing prohibited area Fluorescent yellow shaded sections otherwise the document may stain with ink Put the actual document in the Hopper and confirm that the print cartridge is positioned within the document s width 3 Close the top cover and press lightly until it is fixed with the tabs 2 4 How to Use the Paper Guides Use the Paper Guides to prevent paper jams due to cu...

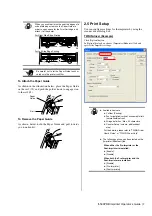
Страница 11: ...l towards you to unhook it 2 5 Print Setup You can configure settings for the imprinter by using the scanner driver dialog box TWAIN driver Example Click Option button In Option dialog box choose Imprinter Endorser tab and specify the Imprinter settings HINT Available items are Y offset Printing Font orientation vertical horizontal width normal bold narrow Strings definition Max 43 characters Coun...

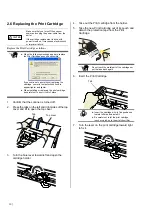
Страница 12: ...areful not to insert it out of place 1 Confirm that the scanner is turned off 2 Press the tabs on the left and right sides of the top cover and lift to open the top cover 3 Turn the blue lever toward left and open the cartridge holder 4 Take out the Print cartridge from the holder 5 Take the new Print Cartridge out of its pouch and detach the protection tape from the Print Cartridge ATTENTION Do n...

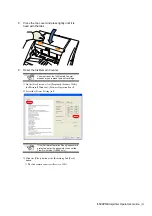
Страница 13: ...enever you replace the print cartridge c On the Start menu select Programs Scanner Utility for Microsoft Windows Software Operation Panel d Select the Device Setting tab If the Software Operation Panel is password protected enter the password to cancel the View Only mode fi 5950 only e Click the Clear button at the Remaining Ink Post button Ö The Ink remain counter will reset to 100 ...

Страница 14: ... the Print Cartridge Refer to 2 6 Replacing the Print Cartridge ATTENTION When installing or replacing the print cartridge be careful not to insert it out of place 3 2 Cleaning the Imprinter Ink may spatter the vicinity of the print cartridge holder We recommend you to clean the scanner after 5000 sheets scanning to avoid smudge on the scanned image Note that the required cleaning cycle may vary d...

Страница 15: ...ies of the cleaner In addition wipe off the cleaner completely with a soft lint free cloth to leave no residue on the surface of the cleaned parts 5 Hold the ADF cover with both hands and press it down slowly Press the ADF cover until it is fixed CAUTION When closing the ADF be sure nothing is left inside of the ADF Be careful not to pinch your fingers 6 Insert the Print cartridge Refer to 2 6 Rep...

Страница 16: ...t the print cartridge has been installed correctly dTurn off the scanner and then turn it on again If the problem occurs again contact the store where you purchased the imprinter or contact an authorized FUJISTU scanner service provider Description The imprinter fuse has blown out How to solve Contact the store where you purchased the scanner or contact an authorized FUJITSU scanner service provid...

Страница 17: ...aracter pitch 3 79mm 0 1492in Normal 2 46mm 0 0968in Narrow Font style Regular Bold Character width Normal Narrow Character width Print orientation Font style Printing Normal Horizontal Regular Available Bold Available Vertical Regular Available Bold Available Narrow Horizontal Regular Available Bold NOT Available Vertical Regular NOT Available Bold NOT Available Document that can be scanned Docum...

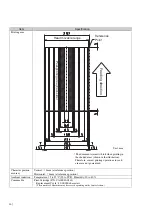
Страница 18: ...80 Consumable Print Cartridge P N CA00050 0262 Replacement Cycle 4 000 000 characters The number of characters may decrease depending on the font selection Unit mm The document stains with ink when printing in the shaded areas shown in the illustration Therefore correct printing operations in such areas are not guaranteed Feeding direction Head movable range Reference Point Post printing area back...

Отзывы: