background image

18

2.2

Connecting ScanSnap to your PC

Follow the procedure below to connect ScanSnap to your PC.

1. Connect ScanSnap to a power outlet using the AC cable. 
2. Connect ScanSnap to your PC using the USB cable. 

The following describes each of the above two procedures.

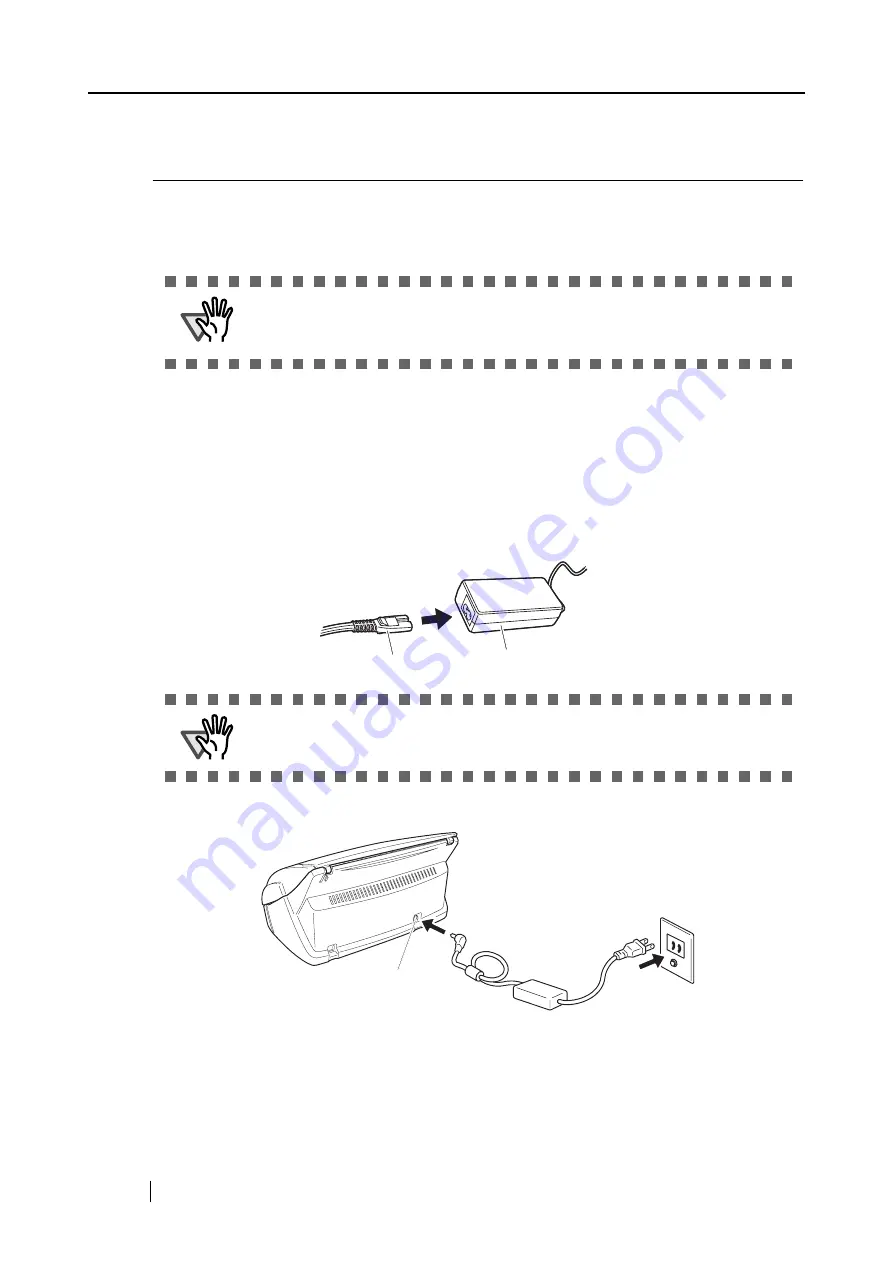
Connecting the AC Adapter

Connect the power cable as shown below. 

1. Connect the AC cable to the AC adapter. 

2. Connect the AC adapter to the AC adapter connector on ScanSnap and to a power outlet.

ATTENTION

Be sure to connect the AC cable first before connecting the USB cable. 

Be sure to install ScanSnap Manager to your PC before connecting ScanSnap to your 
PC. (For details about the installation, refer to "Installing ScanSnap" (page 6)).

ATTENTION

Do not use cables other than the ones supplied with this product. 
Use only specified AC cable and AC adapter.

AC cable

AC adapter

Outlet

Inlet

Содержание Fi-5110EOX2 - ScanSnap! - Document Scanner

Страница 1: ...P3PC 1152 02EN S C A N P O W E R D U P L E X C O L O R Color Image Scanner fi 5110EOX2 Operator s Guide TM ...

Страница 2: ......

Страница 3: ...files even more Effortless scanning Double sided color documents A4 or Letter in size can be scanned at a speed of about 15 sheets minute when Scan mode is set to Normal Color mode is set to Auto and Compression rate is set to 3 1 Small desktop footprint Smaller than a sheet of A4 or letter paper in size ScanSnap scanner can be left on your desk all the time Business cards easily filed Business ca...

Страница 4: ...nt Side 3 Operation Button 4 Rear Side 4 Chapter 2 Connecting ScanSnap 5 2 1 Installing ScanSnap 6 Before Installing ScanSnap 6 Installing Adobe Acrobat 8 Installing Supplied Programs 11 2 2 Connecting ScanSnap to your PC 18 Connecting the AC Adapter 18 Connecting the USB Cable 19 Chapter 3 Basic Scanner Operations 23 3 1 Flow of Operations 24 Preparation 24 Scanning documents 25 Turning the Scann...

Страница 5: ...nt in black and white 79 Skipping blank pages 80 Deleting pages from a PDF file 82 Correcting skewed documents 83 Correcting the orientation of scanned images 84 Rotating the page view of a PDF file 86 Saving scanned images in multiple files 88 Saving scanned images with a high compression rate 89 Merging scanned images divided by scanning errors into one PDF file 91 Converting scanned images to s...

Страница 6: ...ting Checklist 126 Chapter 6 Daily Care 133 6 1 Cleaning Materials 134 6 2 Cleaning the Scanner Exterior 135 6 3 Cleaning the Inside of the Scanner 136 6 4 Cleaning Carrier Sheet 139 Chapter 7 Replacing Consumables and Carrier Sheet 141 7 1 Replacing Consumables 142 Part Nos and Replacement Cycle of Consumables 142 7 2 Replacing the Pad ASSY 144 7 3 Replacing the Pick Roller 147 7 4 Purchasing the...

Страница 7: ...ScanSnap fi 5110EOX2 Operator s Guide v Appendix A Installation Specifications 155 Repairs 157 Index 159 ...

Страница 8: ...hich the receiver is located Consult your dealer or an experienced radio TV technician FCC warning Changes or modifications not expressly approved by the party responsible for compliance could void the user s authority to operate the equipment Canadian DOC Regulations This digital apparatus does not exceed the Class B limit for radio noise emissions from digital apparatus set out in the Radio inte...

Страница 9: ... the ENERGY STAR guidelines for energy efficiency The International ENERGY STAR Office Equipment Program is an international program that promotes energy saving through the penetration of energy efficient computers and other office equipment The program backs the development and dissemination of products with functions that effectively reduce energy consumption It is an open system in which busine...

Страница 10: ...ufactured for use in applications simply called high safety applications from here on that directly involve danger to life and health when a high degree of safety is required for example in the control of nuclear reactions at nuclear power facilities automatic flight control of aircraft air traffic control operation control in mass transport systems medical equipment for sustaining life and missil...

Страница 11: ...llows Windows 98 Microsoft Windows 98 operating system Windows Me Microsoft Windows Millennium Edition operating system Windows 2000 Microsoft Windows 2000 Professional operating system Windows XP Microsoft Windows XP Professional operating system Microsoft Windows XP Home Edition operating system Where there is no distinction between the different versions of the above operating system the genera...

Страница 12: ...ent possible danger and injury to the operator and other persons Symbols Used In This Manual This manual uses the following symbols in explanations in addition to warning indications WARNING This indication alerts operators to an operation that if not strictly observed may result in severe injury or death CAUTION This indication alerts operators to an operation that if not strictly observed may re...

Страница 13: ...About Maintenance The user must not perform repairs on this scanner Contact the store where you purchased the scanner or an authorized FUJITSU Image Scanner service provider to make repairs to this product A TRIANGLE symbol indicates that special care and attention is required The drawing inside the triangle shows the specific caution A CIRCLE with a diagonal line inside shows action which users m...

Страница 14: ...e or modify AC cables Also do not use damaged AC cables or power plugs and AC cables or power plugs when the wall socket is loose Use only specified AC cables and connector cables Failure to use the correct cables might cause electric shock and equipment failure Do not use the AC cable provided with this scanner for other devices since this might cause equipment failure and other troubles or an el...

Страница 15: ...ought the scanner or an authorized FUJITSU scanner service provider If the scanner is damaged for any reason turn off the scanner and unplug the power cable before contacting the store where you purchased the scanner Do not insert or drop metal objects in to the scanner Do not scan wet documents or documents with paper clips or staples Do not splash or allow the scanner to get wet If foreign objec...

Страница 16: ... to prevent it from falling Install the scanner on a strong surface that will support the weight of the scsanner and other devices Firmly insert the power plug into the power outlet as far it can go Do not block the ventilation ports Blocking the ventilation ports generates heat inside of scanner which may results in fire or scanner failure Do not place heavy objects on the scanner or use the scan...

Страница 17: ...unction Do not use aerosol sprays to clean the scanner Aerosol sprays cause dirt and dust to enter the scanner resulting scanner failure and malfunction Avoid touching any scanner mechanism when scanning as this may cause injuries When the scanner is not used for a long period of time be sure to disconnect the power plug from the power outlet for safety Do not install the scanner in the direct sun...

Страница 18: ...xvi Be careful not to cut yourself When handling paper or the Carrier Sheet please be careful not to cut yourself on the paper or the Carrier Sheet ...

Страница 19: ... Operator s Guide 1 Chapter 1 Before You Start Using Your Scanner This chapter describes the necessary preparations before using ScanSnap 1 1 Checking the Contents of the Scanner Package 2 1 2 Names and Functions of Parts 3 ...

Страница 20: ...2 1 1 Checking the Contents of the Scanner Package When you unpack the scanner package make sure that the package contains all the parts on the list included in the package ...

Страница 21: ...ver turns on the scanner ADF cover ADF Automatic Document Feeder Stacker Attach the scanner as shown Adjust the two front pro jection portions to the hollows on the bottom of the scanner Paper chute cover After opening it load the documents to be scanned on this unit Side guide Ajust the side guides to the width of documents so that the scanned imageswill not get skewed Cover open lever To open th...

Страница 22: ...urns on off the power supply Power lamp Indicates the scanner status Green Lighting Ready Green Blinking Scanning Orange Lighting Error Light off Power off Seal informing you that the installation of the software has to be performed first After installing the software remove this seal USB connector AC adapter connector ...

Страница 23: ...lling the ScanSnap Mnanager Scan Snap will not operate correctly If you have connected ScanSnap beforehand the Found New Hardware Wizard this screen might differ slightly according to the used OS screen appears If this screen is displayed click the Cancel button to close the Wizard screen and install ScanSnap Manager first ScanSnap fi 5110EOX2 cannot be connected to a personal computer with ScanSn...

Страница 24: ...r ScanSnap are as follows Operating system Either of the following OS is required Windows 98 Windows Me Windows 2000 Windows XP Service Pack 1 or later 1 Compatible with Service Pack 2 Personal computer Intel Pentium III 600MHz or higher recommended Intel Pentium 4 1 8GHz or higher CD ROM drive required for installation USB port USB 2 0 1 1 RAM 128MB or more recommended 256MB or more Windows 98 Wi...

Страница 25: ...indows XP Home Edition operation system 4 Close all currently running programs ATTENTION ScanSnap may not function if it is connected to the USB ports for the keyboard or monitor If you are using a commercially available USB hub use a type equiped with an AC adapter If you connect the scanner with USB 2 0 it is required that the USB port and the Hub are compliant with USB 2 0 The scanning speed ma...

Страница 26: ...rator s Guide ScanSnap Organizer User s Guide and CardMinder User s Guide Adobe Acrobat can also be linked to ScanSnap so that scanned images are displayed on the Acrobat window There is no need to install Adobe Acrobat if it is already installed on your PC Proceed to Installing Supplied Programs page 11 For Windows 98 Windows Me Adobe Acrobat 7 0 is not supported by Windows 98 and Windows Me In o...

Страница 27: ...o the CD ROM drive The Adobe Acrobat 7 0 Standard Setup window appears 2 Select the language and Click OK button HINT Adobe Acrobat 7 0 is not supported by Windows 98 and Windows Me HINT This window is not displayed automatically when the Auto play setting of your computer is deactivated In this case please run AutoPlay exe of this CD ROM directly using the Explore or My computer ...

Страница 28: ...andard 4 Follow the instructions to isntall the software HINT Select How to install on the Adobe Acrobat 7 0 Standard window to learn more about the Adobe Acrobat 7 0 installation Refer to Adobe Acrobat Help about how to use Adobe Acrobat 7 0 ...

Страница 29: ...for ScanSnap from the Setup CD ROM supplied with the scanner Operation 1 Insert the scanner Setup CD ROM into the CD ROM drive The ScanSnap Installer starts up and the ScanSnap Setup dialog box is displayed HINT If the ScanSnap Setup dialog box is not displayed even after inserting the Setup CD ROM into the CD ROM drive double click the Install exe icon in the folder of the used CD ROM drive using...

Страница 30: ...alling and uninstalling ScanSnap as well as the structure of the files on the Setup CD ROM and other information When you finished reading this description close the screen 3 Click the Install Products button in the ScanSnap Setup dialog box The Welcome to the InstallShield Wizard for ScanSnap screen is displayed ...

Страница 31: ...llShield Wizard for the ScanSnap The License Agreement screen is displayed 5 Please read the details of the License Agreement If you agree with them click the Yes button If you do not accept the terms click the No button This will abort the installation When you click the Yes button the Choose Destination Location screen is displayed ...

Страница 32: ...n directory Change the installation directory if there is not enough free disk space available for the selected drive To change the installation folder for ScanSnap click the Browse button The Select Directory dialog box is displayed Select the folder to install ScanSnap to The Setup Type screen is displayed 7 Select an installation option and click Next button Select Typical for ordinary use This...

Страница 33: ...e left radio button The next ScanSnap Manager Setting screen appears HINT Depending on the selected item the following programs are installed Typical ScanSnap Manager ScanSnap Organizer CardMinder and PDF Thumb nail View are installed including their manuals Compact ScanSnap Manager is installed including its manual Custom You can select the software and the manuals to install HINT You can change ...

Страница 34: ...howing whether or not the Allow auto matic blank page removal and Allow automatic image rotation functions were carried out appears 10 In the Start Copying Files screen check the files that will be installed and click the Next button This starts the installation of the programs supplied with ScanSnap After the installa tion is finished the InstallShield Wizard Complete screen will be displayed ...

Страница 35: ... computer later the ScanSnap Setup dialog box will be displayed Click the Exit button to close the ScanSnap Setup dialog box To complete the installtion you have to restart your PC HINT To display the ScanSnap fi 5110EOX2 Operator s Guide ScanSnap Orga nizer User s Guide and CardMinder User s Guide Adobe Acrobat or Adobe Acrobat ReaderTM is required If this software is not installed on your PC ins...

Страница 36: ...below 1 Connect the AC cable to the AC adapter 2 Connect the AC adapter to the AC adapter connector on ScanSnap and to a power outlet ATTENTION Be sure to connect the AC cable first before connecting the USB cable Be sure to install ScanSnap Manager to your PC before connecting ScanSnap to your PC For details about the installation refer to Installing ScanSnap page 6 ATTENTION Do not use cables ot...

Страница 37: ...r ATTENTION Use only the USB cable supplied with the Scanner The operation with a com mercially available USB cable is not guaranteed When connecting to a USB hub be sure to connect the scanner to the hub nearest your PC first stage If you connect it to a USB hub from the second stage onwards ScanSnap may not function correctly If you connect the scanner with USB 2 0 it is required that the USB po...

Страница 38: ...the Windows 98 CD ROM into the CD ROM drive and click the OK button For Windows Me New hardware is automatically added and processing is continued For Windows 2000 The Digital Signature Not Found dialog box is displayed Click the Yes button ATTENTION If the scanner is not automatically turned on push the POWER button on the scanner Paper chute cover POWER button ...

Страница 39: ...s displayed select No not this time and click the Next button The above windows may not appear unless Windows XP Service Pack 2 is installed 2 Click the Next button in the following window ATTENTION Althought the message If your hardware came with an installation CD or floppy disk insert it now is displayed you do not need to insert the CD into the CD ROM drive ...

Страница 40: ...onger than one second For preventing mis operation the POWER button does not work unless it is pressed for longer than one second HINT The power supply of this scanner is controlled by performing the following actions Opening closing the paper chute cover on the scanner Turning on off the PC to which the scanner is connected Pushing the POWER button on the scanner when the paper chute cover is ope...

Страница 41: ...ions 24 3 2 Scanning Different Document Types 30 3 3 Loading Documents 33 3 4 Changing Scan Settings 46 3 5 Saving Scan Settings 66 3 6 Changing Carrier Sheet Settings 72 3 7 Various settings according to your needs 77 3 8 Scanning Business Cards 98 3 9 Viewing PDF File Thumbnails 102 3 10 Using ScanSnap Organizer 105 3 11 Updating ScanSnap Manager 116 ...

Страница 42: ...ur PC 3 Turn on your PC The ScanSnap Manager icon appears when Windows is started up 4 Open the paper chute cover The scanner is turned on and the ScanSnap Manager icon will change from to HINT You can connect the scanner to your computer after turning it on When the scanner is already connected to your PC you do not need to reconnect it HINT If the scanner is not automatically turned on even when...

Страница 43: ...ms ScanSnap Manager ScanSnap Manager from the Start menu to start up ScanSnap Manager Generally ScanSnap Manager is registered under Startup programs so its icon is displayed on the tasktray when Windows is started up If it is not regis tered under Startup programs select All Programs ScanSnap Manager Startup Register from Start menu in order to register it HINT As the default setting documents ar...

Страница 44: ... scanning file names and the destination folder to save the data etc refer to 3 4 Changing Scan Settings page 46 About the scanning of Business cards refer to 3 8 Scanning Business Cards page 98 HINT As the default setting documents are scanned according to the following set ting Scaning quality Normal and Color mode Auto Color Detection ...

Страница 45: ... on page 46 The following document scan settings can be changed Application linked to ScanSnap Folder to save scanned images to Name of file to save scanned images to File format for scanned image pdf jpg Scan mode draft high quality reduce noise of back side image auto matically remove blank pages adjust skewness change loading doc ument direction continue scanning Size of file for scanned image ...

Страница 46: ...he lamp on the scanner lights up and the scanner is turned on To turn off the scanner when the paper chute cover is opened push the POWER button on the scanner HINT When you turn off on the scanner press the POWER button for longer than one second For preventing mis operation the POWER button does not work unless it is pressed for longer than one second ATTENTION Depending on your PC the ScanSnap ...

Страница 47: ...ar changes from the activated symbol to the deactivated one 2 Disconnect the USB cable from your PC 3 Disconnect the AC cable from the power outlet HINT ScanSnap Manager is necessary for operating ScanSnap When you start ScanSnap Manager select All Programs ScanSnap Manager Scan Snap Manager Generally there is no need to quit ScanSnap Manager HINT The power of the scanner is controlled by turning ...

Страница 48: ... 148 mm 90 55mm 55 90mm Width 50 8 to 216 mm 2 to 8 5 in Length 50 8 to 360 mm 2 to 14 17 in When using Carrier Sheet Media Paper commonly used in offices Post card Business card Photograph Clipping Weight Up to 127 g m2 Up to 34 lb Fold in two when scanning Up to 63 5 g m2 Up to 17 lb Size A3 A4 A5 A6 B4 JIS B5 JIS B6 JIS Post card Business card Letter 11 x 17 Custom 297 420 mm 210 297 mm 148 210...

Страница 49: ...th x 2 length inches Documents thinner than 52 g m2 14 lb and thicker than 127 g m2 34 lb Documents of non uniform thickness e g envelopes paper which has another paper pasted on etc Wrinkled or curled documents Folded or torn documents Tracing paper Coated paper Photographs printing paper Perforated or punched documents Documents that are not square or rectangular Documents of non uniform width C...

Страница 50: ...t on the Carrier Sheet for a long period of time The ink may be transferred onto the Carrier Sheet Do not leave the Carrier Sheet in high temperature places such as a place fac ing direct sunlight or near a heating apparatus for a long period of time Also do not use the Carrier Sheet under a high temperature environment Other wise it may warp Do not bend twist or pull the Carrier Sheet forcibly Do...

Страница 51: ...aller a document stack of 5 mm or less 50 sheets at 64 g m2 or at 17 lb To prevent paper jams fan the document as follows 1 Take out the stack of documents of thickness 5 mm or less 2 Hold both ends of the document with both hands and bend the documents into an arch HINT Scanning accuracy increases when the document is loaded onto the scanner so that the leading edges of the papers form a step lik...

Страница 52: ... or more document sheets the first page faces towards the paper chute cover Reduce the quantity of the documents when the thickness of stack exceeds the reference marks on the side guides ATTENTION If the check box for Allow docu ments to be scanned face up through the ADF of Scanning Options in the Scan and Save Settings window of ScanSnap Manager is selected set the front of the document with th...

Страница 53: ...dth Move the side guides so that there is no space between the document edges and the side guides If there is a space between the document edges and the guides the scanned images may be skewed HINT Before loading long sized documents first pull out the extension of the paper chute cover Paper chute cover Extension Document Side guide ...

Страница 54: ...scanner For details on how to attach the stacker to the scanner refer to Names and Functions of Parts on page 3 Use the stacker as follows 1 Pull out the stacker towards you while holding it by its handle 2 Insert your finger into the indent and lift up the stacker extension to clap it out Stacker Handle Indent ...

Страница 55: ...s in one image Scans a document larger than A4 size such as A3 B4 11 x 17 folded in two in duplex mode and out puts an image arranged in two page spread and joined together Create front and back images separately This mode is for scanning photographs which you do not want to scratch or documents of irregular size such as clippings of information that are difficult to load and scan directly on the ...

Страница 56: ...duplex and an image joined together is generated If a document smaller than A4 printed on both sides is scanned it is possible to output a two page spread image Operation 1 Right click ScanSnap Manager icon on the task bar and select Carrier Sheet 2 On the Carrier Sheet Settings screen select Create facing pages in one image on Mode and click OK S S ...

Страница 57: ...r Operations 3 3 Right click ScanSnap Manager icon on the task bar and select Settings The Scan and Save Settings window appears 4 Select Duplex Scan in SCAN button on the Scanning tab 5 Select Automatic Detection in Paper size on the Paper size tab and click the OK button S S ...

Страница 58: ... the Carrier Sheet onto the scanner Align the top of the document to the top of the Carrier Sheet and the folded portion to the top right corner closely Place the top of the sheet with the black white printed pattern downwards and load it in the direction of the arrow When you load the Carrier Sheet adjust the side guides so that it will not skew If you are using the Carrier Sheet for scanning it ...

Страница 59: ...the loading method In this case check the following The situation may be improved Is the document neatly folded Is the edge of the document aligned closely to the edge of the Carrier Sheet Load the Carrier Sheet by turning the front side back In the Carrier Sheet Settings window when Automatic Detection in Output image size is selected the generated image size may be smaller than the document The ...

Страница 60: ...hs which you do not want to scratch or clippings of information that are difficult to be fed Operation 1 Right click ScanSnap Manager icon on the task bar and select Carrier Sheet 2 On the Carrier Sheet Settings window select Create front and back images separately on Mode and click the OK button S S ...

Страница 61: ...110EOX2 Operator s Guide 43 Basic Scanner Operations 3 3 Right click ScanSnap Manager icon on the task bar and select Settings The Scan and Save Settings window appears 4 Select Automatic detection in Paper size on the Paper size tab S S ...

Страница 62: ...printed pattern downwards and load it in the direction of the arrow When you load the Carrier Sheet adjust the side guides so that the document inside will not skew If you are using the Carrier Sheet for scanning it is not possible to scan multiple sheets continuously Load the sheets one by one and scan ATTENTION If the check box for Allow documents to be scanned face up through the ADF of Scannin...

Страница 63: ...ing Carrier Sheet Set tings page 72 In the Carrier Sheet Settings window when Automatic Detection in Output image size is selected the generated image size may be smaller than the document Example If A5 size image is printed in the center of an A4 document it is generated in A5 To output an image that is the same size as the document size set the document size in Output image size HINT If the foll...

Страница 64: ...n B W mode reduce noise of back side image automatically remove blank pages automatically correct documents skewness direction method of loading documents continue scanning Scanning File format for the scanned image File option file option specification of pages of PDF files and password for PDF files Document scan size Paper size Size of the file when saving scanned images Compression S S Start D...

Страница 65: ...ager icon on the task bar and select Setting from the displayed menu The Scan and Save Settings dialog box is displayed 2 Change the scan settings on the Scan and Save Settings window The following describes the setting items of each of the tabs HINT You can launch Scan and Save Settings dialog box by simultaneously press ing Ctrl Shift Space or double clicking the icon on the task bar ...

Страница 66: ...been uninstalled they are automatically no longer displayed among the selection items If you select Scan to File only saves image data as files the scanned image is saved to file after the scanning is completed The scanning result is not displayed on screen This setting is ideal when the scanning result needs not be confirmed each time a document is scanned If you select CardMinder at Application ...

Страница 67: ... the execution file exe The folder of the selected application is displayed at Path Enter the name to be displayed at Name The name you entered is displayed at Application 3 When you have finished the above setting click the OK button ATTENTION In the situation that Adobe Acrobat ReaderTM or Adobe Reader and Adobe Acrobat are installed concurrently and PDF Thumbnail View is enabled even if you sel...

Страница 68: ... or remove application screen is displayed and the settings are changed Click the Close button to close the screen HINT When you add an application select an application that is able to process files of the following formats JPEG jpg PDF pdf Scanned images cannot be displayed properly unless these file formats are supported Depending on applications password protected PDF files may not be opened T...

Страница 69: ...ve tab Folder path to save an image Specify the folder to save the scanned image to When you click the Browse button the Browse for Folder screen is displayed Select the folder to save the scanned image to and click the OK button ATTENTION The function Make New Folder is not provided for Windows 98 ...

Страница 70: ...he screen HINT When ScanSnap Organizer is selected at Application the Image saving folder and the Browse button are grayed out and you cannot specify the folder to save images to from this window In this case scanned images are saved in the My ScanSnap Folder specified by ScanSnap Organizer page 108 HINT About Counter When there is no other file with the same name as the one specified at File Name...

Страница 71: ...ename click the Save button If multiple files are generated with one scan counters are appended after the file name File name counter extension Example 1 In PDF File Option page 57 select Generate PDF file after xx pages If a document with pages exceeding the specified pages is scanned they become Scan001 pdf Scan002 pdf Scan003 pdf Example 2 If saving in JPEG they become Scan001 jpg Scan002 jpg S...

Страница 72: ...to scan documents at even higher quality Excellent Slower Select this mode when you wish to scan documents at the highest quality HINT Normal is equivalent of 150 dpi for color and 300 dpi for B W Fine is equiva lent to 200 dpi for color and 400 dpi for B W Best is equivalent to 300 dpi for color and 600 dpi for B W and Excellent is equivalent to 600 dpi for color and 1200 dpi for B W Generally th...

Страница 73: ...k and white documents containing mostly text File sizes can also be kept smaller at the B W setting compared to the color mode SCAN button Specifies the scanning mode that for is launched when pressing the SCAN button on the scanner Select Duplex Scan or Simplex Scan from the menu Option button With this item you can configure other scanning related settings Clicking the Option button displays the...

Страница 74: ...documents is scanned in Duplex mode this feature removes only the back sides i e blank pages of one sided documents from the output images No scanned images are output if all of the sheets in the document stack are rec ognized as blank pages Allow automatic image deskew This setting automatically detects skewed documents and correct them for the output data Up to 5 degrees of skews can be correcte...

Страница 75: ...w or characters are overlapped Documents which have many charcters that contact underlines or ruled lines Documents which have many photographs or figures and a few charac ters Documents which have a background pattern behind characters Documents which have characters printed in various directions e g plans etc Documents which have only capital letters Documents with handwritten characters When yo...

Страница 76: ...utton To finish scanning click the Finish Scanning button At the point where scanning ended the scanned images up till then are consolidated into one file and generated It is possible to continue scanning up to 1000 pages The maximum PDF file size is 1G byte Although it is possible to generate a file longer than 1G byte viewing it with Adobe Acrobat may show a mes sage that the file is corrupted a...

Страница 77: ...on button This function is used for configuring detailed settings of PDF files This button is enabled when PDF pdf is specified at File format Click Option button to display the following dialog box ATTENTION JPEG setting is not available when Auto Color Detection or B W is selected at Color mode under Scanning tab or when ScanSnap Organizer is selected at Application File format is automatically ...

Страница 78: ...without a password Use a fixed password You can set a fixed password in advance for all the PDF files so that the enter password screen will not appear when you scan If you select the check box the Password and the Confirm boxes become enabled Enter the same password into the two places ATTENTION If you select Adobe Acrobat and Adobe Reader or Acrobat Reader at Application only the first file is d...

Страница 79: ...e size The following paper sizes W x L can be selected Automatic detection Letter 8 5 x 11 in 216 x 279 4 mm Legal 8 5 x 14 in 216 x 355 6 mm A4 210 x 297 mm A5 148 x 210 mm A6 105 x 148 mm B5 JIS 182 x 257 mm B6 JIS 128 x 182 mm Post card 100 x 148 mm Business card 90 x 55 mm 55 x 90 mm Custom up to 5 settings can be registered ATTENTION To use the Carrier Sheet Automatic detection must be select...

Страница 80: ... Name The entered name is displayed in Paper size 3 To complete the setting click the OK button 4 The customized document size will be registered Click Close to exit from the Add or Remove Custom sizes window When deleting a customized document size 1 In the Add or Remove Custom sizes window select the document size to be deleted and click the Remove button 2 The confirmation messsage appears twic...

Страница 81: ...e document is sanned as Post card size Do not load documents with different sizes simultaneously onto the scanner When Automatic detection is selected documents of non standard sizes are regarded as documents of a standard size Letter Legal A4 B5 A5 B6 A6 or Business card that is closest to their actual length For length scanned using the length of the document For width it is scanned using the st...

Страница 82: ...inary compression method and the file sizes becomes even smaller ATTENTION When the compression rate is increased the quality of scanned images deteriorates ATTENTION This function compresses characters and backgrounds on the document separately So using this function on the document which mostly contains text characters the file size becomes smaller while keeping the quality of the characters as ...

Страница 83: ...cient use set Compression High Compression funcitons as follows Setting Compression rate 1 to 5 reduces the file size when reading documents such as photographs or figures Enabling High Compression reduces the file size even more when reading documents with many characters in Color mode at Best Excellent Scan mode Compression rate 1 2 3 4 5 High Compression Normal quality 784 379 293 219 117 217 B...

Страница 84: ... You can create different types of frequently used scanning conditions in advance and when you open the Settings screen during scanning it is easy to scan without changing the settings one by one The following explains the operation procedure Creating Scan Settings Operation 1 Right click ScanSnap Manager icon and select Settings 2 On the Scan and Save Settings change the scan settings S S ...

Страница 85: ...gs click the Save Current Setting button The Save as window appears 4 Enter a suitable name and click the OK button The current settings and the entered name is created in Current Setting 5 Click the OK button and the Scan and Save Settings window closes A scan setting is created HINT You can create a maximum of 9 scan settings ...

Страница 86: ... appears The icon of the program that starts after scanning appears on the left of the settings names 2 Select the scan setting to use A check mark appears on the selected setting 3 Load the document on the scanner 4 Click the SCAN button Scanning is carried out with the selected scan setting S S SCAN ...

Страница 87: ...enaming Scan Settings Operation 1 Right click the ScanSnap icon and select Settings The Scan and Save Settings screen appears 2 On Current Setting select the name of the setting you want to change 3 Click the Rename button The Save As screen appears 4 Enter a new name and click the OK button S S ...

Страница 88: ...reen appears 2 On Current Setting select the name of the setting you want to delete HINT You can also rename the setting from the Settings Management screen Right click the ScanSnap icon and the Settings Management screen appears when you select it Select the name you want to change and click the Rename button S S S S ...

Страница 89: ... Delete button 4 The confirmation dialog box appears Click the Yes button HINT You can also delete the setting from the Settings Management screen Right click the ScanSnap icon and the Settings Management screen appears when you select it Select the name you want to delete and click the Delete button S S ...

Страница 90: ...k bar Right click the icon and when the menu appears select Carrier Sheet The Carrier Sheet Settings screen appears The following explains the settings that can be changed on the Carrier Sheet Settings S S Change the Carrier Sheet settings here A simple explanation for Mode appears The image of the Mode appears Enables the setting and closes the screen Cancels the setting and closes the screen Sho...

Страница 91: ... information that are difficult to load and scan directly on the scanner in the Carrier Sheet If both sides are scanned the front and back images are generated separately Output Image Size Specifies an image size when generating a scanned image You can select it from the following document sizes ATTENTION When scanning in Create facing pages in one image mode select Duplex Scan on the Scanning set...

Страница 92: ...click the selected area for the necessary image portion ATTENTION If you specify Automatic Detection on Output image size to scan a document which size is not among the possible scan sizes on the above table the scanned image is bigger than the document size as well as nearest to the fixed size If you want to scan a document in its size create a document size at the Custom button and select that s...

Страница 93: ... 8 297 mm 3 11 69 in Enter a name you want to display in Name The entered name is displayed on Add or Remove Custom sizes 3 When you complete the settings click the OK button 4 A new custom document size is created Click the Close button and the Add or Remove custom sizes screen closes To delete custom size documents 1 On the Add or Remove custom sizes screen select the document size you want to d...

Страница 94: ...nt to change and click the Change button 2 The Additional custom sizes settings screen appears Change the items you want to change 3 When you have completed the settings click the OK button 4 The Add or Remove custom sizes screen appears and the settings have changed Click the Close button and the screen closes ...

Страница 95: ...y hour minute second Rename file after scanning Disabled Scanning quality Normal Fastest Color mode Auto Color Detection automatically judges whether the document is color or black and white SCAN button Duplex Scan Scanning Option Brightness Normal Setting for text only document in Color mode only Disabled Allow automatic blank page removal Enabled Allow automatic image deskew Enabled Allow automa...

Страница 96: ...n 1 Right click the ScanSnap Manager icon on the task bar and select Setting from the menu 2 Click Scanning tab and select Simplex scan at SCAN button s 3 Click OK button to close the window 4 Load the document onto the scanner 5 Press the SCAN button The document is scanned in the Simplex mode HINT To return the setting to the Duplex mode select Duplex scan in step 2 above The selected setting is...

Страница 97: ...le black white docu ments are scanned monochrome If you wish to scan colored document in black white change the settings following the proce dure below Operation 1 Right click the ScanSnap Manager icon on the task bar and select Setting from the menu 2 Click Scanning tab and select B W at Color mode If you scan color documents in color select Color 3 Click the OK button to close the dialog box 4 L...

Страница 98: ...dless if their back sides are printed or not Though the empty back sides are scanned they are recognized as blank and automatically removed so they will not appear on the output data To change the setting follow the procedure below Operation 1 Right click the ScanSnap Manager icon on the task bar and select Setting from the menu 2 Select the Scanning tab and click the Option button S S ...

Страница 99: ... box 4 Click the OK button to close the window The setting is enabled from next scanning ATTENTION Following kinds of documents may be accidentally recognized as blank pages Almost blank documents containing only a few characters Documents of only one color including black and without any patterns lines or characters When you scan such documents clear the check box ...

Страница 100: ... blank page removal function page 80 or you want to delete another unnecessary page follow the procedure below Operation 1 With Adobe Acrobat open the PDF file targeted for this operation 2 From the menu bar select Document Delete Pages 3 Specify the page number of the page s you want to delete and click the OK button The specified page is deleted HINT For details of this function refer to Adobe A...

Страница 101: ...wed documents ScanSnap is able to automatically correct document skews To change the setting follow the procedure below Operation 1 Right click the ScanSnap Manager icon on the task bar and select Setting from the menu 2 Select the Scanning tab and click the Option button 3 Select the Allow automatic image deskew check box S S ...

Страница 102: ...peration 1 Right click the ScanSnap Manager icon on the task bar and select Setting from the menu ATTENTION Up to 5 degrees of skews can be corrected This function judges a document skew based on the characters printed on the document so it may not work properly for the following document Documents on which the pitches of lines or characters are extremely narrow or characters are overlapped Docume...

Страница 103: ... may not work properly for the following kinds of documents Documenst with many extremely large small characters Documents on which the pitches of lines or characters are extremely narrow or characters are overlapped Documents with many charcters that contact underlines or ruled lines Documents with have many photographs or figures and only a few characters Documents with a background pattern behi...

Страница 104: ... this PDF file with Adobe Acrobat When the Allow automatic image rotation function page 84 fails to correct the orientation of a page view or you want change the orientation of any other page follow the procedure below Operation 1 With Adobe Acrobat open the PDF file targeted for this operation 2 From the menu bar select Document Rotate Pages ...

Страница 105: ...the page in which you want to change the orientation and clic the OK button Direction Specifies the angle and the direction of the rotation Page range Specifies the page number of the pages you want to rotate The orientation of the specified page s is are changed HINT For details of this function refer to Adobe Acrobat Help ...

Страница 106: ...le you can scan a batch of documents and create files for every single page To change the setting follow the procedure below Operation 1 Right click the ScanSnap Manager icon on the task bar and select Setting from the menu 2 Select the File option tab and click the Option button ATTENTION Make sure that PDF pdf is selected at File format S S ...

Страница 107: ...ression function for reducing the size of scanned images This function is designed for ordinary text documents used in offices For example piles of paper documents can be compacted into PDF files by scanning them with this function To change the setting follow the procedure below Operation 1 Right click the ScanSnap Manager icon on the task bar and select Setting from the menu HINT In Duplex mode ...

Страница 108: ...tion compresses characters and backgrounds on the document separately So using this function on documents containing mostly text characters the file size becomes smaller while leaving the characters quality as they are Meanwhile this function is not appropriate for scanning photo graphs or figures because such drawings are recognized as background and compressed as such so the qualities of such im...

Страница 109: ...In that case you can resume or abort the scanning by the following procedure Operation To resume scanning 1 Check the last page scanned on the Message window 2 Load the unscanned pages back onto ADF 3 Click Continue Scanning button to restart the scanning To quit scanning 1 Click the Quit button The following window appears 2 Click Yes to delete the data that were scanned up to the interruption Ot...

Страница 110: ...lable for files of PDF format The following shows the procedures for this operation 1 Confirm the last page scanned on the Message window 2 Click the Close button then the following window appears 3 Click the No button to completely save the image PDF file scanned before the interruption this file is called File A 4 Scan the remaining documents that need to be scanned this part is called File B 5 ...

Страница 111: ...EOX2 Operator s Guide 93 Basic Scanner Operations 3 ATTENTION 7 Select File B in the Select File to Insert screen and click the Select button The Insert Pages window will appear 8 Select After from the Location menu and Last from Page radio buttons then click OK ...

Страница 112: ...text data by using OCR processing Recognize Text function of Adobe Acrobat 7 0 Operation 1 With Adobe Acrobat open the PDF file you wish to convert 2 Select Document Recognize Text Using OCR Start from the menu bar 3 In the following window configure the necessary settings then click the OK button The text information is added to the image data by the Recognize Text function HINT For color documen...

Страница 113: ...not read the contents of a password protected PDF file if you do not enter a password when you open the file When scanning confidential documents or important internal documents you can prevent impor tant information from being leaked if you save these documents with passwords Operation 1 Right click the ScanSnap icon and select Setting 2 Click the File Option tab and then click the Option button ...

Страница 114: ...e 1 Select the check box for Use a fixed password The same password is used for all PDF files There is no need to enter a password for every scan 2 Enter the same password for Password and Confirm 4 Click the OK button All the screens close 5 Load the document onto the scanner 6 Press the SCAN button Scanning starts HINT You can use the following characters to set your password Maxium number of ch...

Страница 115: ...nd click the OK button The scanned document is saved as a password protected PDF file HINT You can use the following characters to set your password Maximum number of characters 16 Characters A Z a z 0 9 Symbols _ If you click the Cancel button the PDF file is saved as a normal file without a password ATTENTION This function is enabled only if Adobe Acrobat 7 0 is installed on your computer Take n...

Страница 116: ...details refer to the CardMinder User s Guide If CardMinder is already installed on your PC you can browse the User s Guide by selecting Programs CardMinder CardMinder User s Guide from the Start menu You can also browse the User s Guide from the Setup CD ROM startup screen supplied with this scanner When CardMinder is selected at Application under Application tab the File option Paper size Scannin...

Страница 117: ...g box is displayed 2 Select CardMinder at Application under the Application tab Two tabs Application and Scanning will be displayed HINT Scanning quality and Color mode can be changed on the Scanning tab Refer to Scanning tab on page 54 The defaults are Best and Color for the scan mode In this section business cards are scanned using these default settings When CardMinder is selected as Applicatio...

Страница 118: ...ng will be started After the scanning has finished the CardMinder screen is displayed HINT As the default setting documents are scanned at Duplex mode when you press the SCAN button Using ScanSnap Manager you can set the scanner to scan documents in Simplex mode by pressing SCAN button You can also start scanning with the ScanSnap Manager icon on the task bar For details refer to 3 4 Changing Scan...

Страница 119: ... of the recognition correct the data manually Correct the recognized characters if they are different from image data 5 Select Exit from the File menu to quit CardMinder HINT For details on correcting recognized characters refer to the CardMinder User s Guide HINT For further details refer to the CardMinder User s Guide If CardMinder is already installed on your PC you can browse the User s Guide ...

Страница 120: ...then Configuration Tool The PDF Thumbnail View Function Settings screen is displayed 2 Select the Enable check box to enable the function and Click OK button ATTENTION In order to use PDF Thumbnail View Adobe Acrobat 7 0 must be installed on your PC beforehand Acrobat Reader does not support the PDF Thumbnail View PDF Thumbnail View will be installed automatically after installing Scan Snap Manage...

Страница 121: ...ocedure below 1 Start the Explorer Right click the Start menu and select the Explore 2 Select a folder where PDF files of scanned images are stored Usually PDF files created by ScanSnap are saved in the folder specified in Image saving folder under the Save tab of ScanSnap Manager page 51 3 Select Thumbnails from the View menu The thumbnails of the PDF files are displayed ATTENTION When uninstalli...

Страница 122: ...played on the upper left side of the screen when refreshing the thumbnails When there is a large quantity of PDF files saved in one folder it may take some time to display the thumbnails The first page of a PDF file document is displayed as a thumbnail The thumbnail of a PDF is not displayed when Adobe Acrobat is currently running ...

Страница 123: ...llowing explains how to use ScanSnap Organizer Starting ScanSnap Organizer Operation 1 From the Start menu select All Programs ScanSnap Organizer ScanSnap Organizer The ScanSnap Organizer window appears HINT When starting up ScanSnap Organizer ScanSnap Organizer is selected at Application under Application tab of ScanSnap Manager In this case the scanned images are saved in My ScanSnap Folder spec...

Страница 124: ...is created directly under My ScanSnap folder in other programs such as Windows Explorer it is shown as Cabinet in ScanSnap Organizer Folder Link Creates a Folder Link to any existing folder in Folder view Files selected in the linked folder can be previewed in ScanSnap Organizer My ScanSnap folder cannot be designated as a Folder Link Toolbar Frequently used functions are indicated by icons Menu B...

Страница 125: ...ting the printer set as the default printer in Windows is used If you want to print using another printer double click the displayed thumb nail and then change to the desired printer in the associated application s Print command Attach to E mail Opens your e mail program with the selected PDF or JPEG file attached Exit Exits ScanSnap Organizer Edit Undo Undoes the most recent action Cut Cuts the s...

Страница 126: ...cending order Small Big according to the size By Date You can sort the display of File View in descending order New Old according to the date Refresh Refreshes the display of Folder View and File View to the latest information Tools Options General Settings tab My ScanSnap folder Specifies the location of My ScanSnap folder when ScanSnap Organizer is started The specified folder and the sub folder...

Страница 127: ...under My ScanSnap folder in other programs such as Windows Explorer it is shown as Cabinet in ScanSnap Organizer New Folder Link Creates an optional Folder Link Shortcut Display Changes the display of File View to either Big Medium Small or Top Thumb nail view Big Thumbnail 196 X 196 Pixels Medium Thumbnail 128 X 128 Pixels Small Thumbnail 96 X 96 Pixels Thumbnail Top Shows the upper part of the f...

Страница 128: ...ions In this case the Adobe Acrobat icon is displayed and a lock icon is displayed on the lower right hand corner However if Fixed Password is set in ScanSnap Manager s PDF File Options thumbnails of PDF files with the same password can be displayed Refer to Using a Fixed Password page 61 for more information on setting a fixed password Thumbnail Image Displays a miniature image of the file Page N...

Страница 129: ...3 10 Using ScanSnap Organizer ScanSnap fi 5110EOX2 Operator s Guide 111 Basic Scanner Operations 3 Thumbnail Top ...

Страница 130: ...ges is explained Preparation Operation 1 Right click the ScanSnap Manager icon on the task bar and select Setting from the menu The Scan and Save Settings screen appears 2 Select ScanSnap Organizer on Application on the Application tab 3 Click the OK button The Scan and Save Settings screen closes S S ...

Страница 131: ... the scanner 2 Press the SCAN button Scanning is started When scanning stops ScanSnap Organizer starts and the scanned image is displayed as a thumbnail HINT The scanned image is saved in the folder specified in My ScanSnap Folder on the Option Settings window Refer to page 108 The initial setting is My ScanSnap Folder under My Documents SCAN ...

Страница 132: ...s created 2 Enter a name for the Cabinet Enter the name Investigation Report here 3 Select the Cabinet created in Step 1 4 On the File menu select New Folder Under the Cabinet created in Step 1 New Folder is created HINT The idea is similar to arranging a big pile of documents files in the room My ScanSnap folder purchasing a new shelf Cabinet and a new document tray folder and classifying them ac...

Страница 133: ...folders as needed As an example create two folders named July 2004 and August 2004 7 Select the file The selected file is shown in a red frame 8 Drag and drop the selected file to the destination folder 9 Repeat Steps 7 8 to store files in the destination folders HINT You can select several files at one time when you press down and hold the Ctrl key ...

Страница 134: ...p Manager follow the instructions below Operation 1 Right click the ScanSnap Manager icon and select Help Online Update A message window to confirm whether or not to update ScanSnap Manager appears HINT Update Packs are made available without notice We recommend that you update your program regularly ATTENTION When updating it is essential that Internet Explorer is installed in a system which can ...

Страница 135: ...ownloaded and a confirmation message to start installation appears 4 Click the Install button Installation starts and the Welcome to InstallShield Wizard for ScanSnap Manager window appears Follow the instructions on the screen to install HINT In case the latest update is already installed the message below appears Click the OK button to close the message HINT When you click the Info button Intern...

Страница 136: ...118 ...

Страница 137: ...ng ScanSnap Uninstallation removes the ScanSnap program files that were copied during the installation from the hard disk to restore the system environment to its original state This chapter describes how to uninstall ScanSnap 4 1 Uninstalling Supplied Programs 120 ...

Страница 138: ...e Programs screen which displays a list of the currently installed applications 4 Select the application to uninstall 1 When uninstalling ScanSnap Manager Select ScanSnap Manager 2 When uninstalling CardMinder Select CardMinder V2 0 3 When uninstalling PDF Thumbnail View Select PDF Thumbnail View 4 When uninstalling ScanSnap Organizer Select ScanSnap Organizer 5 Click the Change Remove button The ...

Страница 139: ...r CardMinder and ScanSnap Organizer Select Yes I want to restart my computer now and click the Finish button 2 For PDF Thumbnail View Click the Finish button ATTENTION Screen displays may vary slightly according to the operating system OS you are using Follow the on screen instructions of the OS Example When the OS is Windows 2000 Add or Remove Programs Add Remove Applications Change Remove button...

Страница 140: ...122 ...

Страница 141: ...Snap fi 5110EOX2 Operator s Guide 123 Chapter 5 Troubleshooting This chapter describes how to remove jammed documents and remedy other troubles 5 1 Clearing Document Jams 124 5 2 Troubleshooting Checklist 126 ...

Страница 142: ... document When removing the jammed document be careful not to get neckties or necklaces entan gled in the scanner The surface of the ADF glass becomes hot during operation Take care not to get burned Operation 1 Remove the document on the paper chute cover 2 Open the ADF cover while pulling the cover open lever HINT Clean the ADF referring the guidelines in 6 3 Cleaning the Inside of the Scan ner ...

Страница 143: ...eshooting 5 3 Remove the jammed document 4 Close the ADF cover You should hear the ADF cover click when it returns to its original position ATTENTION Make sure that the ADF is completely closed Otherwise paper jams or other feeding errors may occur Paper chute cover ADF cover ...

Страница 144: ...AC USB cable and AC adapter Disconnect and then re connect the AC cable and AC adapter Please wait at least 5 seconds before recon necting the AC cable Is the paper chute cover closed The scanner s power is controlled by closing opening the paper chute cover Open the paper chute cover Is Windows normally started up This scanner s power is controlled by turning on off the computer Please wait until...

Страница 145: ...connect the AC cable and AC adapter Please wait at least 5 sec onds before turning on the power again If this does not change the state perform step 3 3 If a USB hub is being used directly con nect ScanSnap to your PC If this does not change the state perform step 4 4 If your PC has multiple USB ports connect ScanSnap with other port s If this does not change the state perform step 5 5 Restart you...

Страница 146: ...port connect the scanner to this port If using a USB hub it must also support USB 2 0 interfaces 3 Multi feeds 4 occur frequently Is the Pad ASSY dirty Clean the pad following the instructions in 6 3 Cleaning the Inside of the Scanner page 136 Is the Pad ASSY worn Clean the Pad ASSY following the instructions in 7 2 Replacing the Pad ASSY page 144 Is the document stack thicker than 5mm Reduce the ...

Страница 147: ...ding photos and illustrations However the contrasts and colors might be affected Scanned images are not displayed on the screen when Allow automatic blank page removal is enabled When Allow automatic blank page removal is enabled almost blank doc uments with only a few characters may be acci dentally recognized as blank pages and removed from scanned image data Right click ScanSnap Manager icon on...

Страница 148: ... After you have removed the above given folders please confirm if the files fi5110e INT fi5110e PNF in the folder C Windows Inf have been deleted If this is not the case please remove also these two files ATTENTION After the uninstallation of ScanSnap Manager delete the following folders and files before restarting your computer Pay extra attention not to remove any other folders or files since th...

Страница 149: ...her the scanner is connected with USB1 1 or USB2 0 right click ScanSnap icon on the task and select Help About ScanSnap Manager then click Detail button on Ver sion Information window USB type is displayed 4 Multi feed is a phenomenon where two or more sheets are fed into the scanner together Visit our Web site for your reference Other useful information will be posted on the FAQ corner at the fol...

Страница 150: ...132 ...

Страница 151: ...ow to clean ScanSnap WARNING Fire Electric Shock Before you clean the scanner turn off the scanner and dis connect the AC adapter from the power outlet 6 1 Cleaning Materials 134 6 2 Cleaning the Scanner Exterior 135 6 3 Cleaning the Inside of the Scanner 136 6 4 Cleaning Carrier Sheet 139 ...

Страница 152: ...e FUJITSU scanner dealer where you pur chased the scanner 2 Any lint free cloth can be used Cleaning Materials Parts No Remarks Cleaner F1 CA99501 0013 1 bottle 100ml Moisten a cloth with this fluid and wipe the scanner clean 1 Lint free dry cloth Commercially available 2 ...

Страница 153: ...ened with a small amount of Cleaner F1 or any neutral detergent ATTENTION Never use paint thinner and other organic solvents During the cleaning prevent water or moisture from getting inside the scanner Do not use aerosol sprays to clean the scanner Aerosol sprays cause dirt and dust to enter the scanner resulting scanner failure and malfunction Cloth Cleaner F1 or neutral detergent Paint thinner ...

Страница 154: ...n sufficiently fixed on Clean the ADF according to the following procedure referring to the illustrations on the following page CAUTION The glass surface inside the ADF becomes hot during the scanner operation Before you start to clean the inside of the scanner disconnect the AC adapter from the outlet and wait at least 15 minutes to let the scanner cool down 1 Open the ADF while pulling the cover...

Страница 155: ... ADF cover and the opposite side Clean lightly Pick roller x 1 Clean lightly taking care not to scratch the surface of the roller Take particular care in cleaning the Pick roller since black debris on the roller adversely affect the pickup perfor mance Plastic rollers x4 on the ADF cover Clean them lightly while rotating the rollers with your finger Take care not to roughen the surface of the roll...

Страница 156: ... rollers since black debris on the rollers adversely affect the pickup performance To rotate the feed rollers and the eject rollers press the POWER button while holding down the SCAN button As a guideline six presses of the POWER button make the rollers to rotate one full turn 3 Close the ADF ATTENTION Connect the AC adapter and AC cable only when cleaning the feed rollers and eject rollers ATTENT...

Страница 157: ...ith Cleaner F1 sold separately or a mild detergent to lightly clean off the dirt and dust from the surface and the interior of the Carrier Sheet ATTENTION Never use paint thinner or other organic solvents Do not rub too hard Otherwise the Carrier Sheet may be scratched or be deformed After cleaning the interior of the Carrier Sheet with Cleaner F1 or a mild detergent close the Carrier Sheet after ...

Страница 158: ...140 ...

Страница 159: ...r describes how to replace consumables WARNING Fire Electric Shock Before you replace the consumables turn off the scanner and disconnect the AC adapter from the power outlet 7 1 Replacing Consumables 142 7 2 Replacing the Pad ASSY 144 7 3 Replacing the Pick Roller 147 7 4 Purchasing the Carrier Sheet 153 ...

Страница 160: ...e replacement cycles are rough guidelines for the case of using A4 Letter wood free paper 64 g m2 17 lb So it may differ according to the paper being used Use only the consumables specified by PFU LIMITED Do not use consumables and parts made by other manufacturers No Description P N Standard Replacement Cycle 1 fi 5110EOX Pad ASSY PA03360 0002 50 000 sheets or one year 2 fi 5110EOX Pick roller PA...

Страница 161: ...click the ScanSnap Manager icon on the task bar 2 Click Check consumable supplies at the menu The screen Check consumable status screen is displayed This screen indicates how many times consumables have been used Replace consumables referring to Target value to change supplies as a rough guideline For details about purchasing consumables visit the following website or con tact the Fujitsu scanner ...

Страница 162: ...low 1 Remove the documents on the paper chute cover 2 Open the ADF while pulling the cover open lever 3 Remove the Pad ASSY Pull out the Pad ASSY in the direction of the arrow while pinching both ends of the Pad ASSY ADF cover Cover open lever Paper chute cover ADF cover Pad ASSY ...

Страница 163: ... Carrier Sheet 7 4 Attach the new Pad ASSY 5 Close the ADF You should hear the ADF click when it returns to its original position ATTENTION Make sure that the Pad ASSY is completely attached Otherwise document jams or other feeding errors may occur Pad ASSY ADF cover Paper chute cover ADF cover ...

Страница 164: ...ScanSnap Manager icon on the task bar and select Check consum able supplies from the menu This displays the Check consumable status window 8 In the Check consumable status window click the Reset button of Pad ASSY Count The counter is reset to 0 ...

Страница 165: ...e Pick Roller Replace the Pick roller following the procedure below 1 Remove the documents on the paper chute cover 2 Open the ADF while pulling the cover open lever 3 Remove the sheet guide Pinch the knobs on the sheet guide and pull the sheet guide to remove it ADF cover Cover open lever Paper chute cover Handle Sheet guide Claw ...

Страница 166: ...haft from the scanner while pulling the shaft to the left ATTENTION If the around the pick roller is dirty by paper powder it may cause a scanning error Please remove the dirt using a dry cloth with dollop of Cleaner F1 Don t use water mild detergent or air spray Pick roller bushing Pick roller Pick roller shaft Pick roller shaft Pick roller ...

Страница 167: ... up its tab 7 Attach the new pick roller to the shaft Insert the shaft aligning the protrusion with the slot on the new pick roller ATTENTION If you push up the pick roller tab using your fingernail your fingernail may be hurt or get chipped If you cannot push it up successfully with your fingernail use a paper clip to push up the pick roller tab Shaft Tab Pick roller 1 2 Shaft Protrusion Pick rol...

Страница 168: ...nd set the shaft to the slot while lowering it 9 Rotate the roller bushing left by rotating it in the direction of the arrow ATTENTION Make sure that the Pick roller is completely attached Otherwise document jams or other feeding errors may occur Pick roller Pick roller shaft Pick roller Pick roller shaft Pick roller bushing ...

Страница 169: ...de and attach it to the scanner The sheet guide makes a clicking sound when the knobs fix into position 11 Close the ADF You should hear the ADF click when it returns to its original position 12 Turn on the scanner ATTENTION Make sure that the sheet guide is completely attached Otherwise document jams or other feeding errors may occur Handle Sheet guide Craw Paper chute cover ADF cover ...

Страница 170: ...icon in the task bar and select Check consum able supplies from the menu This displays the Check consumable status window 14 In the Check consumable status window click the Reset button of the consumable you replaced The counter is reset to 0 ...

Страница 171: ...e to damage or wear and tear you can purchase just the Carrier Sheet separately As a guideline it is recommended to replace the Carrier Sheet every 500 scans However it differs according to usage If scratches and dirt are conspicuous please replace the Carrier Sheet accordingly The description of the Carrier Sheet also sold separately and part number are as follows Desciption Oty P N ScanSnap Carr...

Страница 172: ...154 ...

Страница 173: ... mm 18 90 in 302 mm 11 89 in Weight 2 7 kg approxiamtely 5 95 lb Input power supply Voltage 100 240 V Number of phases Single phase Frequency 50 60 Hz Power con sumption During operation 27 W or less During standby 8 W or less Temperature Humidity Allowable Ranges Scanner state During operation During standby During storage transportation Temperature 5 to 35 C 41 to 95 F 20 to 60 C 4 to140 F 20 to...

Страница 174: ...156 ...

Страница 175: ...110EOX2 Operator s Guide 157 Contact the store where you purchased your ScanSnap or an authorized service provider for per forming repairs on this product The user must not perform any repairs on the scanner Repairs ...

Страница 176: ...158 ...

Страница 177: ...n Settings 46 Cleaner F1 134 Cleaning Carrier Sheet 139 Cleaning cycle 136 Cleaning Materials 134 Cleaning the ADF 136 Clearing Document Jams 124 Color scanning 55 Compression rate 64 Compression tab 64 Connecting ScanSnap 18 Connecting the AC adapter 18 Connecting the USB Cable 19 Consumables 142 Continue scanning 58 Correcting skewed documents 83 Correcting the orientation of scanned images 84 C...

Страница 178: ...oller 142 POWER button 4 Power lamp 4 Purchasing the Carrier Sheet 153 R Recognize Text 94 Regulatory Information vi Replacing the Pad ASSY 144 Replacing the Pick Roller 147 Rotating the page view of a PDF file 86 S Save Current Setting 67 Save tab 51 Saving Scan Settings 66 Saving scanned images as different files 88 Scan and Save Settings 47 SCAN button 4 Scanning color document in black and whi...

Страница 179: ...0EOX2 Operator s Guide 161 Stacker 3 36 T Troubleshooting 123 Troubleshooting Checklist 126 U Uninstalling ScanSnap 119 Uninstalling Supplied Programs 120 USB 2 0 7 USB connector 4 Use a fixed password 60 W Weight 30 ...

Страница 180: ...162 ...

Страница 181: ...l damages arising from the use of this manual and any claims by a third party z Copying of the contents of this manual in whole or in part and copying of the scanner application is forbidden under the copyright law ScanSnap fi 5110EOX2 Operator s Guide P3PC 1152 02EN Date of issuance January 2005 Issuance responsibility PFU LIMITED ...

Отзывы: