background image

E-26

BASIC PROCEDURES OF ADJUSTMENT MENU

• Shown below is the basic procedure used to change the 

options on the ADJUSTMENT MENU. (Ex.: Adjusting tint 
setting (Tint))

• Selecting the adjustment mode for adjustment or setting. 

(The items to be adjusted or set are stored for each 
adjustment mode.)

1

Press 

Y


.

The “Main Menu” screen will appear.

2

Press

a

 or 

b

 to select “Display 

Menu” and press 

d

 or 

Z

.

The “Display Menu” appears.

3

Press 

a

 or 

b

 to select “PICTURE” 

and press 

d

 or 

Z

.

Each time you press 

a

 or 

b

, one of the available 

menus appears in the following sequence:

PICTURE 

<

 AUDIO 

<

 POSITION/SIZE 

<


FEATURES 

<

 FACTORY DEFAULT

The “PICTURE” menu screen will appear.

4

Press 

a

 or 

b

 to select “Tint”.

5

Press 

d

 or 

Z

, and press 

c

 or 

d

 to 

change Tint values.

d

: More greenish colors

c

: More purplish colors

6

Press

Z


to store.

7

Press 

Y

 or 

h


when you 

finish.

* Repeat steps 3, 4, 5 and 6 when you wish to make 

changes to other options.

* Select “Default” and press 

Z

, and then select “Yes” 

and press 

Z

The PICTURE items are changed back to the default 
settings available when the display was purchased.

* Press 

Y

 or 

h

 to halt the operation in 

progress.

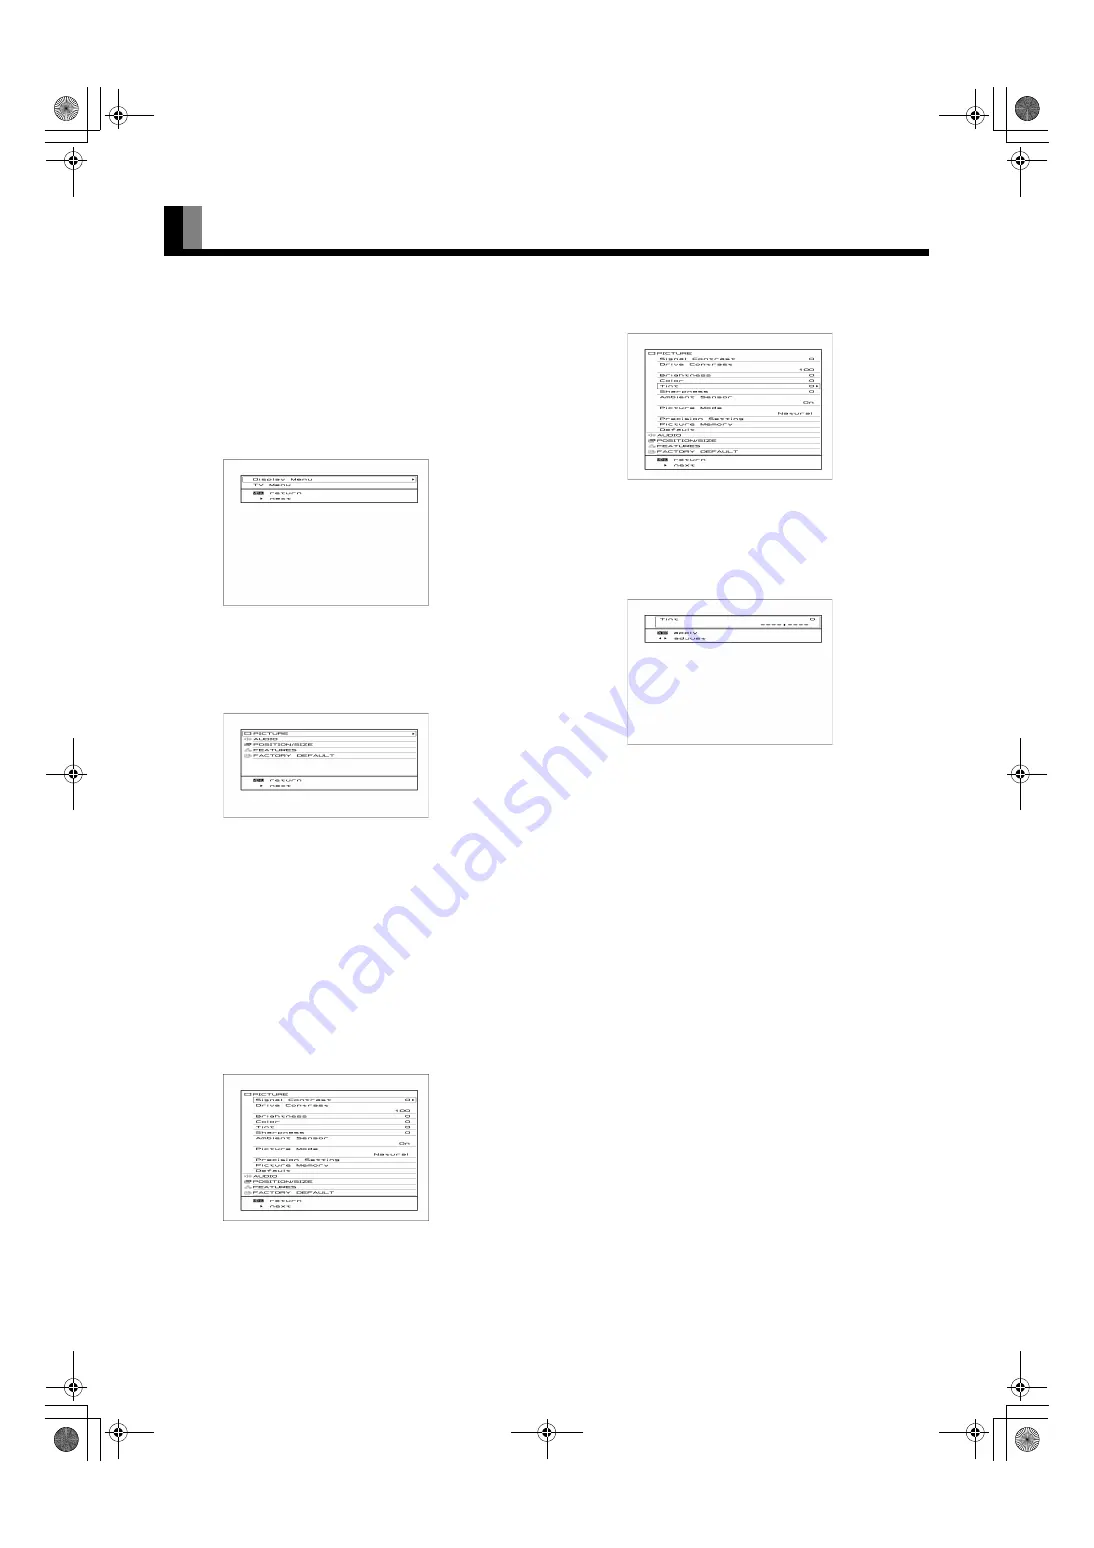
“Display Menu” selected in the main 
menu screen

“PICTURE” selected in the main menu 
screen

“Tint” selected in the PICTURE menu 
screen

“Tint” adjustment screen

7701_01_E.book  26 ページ  2007年3月22日 木曜日 午後2時38分

Содержание Aviamo P37FT05AEB

Страница 1: ...cautions manual Keep this manual where the user can see it easily Installation and removal require special expertise Consult your product dealer for details When English is selected at Language of the on screen display colour will be displayed in the case of the E model and color will be displayed for all other models The notation used in this user s manual is color FULL HD DISPLAY P37FT05AEB P65F...

Страница 2: ...Signal Contrast 27 Drive Contrast 27 Brightness 27 Color 27 Tint 27 Sharpness 27 Ambient Sensor 27 Picture Mode 27 Precision Setting 28 Black Level 28 Detail Gradation 28 3D NR 28 CODEC NR 28 Image Enhance 28 Color Temp 28 User Color Temp 28 Color Tuning 29 Progressive Scan 29 Gamma 30 ALC Setting 30 PAL 3D Y C 31 Picture Memory 31 ADJUSTING TO DESIRED AUDIO AUDIO MENU 32 Treble 32 Bass 32 Balance...

Страница 3: ...your display if it produces degraded pictures or noise due to electromagnetic radiation or if the infrared remote control does not function properly Pictures may not be displayed properly if you connect a non standard PC to the RGB input terminal In this case contact your dealer for more information The protective circuit built into the display automatically turns off the power if the display has ...

Страница 4: ...e Remote Control AA Battery 2 Safety Precautions User s Manuall Power Cord See P E 6 for the installation procedure See P E 6 for the installation procedure for 65 model Note Cables for connecting the display to external equipment are not supplied Contact your dealer for more information on these supporting products The pictures and diagrams in this manual are meant to complement the explanations ...

Страница 5: ... from being accidentally pulled make sure that they run along the wall or through corners To prevent accidents and ensure safety in the event of an earthquake secure the display to prevent it from tipping over When placing with the display surface down lay the body on a flat surface covered with a thick towel etc so as not to scratch the display surface Also be careful that the display does not ti...

Страница 6: ...ns Carefully check the terminals for position and type before making any connections Loose connectors can result in picture or color problems Make sure that all connectors are securely inserted into their terminals Large ferrite core 4 When connecting the cord to the power input terminal RS232C input terminal and HDMI input terminal attach one of these ferrite cores to the cord and the cable near ...

Страница 7: ...Power indicator lamp This lamp shows the state of the power supply Lit red Standby state Lit green Power ON state Flashing red or green Malfunction Flashes differently depending on the type of malfunction ON OFF button Turns the power ON and OFF standby state Remote control signal receiver Receives the signals from the remote control Ambient Sensor Detects the brightness of ambient light It is imp...

Страница 8: ...t this terminal to the HDMI output terminal of DVD recorder player or other video equipment If the HDMI output is connected an Audio signal cable does not need to be connected When connecting a cable attach a ferrite core to the cable See P E 6 RGB1 input terminal RGB1 INPUT mD sub Connect this terminal to the output terminal of a PC set top box game etc SCART input terminal VIDEO1 INPUT SCART inp...

Страница 9: ... Connect this terminal to the audio output terminal of VCR or PC etc Antenna input terminal RF INPUT Connect this terminal to the VHF UHF antenna signal CI Module slot COMMON INTERFACE Insert pay TV carrier s CI Module into this slot when receiving pay TV See P E 15 Power input terminal Connect this terminal to the power cord supplied with the display When connecting a cable attach a ferrite core ...

Страница 10: ...9 E 20 E 22 Press to switch analog TV and digital terrestrial TV Video input mode selector button Î E 19 Press to select VIDEO1 6 RGB input mode selector button Î E 19 Press to select RGB1 0 9 Number buttons Î E 19 E 22 Use these buttons for the Program No selection directly In the teletext broadcastings input the 3 digits for the required teletext page to change the page X PROGRAM RETURN button Î...

Страница 11: ...tected channel list when TV Favourite Channel List and Auto Scan were performed h EXIT button Î E 26 E 38 Use to exit from a menu screen ijkl COLOR button Î E 20 E 22 E 41 E 43 Used at teletext broadcasting and digital terrestrial TV menu setting 0 m SUBPAGE SUBTITLE button Î E 20 E 22 Press to display the SUBPAGE or SUBTITLE 1 q INDEX button Î E 21 E 22 Use in the teletext broadcasting 2 r MODE b...

Страница 12: ...N THE REMOTE CONTROL 1 To remove the cover slide it outwards while pressing it down 2 Place two AA batteries in the remote control Make sure that the batteries are properly oriented 3 Close the cover until it snaps into place PRECAUTIONS CAUTION It is very important to use replacement batteries of the same type as the originally used Do not use rechargeable batteries Ni Cd etc When disposing of us...

Страница 13: ...ay front Display side Upper Lower Right 5 m Front Remote Control Remote Control 37 model 65 model Note The remote control will not function properly if the batteries are dead Be sure to replace them as needed When used by lighting the remote control buttons frequently use by purchasing an alkali battery is recommended The remote control may not function properly if a high frequency fluorescent lam...

Страница 14: ...PMENT P E 16 E 17 4 Connect the display power cable to an AC outlet and turn on the power Perform detailed operation in accordance with Power On on P E 18 To watch digital terrestrial TV 5 Press to select the digital terrestrial TV mode See P E 20 for more information 6 Execute Auto Scan See P E 41 for more information 7 Select the program you want to watch To watch analog TV 5 Press to select the...

Страница 15: ...p Smart Card About pay TV To watch pay TV you must conclude a contract with the pay TV carrier in the area you want to watch After concluding the contact a CI Module and Smart Card will be supplied by the pay TV carrier TV viewing is possible by inserting the CI Module into the CI Module slot in this product Notes Use the dedicated CI Module and Smart Card supplied by the pay TV carrier Insert the...

Страница 16: ...tion manual for the equipment to be connected There are two audio inputs HDMI audio excluded Set them according to Audio Input on P E 36 Back of the display Component Video output Audio amplifier Personal computer HDMI compatible external equipment e g DVD player Audio output Digital audio input Analog audio input RGB output Analog HDMI output Audio output External equipment e g VTR DVD recorder p...

Страница 17: ...minals If the HDMI input or SCART input is connected an Audio signal cable does not need to be connected To SCART output To Audio output To Audio input To SCART input To Component Video output To Component Video input To HDMI input ToHDMI output Back of the display VTR DVD To SCART input output To SCART input output Note Unplug the power cord from the AC outlet before you connect external equipmen...

Страница 18: ... displayed when No Audio is selected See P E 36 An audio signal from an audio output terminal AUDIO OUTPUT DIGITAL or AUDIO OUTPUT ANALOG does not change Press K The audio is removed Press again to restore the audio to the original level The mute mode can also be released by pressing O or P An audio signal from an audio output terminal AUDIO OUTPUT DIGITAL or AUDIO OUTPUT ANALOG does not change Po...

Страница 19: ...o the channel viewed immediately before the present channel If the previous content was from another video input the video mode reverts to that input Press You can select from VIDEO1 mode to VIDEO6 mode The video modes corresponding to each input terminal are as follows VIDEO1 SCART VIDEO2 SCART VIDEO3 Component Video VIDEO4 Component Video VIDEO5 HDMI VIDEO6 HDMI For selection of the input termin...

Страница 20: ...sappears EPG information cannot be displayed when it is not being broadcast or when it cannot be acquired Displays the Favourite Channel List and the Channel List acquired by Auto Scan Press Each time this button is pressed the displayed list is switched as follows Favourite List Channel List No display To select channel from Favourite List Use a or b to select the channel you want to watch from t...

Страница 21: ...old the transmission of the teletext program you are currently watching o Press to change the size of the current watching page q Press to return to the INDEX page At teletext broadcasts there may be remote control buttons that do not work When you want to operate reset teletext broadcast Displayed the information for the channel currently being viewed Displays the Carrier Name Channel Name Signal...

Страница 22: ...he LIST mode 2 Press i j k or l to select the color button for storing the teletext page program 3 Press t for three seconds at least to store the displaying teletext program to the color button During the storing operation the color button momentarily turns white 4 In the LIST mode press i j k or l to display the stored teletext page program The following operations can also be performed using th...

Страница 23: ... sequences used are as follows Video mode SD signal Normal Wide1 Wide2 Zoom1 Zoom2 Video mode HD signal Wide1 Wide2 True Signal RGB mode Normal Wide Zoom Depending on the type of signal some aspects may not be selected When the Wide function is used to select the Zoom1 or Zoom2 mode it may not be possible to display part of the menu screen Listening mode NIGHT DISPLAY OFF TIMER FINE Note When the ...

Страница 24: ...rizontally extended pictures with captions without eliminating the caption Only the height of pictures is reduced not the height of the caption Captions may not be easy to read however depending on the picture The Zoom mode display method may be different depending on the input signal The following aspect ratios are available VHF UHF broadcasting BS broadcasting 4 3 aspect ratio HDTV broadcasting ...

Страница 25: ...E 33 Default FEATURES E 34 Adjustment E 34 Dot Clock E 34 Clock Phase E 34 Clamp Position E 34 Auto Calibration E 34 On Screen Menu E 34 OSD E 34 Language E 34 Name Select E 35 Input Terminal E 35 D SUB Input E 35 Video1 E 35 Function E 35 Video Format E 35 Video2 E 35 Function E 35 Video Format E 35 Others E 36 Auto Off NO SIG E 36 Time E 36 Background E 36 Digital Tuner Power Save E 36 Audio Inp...

Страница 26: ... PICTURE AUDIO POSITION SIZE FEATURES FACTORY DEFAULT The PICTURE menu screen will appear 4 Press a or b to select Tint 5 Press d or Z and press c or d to change Tint values d More greenish colors c More purplish colors 6 PressZto store 7 Press Y or h when you finish Repeat steps 3 4 5 and 6 when you wish to make changes to other options Select Default and press Z and then select Yes and press Z T...

Страница 27: ... Z to store Automatically adjusts the picture quality to an optimized level that matches the brightness of the ambient light Each time c or d is pressed the setting is switched On Off Press Z to store Each time you press c or d the available choices appear in the following sequence Natural Fine Effective Conventional Still Press Z to store Signal Contrast Drive Contrast Brightness Color Tint Sharp...

Страница 28: ...g sequence Off Min Mid Max Press Z to store This performs detailed image quality settings Image Identify RGB This function discerns between the natural image display section and the text display section and performs correction to enable an optimized display for each Each time c or d is pressed the setting is switched On Off Press Z to store Chroma Transient This function corrects the color contour...

Страница 29: ...Corrects the Color and Tint for yellow g targeting green CCorrects the Color and Tint for green c targeting cyan Corrects the Color and Tint for cyan b targeting blue Corrects the Color and Tint for blue m targeting magenta Corrects the Color and Tint for magenta w targeting white Corrects the R Gain G Gain and B Gain for white This sets the conversion processing of interlace signals to block rece...

Страница 30: ...evel Sets the upper limit value of the ambient brightness detected by the ambient sensor Press c to lower the upper limit value Press d to raise the upper limit value Press Z to store High Point Gain Sets the upper limit value of the screen luminance corresponding to the brightness detected by the ambient sensor in a bright environment Press c to lower the upper limit value Press d to raise the up...

Страница 31: ...re adjustment values stored in the selected Memory Save Use aor bto select Memory 1 8 If Zis pressed the current picture adjustment values are stored to the selected Memory PAL 3D Y C Picture Memory Picture Memory Selection Screen Load Selection Screen Save Selection Screen Note If the operation is not executed for about 60 seconds the menu disappears Some functions are not available depending on ...

Страница 32: ... or d one of the available choices appears in the following sequence Off Min Mid Max Press Z to store Sets the sound field Each time c or d is pressed the setting is switched Flat Standard Voice Surround Flat Reproduces the sound input signal naturally Mild sound reproduction is realized Standard Listening fatigue free placid sound reproduction is realized by suitable equalizing sound quality adju...

Страница 33: ...cture down Press Z to store Screen width Width d Increases the width c Reduces the width Screen height Height a Increases the height b Reduces the height Press Z to store Screen Position POSITION SIZE Menu screen Position adjustment screen Screen Size Size adjustment screen Note If the operation is not executed for about 60 seconds the menu disappears Some functions are not available depending on ...

Страница 34: ...the Auto setting ensures the optimal value When Manual is selected use c or d to adjust to minimize pictures blur Clamp Position RGB Comp video Adjusts the extremely dark or bright pictures Normally the automatic setting ensures the optimal value Use c or d to adjust pictures optimally Auto Calibration RGB Adjusts the dynamic range of images to the optimum Performed while a white screen signal is ...

Страница 35: ...s in the following sequence RGB PC Decoder RGB PC For using RGB for PC Decoder For using digital broadcast tuner 3 Press Z to store Function Select the video input format Each time c or d is pressed the setting is switched Video S video RGB Press Z to store Video Format You can use this option to select the video format appropriate for the input signal Each time you press c or d one of the availab...

Страница 36: ...s in the following sequence No Audio Audio1 Audio2 No Audio No audio in the corresponding mode Audio 1 2 SCART Audio 3 4 Selects Audio 3 through 4 for receiving audio in the corresponding mode Audio 5 6 HDMI There is also Audio Input that cannot be selected Repeat steps 1 and 2 for each piece of input equipment 3 Press Z to store AUDIO menu will not be displayed when No Audio is selected You can u...

Страница 37: ...the brightness of the part at which left and right images are not displayed can be set Normally we recommend that Light Gray be used Each time you press c or d the settings is switched Black Dark Gray Light Gray Press Z to store Effective for plasma display Burn in can still occur if the Normal mode is shown for extended periods Displays system operation status Select Information and press Z The I...

Страница 38: ...mpleted the initialization will be displayed after initializing 7 Press Y or h when you finish Display Menu selected in the main menu screen FACTORY DEFAULT selected in the main menu screen Displays the message of whether to proceed the initialization Displays the message of having completed the initialization Note If the operation is not executed for about 60 seconds the menu disappears Some func...

Страница 39: ...switched West Euro standard BG reception East Euro standard DK reception UK standard I reception France standard LL reception Adjust Each time c or d is pressed the fine tune adjustment for Tuning is switched Skip This function specifies whether or not to use the Skip function for the displayed Program No Each time c or d is pressed the setting is switched Off On Off The Skip function is not avail...

Страница 40: ... Sets the 1st preferred audio 2nd Pref Audio Sets the 2nd preferred audio 3rd Pref Audio Sets the 3rd preferred audio Pref Subtitle 1st preferred language which displays Subtitle can be set Each time c or d is pressed the language is switched as follows English Français Deutsch Italiano Español Select the language and press Z to store TV Menu screen LANGUAGE SETUP LANGUAGE SETUP screen Note If the...

Страница 41: ...nu may not be displayed depending on the broadcast station Switch the TV and Radio list display 5 When TV Radio is pressed TV channel list and Radio channel list are switched Each time the Auto Scan Manual Scan and Carrier Setup setting screen is entered the Password input screen is displayed After this screen is displayed enter the password Operation is different depending on the Password mode se...

Страница 42: ... set age or younger cannot be viewed It is switched each time c or d is pressed None 4 5 6 18 The Parental Lock menu may not be displayed depending on the broadcast station Password change The password can be changed by entering the passwords in Old Password New Password Confirm Password order Make a note so as not to forget the modified password Displays the information on the Smart Card when a S...

Страница 43: ... E 42 Since recording start processing may take some time when reserving recording provide an ample margin at the time Add Edit operation procedure Channel Channel Name After pressing c or d select the channel using a or b and set by pressing Z Date Start Day Set using the numeric keypad Start Start Time Set using the numeric keypad End End Time Set using the numeric keypad Mode Select using c or ...

Страница 44: ...del Speaker 1 set of 2 speakers P SP2000 for attaching to the display for 65 model Warning To prevent injury fire and electric shock arrange for options to be initially installed or installed at a different location by your dealer CAUTION This display P37FT05AEB is for use only with Fujitsu General Limited s option P TT3700 This display P65FT00AEB is for use only with Fujitsu General Limited s opt...

Страница 45: ...z Signal 640 x 480 31 47 59 94 VGA 640 x 480 37 50 75 00 VGA 75 Hz 640 x 480 43 27 85 01 VGA 85 Hz 720 x 400 31 47 70 09 400 lines 800 x 600 37 88 60 32 SVGA 60 Hz 800 x 600 46 88 75 00 SVGA 75 Hz 800 x 600 53 67 85 06 SVGA 85 Hz 1024 x 768 48 36 60 00 XGA 60 Hz 1024 x 768 60 02 75 03 XGA 75 Hz 1024 x 768 68 68 84 99 XGA 85 Hz 1280 x 1024 63 98 60 02 SXGA 60 Hz 1280 x 1024 79 98 75 03 SXGA 75 Hz 8...

Страница 46: ...he dust on the cabinet to prevent scratches on the cabinet caused by dust If the cabinet is extremely dirty use a clean soft cloth from which the excess water has been removed after being soaked in a kitchen cleaner diluted with water Finish cleaning by wiping the cabinet with a clean dry soft cloth To prevent fingerprints etc on the cabinet do not hold the cabinet with your bare hands Cleaning th...

Страница 47: ...ING TO A DESIRED PICTURE on P E 27 E 30 Improper screen position size Check whether screen position and size have been properly adjusted See ADJUSTING SCREEN POTISION AND SIZE on P E 33 No audio Check cables for disconnection Check whether the proper audio input has been selected See Audio Input on P E 36 If Out of range appears the display is receiving a signal whose picture or signal cannot be r...

Страница 48: ...PUT Component video3 RCA terminals Y 1 Vp p 75 Ω PB CB 0 7 Vp p 75 Ω PR CR 0 7 Vp p 75 Ω VIDEO5 6 INPUT HDMI terminal HDMI type A connector RGB1 INPUT mD Sub 3 rows 15 pin Picture signal 0 7 Vp p 75 Ω Synchronization signal TTL level AUDIO1 2 INPUT 2 audio input pin jacks L R 0 5Vrms AUDIO OUTPUT ANALOG 2 audio output pin jacks L R 0 5 Vrms AUDIO OUTPUT DIGITAL Optical audio terminal PCM RS 232C D...

Отзывы: