background image

Before using the terminal

41

Enter characters using software keyboard displayed on the 
screen.

Entering characters with Super ATOK ULTIAS is mainly 
described in this section.

Switching to other input method is available.

P44

You can connect an external keyboard to enter characters.

P47

Using keyboard

You can enter characters using numeric keypad, QWERTY 
keypad or handwritten input.

You can activate voice input from each keypad.

P42

When the overwrite handwritten input option is enabled, 
handwritten input is available with the numeric or QWERTY 
keypad displayed.

P45

Numeric keypad

Multiple characters are assigned to a key.

You can select input method from Flick input, Numeric 
keypad input, Gesture input, or 2-touch input.

P43

QWERTY keypad

Enter characters using Romaji input.

Handwritten input

Enter characters in handwriting.

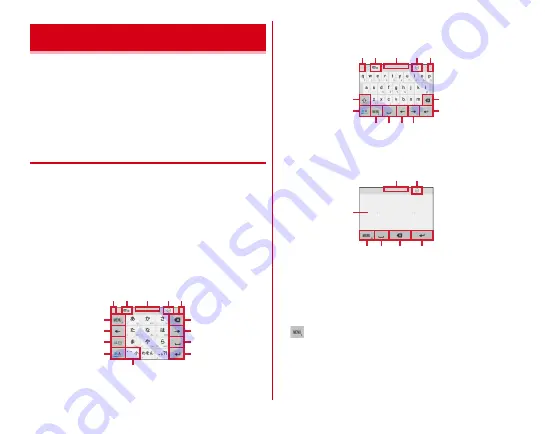
Some key displays may be changed depending on the 
setting or condition.

a

Drag left or right to adjust the width of the keypad

b

Enable/disable Overwrite handwritten input

c

Drag up or down to adjust the height of the keypad

d

Display a list of number/symbol/smiley/pict/pict D

e

 : Display menu

When the menu is displayed, the following operations 
are available.

テンキー

 (Numeric keypad) : 

Switch to Numeric keypad

QWERTY

キー

 (QWERTY keypad) : 

Switch to QWERTY 

keypad

Character entry

i

m

a

a

d

c

b

j
k
l

e
f
g
h

e

i
l

n
h

f j

k

a

a

d

c

b

e

o

i

l

k

d

c

Содержание ARROWS NX F-01K

Страница 1: ...F 01K INSTRUCTION MANUAL 17 11 ...

Страница 2: ...or notice クイックスタートガイド Quick start guide included with the terminal in Japanese only This guide provides information of parts names and functions Instruction Manual application e manual installed in the terminal in Japanese only This manual provides detailed information and operations of the functions Operation steps From the Home screen Instruction Manual When activating for the first time follow ...

Страница 3: ...ご利用にあたっての注意事項 Notes and instructions for use in Japanese only TV antenna cable F01 You can check or purchase optional accessories compatible with the terminal optional in the DOCOMO online shop https www mydocomo com onlineshop options index html In Japanese only Basic package ...

Страница 4: ...con 49 Task manager 56 Split screen 56 Switching the home applications 57 docomo LIVE UX 58 Home screen 58 Application list 60 Backup and restoration of Home screen 65 My Magazine 65 Information of home application 66 Phone 67 Making a call video call 67 Receiving a call video call 69 Operation during a call 70 Recent calls 72 Phone memo 73 Call settings 73 Phonebook 77 Mail Browser 80 docomo mail...

Страница 5: ...input 160 Backup reset 161 Useful tools 162 Date time 166 Accessibility 166 About phone 167 File management 168 Storage Internal storage 168 microSD card External storage 168 File operations 169 Data communication 170 Bluetooth communication 170 NFC communication 173 External device connection 175 Connecting with a PC 175 Connecting with a printer 175 Connecting with DLNA device 177 Connecting wit...

Страница 6: ...FAQ 186 Anshin Enkaku Support 193 Warranty and After Sales Service 194 Software update 196 Main specifications 199 Specific Absorption Rate SAR of Mobile Phones 203 Export Administration Regulations 208 Intellectual Property Right 208 SIM unlock 211 Index 212 ...

Страница 7: ...recognize them as the same user even after the user is switched Note that DOCOMO assumes no responsibility for any loss or troubles the customer or the third party may be incurred by using the function P145 Regularly take a memo of the information you registered in the terminal or store it in the external memories such as microSD card or PC DOCOMO assumes no responsibility for any loss of your dat...

Страница 8: ...nning applications may not operate normally In that case delete the saved data Applications and service contents are subject to change without prior notice For using services and applications provided by the third party s including the applications provided by Google LLC confirm the terms and conditions specified by Google or the providers DOCOMO assumes no responsibility for any malfunctions resu...

Страница 9: ...eatment or long term hospital attendance as an outpatient 3 Physical damage This refers to extended damage to buildings furniture livestock pets etc The symbols below show specific directions Precautions Always follow these directions DANGER This sign denotes that death or serious injury 1 may directly result from improper use WARNING This sign denotes that death or serious injury 1 may result fro...

Страница 10: ...k resistance Do not charge when the terminal is wet with water drinking water perspiration seawater urine of pet animals etc May cause fire burns injuries or electric shock For the waterproof function refer to the following P23 Waterproofness Dustproofness shock resistance Do not subject the terminal to strong pressure or break the terminal Especially when bringing the terminal putting in a pocket...

Страница 11: ...s not complete after the specified charging time has passed stop charging Not doing so may cause fire burns or injuries due to overcharge Make sure to turn off the terminal or stop charging before you get close to places like a gas station where a flammable gas or dust can be generated Not doing so may cause the gas to ignite or fire When using Osaifu Keitai in a place such as a gas station turn O...

Страница 12: ...n or it may result in low temperature burns depending on your constitution and or health condition Handling the terminal DANGER Do not throw the terminal into fire or apply heat May cause fire burns injury etc Do not apply excessive force to the terminal such as sticking a nail hitting with a hammer or stepping on May cause fire burns injury etc If the internal substance of the terminal etc gets i...

Страница 13: ... the terminal in a place where the use is prohibited The radio wave from the terminal may affect electronic equipment and electronic medical equipment When using the handsfree call ringtone is ringing loud or in the standby mode be sure to keep this terminal off of the ears Also when playing games video or music with an earphone microphone connected to the terminal adjust the volume to the proper ...

Страница 14: ...es The vapors from leaking battery fluid may ignite fire or explode Be careful not to let your pet bite the terminal May cause fire burns injury etc resulting from the damage of the internal battery CAUTION Do not swing the terminal around by holding a strap etc May cause accident such as injuries When using the motion sensor check the safety around you hold the terminal firmly and do not shake it...

Страница 15: ... part of this terminal generates magnetism Not doing so may cause injuries etc due to adhered objects When watching the display screen keep a certain distance from the display in a fully bright place Not doing so may reduce visual acuity Handling the adapter WARNING Do not use the adapter cord if it gets damaged May cause fire burns or electric shock Do not use the adapter in a bathroom or other h...

Страница 16: ...doing so may cause fire burns or electric shock When you connect the adapter to an outlet or accessory socket firmly connect it to the outlet Not doing so may cause fire burns electric shock When you disconnect the power plug from an outlet or accessory socket do not pull the adapter cord with excessive force Instead hold the adapter to disconnect Not doing so may cause fire burns electric shock W...

Страница 17: ...ect the performance of electronic medical equipment When electronic medical equipment other than implanted pacemakers or defibrillators are in use outside of medical facilities such as in home care settings check with the device manufacturer to determine how the device is affected by electrical signals The radio wave from the terminal may affect the performance of electronic medical equipment Make...

Страница 18: ...treatment Slot cap Cap part exterior a part of interior Aluminum Alumite treatment Cap part interior PC resin polyester elastomer resin silicone resin None Tray pin pin cover Stainless steel None Tray Aluminum Alumite treatment Stereo earphone jack PA resin None IMEI sheet Sheet Bar code PET None USB Type C jack Stainless steel Nickel plating Part Material Surface treatment Cord Olefinic elastomer...

Страница 19: ...e careful not to damage the jack etc Do not place the terminal near an air conditioner outlet The rapid change in temperature may cause condensation causing internal corrosion and malfunction Do not apply excessive force to the terminal Putting the terminal into a tightly packed bag or sitting on the terminal in your pocket might cause malfunction or damage of the display internal circuit board in...

Страница 20: ...t cards telephone cards floppy disks etc may be erased Bringing strong magnetism near may cause malfunction of the terminal Do not decorate the terminal with films or stickers May hinder the proper operations for functions using the proximity sensor For a location of the proximity sensor see the following P30 Part names and functions The internal battery is not covered by the warranty because it i...

Страница 21: ...lity for malfunctions occurring as the result of inserting and using docomo nano UIM card with another IC card reader writer On occasion clean the IC part to use it If the IC part is dirt you may not use the terminal normally For cleaning use a soft dry cloth such as a cloth for eyeglasses to wipe Be sure to back up the data you saved in the docomo nano UIM card on a microSD card PC or cloud servi...

Страница 22: ...ect identification devices cannot be avoided Use of Bluetooth function is limited in some countries Confirm regulations of the country region to use it To use in airplane confirm with airline company in advance Cautions on using Bluetooth devices In the bandwidth used by the terminal in addition to home electric appliances such as a microwave oven and industrial scientific medical devices in plant...

Страница 23: ...creen may be blurred When multiple wireless LAN access points exist near the terminal and they use the same channel search may not be performed correctly Frequency bands The frequency band used by the terminal s wireless LAN function is written as follows a 2 4 Radio equipment that uses the 2400 MHz band b DS The modulation is the DS SS method c OF The modulation is the OFDM method d 4 The expecte...

Страница 24: ... partitions etc 3 If this device generates harmful radio wave interference against in plant radio stations for identification of mobile objects or amateur radio stations or if any trouble contact General Inquiries on the last page of this manual Cautions on using 5 GHz devices Using wireless LAN built into the terminal in 5 2 5 3 GHz outside is prohibited by the Radio Law Channel numbers and frequ...

Страница 25: ...e basic software Repairs may be refused as a modification of software F 01K has a waterproof equivalent to IPX5 1 and IPX8 2 as well as a dustproof property equivalent to IP6X 3 on the condition that the slot cap is securely attached Also the terminal comprises the shock resistant structure which passed the test 4 in accordance with United States Military Standard 1 IPX5 means that a phone keeps f...

Страница 26: ...op Raindrop from 1 meter height for 15 minutes Heat resistance Temperature durability test against 21 50 sudden changes of temperature for 3 hours consecutively Operation at high temperature 60 fixed Operation environment High temperature test at 60 Operation at high temperature change 32 49 High temperature test of 3 cycles of temperature changes of 32 49 Storage at high temperature 70 fixed Stor...

Страница 27: ...minal to talk or watch TV without using an umbrella in the rain with a rainfall of about 20 mm per hour When your hands or the terminal are wet avoid opening closing the slot cap The terminal can be washed with tap water at room temperature With holding the slot cap not to open wash the terminal with tap water without rubbing hard Do not apply water flow stronger than allowed P23 Do not use brush ...

Страница 28: ... cause a damage of the slot cap After using insert the slot cap in the direction of the arrow straight firmly press part Make sure that there is no gap between the terminal and the slot cap Make sure to firmly close the slot cap Even a fine obstacle one hair one grain of sand tiny fiber etc which is put between contact surfaces may allow water or dust to enter Do not poke the stereo earphone jack ...

Страница 29: ... to remove the dirt and it may cause damage or malfunction Do not put the terminal in hot water use it in a sauna or apply hot airflow from a hair dryer etc to it Do not move the terminal in water or slam the terminal against the surface of water When you use the terminal in swimming pool obey rules of the facility The terminal does not float on water Do not leave water drop on the terminal In a c...

Страница 30: ...ck side with dry clean cloth etc b Shake the terminal approximately 20 times firmly holding it until there is no more water splattering c Swing the terminal about 10 times against a dry clean cloth etc to wipe off any water remaining in the stereo earphone jack USB Type C jack mouthpiece microphone earpiece speaker speaker back side microphone keys etc d Wipe off water drained from the terminal wi...

Страница 31: ...ately drain the terminal and then wipe off the remaining water with a dry clean cloth or something similar Ensure that there are no water droplets or foreign objects on the USB Type C jack before use Do not use the AC adapter in a bathroom shower room kitchen lavatory or other highly humid area May cause fire or electric shock Do not touch the AC adapter with wet hands May cause electric shock ...

Страница 32: ...ghtness and automatically adjusts the display backlight f Earpiece Speaker g Iris authentication LED P153 Use for iris registration or iris authentication operation h Display Touch panel i Mouthpiece microphone 3 j Speaker k Out camera P104 l Back side microphone Use for reducing noise during a call Do not cover it m Wi Fi Bluetooth antenna section 4 n LTE FOMA GPS antenna section 4 o Wi Fi antenn...

Страница 33: ... or covering the sensor with fingers may cause erroneous operation or incorrect sensing result 3 Do not put stickers or a film on mouthpiece microphone area Also do not cover it with a finger May cause erroneous operation or incorrect sensing result 4 It is built in the terminal Covering around the antenna by the hand may affect the quality 5 Install remove after turning off the power To avoid wat...

Страница 34: ...mo nano UIM card or NTT DOCOMO website Installing Removing a docomo nano UIM card Install remove after turning OFF the power Be sure to use the slot cap when inserting a docomo nano UIM card Inserting of a docomo nano UIM card alone may cause a malfunction Installing a Face the display side of the terminal up put your fingertip into the groove and then open the slot cap P26 b Draw the slot cap in ...

Страница 35: ... to insert or remove the docomo nano UIM card using excessive force may cause it to break For drawing inserting the slot cap from into the slot do not draw or insert forcibly Doing so may damage the slot cap Security code for the docomo nano UIM card You can set up a security code called a PIN code for the docomo nano UIM card P149 Save the data of the terminal to a microSD card or import the data...

Страница 36: ...arge amount of data such as video recording use a high speed microSD card Class 10 or more is recommended For speed class of microSD card up to Class 10 can be available The terminal supports up to UHS Class 3 speed microSD card Installing Removing microSD card Install remove after turning off the power Be sure to use the slot cap when inserting a microSD card Installing of a microSD card alone ma...

Страница 37: ... charger and retry When the power voltage of the internal battery is abnormal charging error occurs and the indicator LED flashes Immediately exit any applications if you are using Remove the terminal from the charger and charge it again in the proper manner If you still fail to charge the terminal normally remove the terminal from the charger turn off the power then contact Technical Inquiries Re...

Страница 38: ...ow the procedure below to use AC Adapter 06 optional for charging a Insert the Type C plug of the AC adapter horizontally into the USB Type C jack of the terminal b Insert the AC adapter power plug into an outlet The indicator LED on the terminal lights up red while charging and turns off when charging is complete c When charging is complete remove the AC adapter s power plug from the outlet d Rem...

Страница 39: ... Turn the Airplane mode ON OFF P133 Manner mode Manner mode Silent Manner mode Alarm Turn the Manner mode ON OFF P141 Emergency mode Turn the Emergency mode ON OFF P40 2 Power off OK The terminal turns off vibrating Using touch panel Touch the touch panel directly to operate the terminal Notes for using the touch panel The touch panel is designed for being touched lightly with fingers Do not push ...

Страница 40: ... move it to the desired position Slide Swipe Touch the screen with your finger and drag to the desired position For some applications you can touch the screen with your fingers and move them up and down or rotate them to operate Pan Drag the screen in a direction to view the desired part when whole web page etc is not displayed in one screen Pinch Touch the screen with two fingers and widen pinch ...

Страница 41: ...ng Scroll is available until you release your finger You can set the scroll operation to No change in speed or Change speed in Action setting When Change speed is set set the scroll speed P163 Magnification mode Zoom in center of screen Double tap Exlider P Zoom in Slide Exlider P up or down Change the magnification of the screen Specify the portion of the screen to zoom in Double tap Exlider P Di...

Страница 42: ... from the Home screen tap Disaster kit OK for setting Emergency mode In Emergency mode the setting is not canceled by turning the power off Application permissions The first time you launch an application or function that accesses other functions and information on the terminal a confirmation screen that requests authorization for access rights appears When you approve these access rights the corr...

Страница 43: ...d Multiple characters are assigned to a key You can select input method from Flick input Numeric keypad input Gesture input or 2 touch input P43 QWERTY keypad Enter characters using Romaji input Handwritten input Enter characters in handwriting Some key displays may be changed depending on the setting or condition a Drag left or right to adjust the width of the keypad b Enable disable Overwrite ha...

Страница 44: ...ursor up or flick right to move the cursor down g Display a list of number symbol smiley pict pict D h Switch input mode to Kana Alphabet Switch input mode to Kana Alphabet Number i Backspace Delete a character to the left of the cursor After a character is fixed flick a key up to delete the character on the right to the cursor and flick to the left to delete all characters on the left to the curs...

Страница 45: ...ions tap Quote from Personal note On the browser Chrome ID and password will be automatically entered as the quotations according to the related screen information However ID and password may not be entered automatically as the quotation according to the screen layout In other applications the items selected from the list screen will be entered as the quotations according to the related screen inf...

Страница 46: ...easing your finger from the screen 2 touch input Tap a key assigned a character you want to enter first then tap a desired character Switching input method You can also switch to another input method such as the Google keyboard to enter characters The Google keyboard does not support the Japanese input mode 1 From the Home screen Settings Languages input 2 Current Keyboard Select an input method T...

Страница 47: ...o cursor moving Auto cursor moving Time of auto cursor moving Gesture input Gesture guide Gesture sensitivity Around touch position Show faster Close faster Time of gesture guide や key gesture Direct numeric input QWERTY keypad Set Direct alphanumeric input Show numeric keys Vertical screen Horizontal screen Handwritten input Set Overwrite handwritten input Numeric keypad QWERTY keypad Number of i...

Страница 48: ... personal dictionary common phrase are not deleted even if Initializing settings is executed Open source software license Display the open source software license Super ATOK ULTIAS Check the version of Super ATOK ULTIAS Editing text You can copy texts in the character entry field web page or received mail and cut and paste texts in the character entry field Operation method may vary by application...

Страница 49: ...to the USB Type C jack on the terminal Setting external keyboard A keyboard is displayed when the external keyboard is connected 1 From the Home screen Settings Languages input 2 Physical keyboard Select a keyboard Select a keyboard layout Displaying the virtual keyboard You can set whether to display the software keyboard when an external keyboard is connected 1 From the Home screen Settings Lang...

Страница 50: ... Google Assistant Exlider Swipe by finger new operation experience 2 In the initial settings screen for docomo services Agree to all NEXT 3 Set each item d ACCOUNT Set d ACCOUNT for using in docomo apps docomo cloud Set whether to use docomo cloud Install all apps Install applications necessary for using docomo services you subscribed all at once 4 In Anything else screen set each item ALL SET The...

Страница 51: ...me Depending on the notification contents the indicator LED lights only when in the sleep mode Icons on Navigation bar Operation icons appear on the navigation bar shown at the bottom of the screen Names and actions of icons are as follows Back icon Tap Return to the previous screen exit out of application Home icon Tap Return to the Home screen P58 Touch and hold Activate Google Assistant History...

Страница 52: ...to sleep mode Displaying the keyboard for character entry To set to show hide slide display icons while slide display is displayed tap or from the Home screen tap Settings Useful tools Navigation bar For some screens such as during screen lock or when the screen saver is activated sliding is not available Icons on the status bar The status bar along the top of the screen shows notification icons a...

Страница 53: ...u Keitai lock is set on the terminal and docomo nano UIM card P96 NFC Osaifu Keitai lock is set on the terminal or docomo nano UIM card P96 Omakase Lock is set on the terminal and docomo nano UIM card Omakase Lock is set on the terminal or docomo nano UIM card Phone memo is set P73 Speaker phone is ON P70 Microphone is muted P70 Vibration is ON P140 Do not disturb is set to Alarms only or Priority...

Страница 54: ...unction or setting Flick the Panel switch downward to display the hidden panel switches d Notification Tap the notification to check details or activate the corresponding application Touch and hold the notification or slide left or right and then tap to make settings of Notifications e CLEAR ALL Clear the all notifications and close the Notification panel Some notifications may not be cleared depe...

Страница 55: ...corresponding setting menu f Notification P52 g Screen brightness level Slide the slider to adjust the brightness h Indicator Indicates the number of Panel switch pages and the which page you are in INFORMATION To close the Panel switch flick the Panel switch upward or tap Back ON OFF operation of NFC in the Panel switch is unavailable while charging because the NFC is disabled Sleep mode When the...

Страница 56: ...n function By default you can call out Slide in launcher and Capture Draw Highlight Copy by sliding your finger from the slide spot start point for sliding at the corner of the screen For setting of the Slide in function refer to Slide in function P164 Slide in launcher Activate an application from a shortcut saved in Slide in launcher 1 Slide your finger from the slide spot to the center of the s...

Страница 57: ...ctivate an application by tapping an app icon displayed next to Share Highlight Copy Text strings selected by tracing on the screen with your finger can be copied or shared with another application 1 Slide your finger from the slide spot to the center of the screen then release the finger in Highlight Copy area By default Capture Draw Highlight Copy are set in the slide spot at the lower right of ...

Страница 58: ...ion To end all applications tap Delete all INFORMATION You can set the recently used application to be shown hide P157 Split the screen in two and operate two different applications at the same time in each screen Activate an application to display beforehand If the application does not support the split screen it cannot be displayed with this function 1 History The recently used applications are ...

Страница 59: ...e center of the screen to the upper part or lower part of the screen left end or right end in the landscape view or touch and hold When is displayed the split screen is still functioning When the Home screen or the application list screen is displayed tap to return to the split screen Change the screen Home screen displayed by tapping Home docomo LIVE UX NX Home and NX Home Simple are available in...

Страница 60: ...isplay the application list screen P60 My Magazine button Display My Magazine P65 f Customize area You can locate applications widgets and folders g Folder Store multiple applications Customizing the Home screen You can locate desired applications widgets etc or create folders to manage applications on the Home screen Applications are located on either Home screen or the application list screen To...

Страница 61: ...to remove 2 Drag to Back to apps list Remove from Home Applications are moved to the application list screen P60 Disabling applications or widgets Touch and hold an application or widget and drag it to Disable app DISABLE DISABLE INFORMATION If Uninstall appears when you touch and hold an application drag the application to Uninstall and tap OK to uninstall Changing Kisekae Wallpaper 1 Touch and h...

Страница 62: ...ION Alternatively from the Home screen Home screens Or pinch in at any position on the Home screen to display the home screens Display the application list to activate registered applications or move applications or widgets to the Home screen Applications not located in the application list screen are displayed on the Home screen You can check the functions and operation steps from Help for some a...

Страница 63: ...ded TV programs photos music videos on the home network with your devices For use Wi Fi environment is required in Japanese only P177 Duo Make video calls dポイント d POINT An application for confirming collecting or using d points dmarket Various services including selling digital contents such as music videos books shopping sites travel reservation sites etc are provided P91 dメニュー dmenu An applicati...

Страница 64: ...e View play still images videos shot by the camera or downloaded to the terminal P113 Anshin Scan Ensure your smartphone by checking virus applications which require your personal data by alerting when you attempt to access a non secure website etc 遠隔サポート Enkaku support An application for using あんしん遠隔サポート Anshin Enkaku Support Anshin Enkaku Support is a service that allows staff of the Call center...

Страница 65: ...ion for collecting saving coupons convenient information from your favorite shops P97 Personal note Register and manage authentication information such as your ID account password etc P156 Hanashite Hon yaku An application that translates the speaker s language into the partner s language You can enjoy communication with people in different languages File Manager An application for managing data i...

Страница 66: ...ications Touch and hold an application and drag it to a destination Installing a recommended application Tap Recommends button to display applications recommended by NTT DOCOMO 1 From the Home screen Recommends When you activate the application for the first time the confirmation screen for Osusume apps appears Confirm the content tap ENABLE and then on the explanation screen Tap おすすめアプリ一覧へ To Osu...

Страница 67: ...reens My Magazine is a search service for displaying articles for categories you selected It helps to set search words based on your tendency of articles to read or profile information to bring them closer to your preference You can also configure My Magazine so that it can be customized using notifications location information docomo service contract information etc Viewing articles 1 From the Ho...

Страница 68: ...gory setting Select categories INFORMATION On the list screen tap to change My Magazine settings or check the Help You can check the provider of docomo LIVE UX or version of home application 1 From the Home screen About If the update of docomo LIVE UX is available Update now is displayed in the application information screen Tap it to update docomo LIVE UX Information of home application ...

Страница 69: ...all is ended END CALL INFORMATION With VoLTE you can make high quality voice and video calls To use VoLTE both parties must meet the following requirements Both terminals support VoLTE Both parties are in a VoLTE service area Network Mode 1 in Cellular networks is set to 4G 3G GSM Auto and Call mode setting 2 is ON With VoLTE HD you can make more higher quality voice and video calls than VoLTE To ...

Страница 70: ... Emergency call acceptance organization may not be able to figure out your exact location depending on the location where you place a call or radio wave condition When location information is notified name of Emergency call acceptance organization you are calling to will appear If you dial by adding 184 in front of your number to hide your caller ID your location information and phone number are n...

Страница 71: ... CALL is a service which allows you to make international calls with your DOCOMO terminal in Japan For details of WORLD CALL refer to NTT DOCOMO website 1 From the Home screen Dial Touch and hold 0 Enter Country code Area code City code omitted prefix 0 and phone number In some countries and areas such as Italy 0 is required When selecting from the country list to enter country code enter the area...

Страница 72: ...en full screen When you could not answer a call notification icon P50 appears on the status bar Open the Notification panel P52 to check missed calls dial or send SMS With Suguden setting P74 set to ON you can answer incoming calls just by placing the terminal to your ear It is not available for video calls The following operations are possible in the screen during a call You can adjust call volum...

Страница 73: ...full screen and normal screen If the camera function of the other party s terminal turns off the stationary image immediately before turning off is displayed j Your image k Switch camera for sending image Switch camera in camera out camera to shoot image for sending INFORMATION Enable Voice clear to improve call sound to be heard clearly by emphasizing the other party s voice or adjusting the list...

Страница 74: ...g tab Display received call history only d Outgoing tab Display dialed call history only e Voice call button Make a voice call f History Display Outgoing call Incoming call Missed call In Recent calls call type such as voice call or video call is not displayed g Date and time for incoming outgoing call INFORMATION Up to 500 items can be displayed in Recent calls Deleting call history 1 On the hist...

Страница 75: ...e guide message tells the caller that you cannot answer the call right now and prompts to leave a message within 60 seconds after beep tone Make various settings for DOCOMO network services call and Internet call 1 From the Home screen Call settings 2 Set required items Network service The following DOCOMO network services are available Voicemail service 1 Start stop the service or set call time e...

Страница 76: ...OMO repair office ドコモ総合案内 受付 DOCOMO General Inquiries 海外紛失 盗難等 For lost theft etc while overseas 海外故障 For malfunction while overseas Calling accounts Set for Internet calling SIP account or using SIP call Open source licenses Confirm open source licenses Extension line service setting 2 Make setting to use the Office Link holding and forwarding line service 1 It is not available for video calls 2 ...

Страница 77: ...overseas set Disable Suguden during roaming to OFF in the Suguden setting INFORMATION Although the voice command function of Suguden uses the voice recognition technology or the language processing technology DOCOMO is not liable for any accuracy of those technologies The voice recognition may fail when the distance from the terminal is too far when saying the volume of voice is too small when say...

Страница 78: ...l with Disconnect by voice command set to ON the other application which uses the microphone or uses voice sound during call e g a call recording application may not be available To use the application during a call set Disconnect Voice command to OFF after end of the call While Phone memo is activated playing back a greeting recording a Phone memo message disconnection with voice command is not a...

Страница 79: ...y the profile screen In the profile screen you can make a call send SMS etc b Search Search contacts c Register P77 Register a new phonebook entry d Logging in to out from cloud e Display submenu You can delete contacts operate the cloud menu SD card SIM card sharing settings or view help number of registrations application information f Index Display the index Search entries in the order of Japan...

Страница 80: ...up Deleting a group In the group list touch and hold a group Delete group OK In Group list tap Delete group to select a group to delete INFORMATION Only groups of docomo account can be sorted Registering a contact to a group 1 In the phonebook list Group 2 Select a group Add member Mark contacts to add OK OK Canceling group Select a group Delete member Mark a contact to delete OK OK Displaying pro...

Страница 81: ... or restore the phonebook entries or other data to or from a microSD card collectively P123 Send all data common Create an export data of all entries of the phonebook vcf Open the Notification panel and then tap the notification of Finished exporting contacts Tap to share contacts Select the application such as Bluetooth or the mail application to perform sending operation It is not supported for ...

Страница 82: ...tails on a number of characters that you can send receive etc refer to Short Message Service SMS on the NTT DOCOMO website Creating and sending SMS 1 From the Home screen Messaging 2 NEW MESSAGE Enter a mobile phone number 確定 Done When a phone number or reading is entered the contacts matching the phonebook data appear and then you can select from them 3 Send message Enter a message Send INFORMATI...

Страница 83: ... From the Home screen Messaging 2 Select a message thread Tap CALL to make a call Replying to SMS 1 From the Home screen Messaging 2 Select a message thread Send message Enter a message Send Forwarding SMS 1 From the Home screen Messaging 2 Select a message thread Touch and hold SMS Forward 3 Enter a mobile phone number 確定 Done Send When a phone number or reading is entered the contacts matching t...

Страница 84: ...Set the message center number Making the setting is not necessary normally INFORMATION On the SMS setting screen tap MENU Restore default settings for restoring the default settings Set docomo mail address docomo ne jp or an email account provided by general provider to use Email To use NX Mail download the application from Google Play You can use SMS Setting Email account Obtain the information r...

Страница 85: ...sage in the message field 6 SEND INFORMATION Email is handled as email from a PC If the receiver sets rejection of emails from PCs the email cannot be sent With some service providers settings for OP25B Outbound Port 25 Blocking Spam mail transmission blocking are needed For details contact the service provider you are subscribed to Receiving Displaying emails 1 From the Home screen NX Mail 2 MENU...

Страница 86: ...older to delete Delete OK Displaying the menu MENU You can perform operations such as the mail update account edit email backup restore and mail setting Setting Email Make Email settings General settings for NX Mail 1 On the folder list screen MENU Settings 2 Set required items Incoming settings Set the operation when receiving an mail Account settings Add the account and settings P85 Change layou...

Страница 87: ...eive a reply with a mail address different from the one you sent enter the address for reply Ringtone Set the ringtone for incoming mail Vibration Set whether to vibrate the terminal when an email is received LED Set the color of the Indicator LED for incoming mail Character code when sending mail Set the character codes for emails INFORMATION Setting of Push to Receive interval accelerates the ba...

Страница 88: ...gestion Area Mail is a free service and subscription is not required Up to 50 messages can be saved If savable number of Area Mail exceeds the limit of maximum the oldest one is deleted in order Area Mail cannot be received in the following case When the power is off During international roaming In Airplane mode While updating software When PIN code entry screen is displayed When using a SIM card ...

Страница 89: ...her to receive Area Mail or set operations when receiving Area Mail 1 From the Home screen Disaster kit 2 Early Warning Area Mail 3 Settings 4 Set required items Receive setting Set whether to receive Area Mail Beep tone Set the sounding time or the sound volume for the buzzer ringtone or set whether to sound the buzzer ringtone even in silent mode Check screen image and beep tone Check the recept...

Страница 90: ...word in the address bar Opening a new tab You can open multiple tabs to switch web pages quickly 1 When a web page is displayed slide the screen down to display the top of the screen The number varies according to opened tabs 2 A new tab opens and a web page is displayed Switching Tap a tab you want to display Closing of tab you want to close Displaying website in incognito tab You can browse web ...

Страница 91: ...rks 2 Select a bookmark Tap at the right of Bookmarks to edit or delete Web page link operations Tap a link displayed on web page to operate the following Touch and hold a link to display menu options save the link or copy the URL URL Open the web page Email address Create a new mail Phone number Call to the phone number File View save the file INFORMATION The saved files can be checked with File ...

Страница 92: ...en Settings 2 Set required items Sign in to Chrome Sign in to Chrome with your Google account Search engine Set the search engine to be used for search web pages Autofill and payments Use Autofill or set address or credit card information used for Autofill Save passwords Set whether to save passwords entered to web pages Home page Set a home page Privacy Make settings for safety or convenience Acc...

Страница 93: ...s travel reservation sites etc are provided 1 From the Home screen dmarket Top screen of dmarket appears For details on dmarket refer to the following website https d dmkt sp jp common about index html In Japanese only With Play Store you can access to Google Play to search convenient applications or fun games which you can download and install on the terminal Also movie contents can be rented to ...

Страница 94: ... progress When installation is completed appears on the status bar INFORMATION Once you accept the installation of an application you will be held responsible for its use Be careful especially about applications which access many functions or large amount of data Make sure the security of application then install it at your own risk The terminal may be infected with a virus and the data may be dam...

Страница 95: ...he malfunction of the terminal when we repair your terminal etc as we cannot repair it with Osaifu Keitai data remained you are required to erase the data yourself For more information about reissuing and restoring data and support for saving and transferring data contact the Osaifu Keitai compatible service provider For important data be sure to use an Osaifu Keitai compatible service with backup...

Страница 96: ... the IC card reader For non subscriber to sp mode a part of Osaifu Keitai service may not be available When the terminal is turned on or restarted or after the software is updated unlock the screen lock and then hold the terminal over an IC reader to use the Osaifu Keitai service Using かざしてリンク対応サービス Kazashite Link compatible service 1 From the Home screen Settings Wireless networks NFC Osaifu Keit...

Страница 97: ...atible services check the settings of Tap pay and hold the terminal over the IC card reader P40 Notes when holding over the other device Pay attention to the following when holding the terminal over a card reader NFC module equipped device etc Bring mark close to the device slowly do not hit it strongly Hold mark over the center of the compatible device in parallel If scanning fails even with it h...

Страница 98: ... before canceling NFC Osaifu Keitai Lock To use Osaifu Keitai menu while NFC Osaifu Keitai Lock is set cancel NFC Osaifu Keitai Lock A lock password for NFC Osaifu Keitai cannot be erased even if you reset the terminal When canceling Lock NFC Osaifu Keitai make sure that your terminal contains the same docomo nano UIM card that was in the slot when you enabled Lock NFC Osaifu Keitai Canceling lock...

Страница 99: ...nals It can also receive data broadcasting together with images voice and sound and you can also use interactive services using communication function of mobile devices and detail information via communication With Full Seg you can watch a terrestrial digital TV broadcasting service with high definition quality With 1Seg you can watch a terrestrial digital TV broadcasting service for mobile device...

Страница 100: ...he landscaper or structures such as mountain areas or behind buildings Places where the signal is weak or does not reach such as tunnels basements or places inside buildings The included TV antenna cable F01 functions as an antenna when it is connected to the stereo earphone jack of the terminal Change the direction of the cable set apart from a human body or move to the other place to improve the...

Страница 101: ... video or audio may be interrupted or stopped When the terminal returns to the Home screen or goes into the sleep mode while receiving TV program the sound of TV keeps coming out To end Background play of the TV return to the TV watching screen and tap Back When Video correction is marked the video correction engine can be used for 1Seg watching P138 Since TV content is prohibited from copying scr...

Страница 102: ...d by the channel search you can display the list of channels Touch and hold an empty channel Tap YES to add the station to the channel list Pop up the list of channels INFORMATION You can adjust the volume by pressing the volume key when the TV watching screen is displayed On the horizontal screen the content is displayed full screen Tap the screen to show the operation area channel information ar...

Страница 103: ...creen for updating the application or installation screen appears when From Program guide in Step 3 follow the onscreen instructions When using functions that can be used by users or guests or the terminal is being used by other than the owner Reserve Viewing Reserve Recording is not available If the reserved time comes while the terminal is being used by other than owner the reservation is not pe...

Страница 104: ... Full Seg 1Seg recording automatically stops Available space on the terminals memory or microSD card is 19 MB or less for Full Seg and 0 5 MB or less for 1Seg Remaining battery is 10 or less 1Seg recording data size is 2 GB approximately 600 minutes Recorded TV programs are saved as copyrighted data It cannot be attached to mail Record programs in a place where airwave condition is stable A progra...

Страница 105: ...cted item In the recorded list touch and hold the data Check all YES to delete all data TV settings 1 On the TV watching screen Settings 2 Set required items Superimpose setting Set displaying hiding super impose text and language for Full Seg Data Broadcasting settings Configure settings for when data broadcasting is displayed Use location info Use device info Delete station memory and Zipcode Au...

Страница 106: ... not a malfunction When the terminal is in high temperature state for a long time the camera may not be available Wait until the terminal cools down to use again When the battery is low the camera may not be available Fully charge the terminal before using the camera The captured images may be different from actual objects for color and brightness If you try to shoot an object in an environment wi...

Страница 107: ...photos using camera equipped mobile phones If you cause the public any trouble using the terminal you may be punished under law or regulations for example nuisance prevention ordinance Viewing shooting screen a Flash icon An icon appears showing the setting of the flash P109 b Location information icon It appears when location information is set to be added P109 c White balance adjustment icon Adj...

Страница 108: ...RMATION If confirmation screen for switching save destination appears when the camera is activated tap NO SWITCH When available memory space is reduced remaining recordable numbers for shooting still images and remaining recordable time for shooting videos are displayed on the shooting screen Shooting still images 1 From the Home screen Camera A still image shooting screen appears 2 Display an obj...

Страница 109: ...tination becomes low on memory In continuous shooting mode you can set the picture size 3MP 2048 1536 Fit screen 1920 1080 Mobile email 640 480 location information save location Touch shutter grid view and Exposure WB adjust P108 Panorama shooting You can shoot a panoramic image by slowly swiveling the camera to the left or right Panorama shooting is not available for in camera 1 From the Home sc...

Страница 110: ...cognize according to object and circumstance and switch suitable shooting mode When QR code is displayed QR code is scanned and results are shown Automatic exposure Automatically adjust exposure according to the ambient lighting When face detection frame of auto focus appears exposure is fixed based on the brightness of face If you want to use an object as the base tap the object to fix the exposu...

Страница 111: ...the shooting screen as an assistant for photo composition Others Location Set to add location information to shot images When location information is set to be added icon of for obtaining location information not obtained appears then for completion of obtaining appears on the shooting screen Save Select data saving location Terminal SD card If the selected saving destination is low on memory a me...

Страница 112: ...le while recording Switching to in camera out camera On the shooting screen Switching to the still image shooting screen Flick the shooting screen right Shooting High speed videos You can shoot scenes with motions such as sport etc with HighSpeedVideo camera mode and edit so that the videos can be played partially in slow motion The shooting picture size of HighSpeedVideo is HD 1280 720 only and i...

Страница 113: ...esponse is not good due to heat etc of the terminal and lack of certain frame rates editing may not be available Automatic video recording The terminal automatically adjusts settings and records video in the following functions Recording voice is always turned on Auto focus Focus on the center of the screen before or while recording White balance Automatically adjust for shooting in natural color ...

Страница 114: ... scanned for some versions type and size Scratches dirt damages low print quality and the strong reflection of light may disable code reading Reading with QR code reader Scan using the camera with the distance of approximately 12 cm or more from an object QR code If the QR code is not scanned well try to change the distance between the QR code and camera the angle or direction of camera 1 From the...

Страница 115: ...layed However some files may not be viewed played back Still image JPEG BMP GIF PNG WEBP Video H 263 H 264 H 265 MPEG 4 VP8 VP9 GIF animation cannot be played Some specifications vary from Scene by ripplex that is released on Google Play Viewing still image Playing video 1 From the Home screen Album Scene Image list screen appears 2 Select an image Flick the screen left and right to switch between...

Страница 116: ...ge or a microSD card File formats codecs that can be played with HF Player are WAV AIFF FLAC ALAC DSF DSDIFF MP3 AAC and Ogg Vorbis However some files may not be played The terminal supports play of high resolution audio source File types that can be played are 44 1kHz 48kHz 88 2kHz 96kHz 176 4kHz 192kHz of sampling frequency 24 bit of quantization bit rate in FLAC PCM AIFF ALAC formats with 2ch c...

Страница 117: ...the item Repeat off One song repeat All song repeat switches g Playing operation Pause Play Play the previous next file Go back to the top of the file depending on the operation status h Volume adjustment Drag it left or right to adjust sound volume i Display the Settings menu j Display the playlist After you tap Edit cue tap to delete from the list or drag up or down to sort the play order Tap Sa...

Страница 118: ...then mark songs or marking artist names or album names Also tap the artist name or album name and then select only songs to add 5 Done The created playlist screen appears INFORMATION Select a play list on the play list screen Select a song to play To sort the playlists in the playlist list screen Edit Drag of the playlist up or down to move Done To delete the playlist in the playlist list screen t...

Страница 119: ...f you suffer damage or loss due to a deviation of the location information GPS is a service operated by the USA Department of Defense so the GPS radio wave condition may be controlled accuracy degraded radio wave suspended etc for reasons of US national security Wireless communications products mobile phones data detectors etc might interfere with satellite signals and cause signal reception to be...

Страница 120: ...agnet a magnetic necklace bag fastening etc home appliances a TV computer speaker etc When an applications such as Maps cannot calculate directions correctly adjust the electronic compass Adjusting the electronic compass Operation method While using an application such as Maps that uses the electronic compass move the terminal like describing a big figure of eight twisting your wrist for around 10...

Страница 121: ...reen for changing location information settings and accuracy for measuring current location follow on screen instructions You can manage your schedule 1 From the Home screen ドコモクラウド docomo cloud Schedule The calendar screen appears If a screen for access to cloud services appears tap ク ラウドサービスを設定する Set cloud service or 後で設 定する Not now Registering schedule 1 On the calendar screen To set alarm etc ...

Страница 122: ...can use the alarm clock timer stopwatch and world clock On the alarm clock timer stopwatch screen tap Settings to make settings for the clock Displaying the clock 1 From the Home screen Clock The clock screen is displayed INFORMATION To display the world clock on the CLOCK screen on the CLOCK screen tap Mark cities Using alarms 1 From the Home screen Clock 2 ALARM The alarm screen is displayed 3 S...

Страница 123: ...untdown tap Resetting the countdown While pausing the countdown RESET Deleting a timer DELETE Adding a timer ADD TIMER Enter a time Slide up or down the timer screen to display another timer Adding 1 minute During the countdown 1 00 Add 1 minute for countdown every time it is tapped Using stopwatch 1 From the Home screen Clock 2 STOPWATCH The stopwatch screen is displayed 3 The measurement starts ...

Страница 124: ...ication to search Items or displays may vary depending on the version of the application Google Search You can search in the website by entering keywords Also you can use the feed to check the information related to your current location weather traffic condition etc 1 From the Home screen Google Google When you activate the application for the first time the use of feed screen appears Follow the ...

Страница 125: ...regular intervals Depending on OS or file format copying backing up or restoring may not be performed correctly Data Copy You can copy your data such as phonebook images etc to another terminal with one to one direct communication not using the Internet Activate Data Copy of both the source terminal and the destination terminal and line them up before use 1 From the Home screen Data Copy Data tran...

Страница 126: ...files from the microSD card to save the memory space When the remaining battery gets low backup or restoration may not be executed In such case charge the battery of the terminal and then back up or restore You can back up only the data such as still images and movies stored in the terminal with this application The data stored in a microSD card cannot be backed up Backup Back up the phonebook dat...

Страница 127: ...d Use the cloud Data storage BOX to back up or restore the call history or music 1 From the Home screen Data Copy Backup Restore to Cloud 2 Backup or Restore Follow the onscreen instructions If you do not sign in to docomo cloud the confirmation screen appears INFORMATION Periodical backup is not executed at the specified time while the screen is locked or the emergency mode is running and will be...

Страница 128: ...ompt you to make setting Setting menu Category Page Display Sound Apps Display Wallpaper P137 Notifications P139 Sound P140 Apps P143 Storage P144 Memory P145 Gestures P146 Location Accounts Location P118 Accounts P158 Backup reset P161 Battery P144 Wireless networks Wi Fi P127 Bluetooth P170 NFC Osaifu Keitai Settings P94 P173 Airplane mode P133 Tethering P133 VPN P135 Cellular networks P136 P181...

Страница 129: ...urn off the Bluetooth device Turning Wi Fi to On to connect network 1 From the Home screen Settings Wireless networks Wi Fi 2 Tap the button at the upper right of the screen to turn Wi Fi to On 3 Select a Wi Fi network To connect to a protected Wi Fi network enter the password and then tap CONNECT After Wi Fi network is selected a screen for selecting connection may appear INFORMATION Even when Wi...

Страница 130: ... to add Wi Fi network manually Set Wi Fi to On in advance 1 From the Home screen Settings Wireless networks Wi Fi 2 Add network 3 Enter a network SSID of Wi Fi network to add Select security Security can be set to None WEP WPA WPA2 PSK or 802 1x EAP 4 Enter additional security information as required SAVE Deleting Wi Fi network connecting information 1 From the Home screen Settings Wireless networ...

Страница 131: ...ed Wi Fi Direct When a Wi Fi Direct device does not appear tap SEARCH FOR DEVICES 3 Tap the detected Wi Fi Direct device Disconnecting Wi Fi Direct device Tap the connected Wi Fi Direct device OK When connection request is sent from the other Wi Fi Direct device When an invitation screen for connecting appears tap ACCEPT Multi connection Set whether to use Wi Fi network and packet communication LT...

Страница 132: ... used hotspot behaves erratically some applications that usually restrict communications to Wi Fi may temporarily switch over to packet communications LTE 3G When Multi connection is set to OFF high speed download also turns OFF If data amount exceeds the limit of subscribed budget plan and transmission speed is limited Multi connection does not work Wi Fi Auto ON OFF Turn Wi Fi function to ON OFF...

Страница 133: ...128 Multi connection Setting steps P129 Wi Fi Auto ON OFF Setting steps P130 Wi Fi optimization Set whether to reduce the battery consumption when the Wi Fi is On auto IP Set whether to enable auto IP function Setting is not available when the Wi Fi is On Configuring Wi Fi 1 From the Home screen Settings Wireless networks Wi Fi CONFIGURE 2 Set each item Saved networks Saved Wi Fi networks are disp...

Страница 134: ...i data usage Wi Fi data usage is displayed in a graph Also Wi Fi data usage amount per application can be checked Network restrictions Set to restrict usage of the specified Wi Fi network Cellular data Enable the Internet access via cellular network 1 From the Home screen Settings Data usage Turn Cellular data to ON Setting a billing cycle Set a billing cycle measuring period a data amount for war...

Страница 135: ...disable tethering to use When you connect to Internet using tethering Wi Fi device applications such as web browser or game may not work properly depending on the usage environment USB tethering Connect the terminal to a PC using USB cable A to C 01 optional to use the terminal as a modem to access the Internet 1 Connect the terminal and a PC with the USB cable A to C 01 2 Open the Notification pa...

Страница 136: ...rom the Home screen Settings Wireless networks More Tethering Easy settings for Wi Fi tethering 2 Push button system PIN entry system Set required items On the registered screen OK For push button system press a dedicated button on a Wi Fi device For PIN entry system enter PIN code displayed on the Wi Fi device and tap OK Bluetooth tethering You can connect Bluetooth devices to the Internet Up to ...

Страница 137: ...password Fingerprint authentication or Iris authentication for the security unlock preference in advance P150 Adding VPN 1 From the Home screen Settings Wireless networks More VPN 2 Set each item SAVE Connecting to VPN 1 From the Home screen Settings Wireless networks More VPN 2 Select a VPN to connect to 3 Enter necessary authentication information CONNECT When you are connected to the VPN appear...

Страница 138: ...apanese only For using mopera U Business mopera Internet add the access point manually For details on mopera U refer to mopera U website https www mopera net In Japanese only When the tethering function is enabled setting access point is not available P133 Checking the access point in use 1 From the Home screen Settings Wireless networks More Cellular networks Access Point Names Adding an access p...

Страница 139: ...s level Setting steps P138 Adaptive brightness Adjust brightness automatically according to the ambient brightness based on the brightness level specified in Brightness level Auto rotate screen Set whether to rotate the screen according to the terminal orientation Even when you change the orientation of the terminal the screen may not change depending on the screen displayed Wallpaper Setting step...

Страница 140: ...eep Set a time for turning off of screen backlight 1 From the Home screen Settings Display Sound Apps Display Wallpaper Screen timeout 2 Sleep Select the time Keep lit when held Set whether to keep the screen backlight on while the terminal is in motion held in hand 1 From the Home screen Settings Display Sound Apps Display Wallpaper Screen timeout 2 Mark Unmark Keep lit when held Screen saver Set...

Страница 141: ...notifications 1 From the Home screen Settings Display Sound Apps Notifications To display all applications tap MENU Show system Tap All apps in the upper part of the screen to select the condition of displaying applications 2 Select the application or function Set each item Block all Set whether to not perform all notifications Show silently Set whether to notify without sound vibration screen dis...

Страница 142: ...n flipped Set whether to stop ringtone alarm sound etc temporarily by flipping the terminal The sound may not turn off depending on application When the vibrator is set vibration turns off temporarily too Vibrate on ring Set whether to vibrate while ringtone is sounding It cannot be set in Manner mode Even if it is unmarked the vibrator works when Ring volume is set to 0 Sound at start charging Se...

Страница 143: ...vigation bar dialing with Phone application authenticating with the security unlock preference set to Pattern or Security code Screen Music Cast Setting steps P179 Dolby Audio Setting steps P142 Volumes You can adjust volume of media playing sound alarm sound ringtone It cannot be set in Manner mode 1 From the Home screen Settings Display Sound Apps Sound Media volume Alarm volume Ring volume 2 Sl...

Страница 144: ...er mode Silent In addition to mute sounds turn off the vibration Manner mode Alarm Same operation as Manner mode except alarm volume and vibration go along to the alarm settings Dolby Audio Set whether to use Dolby Audio for playing video or music 1 From the Home screen Settings Display Sound Apps Sound Dolby Audio If the Dolby Audio screen appears read the description and tap OK 2 Set required it...

Страница 145: ...f pre installed applications are uninstalled you can reset the terminal to restore 1 From the Home screen Settings Display Sound Apps Apps 2 Select an application UNINSTALL OK Disabling an application Disabling application is available for some applications and services that cannot be uninstalled Disabled applications are not displayed in the applications list screen or the Home screen or cannot b...

Страница 146: ... settings Format 3 ERASE FORMAT DONE Check the remaining amount of battery etc 1 From the Home screen Settings Battery 2 Set each item Battery saver Setting steps P144 Full charge settings Set whether to charge the battery to 100 or 85 so as to save the battery life Battery usage status Display the battery level and the applications and functions which consume battery power from the last full char...

Страница 147: ...n that is necessary for emergency or your profile information can be registered too 1 From the Home screen Settings Users 2 Set each item You XXX A user who currently uses the terminal Tap to edit the icon and user name User name Registered user names are displayed Set whether to permit a user to use the phone SMS function and delete a user by tapping of the user while the owner is using Guest Whe...

Страница 148: ...ake settings for docomo service or cloud 1 From the Home screen Settings docomo service cloud 2 Set each item d ACCOUNT setting Set up d ACCOUNT setting used for docomo applications You can also use your biological information Fingerprint authentication Iris authentication registered on the terminal to set up your d ACCOUNT docomo cloud Make settings compatible with docomo cloud docomo apps manage...

Страница 149: ...steps P155 Iris settings 1 Setting steps P155 Smart Lock Setting steps P155 Personal note Setting steps P156 Make passwords visible Set whether to show entered characters when entering security code passwords Information security The following items can be set Storage type Setting steps P156 Trusted credentials Setting steps P156 User credentials Manage the user credentials saved to the terminal I...

Страница 150: ... that is easy to guess such as birth date part of your phone number street address number or room number 1111 and 1234 Make sure to make a note of the security code you set lest you should forget it Be very careful not to let others know your security code If your security code is known by anyone else DOCOMO shall have no liability for any loss due to any unauthorized use of it If you forget your ...

Страница 151: ...he set PIN code on the former terminal If you did not change the setting the code is 0000 If you enter a wrong PIN code 3 times consecutively the PIN code is locked PUK lock and cannot be used anymore In this case unlock with PUK Unlock the PIN code before setting new PIN code A new PIN code cannot be set until the lock is unlocked If docomo nano UIM card is PIN locked or PUK locked remove the doc...

Страница 152: ...ower button instantly locks Set whether to activate the screen lock instantly by pressing P Canceling the screen lock requires authentication Lock screen message Enter a message to be displayed on the lock screen Slide to activate camera Set whether to activate Camera by flicking left the camera icon at the bottom right of the lock screen INFORMATION While you use authentication storage any of pat...

Страница 153: ...hentication the fingerprint authentication may not be available if your fingerprints are not sufficiently characteristic Authentication performance how successfully your fingerprint can be recognized when you touch the fingerprint sensor P properly varies depending on the condition of your fingers Fingerprint registration may fail or the authentication performance may decrease if your fingers have...

Страница 154: ... give a hard shock Scratch or poke with a pointed object By pressing a hard object such as fingernail or a metal of strap against the surface of the fingerprint sensor is scratched The surface of the fingerprint sensor is scratched or dirty due to mud etc Cover with a sticker or paint with ink etc The following conditions may make fingerprint authentication difficult or reduce the authentication p...

Страница 155: ...ris authentication and LED Do not place your eyes closer than 20 cm from the terminal while the iris authentication LED is lit The camera for iris authentication is waterproof however malfunction may occur if water or dirt adheres to the surface of the camera for iris authentication When the iris registration or authentication fails often wipe any water or dirt surface with a dry soft and static f...

Страница 156: ...y use of this terminal or unavailability of this terminal Even when the security unlock preference is set to Iris authentication unlocking the screen lock with the security unlock preference used in combination every 72 hours and when activating the terminal is required Do not forget the security unlock preference used in combination Precautions for using iris authentication Authentication perform...

Страница 157: ...is authentication setting 1 From the Home screen Settings Security Iris settings 2 Set required items Improving accuracy of iris authentication Register the additional iris for improving the accuracy of iris authentication Delete iris data Delete iris data Display iris finder Set whether to display the finder on the iris authentication screen Tips for iris authentication Display the tips at iris a...

Страница 158: ...en instruction Deleting all items MENU Delete all OK Managing authentication information You can display credential authentication information or certificates or install authentication information for accessing VPNs etc or other certificates Displaying authentication information storage type 1 From the Home screen Settings Security Information security 2 Check Storage type Displaying trusted crede...

Страница 159: ...ls etc To protect the terminal and personal data download applications only from trusted sources such as Play Store etc 1 From the Home screen Settings Security Information security 2 Mark Unknown sources Confirm precautions and OK Setting PIN code Set up SIM card lock Set to require entry of PIN code when powered on 1 From the Home screen Settings Security Information security Set up SIM card loc...

Страница 160: ...On 3 Activate the application to be fixed 4 History of the application to be fixed GOT IT To cancel pinning of application touch and hold Back INFORMATION You can set to require authentication when unpinning application by setting Security authentication for unpinning to On in Step 2 Add or delete accounts Adding an account 1 From the Home screen Settings Location Accounts Accounts 2 Add account S...

Страница 161: ...anually 1 From the Home screen Settings Location Accounts Accounts 2 Select an account type Select an account MENU Sync now To cancel sync 1 While sync MENU Cancel sync Check change or delete information or settings related to your Google account and the services For details on Google settings on the Google setting screen Help feedback to see Help 1 From the Home screen Settings Google Google sett...

Страница 162: ...ted to the terminal P47 Text to speech output Make settings for Text to speech output Pointer speed Set pointer speed when a mouse or trackpad is used Switching to English display Change the language to be used to English 1 From the Home screen 設定 Settings 言語と入力 Languages input 言語 Languages 2 Drag of English United States to the top layer position of 1 INFORMATION Some applications are not display...

Страница 163: ...e terminal 1 From the Home screen Settings Location Accounts Backup reset 2 Set each item Back up my data Set whether to back up settings of applications or data to the Google server Backup account Set an account backed up to the Google server Automatic restore Set whether to restore backed up settings or data when reinstalling an application Factory data reset Setting steps P161 Safe data storage...

Страница 164: ...steps P163 Personal assist Setting steps P163 Detect a USB device Detect a USB device when the USB device is connected to the terminal Glove touch Setting steps P163 Slide in function Setting steps P164 Navigation bar Setting steps P164 Pedometer Setting steps P164 Earphone Launcher Set the terminal to display a launcher when an earphone is connected so that you can launch an application from ther...

Страница 165: ...ons for using it 3 Operate following onscreen instructions START USING INFORMATION Configure the following settings to use Personal assist more comfortably These settings will help identify your current location with higher accuracy thus providing more accurate assistance Also you can use Wi Fi to identify even an indoor location where the GPS function does not work Set Location to On and set Mode...

Страница 166: ...m Tap Function Description to show how to use Slide in launcher Capture Draw Highlight Copy INFORMATION When applications registered to the launcher are updated the registration may be canceled Navigation bar Set icons P49 on Navigation bar 1 From the Home screen Settings Useful tools Navigation bar 2 Select icon OFF Easy Zoom Slide display 3 Icon location Select an item Pedometer Set whether to s...

Страница 167: ...you had a lot of up and down motions shaking or horizontal movements such as repeating standing and sitting climbing up and down stairs or steep slope or getting on a vehicle bicycle car train bus etc When you jogged or did some sports other than walking or walked extremely slowly When shaking or swinging the terminal counting steps may not be performed accurately When functions available by users...

Страница 168: ...rvice which allows you to scroll or zoom the screen by swiping the power key Osusume hint Set to use the hints according to your operations or usage condition Captions Set whether to display captions or set the language of captions or font size Magnification gesture Set whether to zoom in out by tapping the screen 3 times Font size Change the font size Display size Enlarge reduce the size of icons...

Страница 169: ...reen Settings System About phone 2 Confirm each item Software Update Setting step P196 Status Displays battery status and performance the SIM card information network name or phone number etc IMEI individual serial number address etc Legal information Check Open source license the Terms of use of Google etc Auth Check information of certificate or compliant marks Model Android version Android secu...

Страница 170: ...arm sound Android Temporary files of installed applications arrows movie Pre installed videos by default DCIM Still images videos taken with the camera Download Files downloaded by browser etc Movies Videos except those taken with the camera Music Music files Notifications Notification sound Pictures Still images except those taken with the camera Podcasts Files from Podcast e g programs delivered...

Страница 171: ... file Tap a file to display play To switch the storage tap F 01K SD card To open the multiple windows tap New window To create a new folder tap New folder 3 Perform the operation Copying Copy to Select a destination to copy to PASTE Moving Move to Select a destination to move to MOVE Renaming Rename Enter a name OK Deleting OK Sharing Operate following the onscreen instructions File operations ...

Страница 172: ...o visual devices and office appliances A microwave oven strongly affects the connection when it is operated Connection may not be established correctly when other devices are powered on or the connection may cause noises on TV or radio or reception difficulty Under strong ambient signals connection may not be established Radio waves emitted by a Bluetooth device may affect electronic medical equip...

Страница 173: ...an enter characters on the terminal with Bluetooth compatible keyboard Set a Bluetooth device to be detectable in advance When connected appears on the status bar For profile HFP HSP A2DP 1 Bluetooth device can be connected simultaneously Bluetooth devices with Qualcomm aptX audio and aptX HD audio enables to play music using aptX and aptX HD audio codec 1 From the Home screen Settings Wireless ne...

Страница 174: ...e ACCEPT To check the received files open the Notification panel and tap the notification of Bluetooth Share Received files or operate from the Home screen Settings Wireless networks Bluetooth MENU Show received files Canceling connection with a Bluetooth device When a Bluetooth device such as an earphone microphone or keyboard is connected cancel it by the following operation 1 From the Home scre...

Страница 175: ...th the terminal even if the time on the terminal changes after pairing is complete INFORMATION Find Me Ringtone in Bluetooth Low Energy setting sounds regardless of the Manner mode and volume settings NFC is an abbreviation for Near Field Communication and a short range wireless communication method of international standard defined by ISO International Organization for Standardization You can use...

Страница 176: ... Beam function 2 Show website content etc to transfer on the senders terminal 3 Hold mark over each other s terminal When the terminal detects a compatible device notification sounds The screen content on the sender s terminal is zoomed out and Tap to beam appears When the operation is being performed by the sender using the shared menu hold marks over each other to start transferring automaticall...

Страница 177: ...r videos to a PC etc which does not support MTP Use device as MIDI Use the terminal for MIDI input USB tethering Setting steps P133 4 Perform target operations INFORMATION When a microSD card is not mounted on the terminal the microSD card cannot be recognized by a PC In such case from the Home screen Settings Display Sound Apps Storage SD card MOUNT and then connect the terminal to a PC When Phot...

Страница 178: ...nt in Cloud Print screen MENU Settings Add account and set a Google account If the connection setup of the daily used printer for the PC printing or the cloud compatible printer are not made in Cloud Print screen tap MENU Add printer to set up the connection Print Example Printing a web page displayed with Chrome application 1 While a web page is displayed slide down the screen to display the top ...

Страница 179: ...ble the server function サーバー名 Server name Change the name displayed on the DLNA device アクセス権の設定 Set access right Mark アクセス権の初 期設定 Set up access right to permit DLNA devices to access the terminal Unmark it to permit only DLNA devices that are marked in 接続機器の一覧 Device list to access 保存先設定 Saving location setting Set the saving location of contents uploaded from the DLNA device You can save on a mic...

Страница 180: ... type Select a folder Select a content When you select その都度選ぶ Select each time in Step 4 select a device to play from the device list Playing back DLNA devices contents on the terminal Disclose contents on the DLNA device to allow access from the terminal in advance 1 From the Home screen DiXiM Player 2 Select a server name of a DLNA device in the server list 3 アプリの設定 Application settings コ ンテンツタッ...

Страница 181: ...be moved out select a content to play Displaying on Wi Fi Miracast device via Wi Fi connection Show videos images etc on TV screen or displays by connecting the terminal to a Wi Fi Miracast device through Wi Fi connection 1 From the Home screen Settings Display Sound Apps Display Wallpaper Sound Screen Music Cast Mark Enable wireless display 2 Tap a detected Wi Fi Miracast device Disconnecting Wi ...

Страница 182: ...minal in countries regions where 3G850MHz GSM850MHz is supported INFORMATION For the country codes international call access number Universal number international prefix compatible countries and regions and overseas network operators refer to NTT DOCOMO website To use packet communication during roaming set Data roaming setting to ON P181 INFORMATION Some services may not be available depending on...

Страница 183: ...network services are not available To use network services overseas you need to set Remote operation settings to activate You can set Remote operation settings in the country you visit From Japan P73 from overseas P185 Even if the setting canceling operation is available some network services cannot be used depending on overseas network operators After arriving overseas When you arrive overseas an...

Страница 184: ... networks More Cellular networks Network operators Tap 4G 3G GSM Auto Date time When Automatic date time Automatic time zone in Date time is marked the date time and time differences of the terminal are corrected by receiving information related to time and time differences from the network of overseas telecommunications carrier you connect to Correction of the time or time differences may not be ...

Страница 185: ...ernational dial assist is marked enter a phone number from City code in the same way as in Japan Tap Convert number Making a call inside the country you stay You can make a call to the other party s land line phone or mobile phone in the same way you do in Japan 1 From the Home screen 2 Dial Enter a phone number Start with the area code city code If you make a call to the party using WORLD WING ma...

Страница 186: ... Home screen Call settings Roaming settings 2 Set required items Incoming call restriction while roaming Set to restrict incoming calls while international roaming Incoming call notification while roaming Set to notify missed calls via SMS in case you are out of service area while international roaming Roaming guidance Set to notify a caller with voice prompt that you are using the international r...

Страница 187: ...e prompt to request caller ID when receiving an anonymous call Incoming call notification while roaming charges apply P184 Roaming guidance charges apply P184 Voicemail service charges apply Set the terminal to take a message from a caller while you are outside the service area or you turn the terminal off Subscription is required Call forwarding service charges apply Set the terminal to forward a...

Страница 188: ...forcibly Note that data and settings may be erased since that is an operation for shutting down of the power or restarting forcibly Cannot charge the battery the indicator LED does not turn on or blinks Is the adapters power plug inserted to the outlet or accessory socket correctly Are the adapter and the terminal set correctly P36 When using an AC adapter optional check if the Type C plug of the ...

Страница 189: ...e function P127 P171 The docomo nano UIM card is not recognized Is the docomo nano UIM card installed in the right direction P32 The screen reacts slowly when a touch panel is tapped key is pressed When large amount of data is saved in the terminal or transferring large size data between the terminal and microSD card the reactions on the screen may be delayed The terminal etc become hot while oper...

Страница 190: ...fe mode is displayed at the lower left of the screen To exit the safe mode turn the power OFF and ON Back up the necessary data before using safe mode Safe mode is not a normal booting state To use ordinarily exit the safe mode Some applications or widgets may be hidden Operations are not possible when tapping the screen Do you operate with a fingernail or foreign object on the screen Do you put a...

Страница 191: ...ted any of the following functions Manner mode P141 Airplane mode P133 Do you set call restriction such as Call Blocking P74 The followings are set to 0 seconds Set answer time in the Phone memo setting P73 Ring time settings in Voicemail service P73 Ring time in Call forwarding service P73 Calls cannot be made Is the docomo nano UIM card installed in the right direction P32 Do you enter a phone n...

Страница 192: ...of maximum charges for use is set in advance When it exceeds the limit of maximum charges for use pay the charges There is no incoming call overseas Is Incoming call restriction while roaming set to Activate restriction P184 No caller ID is notified A notified caller ID is different from that of the caller Functions for using contents saved in the phonebook or those using Caller ID notification do...

Страница 193: ...e GPS function is OFF AUTO GPS function stops P118 Others Data saved in USB mass storage is not displayed Reattach the USB mass storage Commercially available external devices USB mouse keyboard etc are not recognized Connect a USB device to the terminal and operate the following to start using a USB device From the Home screen Settings Useful tools Detect a USB device DETECT A USB DEVICEUSB When ...

Страница 194: ...orrectly P32 SIM card is locked Displayed when you power on the terminal with PIN enabled Enter correct PIN code P157 SIM card is PUK locked Displayed when docomo nano UIM card is locked by PUK code Enter correct PUK code P158 SIM card error SIM card removed Phone will restart It may appear when IC of docomo nano UIM card cannot be loaded because of dirt or when docomo nano UIM card is removed wit...

Страница 195: ...nshin Enkaku Support refer to NTT DOCOMO website 1 Call Support center for Anshin Enkaku Support From DOCOMO mobile phones No prefix 15710 toll free In Japanese only From land line phones 0120 783 360 In Japanese only Business hours 9 00 a m to 8 00 p m open all year round To call from the terminal to Anshin Enkaku Support center from the Home screen 遠隔サポート Enkaku support このスマートフォンから発信する Make a ca...

Страница 196: ...teration of software of the product 2 The malfunction or damage is due to damage of the terminal body display external connection jack etc caused by being dropped or subjected to an external pressure or the malfunction or damage is due to breakdown or deformation of the internal circuit board of the terminal 3 The malfunction or damage is due to fire pollution abnormal voltage earthquake thunder w...

Страница 197: ...k for 4 years after termination of production For details about technical inquiries and repairs see NTT DOCOMO website https www nttdocomo co jp support trouble repair shop compatible index html in Japanese only However depending on the malfunctioning part repair may not be possible due to a lack of replacement parts Please contact a repair counter specified by DOCOMO Notes Never modify this termi...

Страница 198: ... done to the terminal DOCOMO shall have no liability for any change or loss of any kind Note that DOCOMO is not liable for a packet communication charge of re downloading data Under some circumstances DOCOMO may replace your terminal with its equivalent instead of repairing it In that case we cannot transfer these data to replaced products except for some data About Software Update Software Update...

Страница 199: ...n the reboot step after rewriting and you need to enter PIN code If updating failed and all operations become disabled please contact the terminal to DOCOMO specified repair office SMS sent during updating is stored in the SMS center Updating may take time Updating is unavailable in the following cases During a call When the icon out of service area is displayed Tethering in use as an access point...

Страница 200: ...ection Perform at scheduled time via Wi Fi Xi Download the update file via Wi Fi connection or Xi FOMA at the time that is reserved automatically If download via Xi FOMA is not available Perform at scheduled time only via Wi Fi appears When the sp mode is not set the update cannot be per formed by tapping Perform at scheduled time only via Wi Fi Use Wi Fi b Select operation Download and Install Af...

Страница 201: ...om the Home screen Play Store Flick right the left edge of the screen Update each application in My apps games INFORMATION For OS version support information on each application contact the application provider Phone Main specifications Product name F 01K Size Approx 149 mm H 72 mm W 8 1 mm T Weight Approx 154 g Internal memory ROM 32GB 1 RAM 4GB Continuous stand by time 2 3 FOMA 3G Stationary Aut...

Страница 202: ... Number of recording pixels Max Out camera Approx 22 9 million pixels In camera Approx 5 0 million pixels Digital zoom Still images Out camera Up to approx 8 0 x 80 levels Videos Out camera Up to approx 8 0 x 80 levels Still picture recording size Out camera 23M 5520 4140 17M 5520 3104 8M 3840 2160 3M 2048 1536 Fit screen 1920 1080 Mobile email 640 480 7 In camera 5M 2592 1944 3 7M 2592 1458 3M 20...

Страница 203: ... the temperature is high or low it takes a long time for charging 7 Setting can be made in RapidPic mode only 8 When temperature of the terminal is raised during using the camera operation may be ended 9 2 4 GHz 5 GHz are supported for IEEE 802 11n 10 IEEE802 11n ac supports MIMO 11 It is confirmed that the terminal and all Bluetooth devices are compliant with Bluetooth standards designated by Blu...

Страница 204: ...s approximately 10 minutes 2 The recording time when a microSDXC card of 128 GB is used Available files for the terminal You can create view and edit save the following files using the Word Excel and PowerPoint applications in the terminal Type File format Extension Still images JPEG jpg Videos MP4 mp4 Shooting Size Maximum recording time per one item FullHD 1920 1080 Approx 36 min Terminal maximu...

Страница 205: ...nimum required to reach the network Therefore in general the closer you are to a base station the lower the power output of the device This mobile phone can be used in positions other than against your head Please keep the mobile phone farther than 1 5 cm away from your body by using such as a carrying case or a wearable accessory without including any metals This mobile phone satisfies the techni...

Страница 206: ...phones used by the public is 2 0 watts kilogram W kg averaged over ten grams of tissue recommended by The Council of the European Union The limit incorporates a substantial margin of safety to give additional protection for the public and to account for any variations in measurements 3 Including other radio systems that can be simultaneously used with cellular radio wave 4 Tests for SAR have been ...

Страница 207: ...to radio frequency RF energy as set by the FCC of the U S Government These limits are part of comprehensive guidelines and establish permitted levels of RF energy for the general population The guidelines are based on standards that were developed by independent scientific organizations through periodic and thorough evaluation of scientific studies The exposure standard for wireless mobile phones ...

Страница 208: ...n this phone has been tested and meets the FCC RF exposure guidelines Please use an accessory designated for this product or an accessory which contains no metal and which positions the handset a minimum of 1 0 cm from the body In the United States the SAR limit for wireless mobile phones used by the general public is 1 6 Watts kg W kg averaged over one gram of tissue SAR values may vary depending...

Страница 209: ... proximity to personal medical devices such as pacemakers and hearing aids Pacemakers Pacemaker manufacturers recommend that a minimum separation of 15 cm be maintained between a mobile phone and a pace maker to avoid potential interference with the pacemaker To achieve this use the phone on the opposite ear to your pacemaker and does not carry it in a breast pocket Hearing Aids Some digital wirel...

Страница 210: ...ion is prohibited Note that taking photos or recordings at some demonstrations performances or exhibitions may be prohibited even when only for personal use Avoid taking pictures of others with the terminal without their consent or disclosing recorded pictures of others without their consent to general public through Internet websites etc because they may infringe on portrait rights Trademarks FOM...

Страница 211: ...re those of their respective owners Qualcomm aptX audio is a product of Qualcomm Technologies International Ltd Qualcomm is a trademark of Qualcomm Incorporated registered in the United States and other countries used with permission aptX is a trademark of Qualcomm Technologies International Ltd registered in the United States and other countries used with permission Dolby Dolby Audio and the doub...

Страница 212: ...vider licensed from MPEG LA For further utilizing such as promotion in house use or profit making business please contact MPEG LA LLC in U S This product is licensed under the AVC patent portfolio license for the personal and noncommercial use of a consumer to i encode video in compliance with the AVC standard henceforth referred to as AVC video and or ii decode AVC video that was encoded by a con...

Страница 213: ... details of SIM unlock procedure refer to NTT DOCOMO website 1 Install SIM by a carrier other than NTT DOCOMO 2 Turn the terminal ON 3 Enter SIM unlock code 4 UNLOCK INFORMATION To check the SIM unlock status from the Home screen Tap 4 6 6 9 The meanings of the display are as follows SIM Lock SIM is locked SIM Unlock SIM lock is unlocked SIM card such as docomo nano UIM card is not inserted Unknow...

Страница 214: ... 167 Touch hold delay 167 Accounts 158 Adding 158 Cancel sync 159 Deleting 159 Settings 158 Synchronizing manually 159 Adaptive brightness 137 After Sales Service 194 Airplane mode 133 Album Scene 113 Viewing still image Playing video 113 Android Beam 173 Anshin Enkaku Support 193 APN 136 Application list 60 Disabling applications 64 Managing 64 Sorting 64 Uninstalling 64 Application permissions 4...

Страница 215: ... 170 Canceling connection 172 Connecting 171 Function ON OFF 171 Pairing 171 Renaming 172 Sending Receiving data 172 Unpairing 172 Bluetooth Low Energy 173 Alert Notification 173 Alert Notification Detail Setting 173 Find Me Ringtone 173 Find Me Ringtone Settings 173 Proximity 173 Time 173 Bluetooth tethering 134 Bookmarks 89 Delete 89 Edit 89 C Calculator 122 Call forwarding service 73 Call notif...

Страница 216: ...8 AOSS system 128 WPS system 129 Customize screen 56 D d ACCOUNT 149 Data roaming 181 Data usage 132 Billing cycle 132 Cellular data 132 Date 166 Date time 166 Automatic date time 166 Automatic time zone 166 Select time zone 166 Set date 166 Set time 166 Use 24 hour format 166 Decline call 69 Default alarm ringtone 141 Default notification ringtone 141 Default SMS application 82 Detect a USB devic...

Страница 217: ...e tap 38 Drag 38 Draining water 28 E Early warning Area Mail 86 Earphone Launcher 162 Earpiece 30 Easy settings for Wi Fi tethering 134 Editing text 46 Emergency information 145 Emergency mode 40 Enabling Disabling the data communication 136 English display 160 English guidance 73 Error messages 191 Exlider 31 Exlider settings 163 Export Administration Regulations 208 External device connection 17...

Страница 218: ...me screens 60 Kisekae 59 Removing applications widgets 59 Setting Machi Chara 60 Wallpaper 59 Homescreen selector 57 How to use Exlider 39 I Icon 49 Back icon 49 History icon 49 Home icon 49 Navigation bar 49 Notification icon 50 Slide display icon 49 Status bar 50 Status icon 51 Zoom at any time icon 49 iD application 96 In camera 30 Indicator LED 30 49 Information of home application 66 Initial ...

Страница 219: ...er mode Alarm 142 Manner mode Silent 142 Maps 119 Material 16 Memory 145 Messaging 80 Microphone 30 microSD card 33 168 Erasing data 144 File transfers 175 Formatting 144 Installing 34 Operation from a PC 175 Photo transfer PTP 175 Removing 35 Miracast 179 Mouthpiece 30 Multi connection 129 My Magazine 65 My phone number 167 My physical profile 146 My profile 79 N Navigation bar 49 164 Network Mod...

Страница 220: ...P Pan 38 Panel switch 53 Pedometer 164 Personal assist 163 Personal dictionary 160 Personal note 156 Phone 67 Add wait 67 Add 2 sec pause 67 Call settings 73 Call volume 70 Caller ID notification 67 73 Emergency call 68 Making a call 67 Receiving a call 69 Select prefix 67 Suguden setting 74 Phone memo 73 ON OFF 73 Phone memo list 73 Recording 69 Setting 73 Phone ringtone 141 Phonebook 77 Deleting...

Страница 221: ...ngs 184 Network service overseas 185 S Safe data storage 161 162 SAR 203 Schedule 119 Displaying 120 Registering 119 Screen brightness 138 Screen lock Locking 53 150 Setting unlock method 150 Unlock 54 Screen locking sounds 141 Screen saver 138 Screen timeout 138 Screenshot 40 Search 122 Google Search 122 Voice Search 123 Security 147 Security unlock preference 150 Fingerprint authentication 150 I...

Страница 222: ...ying 81 Sending 80 Setting 82 Software Update 196 Sound 140 Sound at start charging 140 Speaker 30 Specifications 199 Spell check 160 Split screen 56 Status bar 50 Status icon 51 Still image shooting screen 105 Stopping the packet communication 136 Storage 144 168 Internal shared storage 144 SD card 144 Storage type 156 Strap hole 31 Suguden 74 Super ATOK ULTIAS settings 45 Conversion setting 45 D...

Страница 223: ... Playing programs 102 Recording 102 Reserving recording 101 Reserving watching 101 Setting 103 Signal 98 Using TV 97 TV antenna cable F01 98 TV watching screen 99 U Unknown sources 157 Unlocking PUK 158 USB tethering 133 USB Type C jack 30 Useful tools 162 Users 145 Using overseas 180 After returning to Japan 185 Checking 181 Communication services 180 Making a call in the country you stay 183 Rec...

Страница 224: ...aterproofness Dustproofness shock resistance 23 Wi Fi 127 Adding 128 Advanced Wi Fi settings 131 Configuring 131 Connecting 127 Connecting easily 128 Deleting 128 Scanning 128 Wi Fi Auto ON OFF 130 Wi Fi sleep policy 131 Wi Fi antenna section 30 Wi Fi Direct 129 Wi Fi tethering 133 WORLD CALL 69 WORLD WING 180 z 1Seg 97 ...

Страница 225: ...aining public safety are exempted In public places such as a theater movie theater or art museum Using the terminal in quiet public places will likely bother other people Match the volume of voice and ring alert to your location In a quiet place like a restaurant or hotel lobby pay attention to the volume of your voice etc when using the terminal In town areas while using the terminal be sure not ...

Страница 226: ...ower off of mobile phone and the call is disconnected Vibrate P74 Vibrates when there is an incoming call Manner mode P141 Eliminates all sounds the terminal makes such as ring alert and keypad touch sound Shutter sound cannot be eliminated And you can use optional services such as Voice Mail Service Call Forwarding Service etc P73 We collect old phones etc regardless of brands and manufacturers B...

Страница 227: ... charges apply 81 3 6832 6600 toll free From DOCOMO mobile phones For inquiries while overseas for loss theft malfunction etc Please confirm the phone number before you dial If you lose your terminal or have it stolen immediately take the steps necessary for suspending the use of the terminal If the terminal you purchased is damaged bring your terminal to a repair counter specified by DOCOMO after...

Страница 228: ...ial For Applications or Repairs and After Sales Service please contact the above mentioned information center or the docomo Shop etc near you on the NTT DOCOMO website Technical Inquiries Repairs Business hours 24 hours open all year round Unavailable from part of IP phones From land line phones In Japanese only 0120 800 000 toll free Unavailable from land line phones etc No prefix 113 toll free F...

Отзывы: