


04/2008
These instructions should be used for Wellborn Accessory Kits
PCWHFLK36-PCWHFLK48. (Page 3 of 4)
INSTALLATION MANUAL
MODEL: BUF-06P
1U03 1481
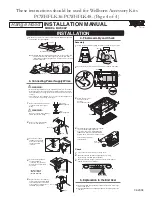
Range Hood
Liner
Liner
Screw-washer
[Right & left,
each two (2) places]
[Securing plate turns
while passing through
the opening of Liner]
Securing plate
Four screws (M5
×
30)
Roof cap
7" round duct
(For vertical discharge)
Range hood
Wood hood
Soffit
INSTALLATION
1. Preparation
2. Range Hood Mounting
1
This range hood is designed
to discharge upward. For
vertical discharge, run duct
work between the hood
location and roof cap location.
To get the best result, use a
minimum number of
transitions and elbows.
Be sure to attach a roof cap
to avoid rain from entering
the exhaust duct.
2
The range hood unit
must be mounted to a
liner which has the
following dimensions.
Install the liner
securely after checking
that the opening size of
the liner is the same as
the figure right.
• Ensure that the metal duct does not touch other metal housing materials,
otherwise fire or electric shock could result.
The liner should be installed tightly. If the liner installation is not correct,
the range hood unit may become detached and fall.
• Wear working gloves to avoid injury.
CAUTION:
5
Align 4 screw holes of the liner and range hood, then fix securely
using the supplied screws (M5
×
30) and nuts.
Note: Fasten all the screws and nuts evenly.
CAUTION:
WARNING:
26" (660)
15-15/16" (405)
25-3/16" (640)
9-13/16" (250)
4-
∅
1/4" (4-
∅
6.5)
Loosen 2 screws
to remove the filter.
Front Cover
Filter
Detach
the tape.
Tape
Mounting Bracket
Beam
Washer
*
Bracket
*
Not supplied
Spring-washer
*
Nut
*
3
Put 4 all thread rod (
∅
12~14 anchor bolt, not supplied) into the corner
holes of the mounting bracket, and secure them using washers, spring
washers, and nuts. Place the mounting bracket on the beam of the
ceiling as shown.
1
Detach the tape on the
exhaust port.
In this manual, the following method is explained as a standard
installation.
There may be some different cases depending on the structure of
the ceiling where the mounting bracket is placed or the shape and
mounting condition of the wood hood.
In such a case, please arrange to find best possible way according
to the condition of the place where the range hood is installed.
3
Remove the fan unit from the range hood.
(1) Unplug the connector coming from the fan motor.
(2) Remove 3 screws, then detach the fan unit with sliding it laterally to
disengage from 4 hooks.
(3) Pull up the fan unit while avoiding the bracket.
Motor
Bracket
Bracket
Hook
Fan Unit
Screw
Connector
Wire-clamp
Hook
(1)
(2)
(3)
6
Using washers, spring washers, and double nuts, attach the range
hood to all 4 threaded rods securely.
4
Hold up the range hood,
and with inserting the
exhaust port into the duct,
pass all 4 threaded rods
through the corner holes
of the range hood.
Note: The mounting bracket
should be securely
fastened at this point
to simplify installing
the range hood later.
2
Detach the filters by
loosening 2 screws.
Then remove 5 screws
holding the front cover
and detach the front cover.
Liner Dimensions
Unit: inch (mm)
Washer
*
Spring-washer
*
Nut
*
*
Not supplied