background image


Quick Reference Guide 

QRG-03 

R-02 


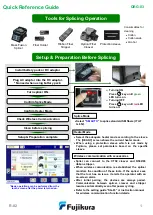
Tools for Splicing Operation


Setup & Preparation Before Splicing


Install battery pack or DC adaptor


Plug AC adaptor into the DC adaptor.   

*No need when using battery pack. 


Turn splicer ON.


Confirm Heater Mode


Check Wireless Communication


Clean before splicing 

Setup & Preparation complete 

Confirm Splice Mode 

Wireless communication with accessories 

Splicr  can  connect  to  the  CT50  cleaver  and  RS02/03 
ribbon stripper.   

When  wireless  comunication  is  established,  the  splicer 
monitors  the  conditon  of  these  tools.  If  the  splicer  sees 
that  the  tool  has  an  issue,  it  alerts  the  operator  with  an 
on-screen alarm. 

After  initial  pairing,  the  devices  are  always  paired. 
Communication  between  splicer,  cleaver  and  stripper 
resumes automatically even after power cycling.   

Refer to the 

setting guide “SG-03” or instruction manual 

for wireless communication function details.


LED 

Turning ON 

Press          key until 

green


LED turns on. 

Turning OFF 

Press          key until 

red

 LED 

turns on.


Select the adequate heater mode according to the sleeve. 
The [READY] screen shows the current heater mode. 

When  using  a  protection  sleeve  which  is  not  made  by 
Fujikura,  please  set  parameters  based  on  the  specific 
sleeve. 


Heater Mode 

Optical Fiber 

Cleaver 

Protection sleeve 

Ribbon Fiber 

Stripper 

Mass Fusion 

Splicer 

Fiber Holder 

Consumables for 

cleaning   

 Cotton 

 Cotton swab 


Alcohol


Splice Mode 

Select ”

SM AUTO

” to splice standard SM fibers (ITU-T 

G.652).


*Basic operations can be performed from the 

touch screen after the power is turned on. 

Содержание QRG-03

Страница 1: ...g the devices are always paired Communication between splicer cleaver and stripper resumes automatically even after power cycling Refer to the setting guide SG 03 or instruction manual for wireless communication function details LED Turning ON Press key until green LED turns on Turning OFF Press key until red LED turns on Select the adequate heater mode according to the sleeve The READY screen sho...

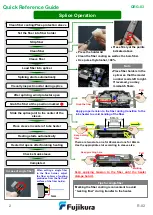
Страница 2: ... heater Tips for single fiber Clean the fiber coating as well as the bare fiber Use pure ethyl alcohol 99 Press the holder lid Place fiber holders in the splicer so that the model number reads left to right If reversed you may mismatch fibers Note Press firmly at the points indicated above In case of single fiber When setting a single fiber in the fiber holder adjust the fiber so 3mm of coating pr...

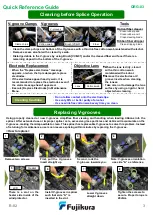
Страница 3: ...es in Maintenance Menu Using properly cleaned or new V grooves simplifies fiber viewing and handling when loading ribbons into the splicer After extended use or improper splicer care excessive glass particles and debris will accumulate on the V grooves making them impossible to clean This splicer has replaceable V grooves to solve this problem Instead of returning for maintenance users can resume ...

Страница 4: ...de database Cleave Shape NG Bad fiber end face Clean and check the condition of the fiber cleaver If the blade is worn rotate the blade to a new position If dirty clean clamp pads anvil or blade High Estimated Loss Dust or dirt is on the fiber surface Bad fiber end face Unstable arc discharge Completely prepare the fiber again strip clean and cleave Check the condition of the fiber cleaver If the ...

Отзывы: