background image

88

5

T

a

k

ing Phot

og
raphs

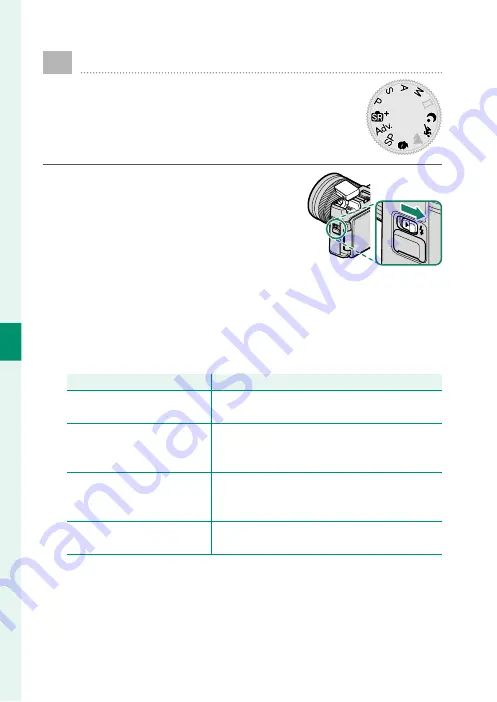
 Using the Flash

Use the built-in fl ash for additional lighting 
when shooting at night or indoors under low 
light.

Slide the 

N

 (fl ash pop-up) switch to 

raise the fl ash.

Press 

MENU/OK

 to display the shooting menu.

Highlight 

F


FLASH SETTING

 > 

FLASH MODE

 in the shooting 

menu and press 

MENU/OK

 to view fl ash options.

Highlight one of the following options and press 

MENU/OK

.

Mode

Mode

Description

Description

AUTO

AUTO AUTO FLASH

AUTO FLASH

The fl ash fi res when required. Recommended 
in most situations.

K

K

RED EYE REDUCTION 

RED EYE REDUCTION 

**

N

N

L

L

FORCED FLASH

FORCED FLASH
FORCED FLASH 

FORCED FLASH 

**

The fl ash fi res whenever a picture is taken. Use 
for backlit subjects or for natural coloration 
when shooting in bright light.

O

O
M

M

SLOW SYNCHRO

SLOW SYNCHRO
RED EYE & SLOW 

RED EYE & SLOW 

**

Capture both the main subject and the back-
ground under low light (note that brightly lit 
scenes may be overexposed).

l

l

d

d

2ND CURTAIN SYNC.

2ND CURTAIN SYNC.
2ND CURTAIN SYNC. 

2ND CURTAIN SYNC. 

**

The fl ash fi res immediately before the shutter 
closes.

Содержание X-A7

Страница 1: ...Owner s Manual BL00005018 201 EN ...

Страница 2: ... read by all who use the product For the Latest Information The latest versions of the manuals are available from http fujifilm dsc com en manual The site can be accessed not only from your computer but also from smartphones and tablets It also contains information on the software license For information on firmware updates visit http www fujifilm com support digital_cameras software ...

Страница 3: ... and Playback 33 4 Movie Recording and Playback 39 5 Taking Photographs 45 6 The Shooting Menus 91 7 Playback and the Playback Menu 129 8 The Setup Menus 151 9 Shortcuts 173 10 Peripherals and Optional Accessories 181 11 Connections 187 12 Technical Notes 199 P Chapter Index ...

Страница 4: ... SHARPNESS 100 NOISE REDUCTION 101 LONG EXPOSURE NR 101 COLOR SPACE 101 G AF MF SETTING P 1 2 1 2 FOCUS AREA FOCUS AREA 102 FOCUS MODE FOCUS MODE 102 AF MODE AF MODE 103 NUMBER OF FOCUS POINTS NUMBER OF FOCUS POINTS 104 PRE AF PRE AF 104 AF ILLUMINATOR AF ILLUMINATOR 104 FACE EYE DETECTION SETTING FACE EYE DETECTION SETTING 105 AF MF AF MF 106 2 2 2 2 MF ASSIST MF ASSIST 106 FOCUS CHECK FOCUS CHEC...

Страница 5: ...ER SETTING MOUNT ADAPTER SETTING 120 TOUCH ZOOM TOUCH ZOOM 122 WIRELESS COMMUNICATION WIRELESS COMMUNICATION 122 F FLASH SETTING P FLASH MODE 123 FLASH COMPENSATION 123 RED EYE REMOVAL 123 B MOVIE SETTING P 1 2 1 2 MOVIE MODE MOVIE MODE 124 HD HIGH SPEEDVIDEO HD HIGH SPEEDVIDEO 125 COUNTDOWNVIDEO RECORDING COUNTDOWNVIDEO RECORDING 125 F FFOCUS MODE FOCUS MODE 126 MOVIE AF MODE MOVIE AF MODE 126 DI...

Страница 6: ...VAL 143 IMAGETRANSFER ORDER IMAGETRANSFER ORDER 144 C PLAY BACK MENU P 2 2 2 2 WIRELESS COMMUNICATION WIRELESS COMMUNICATION 145 SLIDE SHOW SLIDE SHOW 145 PHOTOBOOK ASSIST PHOTOBOOK ASSIST 146 PC AUTO SAVE PC AUTO SAVE 147 PRINT ORDER DPOF PRINT ORDER DPOF 148 instax PRINTER PRINT instax PRINTER PRINT 149 DISP ASPECT DISP ASPECT 150 Playback Menus Adjust playback settings N See page 135 for detail...

Страница 7: ...AUTOROTATE PB AUTOROTATE PB 160 FOCUS SCALE UNITS FOCUS SCALE UNITS 160 2 2 2 2 DISP CUSTOM SETTING DISP CUSTOM SETTING 161 D BUTTON SETTING P FOCUS LEVER SETTING FOCUS LEVER SETTING 162 EDIT SAVE QUICK MENU EDIT SAVE QUICK MENU 163 FUNCTION Fn SETTING FUNCTION Fn SETTING 164 SHOOTWITHOUT LENS SHOOTWITHOUT LENS 165 FOCUS RING FOCUS RING 165 TOUCH SCREEN SETTING TOUCH SCREEN SETTING 165 D POWER MAN...

Страница 8: ...1Before You Begin 1 Before You Begin 1 Parts of the Camera 2 The Mode Dial 4 The Focus Stick Focus Lever 5 The DRIVE Button 5 The Command Dials 6 The Indicator Lamp 7 The LCD Monitor 7 Camera Displays 8 The Standard Shooting Display 8 The Touch Menu Display 10 Adjusting Display Brightness 11 The DISP BACK Button 11 Customizing the Standard Display 12 Using the Menus 14 Touch Screen Mode 15 Shootin...

Страница 9: ... Basic Photography and Playback 33 Taking Photographs 34 Viewing Pictures 36 Deleting Pictures 37 4Movie Recording and Playback 39 Movie Recording and Playback 39 Recording Movies 40 Adjusting Movie Settings 42 Viewing Movies 43 5Taking Photographs 45 Taking Photographs 45 Choosing a Shooting Mode 46 SADVANCED SR AUTO 46 Program AE P 47 Shutter Priority AE S 48 Aperture Priority AE A 50 Manual Exp...

Страница 10: ...P 82 Bracketing 83 OAE BKT 84 WISO BKT 84 XFILM SIMULATION BKT 84 VWHITE BALANCE BKT 84 YDYNAMIC RANGE BKT 85 hHDR 85 Continuous Shooting Burst Mode 86 Using the Flash 88 Self Portraits Selfies 90 6The Shooting Menus 91 The Shooting Menus 91 IMAGE QUALITY SETTING 92 IMAGE SIZE 92 IMAGE QUALITY 93 FILM SIMULATION 94 PORTRAIT ENHANCER LV 95 BRIGHT MODE 95 DYNAMIC RANGE 96 WHITE BALANCE 97 HIGHLIGHT ...

Страница 11: ... FOCUS AREA 107 RELEASE FOCUS PRIORITY 107 TOUCH SCREEN MODE 107 SHOOTING SETTING 108 SCENE POSITION 108 ADVANCED FILTER 109 SELF TIMER 110 INTERVAL TIMER SHOOTING 111 TIME LAPSE MOVIE MODE 113 AE BKT SETTING 114 FRAMES STEP SETTING 114 1 FRAME CONTINUOUS 114 SEQUENCE SETTING 114 FILM SIMULATION BKT 115 LIGHT TRAIL SHOOTING SETTING 116 Long Exposure setting 116 RELEASE TYPE 116 PHOTOMETRY 116 SHUT...

Страница 12: ...E OUTPUT 127 HDMI REC CONTROL 128 MIC LEVEL ADJUSTMENT 128 MIC REMOTE RELEASE 128 7Playback and the Playback Menu 129 Playback and the Playback Menu 129 The Playback Display 130 The DISP BACK Button 131 Viewing Pictures 133 Playback Zoom 134 Multi Frame Playback 134 The Playback Menu 135 RAW CONVERSION 135 ERASE 137 CROP 139 RESIZE 140 PROTECT 141 IMAGE ROTATE 142 RED EYE REMOVAL 143 IMAGE TRANSFE...

Страница 13: ...F BEEP VOL 156 SELF TIMER BEEP VOL 156 OPERATION VOL 156 SHUTTER VOLUME 157 SHUTTER SOUND 157 PLAYBACK VOLUME 157 SCREEN SETTING 158 LCD BRIGHTNESS 158 LCD COLOR 158 IMAGE DISP 158 PREVIEW EXP WB IN MANUAL MODE 159 NATURAL LIVE VIEW 159 FRAMING GUIDELINE 160 AUTOROTATE PB 160 FOCUS SCALE UNITS 160 DISP CUSTOM SETTING 161 BUTTON SETTING 162 FOCUS LEVER SETTING 162 EDIT SAVE QUICK MENU 163 FUNCTION ...

Страница 14: ...RMATION 172 RESET WIRELESS SETTING 172 9Shortcuts 173 Shortcuts 173 Shortcut Options 174 The Quick Menu 175 The Quick Menu Display 175 Viewing and Changing Settings 176 Editing the Quick Menu 177 The Function Button 178 Touch Function Buttons 179 10Peripherals and Optional Accessories 181 Peripherals and Optional Accessories 181 Lenses 182 Lens Parts 182 Power Zoom 183 Removing Lens Caps 183 Lense...

Страница 15: ...ures to a Computer 195 Connecting to Smartphones 196 instax SHARE Printers 197 Establishing a Connection 197 Printing Pictures 198 12Technical Notes 199 Technical Notes 199 Accessories from Fujifilm 200 Software from Fujifilm 202 FUJIFILM Camera Remote 202 FUJIFILM PC AutoSave 202 Capture One Express Fujifilm 202 RAW FILE CONVERTER EX 202 For Your Safety 203 Product Care 217 Cleaning the Image Sen...

Страница 16: ...ble battery Body cap USB cable 3 5 mm microphone adapter Shoulder strap Basic Manual N If you purchased a lens kit check that a lens is included Use the 3 5 mm microphone adapter when connecting micro phones and other devices with a 3 5 mm jack to the camera s 2 5 mm microphone remote release connector ...

Страница 17: ... product N Additional information that may be helpful when using the product P Pages on which related information may be found Menusandothertextinthedisplaysareshowninbold Illustrations are for explanatory purposes only drawings may be simplified while photographs are not necessarily taken with the model of camera described in this manual Terminology The optional SD SDHC and SDXC memory cards the ...

Страница 18: ...xviii MEMO ...

Страница 19: ...1 Before You Begin ...

Страница 20: ...Flash 88 123 G Strap eyelet 20 H N flash pop up switch 88 I Connector cover 40 49 53 J Lens signal contacts 21 182 K Lens release button 21 L Microphone 40 M AF assist illuminator 34 104 Self timer lamp 79 110 N Front command dial 6 O Shutter button 35 P Microphone remote release connector 2 5 mm 40 49 53 Q Battery chamber 22 R Memory card slot 22 S Battery latch 24 T Body cap 21 ...

Страница 21: ...r cover 26 188 a MENU OK button 14 91 135 151 b DISP display BACK button 11 131 c Cable channel cover for DC coupler d Battery chamber cover latch 22 e Battery chamber cover 22 f Tripod mount g Speaker 43 157 h HDMI Micro connector Type D 188 i USB connector Type C 26 193 j Serial number plate see below ODo not remove the serial number plate which provides the FCC ID KC mark CMIIT ID serial number...

Страница 22: ...using program shift 47 C C S S SHUTTER PRIORITY AE SHUTTER PRIORITY AE A A APERTURE PRIORITY AE APERTURE PRIORITY AE M M MANUAL MANUAL Select for full control over camera settings including aperture M and A and or shutter speed M and S 48 50 51 D D u u PANORAMA PANORAMA Follow an on screen guide to create a pan orama 54 E E SP SP SCENE POSITION SCENE POSITION h h M M N N O O Choose a scene suited ...

Страница 23: ...ing the DRIVE button displays drive mode options where you can choose from the following the drive modes Mode Mode P P B B STILL IMAGE STILL IMAGE 46 I I CONTINUOUS CONTINUOUS 86 O O AE BKT AE BKT 84 W W ISO BKT ISO BKT 84 X X FILM SIMULATION BKT FILM SIMULATION BKT 84 Mode Mode P P V V WHITE BALANCE BKT WHITE BALANCE BKT 84 Y Y DYNAMIC RANGE BKT DYNAMIC RANGE BKT 85 h h HDR HDR 85 F F MOVIE MOVIE...

Страница 24: ...d combina tion of shutter speed and aper ture program shift Adjust aperture Choose a shutter speed Choose a shutter speed Adjust exposure compensation Menus Menus Select menu tabs or page through menus Highlight menu items Q Menu Q Menu Adjust settings in the quick menu Playback Playback View other pictures Zoom in or out full frame play back Zoom in or out multi frame playback ...

Страница 25: ...e or tablet Displayed only if pictures are selected for upload Glows orange Recording pictures No additional pictures can be taken at this time Blinks orange Flash charging flash will not fire when picture is taken Blinks red Lens or memory error N Warnings may also appear in the display The LCD Monitor The LCD monitor can be tilted or reversed for ease of viewing You will find this fea ture particu...

Страница 26: ...ing you can choose between standard and touch menu displays O For illustrative purposes displays are shown with all indicators lit The Standard Shooting Display G ABC EF J I K L D H o n m c a Z X W Y e d U V j k l N M R S T Q P O b f g h i p q rs u t ...

Страница 27: ...m 13 V Distance indicator 72 W Battery level 29 X Sensitivity 118 Y Exposure compensation 73 Z Aperture 47 50 51 a Shutter speed 47 48 51 b AE lock 74 c Metering 116 d Shooting mode 4 46 e Movie mode 5 40 f Focus mode 63 g Focus indicator 64 h Manual focus indicator 71 i AF lock 74 j Power zoom indicator 35 k AF MF indicator 106 l Shutter type 117 m Exposure indicator 51 73 n Continuous mode 86 o ...

Страница 28: ... Exposure compensation Adjust exposure P73 E Depth control Adjust depth of field F Image aspect Choose the aspect ratio for new pictures G Playback mode Switch to playback mode P36 H Help View function button help I Bright mode Turn bright mode on or off J T B Fn2 View the options assigned to the function buttons using DBUTTON SETTING FUNCTION Fn SETTING P179 K T B Fn1 L Touch screen mode Choose a t...

Страница 29: ...itor when changes in am bient brightness make the display difficult to read Choose LCD BRIGHTNESS to adjust brightness or LCD COLOR to adjust hue NHolding the DISP BACK button during shooting sets LCD BRIGHTNESS to 5 and displays LCD BRIGHTNESS options The DISP BACK Button Press DISP BACK to cycle through display modes as follows Standard Information off ...

Страница 30: ... R ELECTRONIC LEVEL R FOCUS FRAME R AF DISTANCE INDICATOR R MF DISTANCE INDICATOR R HISTOGRAM R SHOOTING MODE R APERTURE S SPEED ISO R INFORMATION BACKGROUND R Expo Comp Digit R Expo Comp Scale R FOCUS MODE R PHOTOMETRY R Item Item Default Default SHUTTERTYPE R FLASH R CONTINUOUS MODE R DUAL IS MODE R WHITE BALANCE R FILM SIMULATION R DYNAMIC RANGE R FRAMES REMAINING R IMAGE SIZE QUALITY R MOVIE M...

Страница 31: ...inted up or down Histograms Histograms show the distribution of tones in the image Brightness is shown by the horizontal axis the number of pixels by the vertical axis Number of pixels Shadows Highlights Pixel brightness Optimal exposure Pixels are distributed in an even curve throughout the tone range Overexposed Pixels are clustered on the right side of the graph Underexposed Pixels are clustere...

Страница 32: ...LM SIMULATION PORTRAIT ENHANCER LV BRIGHT MODE DYNAMIC RANGE WHITE BALANCE HIGHLIGHT TONE IMAGE SIZE 2 Press the focus stick focus lever left to highlight the tab for the current menu IMAGE QUALITY SETTING EXIT IMAGE QUALITY FILM SIMULATION PORTRAIT ENHANCER LV BRIGHT MODE DYNAMIC RANGE WHITE BALANCE HIGHLIGHT TONE IMAGE SIZE Tab 3 Press the focus stick up or down to highlight the tab H G A F B C ...

Страница 33: ...sed for such operations as choosing the focus area and taking photographs Tap the touch screen mode icon to choose a touch screen mode N To disable touch controls and hide the touch screen mode indicator select OFF for DBUTTON SETTING TOUCH SCREEN SETTING xTOUCH SCREEN SETTING When ON is selected for DBUTTON SETTING TOUCH SCREEN SETTING xDOUBLE TAP SETTING you can zoom in by tapping the monitor tw...

Страница 34: ...r BMOVIE SETTING FFOCUS MODE Tap your subject in the display to focus CONTINUOUS AF selected for BMOVIE SETTING FFOCUS MODE The camera continually adjusts focus in response to changes in the distance to the subject in the selected focus point AREA AREA SINGLE AF selected for BMOVIE SETTING FFOCUS MODE Tap to select the focus point The cam era will focus on the subject in the selected point when th...

Страница 35: ... for ASHOOTING SETTING TOUCH ZOOM 2 Use pinch out and pinch in gestures P18 to zoom in and out using digital zoom N Regardless of where you place your fingers the camera will zoom in on and out from the center of the frame The camera will focus on the area selected for GAF MF SETTING FOCUS AREA If AREA is selected for GAF MF SETTING TOUCH SCREEN MODE you can select the focus area by tapping the di...

Страница 36: ... Swipe Swipe a finger across the display to view other images Pinch out Place two fingers on the dis play and spread them apart to zoom in Pinch in Place two fingers on the display and slide them together to zoom out NPictures can be zoomed out until the entire image is visible but no further Double tap Tap the display twice to zoom in on the focus point Drag View other areas of the image during p...

Страница 37: ...19 First Steps ...

Страница 38: ...20 2 First Steps Attaching the Shoulder Strap Attach the strap to the two strap eyelets as shown below O Attach the strap as shown To avoid dropping the camera be sure the strap is correctly secured ...

Страница 39: ...aching the lens Removing Lenses To remove the lens turn the camera off then press the lens release button A and rotate the lens as shown B O To prevent dust accumulating on the lens or inside the camera replace the lens caps and camera body cap when the lens is not attached Lenses and Other Optional Accessories The camera can be used with lenses and accessories for the FUJIFILM X mount OObserve th...

Страница 40: ...recaution could damage image files or memory cards Do not use excessive force when handling the battery chamber cover 2 Insert the battery Using the battery to keep the battery latch pressed to one side insert the battery contacts first in the direction shown by the arrow O Insert the battery in the orientation shown Do not use force or attempt to insert the battery upside down or backwards The ba...

Страница 41: ...e sure card is in the correct orienta tion do not insert at an angle or use force Format memory cards before first use and be sure to reformat all mem ory cards after using them in a com puter or other device 4 Close the battery chamber cover Close and latch the cover O If the cover does not close check that the battery is in the correct orienta tion Do not attempt to force the cov er shut ...

Страница 42: ...the camera as shown OThe battery may become hot when used in high temperature environ ments Observe caution when removing the battery Removing Memory Cards To remove the memory card press it in and re lease it slowly The card can then be removed by hand O Press the center of the card when ejecting it When a memory card is removed the card could be ejected too quickly Use your finger to hold it and...

Страница 43: ...otect switch to the unlocked position Memory cards are small and can be swallowed keep out of reach of children If a child swallows a memory card seek medical assistance immediately miniSD or microSD adapters that are larger or smaller than memory cards may not eject normally if the card does not eject take the cam era to an authorized service representative Do not forcibly remove the card Do not ...

Страница 44: ...e the supplied USB cable Connect the camera directly to the computer do not use a USB hub or keyboard Charging stops if the computer enters sleep mode to resume charging activate the computer and disconnect and reconnect the USB cable Charging may not be supported depending on the model of com puter computer settings and the computer s current state To charge the battery from a household AC power ...

Страница 45: ... this camera Failure to observe this precaution could result in prod uct malfunction Do not remove the labels from the battery or attempt to split or peel the outer casing The battery gradually loses its charge when not in use Charge the battery one or two days before use If the battery fails to hold a charge it has reached the end of its charging life and must be replaced Remove dirt from the bat...

Страница 46: ...e lens in the camera display Keep the lens clean N Pressing the a button during shooting starts playback Press the shutter button halfway to return to shooting mode The camera will turn off automatically if no operations are performed for the length of time selected for DPOWER MANAGEMENT AUTO POWER OFF To reactivate the camera and return to shooting mode after the camera has turned off automatical...

Страница 47: ...ry level is shown as follows Indicator Indicator Description Description O white Battery partially discharged M white Battery about two thirds charged K white Battery about one third charged Charge as soon as possible J red Low battery Charge battery A blinks red Battery exhausted Turn camera off and recharge battery ...

Страница 48: ... of the FUJIFILM Camera Remote App on the smart device before proceeding For more information visit http app fujifilm dsc com en camera_remote 1 Turn the camera on A language selection dialog will be displayed 2 Choose a language Highlight a language and press MENU OK 3 Pair the camera with the smartphone or tablet Press MENU OK to pair the camera with a smartphone or tablet running the FUJIFILM C...

Страница 49: ...r tablet N The option selected can be changed at any time using DCONNECTION SETTING Bluetooth SETTINGS SMARTPHONE SYNC SETTING LOCATION TIME LOCATION TIME START MENU SET OFF 6 Set the clock Press MENU OK to set the camera clock to the time reported by the smartphone or tablet and exit to shooting mode N If the battery is removed for an extended period the camera clock will be reset and the languag...

Страница 50: ...e a language Highlight the desired option and press MENU OK Changing the Time and Date To set the camera clock 1 Display DATE TIME options Select DUSER SETTING DATE TIME 2 Set the clock Press the focus stick focus lever left or right to highlight the year month day hour or minute and press up or down to change Press MENU OK to set the clock ...

Страница 51: ...33 Basic Photography and Playback ...

Страница 52: ... appropriate scene PORTRAIT O In S mode the camera continuously adjusts focus and search es for eyes increasing the drain on the battery in addition the sound of the camera focusing may be audible 2 Ready the camera Hold the camera steady with both hands shaking or unsteady hands can blur your shots To prevent pictures that are out of fo cus or too dark underexposed keep your fingers and other obj...

Страница 53: ...ll glow green Ifthecameraisunabletofocus the focus frame will turn red s will be displayed and the focus indicator will blink white N If the subject is poorly lit the AF assist illuminator may light to assist the focus operation Focus and exposure will lock when the shutter button is pressed halfway Focus and exposure remain locked while the button is kept in this position AF AE lock The camera wi...

Страница 54: ...ctures in reverse order Press it right to page through pictures in the order recorded Keep the stick pressed to scroll rapidly to the desired frame N You can also page through pictures using the front command dial or swipe gestures Pictures taken using other cameras are marked with a m gift im age icon to warn that they may not display correctly and that play back zoom may not be available ...

Страница 55: ...Choose a picture and press MENU OK to delete it The picture will be deleted when the MENU OK button is pressed a confirmation dialog is not displayed Be careful not to accidentally delete pictures you wish to keep Additional pictures can be deleted using the MENU OK but ton Display the desired pictures and press MENU OK to de lete them one by one N Protected pictures cannot be deleted Remove prote...

Страница 56: ...38 MEMO ...

Страница 57: ...39 Movie Recording and Playback ...

Страница 58: ...ding ends automatically when the maximum length is reached or the memory card is full NAt default settings the Fn1 button can also be used to start and stop movie recording P178 Movies can be recorded using the Fn1 but ton regardless of the option selected in the drive mode menu Using an External Microphone Sound can be recorded with external micro phones that connect using jacks 2 5 mm in diamete...

Страница 59: ...crophone during recording Note that the microphone may pick up lens noise and other sounds made by the camera during recording Vertical or horizontal streaks may appear in movies containing very bright subjects This is normal and does not indicate a malfunction N The indicator lamp lights while recording is in progress In the case of zoom lenses zoom can be adjusted during recording using the zoom...

Страница 60: ...ULTI and AREA Focus mode is selected using BMOVIE SETTING FFOCUS MODE for continuous focus adjustment select CONTINUOUS AF or choose SINGLE AF and enable Intelligent Face Detec tion Intelligent Face Detection is not available in manual focus mode Depth of Field Manual aperture adjustment is available in shooting modes A and M adjust aperture before recording begins Choose low f numbers to soften b...

Страница 61: ...gress x x Playback paused Playback paused y y Up End playback Down Start playback Pause playback Start resume playback Left right View other pictures Adjust speed Single frame rewind advance Progress is shown in the display during playback 1m23s PAUSE STOP O Do not cover the speaker during playback Sound is not played back if OFF is selected for DUSER SETTING SOUND FLASH N Press MENU OK to pause p...

Страница 62: ... Recording and Playback Viewing Movies Playback Speed Press the focus stick focus lever left or right to adjust playback speed during playback Speed is shown by the number of arrows M or N 1m23s PAUSE STOP Arrows ...

Страница 63: ...45 Taking Photographs ...

Страница 64: ...S the camera automatically optimizes settings to suit the scene The camera automatically selects the ap propriate scene Scene Scene AUTO PORTRAIT LANDSCAPE NIGHT Scene Scene MACRO NIGHT PORTRAIT BACKLIT PORTRAIT PORTRAIT O The mode selected may vary with shooting conditions If the mode and subject do not match select mode P or choose SP and select a scene manually ...

Страница 65: ...de dial to P P will appear in the display Program Shift Rotate the front command dial to choose the desired combination of shutter speed and ap erture program shift Aperture Shutter speed O Program shift is not available in any of the following circumstances With flash units that support TTL auto When an auto option is selected for HIMAGE QUALITY SETTING DYNAMIC RANGE N To cancel program shift tur...

Страница 66: ... let the camera adjust aperture for optimal exposure 1 Rotate the mode dial to S S will appear in the display 2 Use the front command dial to choose a shutter speed O If the correct exposure cannot be achieved at the selected shutter speed aperture will be displayed in red ...

Страница 67: ...select ON for HIMAGE QUALITY SETTING LONG EXPOSURE NR Note that this may increase the time needed to record images after shooting Using a Remote Release A remote release can be used for long time ex posures When using an optional RR 100 remote release or an electronic release from third party suppliers connect it to the camera s remote re lease connector NA confirmation dialog will be displayed wh...

Страница 68: ...d dial to choose an aperture O If the correct exposure cannot be achieved at the selected aperture shutter speed will be displayed in red Previewing Depth of Field When PREVIEW DEPTH OF FIELD is assigned to a function Fn1 button pressing the button displays a L icon and stops aperture down to the selected setting allowing depth of field to be previewed when the view through the lens appears in the...

Страница 69: ... the mode dial to M M will appear in the display 2 Rotate the rear command dial to choose a shutter speed and the front command dial to choose the aper ture N The manual exposure display includes an exposure indicator that shows the amount the picture would be under or over exposed at current settings Shutter speed Aperture ...

Страница 70: ...eview To preview exposure in the LCD monitor select an option other than OFF for DSCREEN SET UP PREVIEW EXP WB IN MANUAL MODE N Select OFF when using the flash or on other occasions on which ex posure may change when the picture is taken ...

Страница 71: ...prog ress To reduce noise mottling in long time exposures select ON for HIMAGE QUALITY SETTING LONG EXPOSURE NR Note that this may increase the time needed to record images after shooting Using a Remote Release A remote release can be used for long time ex posures When using an optional RR 100 remote release or an electronic release from third party suppliers connect it to the camera s remote re l...

Страница 72: ...ton pressed during recording 5 Pan the camera in the direction shown by the arrow Shooting ends automatically when the camera is panned to the end of the guides and the panorama is complete ANGLE DIRECTION Sweep camera along yellow line in direction of For Best Results For best results use a lens with a focal length of 35mm or less 50mm or less in 35mm format Prop your elbows against your sides an...

Страница 73: ... Panoramas may be blurred if the subject is poorly lit Shooting may be interrupted if the camera is panned too quickly or too slowly Panning the camera in a direction other than that shown cancels shooting The camera may in some cases record a greater or lesser angle than selected The desired results may not be achieved with Moving subjects Subjects close to the camera Unvarying subjects such as t...

Страница 74: ...rame playback you can use the rear command dial to zoom pan oramas in or out Panorama playback is controlled using the focus stick Focus stick Focus stick focus lever focus lever Full frame Full frame playback playback Panorama Panorama playback playback Panorama Panorama playback paused playback paused Up End playback Down Start playback Pause playback Resume playback Left right View other pictur...

Страница 75: ...a smooth skin effect when shooting por traits You can choose the portrait enhancement lev el in the touch menu M M LANDSCAPE LANDSCAPE Choose for daylight shots of buildings and land scapes N N SPORT SPORT Choose when photographing moving subjects O O NIGHT NIGHT Choose for poorly lit twilight or night scenes 2 Press MENU OK while the mode de scription is displayed Clear shots of night scenery with...

Страница 76: ...apture the bright ness of scenes dominated by shining white snow s s BEACH BEACH Choose for crisp clear shots that capture the bright ness of sunlit beaches f f UNDERWATER UNDERWATER Reduces the blue cast typically associated with un derwater lighting U U PARTY PARTY Capture indoor background lighting under low light conditions V V FLOWER FLOWER Effective for taking more vivid shots of flowers W W T...

Страница 77: ...e view through the lens and you will be prompted to take the second shot EXIT RETRY NEXT N To return to Step 2 and retake the first shot press the focus stick focus lever left To save the first shot and exit without creating a multiple expo sure press DISP BACK 4 Take the second shot using the first frame as a guide EXIT 5 Press MENU OK to create the multiple exposure or press the focus stick left...

Страница 78: ...cription Description G GTOY CAMERA TOY CAMERA Choose for a retro toy camera effect I IPOP COLOR POP COLOR Create high contrast images with saturated colors J JHIGH KEY HIGH KEY Create bright low contrast images Z ZLOW KEY LOW KEY Create uniformly dark tones with few areas of emphasized highlights E EFISH EYE FISH EYE Create a distorting effect of a fisheye lens K KDYNAMICTONE DYNAMICTONE Dynamic tone...

Страница 79: ...D PARTIAL COLOR RED Areas of the image that are the selected color are recorded in that color All other areas of the image are recorded in black and white v vPARTIAL COLOR ORANGE PARTIAL COLOR ORANGE w wPARTIAL COLOR YELLOW PARTIAL COLOR YELLOW x xPARTIAL COLOR GREEN PARTIAL COLOR GREEN y yPARTIAL COLOR BLUE PARTIAL COLOR BLUE z zPARTIAL COLOR PURPLE PARTIAL COLOR PURPLE j jFOG REMOVE FOG REMOVE C...

Страница 80: ...G FOCUS MODE to choose a focus mode P63 2 Use GAF MF SETTING AF MODE to choose an AF mode P65 3 Select GAF MF SETTING FOCUS AREA and choose the position and size of the focus frame P67 4 Take pictures N For information on the autofocus system visit http fujifilm x com af en index html ...

Страница 81: ...mera is unable to focus using autofocus P71 k k CONTINUOUS AF Focus is continually adjusted to reflect changes in the dis tance to the subject while the shutter button is pressed halfway Use for subjects that are in motion l l SINGLE AF Focus locks while the shutter button is pressed halfway Choose for stationary subjects N Regardless of the option selected manual focus will be used when the lens i...

Страница 82: ...ocus indicator Focus status Focus status Camera focusing z lights green Subject in focus focus locked focus mode l z lights green Subject in focus focus mode k Focus is automatically adjusted for changes in distance to subject A blinks white Camera unable to focus j Manual focus focus mode p Focus indicator ...

Страница 83: ...ple image r r SINGLE POINT SINGLE POINT Camera focuses on subject in selected focus point Use for pin point focus on selected subject y y ZONE ZONE Camera focuses on subject in se lected focus zone Focus zones in clude multiple focus points mak ing it easier to focus on subjects in motion z z WIDE WIDE Camera focuses automatically on high contrast subjects display shows areas in focus j j ALL ALL ...

Страница 84: ...oint Use for subjects moving toward or away from camera y y ZONE ZONE Focus tracks subject in selected fo cus zone Use for subjects that are moving fairly predictably z z TRACKING TRACKING Focus tracks subjects moving through wide area of frame j j ALL ALL Rotate the rear command dial in the focus point selection dis play P68 69 to cycle through AF modes in the following or der rSINGLE POINT yZONE...

Страница 85: ...us Viewing the Focus Point Display 1 Press MENU OK and go to the shooting menu 2 Select GAF MF SETTING FOCUS AREA to view the fo cus point display 3 Use the focus stick focus lever and rear command dial to choose a focus area N The focus point can also be selected using touch controls P15 ...

Страница 86: ...ial Tilt Tilt Press Press Rotate Rotate r r Select focus point Select center focus point Choose from 6 frame sizes y y Choose from 3 frame sizes z z N Manual focus point selection is not available when zWIDE TRACKING is selected in focus mode l If jALL is selected for AF mode you can rotate the rear command dial in the focus point selection display to cycle through AF modes in the following order ...

Страница 87: ...s are shown by small squares focus zones by the large squares AF mode AF mode r rSINGLE POINT SINGLE POINT y yZONE ZONE z zWIDE TRACKING WIDE TRACKING Number of points avail able can be selected using GAF MF SETTING NUMBER OF FOCUS POINTS Choose from zones with 7 7 5 5 or 3 3 focus points Position focus frame over subject you want to track ...

Страница 88: ...t is also in the focus frame for example a subject photographed against a backdrop of highly contrasting elements Checking Focus To zoom in on the current focus area for precise focus press the center of the focus stick focus lever Press the center of the focus stick again to cancel zoom Normal display Focus zoom N In focus mode l zoom can be adjusted by rotating the rear com mand dial In focus mo...

Страница 89: ...on of rotation of the focus ring Regardless of the option selected manual focus will be used when the lens is in manual focus mode If AF lock is assigned to a function button the button can be used to quickly focus on the subject in the selected focus frame The size of the frame can be adjusted using the rear command dial To display a j indicator in manual focus mode select FOCUS MODE in the DSCRE...

Страница 90: ... and MF DISTANCE INDICATOR are se lected in the DSCREEN SET UP DISP CUSTOM SETTING list the manual focus indicator can also be viewed using the depth of field indicator in the standard display Use the DISP BACK button to display standard indicators Focus Zoom If ON is selected for GAF MF SETTING FOCUS CHECK the camera will automatically zoom in on the selected focus area when the focus ring is rot...

Страница 91: ...73 5 Taking Photographs d Exposure Compensation Adjust exposure Rotate the rear command dial to adjust exposure O The amount of compensation available varies with the shooting mode ...

Страница 92: ... lock 2 Press the button all the way down The Fn1 Button Focus and or exposure lock can be as signed to the Fn1 button Option Option Description Description AE LOCK AE LOCK Pressing the Fn1 button locks expo sure AF LOCK AF LOCK Pressing the Fn1 button locks focus AE AF LOCK AE AF LOCK Pressing the Fn1 button locks both focus and exposure N When the Fn1 button is used for focus or exposure lock th...

Страница 93: ...K to view white balance options 3 Highlight a white balance option Press MENU OK to view a WB SHIFT display where white balance can be fine tuned using the focus stick focus lever Press DISP BACK to select the high lighted option and exit without ap plying fine tuning WB SHIFT SET N At default settings white balance can also be accessed via the T B Fn1 button in the touch menu P179 Tap the T B Fn1...

Страница 94: ...t j For subjects in the shade k Use under daylight fluorescent lights l Use under warm white fluorescent lights m Use under cool white fluorescent lights n Use under incandescent lighting g Reduces the blue cast typically associated with underwater light ing N Results vary with shooting conditions Play pictures back after shoot ing to check colors White balance is adjusted for flash lighting only in ...

Страница 95: ...to measure white balance to select the most recent custom value and exit without measuring white balance press DISP BACK or press MENU OK to select the most recent value and display the fine tuning dialog If COMPLETED is displayed press MENU OK to set white balance to the measured value If UNDER is displayed raise exposure compensation and try again If OVER isdisplayed lower exposure compensation ...

Страница 96: ... ColorTemperature Color temperature is an objective measure of the color of a light source expressed in Kelvin K Light sources with a color temperature close to that of direct sunlight appear white light sources with a lower color tempera ture have a yellow or red cast while those with a higher color temperature are tinged with blue You can match color temperature to the light source or choose opt...

Страница 97: ...n P P R R2 SEC 2 SEC 80 S S10 SEC 10 SEC 80 m mFACE AUTO SHUTTER FACE AUTO SHUTTER 81 o oSMILE SMILE 81 Option Option P P a aBUDDY BUDDY 82 g gGROUP GROUP 82 OFF OFF O Stand behind the camera when using the shutter button Standing in front of the lens can interfere with focus and exposure The self timer turns off automatically when the camera is turned off N To stop the timer before the picture is...

Страница 98: ...se to reduce blur caused by the camera moving when the shutter button is pressed The self timer lamp blinks as the timer counts down S S10 SEC 10 SEC The shutter is released ten seconds after the shutter button is pressed Use for photographs in which you wish to appear yourself The self timer lamp blinks immediately before the pic ture is taken 2 Press the shutter button all the way down to start ...

Страница 99: ...er when the subject is facing the lens EXIT O The camera may fail to detect subjects who are not facing the camera or whose eyes are hidden SMILE The camera releases the shutter when the subject smiles 1 Select o SMILE in the self timer menu 2 Frame portrait subjects in the dis play The camera will initiate face de tection and release the shutter when any of the subjects smiles EXIT O The camera m...

Страница 100: ...hands LV 2 CLOSE UP The timer starts when the subjects are shoul der to shoulder LV 3 SUPER CLOSE The timer starts when the subjects are cheek to cheek N The timer starts only when the subjects are sufficiently close together the shutter is released one second later GROUP The camera takes a picture when it detects the selected number of portrait subjects 1 Select g GROUP in the self timer menu 2 S...

Страница 101: ...BKT 84 X XFILM SIMULATION BKT FILM SIMULATION BKT 84 Option Option P P V VWHITE BALANCE BKT WHITE BALANCE BKT 84 Y YDYNAMIC RANGE BKT DYNAMIC RANGE BKT 85 h hHDR HDR 85 3 Press the focus stick left or right to highlight the desired bracketing settings N Bracketing settings for OAE BKT are selected using ASHOOTING SETTING AE BKT SETTING Bracketing settings for XFILM SIMULATION BKT are selected usin...

Страница 102: ...ake a picture at the current sen sitivity and process it to create two additional copies one with sensitivity raised and the other with sensitivity lowered by the selected amount XFILM SIMULATION BKT Each time the shutter is released the camera takes one shot and processes it to create a total of three copies with different film simulation settings chosen using the ASHOOTING SETTING FILM SIMULATIO...

Страница 103: ...ivity previously in effect is restored when bracketing ends hHDR Each time the shutter button is pressed the camera takes multi ple shots at different exposures and combines them into a single high dynamic range image reducing loss of detail in highlights and shadows Choose the amount the camera varies exposure from AUTO 1 0 EV 1 5 EV 2 0 EV 2 5 EV and 3 0 EV O Keep the camera steady If the camera...

Страница 104: ...us stick focus lever up or down to select ICONTINUOUS 3 Press the focus stick left or right to choose the frame rate JHIGH or OLOW 4 Press MENU OK to save changes and exit the drive mode menu 5 Take pictures Keep the shutter button pressed to take pictures at the rate selected in Step 3 N Shooting ends when the shutter button is released or the memo ry card is full ...

Страница 105: ... card is full the camera will record all photos shot to that point Burst shooting may not begin if the space available on the memory card is insufficient Frame rates may slow as more shots are taken Frame rate varies with the scene shutter speed sensitivity and focus mode Depending on shooting conditions frame rates may slow The flash cannot be used Recording times may increase during burst shooti...

Страница 106: ...ption AUTO AUTO AUTO FLASH AUTO FLASH The flash fires when required Recommended in most situations K K RED EYE REDUCTION RED EYE REDUCTION N N L L FORCED FLASH FORCED FLASH FORCED FLASH FORCED FLASH The flash fires whenever a picture is taken Use for backlit subjects or for natural coloration when shooting in bright light O O M M SLOW SYNCHRO SLOW SYNCHRO RED EYE SLOW RED EYE SLOW Capture both the mai...

Страница 107: ...e to the subject some lenses may cast shadows in photos taken with the flash The flash may contact accessories mounted on the hot shoe If neces sary remove accessories before raising the flash N If p is displayed when the shutter button is pressed halfway the flash will fire when the photo is taken Except in commander mode the flash may fire several times with each shot Do not move the camera unti...

Страница 108: ...ING FACE EYE DETECTION SETTING to FACE ON EYE AUTO Regardless of the option selected for DSCREEN SET UP IMAGE DISP pictures will be displayed for 1 5 seconds after shooting You can also release the shutter by pressing the Fn1 button The Self Portrait Display When rotated to the self portrait position the LCD monitor shows a mirror image of the view through the lens ...

Страница 109: ...91 The Shooting Menus ...

Страница 110: ...GE WHITE BALANCE HIGHLIGHT TONE IMAGE SIZE N The options available vary with the shooting mode selected IMAGE SIZE Choose the size and aspect ratio at which still pictures are recorded Option Image size Option Image size O4 3 5328 4000 O3 2 6000 4000 O16 9 6000 3376 O1 1 4000 4000 P4 3 3712 2784 P3 2 4240 2832 P16 9 4240 2384 P1 1 2832 2832 Q4 3 2656 1992 Q3 2 3008 2000 Q16 9 3008 1688 Q1 1 2000 2...

Страница 111: ...images RAW RAW Record RAW images only The Function Buttons To toggle RAW image quality on or off for a single shot assign RAW to a function button P178 Press the button once to select the option in the right column again to return to the original setting left column Option currently selected for Option currently selected for IMAGE QUALITY IMAGE QUALITY Option selected by pressing function Option s...

Страница 112: ... a calm look g PRO Neg Hi Offers slightly more contrast than h PRO Neg Std Recommended for outdoor portrait photography h PRO Neg Std A soft toned palette The range of hues available for skin tones is enhanced making this a good choice for studio portrait photography b MONOCHROME Take pictures in standard black and white e MONOCHROME Ye FILTER Take black and white pictures with slightly increased c...

Страница 113: ...e effect in the display 露出補正 露出補正 PORTRAIT ENHANCER O Select FACE DETECTION ON for GAF MF SETTING FACE EYE DETECTION SETTING when adjusting the portrait enhancement level BRIGHT MODE Select ON to enable bright mode when shooting in S Use bright mode to better capture details in highlights and shadows PORTRAIT Options Options ON ON OFF OFF ...

Страница 114: ...t autumn leaves and portraits taken against a blue sky and for white objects or people wearing white Options Options AUTO AUTO V V100 100 W W200 200 X X400 400 O Mottling may appear in pictures taken at higher values Choose a val ue according to the scene N If AUTO is selected the camera will automatically choose either V100 or W200 according to the subject and shooting con ditions Shutter speed a...

Страница 115: ...ghting g g Reduces the blue cast typically associated with underwater light ing N In conditions in which AUTO fails to produce the desired results for example under certain types of lighting or in close ups of portrait subjects use custom white balance or choose a white balance op tion suited to the light source White balance is adjusted for flash lighting only in AUTO and g modes Turn the flash o...

Страница 116: ...ure white balance to select the most recent custom value and exit without measuring white balance press DISP BACK or press MENU OK to select the most recent value and display the fine tuning dialog If COMPLETED is displayed press MENU OK to set white balance to the measured value If UNDER is displayed raise exposure compensation and try again If OVER isdisplayed lower exposure compensation and try...

Страница 117: ...TURE ColorTemperature Color temperature is an objective measure of the color of a light source expressed in Kelvin K Light sources with a color temperature close to that of direct sunlight appear white light sources with a lower color tempera ture have a yellow or red cast while those with a higher color temperature are tinged with blue You can match color temperature to the light source or choose...

Страница 118: ...f highlights Options Options 2 2 1 1 0 0 1 1 2 2 SHADOW TONE Adjust the appearance of shadows Options Options 2 2 1 1 0 0 1 1 2 2 COLOR Adjust color density Options Options 2 2 1 1 0 0 1 1 2 2 SHARPNESS Sharpen or soften outlines Options Options 2 2 1 1 0 0 1 1 2 2 ...

Страница 119: ...s Options 2 2 1 1 0 0 1 1 2 2 LONG EXPOSURE NR Select ON to reduce mottling in long time exposures Options Options ON ON OFF OFF COLOR SPACE Choose the gamut of colors available for color reproduction Option Option Description Description sRGB sRGB Recommended in most situations Adobe RGB Adobe RGB For commercial printing ...

Страница 120: ...OCUS MANUAL FOCUS Focus manually using the lens focus ring Choose for manual control of focus or in situations in which the camera is unable to focus using autofocus P71 k k CONTINUOUS AF CONTINUOUS AF Focus is continually adjusted to reflect changes in the distance to the subject while the shutter button is pressed halfway Use for subjects that are in motion l l SINGLE AF SINGLE AF Focus locks whi...

Страница 121: ...us zone Focus zones include multiple focus points making it easier to focus on subjects that are in motion z WIDE TRACKING WIDE TRACKING In focus mode l the camera automatically focuses on high contrast subjects the areas in focus are shown in the display In focus mode k the camera tracks focus on the subject in the selected focus point while the shutter button is pressed halfway The camera may be...

Страница 122: ...essed halfway The camera adjusts focus continuously allowing it to focus faster when the shutter button is pressed halfway Choosing this option helps prevent missed shots Options Options ON ON OFF OFF O Choosing ON increases the drain on the battery AF ILLUMINATOR If ON is selected the AF assist illuminator will light to assist autofocus Options Options ON ON OFF OFF O The AF assist illuminator tu...

Страница 123: ...ace Detection vLEFT EYE PRIORITY The camera focuses on the left eye of subjects detected using Intelligent Face Detection OFF OFF Intelligent Face Detection and eye priority off O If the subject moves as the shutter button is pressed the face may not be in the area indicated by the green border when the picture is taken In some modes the camera may set exposure for the frame as a whole rather than ...

Страница 124: ...cus distance indicator set the focus ring to the center as the camera may fail to focus if the ring is set to infinity or the minimum focus distance NTo assist focus using focus peaking select FOCUS PEAK HIGHLIGHT for MF ASSIST AF MF Focus Zoom When ON is selected for GAF MF SETTING FOCUS CHECK and SINGLE POINT selected for AF MODE focus zoom can be used to zoom in on the selected focus area MF AS...

Страница 125: ...elect ON to meter the current focus frame when SINGLE POINT is selected for AF MODE and SPOT is selected for PHOTOMETRY Options Options ON ON OFF OFF RELEASE FOCUS PRIORITY Choose how the camera focuses in focus mode AF S l or AF C k Option Option Description Description RELEASE RELEASE Shutter response is prioritized over focus Pictures can be taken when the camera is not in focus FOCUS FOCUS Foc...

Страница 126: ...ture the expanding burst of light from a firework Q Q SUNSET SUNSET Choose this mode to record the vivid colors in sunrises and sunsets R R SNOW SNOW Choose for crisp clear shots that capture the brightness of scenes dominated by shining white snow s s BEACH BEACH Choose for crisp clear shots that capture the brightness of sunlit beaches f f UNDERWATER UNDERWATER Reduces the blue cast typically ass...

Страница 127: ...N Create a star pattern where lines radiate out from bright objects The effects of the cross screen filter can be viewed after shooting n n RICH FINE RICH FINE Add a rich fine effect recommend for tabletop pho tography m m MONOCHROME NIR MONOCHROME NIR Monochrome photography as taken by Near infrared camera u uPARTIAL COLOR RED PARTIAL COLOR RED Areas of the image that are the selected color are re co...

Страница 128: ... P81 o oSMILE SMILE The camera releases the shutter when the subject smiles P81 a aBUDDY BUDDY The camera takes a picture when it detects two subjects close together P82 g gGROUP GROUP The camera takes a picture when it detects the selected number of portrait subjects P82 OFF OFF Self timer off O Stand behind the camera when using the shutter button Standing in front of the lens can interfere with ...

Страница 129: ...r of shots Press MENU OK to proceed INTERVAL NUMBER OF TIMES INTERVAL NUMBER OF TIMES 3 Highlight one of the following re cording types and press MENU OK STILL Each photo is recorded sep arately STILL TIME LAPSE MOVIE Each photo is recorded separately in addition the entire sequence is re corded as a time lapse movie SETTING STILL STILL TIME LAPSE MOVIE N The frame size and rate for the time lapse...

Страница 130: ...ography In burst mode only one picture will be taken each time the shutter is released N Use of a tripod is recommended Check the battery level before starting We recommend using an op tional AC 9V AC power adapter and CP W126 DC coupler The display turns off between shots and lights a few seconds before the next shot is taken The display can be activated at any time by pressing the shutter button...

Страница 131: ... fps W W23 98P 23 98P 23 98 fps h h59 94P 59 94P 1280 720 HD 59 94 fps h h50P 50P 50 fps h h29 97P 29 97P 29 97 fps h h25P 25P 25 fps h h24P 24P 24 fps h h23 98P 23 98P 23 98 fps n n59 94P 59 94P 1080 1080 Full HD 59 94 fps n n50P 50P 50 fps n n29 97P 29 97P 29 97 fps n n25P 25P 25 fps n n24P 24P 24 fps n n23 98P 23 98P 23 98 fps m m59 94P 59 94P 720 720 HD 59 94 fps m m50P 50P 50 fps m m29 97P 29...

Страница 132: ...1 FRAME The shots in the bracketing sequence are taken one at a time CONTINUOUS CONTINUOUS The shots in the bracketing sequence are taken in a single burst SEQUENCE SETTING SEQUENCE SETTING Choose the order in which the shots are taken Option Option Description Description 0 0 The first shot is taken at current exposure settings and exposure compensation is then modified over the succeeding shots pr...

Страница 133: ...ons c c PROVIA STANDARD PROVIA STANDARD d dVelvia VIVID Velvia VIVID e e ASTIA SOFT ASTIA SOFT i i CLASSIC CHROME CLASSIC CHROME g g PRO Neg Hi PRO Neg Hi h h PRO Neg Std PRO Neg Std b b MONOCHROME MONOCHROME e e MONOCHROME MONOCHROME Ye FILTER Ye FILTER d d MONOCHROME MONOCHROME R FILTER R FILTER f f MONOCHROME G FILTER MONOCHROME G FILTER f f SEPIA SEPIA ...

Страница 134: ...is pressed a second time PHOTOMETRY Choose how the camera meters exposure O The selected option will only take effect when GAF MF SETTING FACE EYE DETECTION SETTING is OFF Mode Mode Description Description o MULTI MULTI The camera instantly determines exposure based on an analysis of composition color and brightness distribution Recommend ed in most situations v SPOT SPOT The camera meters lightin...

Страница 135: ...according to shooting conditions OWhen using the electronic shutter note the following Distortion may be visible in shots of moving subjects Distortion may also be visible in hand held shots taken at high shut ter speeds use of a tripod is recommended Banding and fog may occur in shots taken under fluorescent lights or other flickering or erratic illumination When taking pictures with the shutter ...

Страница 136: ...OFF OFF Image stabilization off Choose this option when using a tripod N MOTION has no effect when sensitivity is set to a fixed value and may also be unavailable at some other combinations of settings The effect may vary with lighting conditions and the speed at which the object is moving This option is available only with lenses that support image stabili zation ISO Adjust the camera s sensitivit...

Страница 137: ...ault and maximum values sensitivity is only raised above the default value if the shutter speed required for optimal exposure wouldbeslowerthanthevalueselectedforMIN SHUTTERSPEED N If the value selected for DEFAULT SENSITIVITY is higher than that selected for MAX SENSITIVITY DEFAULT SENSITIVITY will be set to the value selected for MAX SENSITIVITY The camera may select shutter speeds slower than M...

Страница 138: ... 21mm MOUNT ADAPTOR SETTING LENS 4 LENS 2 LENS 5 LENS 6 LENS 3 LENS 1 For other lenses select option 5 or 6 to display the menu at right press the selec tor right to display focal length settings and use the selector to enter the focal length LENS 5 INPUT FOCAL LENGTH Distortion Correction Choose from STRONG MEDIUM or WEAK optionstocorrectBARRELorPINCUSHION distortion LENS5 DISTORTION CORRECTION O...

Страница 139: ...adjust colors on the cyan red axis Press the focus stick up or down to adjust colors on the blue yellow axis N To determine the amount required adjust color shading correction while taking photos of blue sky or a sheet of gray paper Peripheral Illumination Correction Choose from values between 5 and 5 Choosing positive values increases peripheral illumination while choosing negative values reduces...

Страница 140: ...ingthelatestversionoftheFUJIFILM Camera Remote app The smartphone can then be used to Control the camera and take pictures remotely Receive pictures uploaded from the camera Browse the pictures on the camera and download selected pic tures Upload location data to the camera N For downloads and other information visit http app fujifilm dsc com en camera_remote ...

Страница 141: ...h mode P88 FLASH COMPENSATION Adjust flash brightness Choose from values between 2 EV and 2 EV Options Options 2 2 12 3 12 3 11 3 11 3 1 1 2 3 2 3 1 3 1 3 0 0 1 3 1 3 2 3 2 3 1 1 11 3 11 3 12 3 12 3 2 2 NNote that the desired results may not be achieved depending on shooting conditions and the distance to the subject RED EYE REMOVAL Choose ON to remove red eye effects caused by the flash Options O...

Страница 142: ...rate for movie recording Option Option Frame size Frame size Rate Rate V V29 97P 29 97P1 1 3840 2160 4K 29 97 fps V V25P 25P1 1 25 fps V V24P 24P1 1 24 fps V V23 98P 23 98P1 1 23 98 fps W W59 94P 59 94P 1920 1080 Full HD 59 94 fps W W50P 50P 50 fps W W29 97P 29 97P 29 97 fps W W25P 25P 25 fps W W24P 24P 24 fps W W23 98P 23 98P 23 98 fps h h59 94P 59 94P 1280 720 HD 59 94 fps h h50P 50P 50 fps h h2...

Страница 143: ... you time to view fast moving subjects or details too fleeting for the naked eye Option Option Description Description 1 6 1 6 a a59 94P 59 94P F F100P 100P Record HD 1280 720 movies at 1 6 2 3 3 or 4 speed and a frame rate of 100 fps The maximum length for 1 6 59 94p movies recorded at 36Mbps is 17 min utes 58 seconds 2 2 a a50P 50P F F100P 100P 3 3 3 3 a a29 97P 29 97P F F100P 100P 4 4 a a25P 25...

Страница 144: ... AF The camera focuses using AF S MOVIE AF MODE Choosehowthecameraselectsthefocuspointformovierecording Option Option Description Description s sMULTI MULTI Automatic focus point selection t tAREA AREA The camera focuses on the subject in the selected focus area DIGITAL IMAGE STABILIZER Choose whether to enable digital image stabilization during movie recording Options Options ON ON OFF OFF NSelec...

Страница 145: ...UTPUT INFO DISPLAY If ON is selected HDMI devices to which the camera is connected will mirror the information in the camera display Options Options ON OFF 4K MOVIE OUTPUT Choose the destination for 4K movies shot while the camera is connected to an HDMI recorder or other device that supports 4K Option Option Description Description b bCARD CARD 4K movies are recorded to a camera memory card and o...

Страница 146: ...ressed to start and stop movie recording Options Options ON OFF MIC LEVEL ADJUSTMENT Adjust the recording level for the built in and external micro phones Options Options 1 1 2 2 3 3 4 4 MIC REMOTE RELEASE Specify whether the device connected to the microphone re mote release connector is a microphone or a remote release Options Options m mMIC MIC n nREMOTE REMOTE ...

Страница 147: ...129 Playback and the Playback Menu ...

Страница 148: ...9 E Image transfer status 144 169 F Number of frames selected for upload 144 169 G Sound and flash indicator 154 H Frame number 167 I Shooting mode 46 J Protected image 141 K Location data 170 172 L Battery level 29 M Image quality 93 N Image size 92 O Film simulation 94 P Dynamic range 96 Q White balance 97 R Sensitivity 118 S Exposure compensation 73 T Aperture 47 50 51 U Shutter speed 47 48 51 V...

Страница 149: ...tion off 01 01 2020 10 00 AM 2019 01 01 10 00 AM 01 01 2020 10 00 AM FAVORITES 01 01 2020 10 00 AM Favorites Info display 1 LENS 23 0mm F5 6 FOCAL LENGTH 23 0mm COLOR SPACE sRGB LENS MODULATION OPT ON Info display 2 Favorites Rating Pictures To rate the current picture press DISP BACK and press the focus stick focus lever up and down to select from zero to five stars ...

Страница 150: ...Playback and the Playback Menu 7 The Playback Display Zooming in on the Focus Point Press the center of the focus stick focus lever to zoom in on the focus point Press again to return to full frame playback ...

Страница 151: ...ormation on playback zoom and multi frame playback Use the rear command dial to go from full frame playback to playback zoom or multi frame playback Full frame playback Multi frame playback Playback zoom Nine frame view Hundred frame view DISP BACK MENU OK Medium zoom Maximum zoom ...

Страница 152: ...resized copies saved at a size of a Scroll When the picture is zoomed in the focus stick focus lever can be used to view areas of the image not currently visible in the display Navigation window Multi Frame Playback To change the number of images displayed rotate the rear com mand dial left when a picture is displayed full frame N Use the focus stick focus lever to highlight images and press MENU ...

Страница 153: ...them in JPEG format Saving RAW Pictures in JPEG Format 1 Display a RAW picture 2 Highlight RAW CONVERSION in the playback menu 3 Press MENU OK A list of settings will be displayed CREATE REFLECT SHOOTING COND PUSH PULL PROCESSING DYNAMIC RANGE FILM SIMULATION WHITE BALANCE WB SHIFT RAW CONVERSION CANCEL 4 Press the focus stick focus lever up or down to highlight a setting 5 Press the focus stick r...

Страница 154: ...G copy using the settings in effect at the time the photo was taken PUSH PULL PROCESSING PUSH PULL PROCESSING Adjust exposure DYNAMIC RANGE DYNAMIC RANGE Enhance details in highlights for natural contrast FILM SIMULATION FILM SIMULATION Simulate the effects of different types of film WHITE BALANCE WHITE BALANCE Adjust white balance WB SHIFT WB SHIFT Fine tune white balance HIGHLIGHTTONE HIGHLIGHTTONE ...

Страница 155: ...CTED FRAMES SELECTED FRAMES Delete multiple selected pictures ALL FRAMES ALL FRAMES Delete all unprotected pictures FRAME 1 Select FRAME for ERASE in the playback menu 2 Press the focus stick focus lever left or right to scroll through pictures and press MENU OK to delete N A confirmation dialog is not displayed before pictures are deleted be sure the correct picture is selected before pressing ME...

Страница 156: ...alog 4 Highlight OK and press MENU OK to delete the selected pic tures N Pictures in photobooks or printer orders are shown by S ALL FRAMES 1 Select ALL FRAMES for ERASE in the playback menu 2 A confirmation dialog will be displayed highlight OK and press MENU OK to delete all unprotected pictures N Pressing DISP BACK cancels deletion note that any pictures deleted before the button was pressed ca...

Страница 157: ...oom in and out and press the focus stick focus lever up down left or right to scroll the picture until the desired portion is displayed 4 Press MENU OK to display a confirmation dialog 5 Press MENU OK again to save the cropped copy to a separate file N The higher the zoom ratio the smaller the number of pixels in the cropped copy If the size of the final copy will be a YES will be displayed in yel...

Страница 158: ...ent picture 1 Display the desired picture 2 Select RESIZE in the playback menu 3 Highlight a size and press MENU OK to display a confirmation dialog 4 Press MENU OK again to save the resized copy to a separate file N The sizes available vary with the size of the original image ...

Страница 159: ...pictures Press the focus stick focus lever left or right to view pictures and press MENU OK to select or deselect Press DISP BACK when the operation is complete SET ALL SET ALL Protect all pictures RESET ALL RESET ALL Remove protection from all pictures O Protected pictures will be deleted when the memory card is formatted N Protecting images currently selected for upload to paired smart phones or...

Страница 160: ...re will automatically be displayed in the selected orientation whenever it is played back on the camera N Protected pictures cannot be rotated Remove protection before ro tating pictures The camera may not be able to rotate pictures created with other devices Pictures rotated on the camera will not be rotated when viewed on a computer or on other cameras Pictures taken with DSCREEN SET UP AUTOROTA...

Страница 161: ...desired picture 2 Select RED EYE REMOVAL in the playback menu 3 Press MENU OK N Results vary depending on the scene and the camera s success in de tecting faces The amount of time needed to process the image varies with the number of faces detected Red eye cannot be removed from pictures that have already been processed using red eye removal which are indicated by a e icon during playback Red eye ...

Страница 162: ...fter you exit to playback or turn the camera off N Image transfer orders can contain a maximum of 999 pictures The following cannot be selected for upload Protected pictures Movies RAW images Gift pictures pictures taken with other cameras If PAIRING TRANSFER ORDER is selected for DCONNECTION SETTING GENERAL SETTINGS rBUTTON SETTING photos can also be marked for upload using the Fn1 button To remo...

Страница 163: ...mera and download selected pic tures Upload location data to the camera N For downloads and other information visit http app fujifilm dsc com en camera_remote SLIDE SHOW View pictures in an automated slide show Press MENU OK to start and press the focus stick focus lever right or left to skip ahead or back Press DISP BACK at any time during the show to view on screen help The show can be ended at ...

Страница 164: ...the book is complete N Neither photographs a or smaller nor movies can be selected for photobooks The first picture selected becomes the cover image Press the fo cus stick down to select the current image for the cover instead 3 Highlight COMPLETE PHOTOBOOK and press MENU OK to se lect all photos for the book choose SELECT ALL The new book will be added to the list in the photobook assist menu N B...

Страница 165: ...MENU OK The following options will be displayed select the desired option and follow the on screen instructions EDIT Edit the book as described in Creating a Photobook ERASE Delete the book PC AUTO SAVE Upload pictures from the camera to a computer running the latest version of FUJIFILM PC AutoSave note that you must first install the software and configure the computer as a destination for images...

Страница 166: ...to choose the number of copies up to 99 N To remove a picture from the order press the focus stick down until the number of copies is 0 Total number of prints Number of copies N Repeat steps 3 4 to complete the print order 5 The total number of prints is displayed in the monitor Press MENU OK to exit N The pictures in the current print order are indicated by a u icon during playback Print orders c...

Страница 167: ...K MENU instax PRINTER PRINT The camera will con nect to the printer FUJIFILM CAMERA 1234 CONNECTING CANCEL PRINTER PRINT instax 12345678 3 Use the focus stick focus lever to display the picture you want to print then press MENU OK The picture will be sent to the printer and printing will start 100 0020 SET CANCEL instax 12345678 PRINTER PRINT N Pictures taken with other cameras cannot be printed T...

Страница 168: ...y pictures with an aspect ratio of 3 2 this option is available only when an HDMI cable is connected 16 9 3 2 Option Option 16 16 9 9 3 3 2 2 Display N Select 16 9 to display the image so that it fills the screen with its top and bottom cropped out 3 2 to display the entire image with black bands at either side ...

Страница 169: ...151 The Setup Menus ...

Страница 170: ... card 1 Select DUSER SETTING FORMAT in the D SET UP tab 2 A confirmation dialog will be dis played To format the memory card highlight OK and press MENU OK NTo exit without formatting the memory card select CANCEL or press DISP BACK FORMAT OK OK CANCEL FORMAT O All data including protected pictures will be deleted from the memory card Be sure important files have been copied to a comput er or othe...

Страница 171: ... camera clock instantly from your home time zone to the local time at your destination when traveling To specify the difference between your local and home time zone 1 Highlight gLOCAL and press MENU OK 2 Use the focus stick focus lever to choose the time difference between local time and your home time zone Press MENU OK when settings are complete To set the camera clock to local time highlight g...

Страница 172: ...CHED OFF WHEN SWITCHED OFF Sensor cleaning will be performed when the camera turns off sensor cleaning is not however performed if the cam era turns off in playback mode NDust that cannot be removed using sensor cleaning can be removed using a blower P218 SOUND FLASH Select OFF to disable the speaker flash illuminator and self tim er lamp in situations in which camera sounds and lights may be unwelc...

Страница 173: ...ING MENU SHOOTING MENU RESET RESET Reset all shooting menu settings other than custom white balance and custom settings banks created using EDIT SAVE CUSTOM SETTING to default values SET UP RESET SET UP RESET Reset all setup menu settings other than DATE TIME TIME DIFFERENCE and CONNECTION SETTING to default values 2 A confirmation dialog will be displayed highlight OK and press MENU OK ...

Страница 174: ...e of the beep that sounds when the camera focuses The beep can be muted by selecting eOFF Options Options b high c medium d low eOFF mute SELF TIMER BEEP VOL Choose the volume of the beep that sounds while the self timer is active The beep can be muted by selecting eOFF Options Options b high c medium d low eOFF mute OPERATION VOL Adjust the volume of the sounds produced when camera con trols are ...

Страница 175: ...FF to disable the shutter sound Options Options b high c medium d low eOFF mute SHUTTER SOUND Choose the sound made by the electronic shutter Options Options i iSOUND 1 SOUND 1 j jSOUND 2 SOUND 2 k kSOUND 3 SOUND 3 PLAYBACK VOLUME Adjust the volume for movie playback Options Options 0 0 1 1 2 2 3 3 4 4 5 5 6 6 7 7 8 8 9 9 10 10 ...

Страница 176: ...s LCD BRIGHTNESS options LCD COLOR Adjust monitor hue Options Options 5 5 4 4 3 3 2 2 1 1 0 0 1 1 2 2 3 3 4 4 5 5 IMAGE DISP Choose how long images are displayed after shooting Option Option Description Description CONTINUOUS Pictures are displayed until the MENU OK button is pressed or the shutter button is pressed halfway To zoom in on the active focus point press the center of the focus stick f...

Страница 177: ...eview Choose this op tion when using a flash or on other occasions on which expo sure may change when the picture is taken NATURAL LIVE VIEW Choose whether the effects of film simulation white balance and other settings are visible in the monitor Option Option Description Description ON The effects of camera settings are not visible in the monitor but shadows in low contrast back lit scenes and othe...

Страница 178: ...ition A six by four grid NFraming guides are not shown at default settings but can be displayed using DSCREEN SET UP DISP CUSTOM SETTING P161 AUTOROTATE PB Choose ON to automatically rotate tall portrait orientation pictures during playback Options Options ON OFF FOCUS SCALE UNITS Choose the units used for the focus distance indicator Options Options METERS FEET ...

Страница 179: ...LINE R ELECTRONIC LEVEL R FOCUS FRAME R AF DISTANCE INDICATOR R MF DISTANCE INDICATOR R HISTOGRAM R SHOOTING MODE R APERTURE S SPEED ISO R INFORMATION BACKGROUND R Expo Comp Digit R Expo Comp Scale R FOCUS MODE R PHOTOMETRY R Item Item Default Default SHUTTERTYPE R FLASH R CONTINUOUS MODE R DUAL IS MODE R WHITE BALANCE R FILM SIMULATION R DYNAMIC RANGE R FRAMES REMAINING R IMAGE SIZE QUALITY R MOV...

Страница 180: ...ever Option Option Description Description LOCK OFF LOCK OFF The focus stick cannot be used during shooting ZOOM INTOTHE ZOOM INTOTHE FOCUS BY PRESSING FOCUS BY PRESSING n n FOCUS STICK FOCUS STICK Press the focus stick to zoom in on the view through the lens for more accurate focus PUSH PUSH n nTO UNLOCK TO UNLOCK Press the stick to view the focus point display and tilt the stick to select a focu...

Страница 181: ...and press MENU OK to assign it to the selected position IMAGE SIZE IMAGE QUALITY FILM SIMULATION DYNAMIC RANGE WHITE BALANCE HIGHLIGHT TONE SHADOW TONE COLOR SHARPNESS NOISE REDUCTION FOCUS MODE AF MODE FACE EYE DETECTION SETTING MF ASSIST TOUCH SCREEN MODE SELF TIMER PHOTOMETRY SHUTTER TYPE IS MODE ISO FLASH MODE FLASH COMPENSATION MOVIE MODE HD HIGH SPEED VIDEO FOCUS MODE MOVIE AF MODE DIGITAL I...

Страница 182: ...S MODE AF MODE FACE EYE DETECTION SETTING TOUCHZOOM SELF TIMER AE BKT SETTING PHOTOMETRY SHUTTER TYPE ISO IS MODE WIRELESS COMMUNICATION FLASH MODE FLASH COMPENSATION MOVIE RECORDING RELEASE MOVIE MODE COUNTDOWN VIDEO RECORDING FOCUS MODE MOVIE AF MODE DIGITAL IMAGE STABILIZER MOVIE ISO PREVIEW DEPTH OF FIELD PREVIEW EXP WB IN MANUAL MODE NATURAL LIVE VIEW AE LOCK AF LOCK AE AF LOCK AUTO IMAGE TAG...

Страница 183: ...nctions as a touch screen during shooting OFF Touch controls disabled x xDOUBLETAP DOUBLETAP SETTING SETTING ON Tap the LCD monitor twice to zoom in on your sub ject during shooting OFF Touch zoom disabled a aTOUCH SCREEN TOUCH SCREEN SETTING SETTING ON The LCD monitor functions as a touch screen during playback OFF Touch controls disabled TOUCH SCREEN MENU TOUCH SCREEN MENU SETTING SETTING ON The...

Страница 184: ...se the length of time before the camera turns off automati cally when no operations are performed Shorter times increase battery life if OFF is selected the camera must be turned off manually Options Options 5 MIN 5 MIN 2 MIN 2 MIN OFF OFF PERFORMANCE Adjust power settings Option Option Startup Startup Frame rate Frame rate Battery Battery endurance endurance HIGH PERFORMANCE Fast Fast Low STANDAR...

Страница 185: ...nserted or the current memory card is formatted Option Option Description Description CONTINUOUS CONTINUOUS Numbering continues from the last file number used or the first available file number whichever is higher Choose this option to reduce the number of pictures with duplicate file names RENEW RENEW Numbering is reset to 0001 after formatting or when a new memory card is inserted N If the frame num...

Страница 186: ...te of recording on photographs as they are taken Option Option Description Description R R S SDATE TIME DATE TIME Stamp new photographs with the date and time of recording R RDATE DATE Stamp new photographs with the date of recording OFF OFF Do not stamp the time and date on new photographs O Time and date stamps cannot be deleted Turn DATE STAMP off to prevent time and date stamps appearing on ne...

Страница 187: ...CT PAIRING DESTINATION DESTINATION Choose a connection from a list of devices with which the camera has been paired using PAIRING REGISTRATION Select NO CONNECTION to exit without connecting DELETE PAIRING DELETE PAIRING REG REG Deletepairinginformationforselecteddevices Choosethede vice in the device list The selected device will also be removed from the devices listed in SELECT PAIRING DESTINATI...

Страница 188: ...S TRANSFER upload to paired devices will begin when the camera is turned off or shortly after you exit to playback If AUTO IMAGE TAGGING is off pictures can be marked for transfer using the IMAGE TRANSFER ORDER option in the playback menu PC AUTO SAVE Adjust settings for connection to computers via wireless LAN Option Option Description Description PC AUTO SAVE SETTING Choose the method used for c...

Страница 189: ...ID and Password The printer name SSID can be found on the bottom of the printer the default password is 1111 If you have already chosen a different password to print from a smartphone enter that password instead USB IMAGE TRANSFER SETTING Choose whether to pictures can be copied to computers or smartphones connected to the camera via USB Options Options ON ON OFF OFF ...

Страница 190: ...e resized to H for upload OFF Images are uploaded at their original size GEOTAGGING GEOTAGGING Choose whether location data downloaded from a smartphone are embedded in pictures as they are taken LOCATION INFO LOCATION INFO Display the location data last downloaded from a smartphone r rBUTTON BUTTON SETTING SETTING Choose the role played by function buttons assigned the WIRELESS COMMUNICATION func...

Страница 191: ...173 Shortcuts ...

Страница 192: ... T B Fn1 T B Fn2 for direct access The Q menu P175 The Q menu is displayed by pressing the Q button Use the Q menu to view or change the options selected for frequently used menu items The function button P178 Use the function Fn1 button for di rect access to selected features Touch function buttons P179 Use the touch function buttons T B Fn1 T B Fn2 in the touch menu for direct access to selected...

Страница 193: ...splay At default settings the quick menu contains the following items COLOR SET END A SHOOTING MODE B ISO C DYNAMIC RANGE D WHITE BALANCE E NOISE REDUCTION F IMAGE SIZE G IMAGE QUALITY H FILM SIMULATION I HIGHLIGHT TONE J SHADOW TONE K COLOR L SHARPNESS M SELF TIMER N AF MODE O FLASH MODE P LCD BRIGHTNESS ...

Страница 194: ...ear front command dial to make changes to the highlighted item 4 Press the focus stick or MENU OK to save changes and exit to the shooting display when settings are complete N The shooting mode is the current shooting mode and cannot be changed from the quick menu hCUSTOM and kCOLOR TEMPERATURE white balance options cannot be accessed via the quick menu Use a function button or the shooting menu ...

Страница 195: ... WHITE BALANCE HIGHLIGHT TONE SHADOW TONE COLOR SHARPNESS NOISE REDUCTION FOCUS MODE AF MODE FACE EYE DETECTION SETTING MF ASSIST TOUCH SCREEN MODE SELF TIMER PHOTOMETRY SHUTTER TYPE IS MODE ISO FLASH MODE FLASH COMPENSATION MOVIE MODE HD HIGH SPEED VIDEO FOCUS MODE MOVIE AF MODE DIGITAL IMAGE STABILIZER MOVIE ISO MIC LEVEL ADJUSTMENT SOUND FLASH LCD BRIGHTNESS LCD COLOR NONE NSelect NONE to assig...

Страница 196: ... BALANCE FOCUS AREA FOCUS CHECK FOCUS MODE AF MODE FACE EYE DETECTION SETTING TOUCHZOOM SELF TIMER AE BKT SETTING PHOTOMETRY SHUTTER TYPE ISO IS MODE WIRELESS COMMUNICATION FLASH MODE FLASH COMPENSATION MOVIE RECORDING RELEASE MOVIE MODE COUNTDOWN VIDEO RECORDING FOCUS MODE MOVIE AF MODE DIGITAL IMAGE STABILIZER MOVIE ISO PREVIEW DEPTH OF FIELD PREVIEW EXP WB IN MANUAL MODE NATURAL LIVE VIEW AE LO...

Страница 197: ...ITY RAW FILM SIMULATION DYNAMIC RANGE WHITE BALANCE FOCUS AREA FOCUS CHECK FOCUS MODE AF MODE FACE EYE DETECTION SETTING TOUCHZOOM SELF TIMER AE BKT SETTING PHOTOMETRY SHUTTER TYPE ISO IS MODE WIRELESS COMMUNICATION FLASH MODE FLASH COMPENSATION MOVIE MODE COUNTDOWN VIDEO RECORDING FOCUS MODE MOVIE AF MODE DIGITAL IMAGE STABILIZER MOVIE ISO PREVIEW DEPTH OF FIELD PREVIEW EXP WB IN MANUAL MODE NATU...

Страница 198: ...180 MEMO ...

Страница 199: ...181 Peripherals and Optional Accessories ...

Страница 200: ...The camera can be used with lenses for the FUJIFILM X mount Lens Parts 1 5 4 5 1 5 4 5 A Focus ring B Zoom ring C Mounting marks D Lens signal contacts E Front lens cap F Rear lens cap N A XC15 45mmF3 5 5 6 OIS PZ is used here for illustrative purposes ...

Страница 201: ...ripherals and Optional Accessories 10 Lenses Power Zoom The focus ring can be used to adjust zoom when autofocus is enabled Removing Lens Caps Remove lens caps as shown O Lens caps may differ from those shown ...

Страница 202: ... aperture by rotating the lens aperture ring exposure modes A and M A 16 11 8 5 6 4 2 8 A 16 11 8 5 6 4 Aperture ring The Aperture Mode Switch If the lens has an aperture mode switch aper ture can be adjusted manually by sliding the switch to Z and rotating the aperture ring Aperture ring Aperture mode switch N When the aperture ring is set to A aperture can be adjusted by rotat ing the front comm...

Страница 203: ...g to the front for aut ofocus For manual focus slide the focus ring to the back and rotate it while checking the results in the camera display The focus distance and depth of field indicators can be used to assist manual focus O Note that manual focus may not be available in all shooting modes The Depth of Field Indicator The depth of field indicator shows the approxi mate depth of field the dista...

Страница 204: ...to remove dust then gently wipe with a soft dry cloth Any remaining stains can be removed by wiping gently with a piece of Fujifilm lens cleaning paper to which a small amount of lens cleaning fluid has been applied Replace the front and rear caps when the lens is not in use ...

Страница 205: ...187 Connections ...

Страница 206: ...tors are fully inserted Insert into HDMI Micro connector Type D Insert into HDMI connector 3 Configure the device for HDMI input as described in the doc umentation supplied with the device 4 Turn the camera on The contents of the camera display will be shown on the HDMI device The camera display turns off in playback mode P189 O Making sure the connectors are fully inserted The USB cable cannot be...

Страница 207: ...nd Full HD movies to an HDMI recorder Playback To start playback press the camera a button The camera mon itor turns off and pictures and movies are output to the HDMI device Note that the camera volume controls have no effect on sounds played on the TV use the television volume controls to adjust the volume O Some televisions may briefly display a black screen when movie play back begins ...

Страница 208: ...e camera you will need to in stall the latest version of the FUJIFILM Camera Remote app on your smartphone or tablet FUJIFILM Camera Remote Once a connection has been established you can use FUJIFILM Camera Remote to Control the camera and take pictures remotely Receive pictures uploaded from the camera Browse the pictures on the camera and download selected pictures Upload location data to the ca...

Страница 209: ... downloading photos from the camera N Photos are downloaded via a wireless connection Once pairing is complete you will be able to synchronize the camera clock and location data with the smartphone or tablet P169 You can choose a connection from up to 7 paired smartphones or tablets Smartphones and Tablets Wireless LAN Use the WIRELESS COMMUNICATION options in ASHOOTING SETTING or the playback men...

Страница 210: ...sion of FUJIFILM PC Autosave to your com puter to upload pictures from the camera over wireless networks Wi Fi FUJIFILM PC AutoSave For downloads and other information visit http app fujifilm dsc com en pc_autosave Computers Wireless Connections You can upload pictures from the camera using the PC AUTO SAVE option in the playback menu ...

Страница 211: ...ownloading pictures or taking pictures remotely connect the camera to a computer and check that it functions normally 1 Turn the computer on 2 Adjust settings according to whether you will be copying pictures to a computer P195 3 Turn the camera off 4 Connect a USB cable USB connector Type C OThe USB cable must be no more than 1 5 m 4 9 ft long and be suitable for data transfer 5 Turn the camera o...

Страница 212: ... pictures Make sure that the indicator lamp is off or lit green before turning the camera off Do not disconnect the USB cable while transfer is in progress Failure to observe this precaution could result in loss of data or damage to the memory card Disconnect the camera before inserting or removing memory cards In some cases it may not be possible to access pictures saved to a network server using...

Страница 213: ...ftware that can be used to copy pictures varies with your computer operating system Mac OS X macOS Pictures can be copied to your computer using Image Capture supplied with your computer or other software OUse a card reader to copy files over 4 GB in size Windows Pictures can be copied to your computer using applications sup plied with the operating system or other software ...

Страница 214: ...he Camera Importer to access the camera tap Cancel and move on to the next step 3 On your Smartphone tap the notification Connected to USB PTP 4 From the recommended applications select Camera Importer The app will automatically start and allow you to import im ages and movies to your Smartphone NIf the message There is no MTP devise connected appears on the app please try again from step 2 For cu...

Страница 215: ...ETTING instaxPRINTERCONNECTION SETTING in the camera setup menu and enter the instax SHARE printer name SSID and password The Printer Name SSID and Password The printer name SSID can be found on the bottom of the printer the default password is 1111 If you have already chosen a different password to print from a smartphone enter that password instead ...

Страница 216: ...R PRINT instax 12345678 3 Use the focus stick focus lever to display the picture you want to print then press MENU OK 100 0020 SET CANCEL instax 12345678 PRINTER PRINT N Pictures taken with other cameras cannot be printed The area printed is smaller than the area visible in the LCD mon itor The displays may vary depending on the printer connected 4 The picture will be sent to the printer and print...

Страница 217: ...199 Technical Notes ...

Страница 218: ... AC power adapters AC power adapters AC 9V requiresCP W126DCcoupler Use this 100 240V 50 60 Hz AC power adapter for extended shooting and playback or when copying pictures to a computer DC couplers DC couplers CP W126 For extended shooting or playback or when using the camera with a computer use the CP W126 to connect the camera to the AC 9V power adapter Remote releases Remote releases RR 100 Use...

Страница 219: ...as a Guide Number of 50 164 ISO 100 m ft and is powered by four AA batteries or an optional EF BP1 battery pack EF BP1 A battery pack for shoe mounted flash units Takes up to 8 AA batteries EF 42 This clip on flash unit has a Guide Number of 42 137 ISO 100 m ft and supports manual and TTL flash control EF X20 This clip on flash unit has a Guide Number of 20 65 ISO 100 m ft and supports manual and TTL ...

Страница 220: ...pictures from your camera over wireless networks P192 http app fujifilm dsc com en pc_autosave Capture One Express Fujifilm Capture One Express Fujifilm is image edit software from Phase One A S View RAW pictures on your computer and convert them into other formats Capture One Express Fujifilm is available free of charge from Phase One https www phaseone com fujifilm RAW FILE CONVERTER EX View RAW...

Страница 221: ...with a three wire grounding type plug a plug having a third grounding pin This plug will only fit into a grounding type power outlet This is a safety feature If you are unable to insert the plug into the outlet contact your electrician to replace your obsolete outlet Do not defeat the safety purpose of the grounding type plug Overloading Do not overload wall outlets and extension cords as this can ...

Страница 222: ...nts for the grounding electrode EXAMPLE OF ANTENNA GROUNDING AS PER NATIONAL ELECTRICAL CODE Power Lines An outside antenna system should not be located in the vicinity of overhead power lines or other electric light or power circuits or where it can fall into such power lines or circuits When installing an outside antenna system extreme care should be taken to keep from touching such power lines ...

Страница 223: ...al part Unautho rized substitutions may result in fire electric shock or other hazards Safety Check Upon completion of any service or repairs to this video product ask the service technician to perform safety checks to determine that the video product is in proper operating condition Be sure to read these notes before use Safety Notes Make sure that you use your camera correctly Read these safety n...

Страница 224: ...r Fujifilm dealer Do not use cables with bent connectors Do not place the camera on an unstable surface Do not place the camera on an unstable surface This can cause the camera to fall or tip over and cause injury Never attempt to take pictures while in motion Never attempt to take pictures while in motion Do not use the camera while walking or driving This can result in you falling down or being i...

Страница 225: ... other metallic objects or batteries could cause the battery to ignite or burst Keep memory cards hot shoes and other small parts out of the reach of small children Keep memory cards hot shoes and other small parts out of the reach of small children Children may swallow small parts keep out of reach of children Should a child swallow a small part seek medical attention or call emergency Keep out o...

Страница 226: ...at such as sunshine fire orthelike orthelike The Battery and Power Supply Note Check the type of battery used in your camera and read the appropriate sections WARNING Battery shall not be exposed to excessive heat such as sunshine fire or the like The following describes the proper use of batteries and how to prolong their life Incorrect use can shorten battery life or cause leakage overheating fir...

Страница 227: ...ations Attention should be drawn to the environmental aspects of battery disposal Use the apparatus under moderate climate Using the Camera Do not aim the camera at extremely bright light sources including artificial light sources or natural light sources such as the sun in a cloudless sky Failure to observe this precaution could damage the camera image sensor Strong sunlight focused through the vi...

Страница 228: ...nc Mac OS X and macOS are trademarks of Apple Inc in the U S A and other countries Windows is a registered trademark of Microsoft Corporation in the U S A and other countries Adobe the Adobe logo Photoshop and Lightroom are trademarks or registered trademarks of Adobe Systems Incorporated in the U S A and other countries Wi Fi and Wi Fi Protected Setup are registered trademarks of theWi Fi Allianc...

Страница 229: ...erence that may cause undesired operation CAUTION This equipment has been tested and found to comply with the limits for a Class B digital device pursuant to Part 15 of the FCC Rules These limits are designed to provide reasonable protection against harmful interference in a residential installation This equipment generates uses and can radiate radio frequency energy and if not installed and used ...

Страница 230: ... subject to the following two conditions 1 This device may not cause interference and 2 This device must accept any interference including interference that may cause undesired operation of the device This device and its antenna s must not be co located or operating in conjunction with any other antenna or transmitter except tested built in radios The County Code Selection feature is disabled for ...

Страница 231: ...available at the following internet address http www fujifilm com products digital_cameras x fujifilm_x_a7 pdf index fujifilm_x_a7_cod pdf This compliance is indicated by the following conformity marking placed on the product This marking is valid for non Telecom products and EU harmonized Telecom products e g Bluetooth IMPORTANT Read the following notices before using the camera s built in wirele...

Страница 232: ...blebylaw Thefollowingmaybepunishablebylaw Disassembly or modification or this device Removal of device certification labels This device operates on the same frequency as commercial educational and medical devices and wireless trans This device operates on the same frequency as commercial educational and medical devices and wireless trans mitters mitters It also operates on the same frequency as lice...

Страница 233: ...hibited Prohibited Filled circles with an exclamation mark indicate an action that must be performed Required WARNING WARNING Donot immerse Donotimmerseinorexposetowater Donotimmerseinorexposetowater Failure to observe this precaution can cause a fire or electric shock Donot disassemble Donotdisassemble donotopenthecase Donotdisassemble donotopenthecase Failure to observe this precaution can cause ...

Страница 234: ...outofthereachofsmallchildren This product could cause injury in the hands of a child Donothandlewithwethands Donothandlewithwethands Failure to observe this precaution can cause electric shock Keep the sun out of the frame when shooting backlit subjects Keep the sun out of the frame when shooting backlit subjects Sunlight focused into the camera when the sun is in or close to the frame can cause fi...

Страница 235: ...oft dry cloth Use a blower to remove dust from the monitor taking care to avoid scratches and then gently wipe with a soft dry cloth Any remaining stains can be removed by wiping gen tly with a piece of Fujifilm lens cleaning paper to which a small amount of lens cleaning fluid has been applied To prevent dust entering the camera replace the body cap when no lens is in place Imagesensor Multiple p...

Страница 236: ... there will be a charge to repair or replace the image sensor if it is damaged during cleaning 1 Use a blower not a brush to remove dust from the sensor O Do not use a brush or blower brush Failure to observe this precaution could damage the sensor 2 Check whether the dust has been successfully removed Re peat Steps 1 and 2 as necessary 3 Replace the body cap or lens ...

Страница 237: ...play the firmware version if a memory card is inserted 1 Turn the camera off and check that a memory card is insert ed 2 Turn the camera on while holding the DISP BACK button The current firmware version will be displayed check the firm ware version 3 Turn the camera off N To view the firmware version or update firmware for optional acces sories such as interchangeable lenses shoe mounted flash un...

Страница 238: ...tion P22 The battery chamber cover is not latched Latch the bat tery chamber cover P22 The battery runs down quickly Thebatteryiscold Warm the battery by placing it in a pock et or other warm place and reinsert it in the camera im mediately before taking a picture There is dirt on the battery terminals Clean the terminals with a soft dry cloth ON is selected for PRE AF Turn PRE AF off P104 The batt...

Страница 239: ...ry in the correct orientation Make sure that the charger is correctly plugged in Ensure that the plug adapter is correctly connected to the charger Charging is slow Charge the battery at room temperature The indicator lamp blinks but the battery does not charge There is dirt on the battery terminals Clean the terminals with a soft dry cloth P22 The battery has been charged many times The battery h...

Страница 240: ...e battery P26 The camera has turned off automatically Turn the camera on P28 You are using a third party mount adapter Select ON for SHOOT WITHOUT LENS P165 The indicator lamp was orange when you attempted to record a panorama Wait until the indicator lamps turns off P7 54 Mottling noise appears in the monitor when the shutter button is pressed halfway Gain is increased to aid composition when the ...

Страница 241: ...he frame P105 The subject s head is tilted or horizontal Ask the subject to hold their head straight P105 The camera is tilted Keep the camera level The subject s face is poorly lit Shoot in bright light Wrong subject is selected The selected subject is closer to the center of the frame than the main subject Recompose the picture or turn face de tection off and frame the picture using focus lock P7...

Страница 242: ...he flash window is obstructed Hold the camera correctly Shutter speed is faster than the sync speed Choose a slower shutter speed P48 51 89 235 Pictures are blurred The lens is dirty Clean the lens P186 The lens is blocked Keep objects away from the lens P34 s is displayed during shooting and the focus frame is dis played in red Check focus before shooting P35 Pictures are mottled Shutterspeedissl...

Страница 243: ...e microphone was obstructed Hold the camera correctly during recording The speaker is obstructed Hold the camera correctly during playback OFF is selected for SOUND FLASH Select ON P154 Selectedpicturesarenot deleted Some of the pictures selected for deletion are protected Remove protection using the device with which it was originally applied P141 Picturesremainafter ERASE ALLFRAMESis selected Fi...

Страница 244: ...in the camera monitor P188 No picture or sound onTV The camera is not properly connected Connect the camera properly P188 Input on the television is set to TV Set input to HDMI P188 ThevolumeontheTVistoolow Use the controls on the tele vision to adjust the volume P188 The computer does not recognize the camera Be sure the camera and computer are correctly connected P193 ...

Страница 245: ...90 Nearby devices are causing radio interference Move the cam era and smartphone away from microwave ovens or cord less phones P190 Cannot upload images The smartphone is connected to another device The smart phone and camera can connect to only one device at a time End the connection and try again There are several smartphones in the vicinity Try connecting again The presence of multiple smartpho...

Страница 246: ... a wireless LAN End the con nection The camera does not func tion as expected Remove and reinsert the battery P22 If the problem persists contact your Fujifilm dealer No sound Adjust the volume P156 Select ON for SOUND FLASH P154 Time and date stamps Time and date stamps are not correct Set the camera clock P32 153 Time and date stamps appear on photographs Time and date stamps cannot be deleted To...

Страница 247: ...red with red focus frame The camera cannot focus Use focus lock to focus on an other subject at the same distance then recompose the picture Aperture or shutter speed displayed in red The subject is too bright or too dark and the picture will be over or under exposed Use the flash for additional light ing when taking photographs of poorly lit subject FOCUS ERROR Camera malfunction Turn the camera o...

Страница 248: ...ifilm dealer LENS ERROR Turn the camera off remove the lens and clean the mount ing surfaces then replace the lens and turn the camera on If the problem persists contact a Fujifilm dealer CARD ERROR The memory card is not formatted for use in the camera For mat the card The memory card contacts require cleaning or the memory card isdamaged Clean the contacts with a soft dry cloth If the message is re...

Страница 249: ...ining to record additional pictures Delete pictures or insert a memory card with more free space The memory card is not formatted Format the memory card FRAME NO FULL The camera has run out of frame numbers current frame number is 999 9999 Format the memory card and select RENEW for FRAME NO Take a picture to reset frame numbering to 100 0001 then select CONTINUOUS for FRAME NO READ ERROR The file...

Страница 250: ...d and create a second print order CAN NOT ROTATE Pictures taken with other cameras cannot be rotated An attempt was made to rotate a protected picture Re move protection and try again FCAN NOT ROTATE Movies cannot be rotated CAN NOT SET DPOF The picture cannot be printed using DPOF FCAN NOT SET DPOF Movies cannot be printed using DPOF FCANNOT EXECUTE Red eye removal cannot be applied to movies mCA...

Страница 251: ...P 25P 24P 23 98P3 3 n n59 94P 50P 29 97P 25P 24P 23 98P 59 94P 50P 29 97P 25P 24P 23 98P3 3 26 minutes 54 minutes h h59 94P 50P 29 97P 25P 24P 23 98P 59 94P 50P 29 97P 25P 24P 23 98P3 3 m m59 94P 50P 29 97P 25P 24P 23 98P 59 94P 50P 29 97P 25P 24P 23 98P3 3 51 minutes 105 minutes 1 Use a UHS speed class 3 card or better 2 Individual movies cannot exceed 15 minutes in length 3 Individual movies can...

Страница 252: ...e size O4 3 5328 4000 P4 3 3712 2784 Q4 3 2656 1992 O3 2 6000 4000 P3 2 4240 2832 Q3 2 3008 2000 O16 9 6000 3376 P16 9 4240 2384 Q16 9 3008 1688 O1 1 4000 4000 P1 1 2832 2832 Q1 1 2000 2000 RAW 6000 4000 Opanorama vertical 2160 9600 horizontal 9600 1440 Ppanorama vertical 2160 6400 horizontal 6400 1440 Lens mount FUJIFILM X mount Sensitivity Still pictures Standard output sensitivity equivalent to...

Страница 253: ...rd used Focus Focus area selection SINGLE POINT ZONE WIDE TRACKING Mode Single or continuous AF manual focus with focus ring AF MF Autofocus system Intelligent hybrid AF TTL contrast detect phase detection AF with AF assist illuminator White balance Custom color temperature selection auto direct sunlight shade daylight fluorescent warm white fluorescent cool white fluorescent incandescent underwater ...

Страница 254: ...n 8 9 cm 2760k dot color touch screen LCD moni tor Vari angle LCD monitor Movies Movies with stereo sound V29 97P V25P V24P V23 98P W59 94P W50P W29 97P W25P W24P W23 98P h59 94P h50P h29 97P h25P h24P h23 98P n59 94P n50P n29 97P n25P n24P n23 98P m59 94P m50P m29 97P m 25P m24P m23 98P Silent HD high speed movies 1 6 a59 94P F100P 2 a50P F100P 3 3 a29 97P F100P 4 a25P F100P ...

Страница 255: ...ng battery and memory card Operating conditions Temperature 0 C to 40 C 32 F to 104 F Humidity 10 to 80 no condensation Battery life Battery type NP W126S Lens XF35mmF1 4 R Shooting mode Mode P Approximate number of frames Approximate number of frames STANDARD STANDARD ECONOMY ECONOMY 270 440 Mode Mode Actual Battery life of Actual Battery life of movie capture movie capture Continuance Battery li...

Страница 256: ...reless protocol Operating frequency center frequency Japan China 2 412 MHz 2 472 MHz 13 channels Other countries 2 412 MHz 2 462 MHz 11 channels Access protocols Infrastructure Bluetooth Standards Bluetooth version 4 2 Bluetooth Low Energy Operating frequency center frequency 2 402 MHz 2 480 MHz ...

Страница 257: ...7 mm 1 4 in 1 8 in 0 6 in Weight Approx 47 g 1 7 oz Weight and dimensions vary with the country or region of sale Labels menus and other displays may differ from those on the actual camera O Specifications and performance are subject to change without notice Fujifilm will not be held liable for any errors this manual may contain The appearance of the product may differ from that described in this m...

Страница 258: ...7 3 AKASAKA 9 CHOME MINATO KU TOKYO 107 0052 JAPAN http www fujifilm com products digital_cameras index html ...

Отзывы: