background image

Crease / Two-Sided Trimmer

51


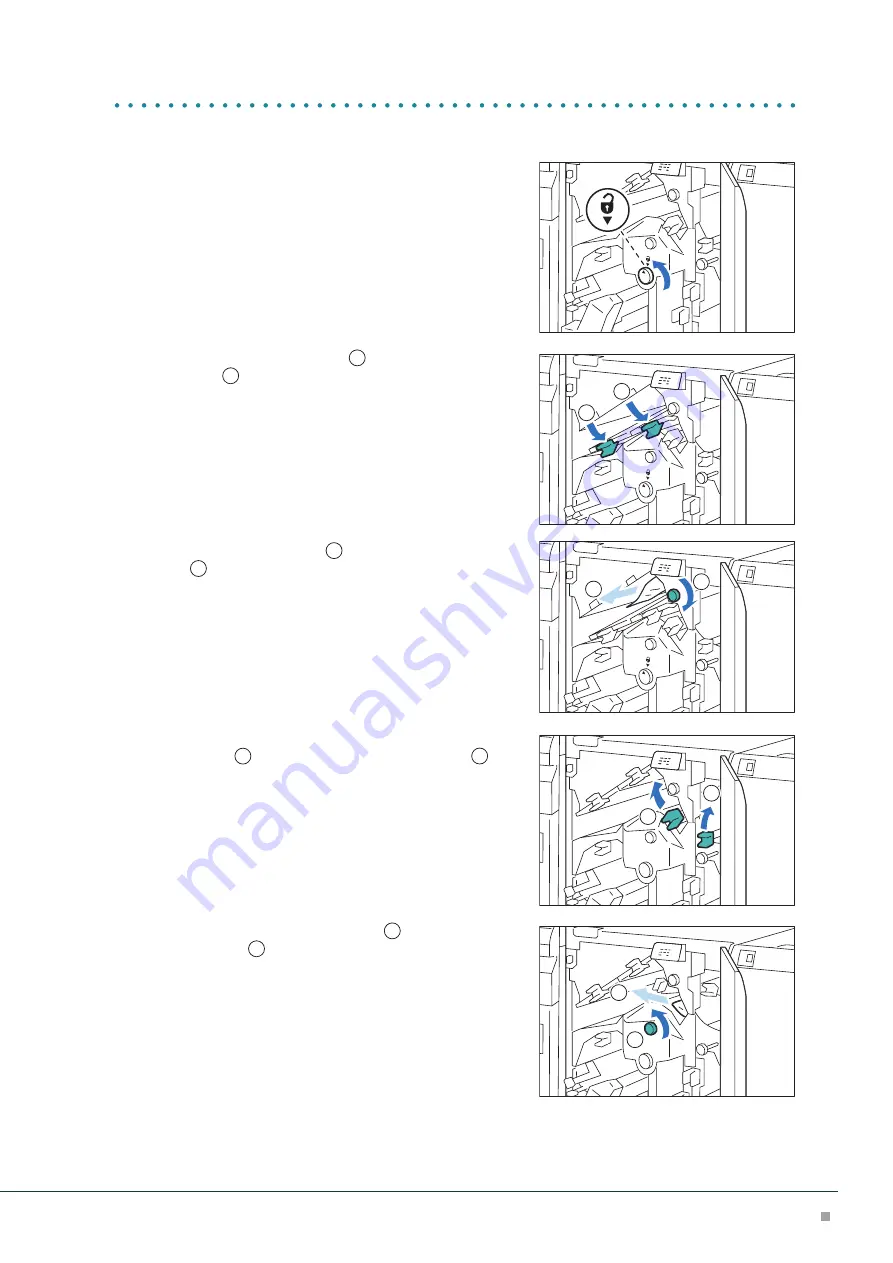
When Indicator E2 is Turned on

(1) 

Turn knob [2] counterclockwise and align the marks.

(2) 

Open lever [1a] downward (

1

) and open lever [1b] 

downward (

2

).

(3) 

Turn knob [1c] clockwise (

1

) and remove the jammed 

paper (

2

).

(4) 

Return lever [1a] and lever [1b].

(5) 

If you have difficulty in removing the papers, open lever 
[1d] upward (

1

) and open lever [2a] to the left (

2

).

(6) 

Turn knob [2b] counterclockwise (

1

) and remove the 

jammed paper (

2

).

(7) 

Return lever [1d] and lever [2a].

1

2

1

2

1

2

1

2

Содержание Revoria Press E1100

Страница 1: ...January 2022 GM1074E2 2 Edition1 FUJIFILM Business Innovation Corp Revoria Press E1136 E1125 E1110 E1100 Reference Guide Optional Units ...

Страница 2: ...eder 24 Loading Paper 4 Interface Decurler Module 29 Curl Correction Paper Jams 5 Inserter 33 Loading Paper Paper Jams 6 High Capacity Stacker 38 Outputting Paper Paper Jams 7 Crease Two Sided Trimmer 46 Waste Container Paper Jams 8 Folder Unit 56 Paper Jams 9 Finisher D 59 Outputting Paper Staple Cartridge Paper Jams 10 Square Back Fold Trimmer 74 Waste Container Paper Jams ...

Страница 3: ...vice note that the their may not be available in some countries or regions This manual may not be edited modified or copied in whole or in part without the written consent of the publisher Some parts of this manual are subject to change without prior notice The screen shots and the illustrations in this manual are used as examples They may differ from yours depending on the model the software or t...

Страница 4: ... High Capacity Tray Paper Tray 7 Load paper here 4 Bypass Tray Paper Tray 5 Refer Reference Guide Main Unit 5 Remaining Volume Display You can check the remaining paper volume Main Specifications Item Specification Paper size A4 Letter 8 5 x 11 JIS B5 7 25 x 10 5 184 x 267 mm Paper weight g m2 52 to 216 Tray capacity sheets 2 000 x 2 trays Max 4 000 Dimensions mm Width 597 x Depth 661 x Height 930...

Страница 5: ...ide position 1 Remove the 2 screws for the guide and remove the guide from the Paper Tray 2 Insert the guide into Paper Size holes and tighten the screws 4 Fan the paper well and load sheets with the printed side facing up and the paper edges aligned in the di rection of the arrow 5 Push in the Paper Tray Special Media Setting Hole Punched Paper Orientation Place the holes of paper on the right si...

Страница 6: ...g is resumed from the state before the paper jam occurred If a paper jam occurred during copying tap on Start Copying is resumed from the state before the paper jam occurred Note Clear the paper jams while the machine is on Paper Tray 1 Pull out the Paper Tray toward you until it stops 2 Remove the jammed paper 3 Push in the Paper Tray Inside of the Right Cover 1 Open the Right Cover 2 Remove the ...

Страница 7: ...r Jams at 1b 1 Open lever 1b to the right 1 turn knob 1c clock wise 2 and remove the jammed paper 3 2 Return lever 1b Paper Jams at 1d 1 Open lever 1d upward 1 and remove the jammed paper 2 2 Return lever 1d 3 Close the cover 2 1 3 1 2 ...

Страница 8: ...Optional Units 8 2 High Capacity Feeder B1 S C3 DS Device Components Caution Labels B1 S 7 6 5 4 3 1 2 C3 DS 6 5 4 3 1 2 7 ...

Страница 9: ...per Replenish Indicator is turned on paper is empty 5 B1 S Consumables Storage Unit Stores papers and consumables C3 DS High Capacity Tray Paper Tray 6 Load paper here 6 B1 S High Capacity Tray Paper Tray 6 Load paper here C3 DS High Capacity Tray Paper Tray 7 7 Ground Fault Interrupter A switch to automatically switch the machine off when a current leakage is detected Ground Fault Interrupter Whe...

Страница 10: ... 253 Coated 64 to 253 High Capacity Tray Uncoated 52 to 350 Coated 64 to 350 Tray capacity sheets B1 S 2 000 Bypass Tray 250 C3 DS 2 000 x 2 trays Max 4 000 Bypass Tray 250 Power supply B1 S AC 100 to 120 V 10 2 5 A 50 60 Hz common AC 220 to 240 V 10 1 5 A 50 60 Hz common C3 DS AC 100 to 120 V 10 6 A 50 60 Hz common AC 220 to 240 V 10 4 A 50 60 Hz common Maximum power consumption B1 S AC 100 V 250...

Страница 11: ...irmly When paper sheets are loaded or fed the Paper Tray makes a sound of supplying air This is caused by the Air Assist function and not an abnormal noise 1 Pull out the Paper Tray toward you until it stops 2 Remove any paper remaining in the Paper Tray 3 Fan the paper well and load about 100 to 500 sheets with the printed side facing up and the paper edges aligned in the direction of the arrow 1...

Страница 12: ...DS is placed in the upper Paper Tray The Postcard Kit of B1 S is placed in the lower Paper Tray 4 Insert the small protrusion of the Kit into the notch to the right side of the bottom of the Paper Tray 1 Align the hole of the Kit with the front Paper Tray hole and tighten the screw to fasten the Kit 2 5 Load about 100 to 500 sheets of paper with the printed side facing up and align the paper edges...

Страница 13: ...o remove the Kit from the Paper Tray loosen the screw completely and then remove the Kit 11 Store the Kit in place by inserting it from the left side of the Paper Tray 1 and tightening the screw 2 Special Media Setting Hole Punched Paper Orientation Place the holes of paper on the right side when you face the front side of machine Precut Tab Orientation Place the tabs of paper on the left side whe...

Страница 14: ...is not effective when the Postcard Kit is used 1 Pull out the Paper Tray until it stops 2 Move the lever at the top of the long side paper guide to the rightmost position I position to en able the changing Note To reset the setting move the lever to the leftmost position 3 If the accuracy of paper feeding is not improved even if 2 is performed move the lever at the right front to the rearmost posi...

Страница 15: ...an be loaded The image quality and paper feeding capability are not guaranteed when more than one sheet is loaded Slide Type 1 Adjust the paper guide to the size of loaded paper 2 Fan the paper well and insert it along the paper guide all the way until it touches the back with the printed side facing up 3 When custom size paper is loaded make fine ad justment of the paper guide based on the paper ...

Страница 16: ...nted side facing up 4 Secure the 4 screws of the paper guide Special Media Setting Hole Punched Paper Orientation Place the holes of paper on the right side when you face the front side of machine Precut Tab Orientation Place the tabs of paper on the left side when you face the front side of machine Postcards Orientation SEF ...

Страница 17: ... occurred If a paper jam occurred during copying tap on Start Copying is resumed from the state before the paper jam occurred Note Clear the paper jams while the machine is on Paper Tray 1 Remove the jammed paper When Indicator E5 is Turned on p 17 When Indicator E6 is Turned on C3 DS p 17 When Indicator E6 is Turned on B1 S when Indicator E7 is Turned on C3 DS p 18 When Indicator E5 is Turned on ...

Страница 18: ...de of the Right Cover 1 Open the Right Cover 2 Remove the jammed paper When Indicator E1 is Turned on p 18 When Indicator E2 is Turned on p 18 When Indicator E3 is Turned on p 19 When Indicator E4 is Turned on p 19 When Indicator E1 is Turned on 1 Open lever 1d upward 1 turn knob 1c clockwise 2 and remove the jammed paper 3 2 Return lever 1d When Indicator E2 is Turned on 1 Open lever 1a to the ri...

Страница 19: ...wise 2 and remove the jammed paper 3 2 Return lever 1b When Indicator E4 is Turned on 1 Open lever 1a to the right 1 turn knob 1c clock wise 2 and remove the jammed paper 3 2 If you have difficulty in removing the papers open the Upper Cover and remove the jammed paper 3 Return lever 1a 3 Close the cover 3 2 1 3 1 2 ...

Страница 20: ...ning may temporarily cause a number of white dots to appear on the output After cleaning feed paper through the machine to ensure effectiveness of the cleaning 1 Create image data consisting K100 for SRA3 or A3 size 2 Run a 2 sided job to print this image on about 20 sheets of paper Cleaning inside the Machine No Work Frequency Page 1 Cleaning High Capacity Trays Every week When collected paper du...

Страница 21: ...stalled in the holder completely 4 Remove roller 2 by picking up the both ends of its pin 5 Wipe the surface of roller 2 6 Rotate the shaft of roller 3 with one hand and wipe the surface of roller 3 with the other hand Note Clean roller 3 without reinstalling roller 2 7 Reinstall roller 2 3 Push in the Paper Tray 4 Clean also the other Paper Tray with the steps 1 to 3 ...

Страница 22: ... 1a to the right 3 Clean behind lever 1a 1 Wipe the roller surface with the soft cloth tightly wrung out of water 2 Lightly wipe paper dust off on the surface of the paper path 4 Return lever 1a 5 Open lever 1b to the right 6 Clean behind lever 1b 1 Wipe the roller surface with the soft cloth tightly wrung out of water 2 Lightly wipe paper dust off on the surface of the paper path 7 Return lever 1...

Страница 23: ...n lever 1d upward 9 Clean behind lever 1d 1 Wipe the roller surface with the soft cloth tightly wrung out of water 2 Lightly wipe paper dust off on the surface of the paper path 10 Return lever 1d 11 Close the cover Roller Paper path surface ...

Страница 24: ...n the Paper Tray is in operation the top lamp is turned on You can check the remaining volume of paper with the 4 lamps each lamp indicates 25 at the center When Paper Replenish Indicator is turned on paper is empty 5 Air Tray Paper Tray 6 Load paper here 6 Air Tray Paper Tray 7 7 Ground Fault Interrupter A switch to automatically switch the machine off when a current leak age is detected Note The...

Страница 25: ...to 488 Paper weight g m2 Uncoated 52 to 350 Coated 64 to 350 Note The Bypass Tray specifications is the same as the 2 High Capacity Feeder B1 S C3 DS p 8 Tray capacity sheets 2 100 x 2 trays Max 4 200 Bypass Tray 250 Power supply AC 100 to 120 V 10 5 A 50 60 Hz common AC 220 to 240 V 10 4 A 50 60 Hz common Maximum power con sumption AC 100 V 500 W AC 240 V 880 W Dimensions mm Width 988 x Depth 762...

Страница 26: ...noise Loading to Air Tray Images are printed on the face side of the loaded paper Note If the amount of the loaded paper is 100 sheets or less the guides apply more pressure to the paper It may cause the paper to be distorted leading to paper jams 1 Pull out the Paper Tray toward you until it stops 2 Remove any paper remaining in the Paper Tray 3 Fan the paper well and load about 100 to 500 sheets...

Страница 27: ...nd then tight en the screw of the guide to fix 3 5 Insert the guide B into the slit on your side 1 and the slit on the bottom 2 and then tighten the screw of the guide to fix 3 Important If the screw is not tighten well it may hit on the transport device to result in break 6 Load about 100 to 500 sheets of paper with the printed side facing up and align the paper edges in the direction of the arro...

Страница 28: ...shutters on the protrudes Confirm that they are firmly fixed Note Align the marks so that the shutters can be mounted in the cor rect orientation The mark on the guide at the top edge of paper is not viewed and the mark on the guide at the bottom edge of paper is viewed in the correct state Special Media Setting Hole Punched Paper Orientation Place the holes of paper on the right side when you fac...

Страница 29: ...m the paper jam operation 2 Curl correction button Press the button to correct paper curl This curl correction function can be used during printing 3 Cover Open this cover to clear paper jams Main Specifications Item Specification Power supply AC 100 to 120 V 10 2 5 A 50 60 Hz common AC 220 to 240 V 10 1 A 50 60 Hz common Maximum power consumption 250 W Dimensions mm Width 340 x Depth 725 x Height...

Страница 30: ...curl direction of paper 2 Confirm that the curl correction indicator is lit and then press the button Note When paper is fed in the AUTO mode the indicator showing the present direction and intensity of curl correction turns on only for a brief moment When manually applying the curl correction make adjustments while using this indicator lighting as a guide After applying the curl correction by upw...

Страница 31: ...FF Curl correction is not performed Upward curl Upward curl correction is per formed when output paper is curled upward Every time the upward curl cor rection button is pressed the degree of correction is changed The higher the indicator s posi tion the stronger the correction Downward curl Downward curl correction is performed when output paper is curled downward Every time the downward curl corr...

Страница 32: ...e finished clearing the paper jam printing is resumed from the state before the paper jam occurred If a paper jam occurred during copying tap on Start Copying is resumed from the state before the paper jam occurred Note Clear the paper jams while the machine is on 1 Open the Cover 2 Open lever 1a downward 1 turn knob 1b counterclockwise 2 and remove the jammed pa per 3 Note Make sure to turn knob ...

Страница 33: ...e this button when Interface Decurler Module is not installed or curl cannot be corrected even if the highest correction or lowest correction of Interface De curler Module is performed The correction method is the same as the Interface Decurler Module The 3 correction levels are available OFF upward and down ward Refer Curl Correction p 30 3 Inserter Tray Paper Tray T1 Load paper to be used as an ...

Страница 34: ...f Saddle stitch Single fold is used for the following papers folding displacement and or paper wrinkles occur Use Bypass Tray for these papers Coated of which paper weight is 127 g m2 or less Blank paper not to be printed of which paper weight is 80 g m2 or less Tray capacity sheets 250 Power supply Supplied from Interface Decurler Module or Finisher Dimensions mm Width 700 x Depth 725 x Height 1 ...

Страница 35: ...nter main unit Load paper first before starting the job 1 Fan the paper well and insert it along the paper guide all the way until it touches the back Important Do not load paper above the maximum fill line It may cause paper jams or machine malfunction 2 Adjust the paper guide to the size of loaded paper Note If the paper guide width is narrower or wider than the paper it may cause paper jams Spe...

Страница 36: ...ng the paper jam printing is resumed from the state before the paper jam occurred If a paper jam occurred during copying tap on Start Copying is resumed from the state before the paper jam occurred Note Clear the paper jams while the machine is on 1 Remove the jammed paper When Indicator E1 is Turned on p 36 When Indicator E2 is Turned on p 36 When Indicator E3 is Turned on p 37 When Indicator E1 ...

Страница 37: ...2 Open lever 1d downward 1 turn knob 1e counter clockwise 2 and remove the jammed paper 3 Note Jammed paper may be hidden at the upper section 3 Return lever 1d 4 If you have difficulty in removing the papers open lever 1a upward 1 turn knob 1e clockwise 2 and re move the jammed paper 3 5 Return lever 1a 6 Close the cover 2 Check the curl direction of the jammed paper and correct the curl Refer Cu...

Страница 38: ...ration 2 Sample button Press the button to output a sample to the Top Output Tray 3 Paper eject button Press the button to stop printing and take out outputs 4 Top Output Tray Outputs are delivered here A sample is delivered here 5 Front Upper Cover Open this cover to clear paper jams 6 Stacker Tray Stacker cart When the paper eject button is pressed paper is moved to the stacker cart and ejected ...

Страница 39: ...stom size mm Width 203 to 330 Length 182 to 488 Paper weight g m2 Top Output Tray Uncoated 52 to 350 Coated 64 to 350 Stacker Tray Uncoated 52 to 300 Coated 64 to 300 Power supply AC 100 to 120 V 10 1 5 A 50 60 Hz common AC 220 to 240 V 10 0 8 A 50 60 Hz common Maximum power consumption AC 100 V 150 W AC 240 V 192 W Dimensions mm Width 800 x Depth 725 x Height 1 042 with Transport Module Width 48 ...

Страница 40: ...ess can be loaded Extension Tray Insert 2 extension trays until they stop Note Pass them through over the guide at the rear side of the tray until they stop Lightweight paper housing wire When it is difficult to load thin paper install the wire Note The tray capacity is 10 sheets Paper of which width is 256 mm or less cannot be used The supported paper weights are from 82 to 127 g m2 1 Remove the ...

Страница 41: ...t come off from the U shaped bar 3 Adjust the wire positions according to the size of paper to be output Note Install the wires in parallel When not using the kit When Finisher is installed Store the kit in the storage case at the rear side of Finisher When Finisher is not installed Hang the kit on the holder at the side of the stacker ...

Страница 42: ...f a paper jam occurred during copying tap on Start Copying is resumed from the state before the paper jam occurred Note Clear the paper jams while the machine is on 1 Remove the jammed paper When Indicator E1 is Turned on p 42 When Indicator E2 is Turned on p 42 When Indicator E3 is Turned on p 43 When Indicator E4 is Turned on p 43 When Indicator E5 is Turned on p 43 When Indicator E6 is Turned o...

Страница 43: ... clockwise 2 and remove the jammed paper 3 5 Return lever 2b 6 Close the cover When Indicator E4 is Turned on 1 Open the front upper cover 2 Open lever 2a downward 1 and remove the jammed paper 2 3 Return lever 2a 4 Close the cover When Indicator E5 is Turned on 1 Open the front upper cover 2 Open lever 2b upward 1 turn knob 2c counter clockwise 2 and remove the jammed paper 3 3 Return lever 2b 4 ...

Страница 44: ...he jammed paper 4 Return the stacker cart slowly 5 Close the cover When Indicator E7 is Turned on 1 Remove the jammed paper that sticks out from the exit of the Top Output Tray 2 Open the front upper cover 3 Open lever 1b upward 1 and remove the jammed paper 2 4 Return lever 1b 5 Open lever 2a downward 1 and remove the jammed paper 2 6 Return lever 2a 7 Close the cover 1 2 1 2 ...

Страница 45: ...ed on 1 Open the front upper cover 2 Open lever 3b upward 1 turn knob 3a clockwise 2 and remove the jammed paper 3 3 Return lever 3b 4 Close the cover 2 Check the curl direction of the jammed paper and correct the curl Refer Curl Correction p 30 2 1 3 ...

Страница 46: ...curs the indicator is turned on When the priority device indicator top lamp blinks first of all perform the paper jam operation 2 Waste full indicator When cut pieces need to be disposed the indicator is turned on When cut pieces be come full the indicator blinks 3 Upper Cover Open this cover to clear paper jams 4 Lower Cover Open this cover to dispose cut pieces ...

Страница 47: ...ize is same Crease Paper size Standard size Max SRA3 320 x 450 mm 12 6 x 19 2 320 x 488 mm Min JIS B5 Custom size mm Width 182 to 330 Length 210 to 488 Cutting and crease up to 386 Paper weight g m2 Uncoated 52 to 350 Coated 106 to 350 Note 157 g m2 or more except in the case of Saddle stitch Single fold Although the crease setting can be also applied to paper of which paper weight is 156 g m2 or ...

Страница 48: ...rim and crease Trim 194 to 330 mm trim 182 to 330 mm crease a 12 mm or more b e 25 mm or more Crease A B 6 to 25 mm Feed direction Printing is not possible when less than 45 mm from the front edge Also the paper feeding capa bility is not guaranteed when 62 mm or less from the front edge ...

Страница 49: ...ste container become full the waste full indicator changes from ON to blinking 1 Open the lower cover 2 Pull out the waste container 3 Dispose all cut pieces Confirm that there are no cut pieces at the bottom of the frame at the rear of the waste container Remove cut pieces using a waste collecting bar if any 4 Insert the Waste Container into the original position Note Push it until its arrow come...

Страница 50: ...rred If a paper jam occurred during copying tap on Start Copying is resumed from the state before the paper jam occurred Note Clear the paper jams while the machine is on 1 Open the upper cover 2 Remove the jammed paper When Indicator E1 is Turned on p 50 When Indicator E2 is Turned on p 51 When Indicator E3 is Turned on p 52 When Indicator E4 is Turned on p 52 When Indicator E5 is Turned on p 53 ...

Страница 51: ...d 1 and open lever 1b downward 2 3 Turn knob 1c clockwise 1 and remove the jammed paper 2 4 Return lever 1a and lever 1b 5 If you have difficulty in removing the papers open lever 1d upward 1 and open lever 2a to the left 2 6 Turn knob 2b counterclockwise 1 and remove the jammed paper 2 7 Return lever 1d and lever 2a 1 2 1 2 1 2 1 2 ...

Страница 52: ... be hidden at the upper section 3 Return lever 2c When Indicator E4 is Turned on 1 Open lever 2c downward 1 open lever 2d upward 2 and open lever 2e to the right 3 2 Hold the lead edge of paper turn knob 2f clockwise 1 and remove the jammed paper 2 If you have difficulty in removing the papers hold the trail edge of the paper and remove it 3 Return lever 2e lever 2d and lever 2c 1 2 1 2 3 1 2 ...

Страница 53: ...remove the jammed paper 2 3 Turn knob 2f counterclockwise 1 and remove the jammed paper 2 4 Return lever 3a and lever 3b When Indicator E6 is Turned on 1 Open lever 3a to the right 1 open lever 4b down ward 2 open lever 4c to the right 3 and remove the jammed paper 4 2 Turn knob 4d counterclockwise 1 and remove the jammed paper 2 1 2 1 2 1 2 1 2 3 4 1 2 ...

Страница 54: ...nob 3c clockwise 1 and remove the jammed paper 2 5 Return lever 3a lever 4b and lever 4c When Indicator E7 is Turned on 1 Open lever 3a to the right 1 and turn knob 2f counterclockwise 2 Note Make sure to turn knob 5 times or more 2 Pull out and insert the Waste Container 3 times 3 Return lever 3a When the indicator is not turned off 1 Remove the waste collecting bar in the cover 1 2 3 1 2 1 2 ...

Страница 55: ...ected in the waste container move them by the waste collecting bar and remove them with hands 5 Return lever 3a and lever 3d 6 Confirm that there are no cut pieces at the bottom of the frame at the rear of the waste container Remove cut pieces using a waste collecting bar if any Refer Waste Container p 49 3 Close the cover 4 Check the curl direction of the jammed paper and correct the curl Refer C...

Страница 56: ...ri Fold Output Tray Paper is ejected only to this tray in case of inner C Fold Z Fold sheets Main Specifications Item Specification Z Fold Half Sheet Paper size A3 11 x 17 8 K JIS B4 Paper weight g m2 60 to 90 Uncoated Tri fold C Fold Z Fold Paper size A4 Letter 8 5 x 11 Paper weight g m2 60 to 90 Uncoated Paper capacity sheets 30 Power supply AC 100 to 120 V 10 1 A 50 60 Hz common AC 220 to 240 V...

Страница 57: ...he torn pieces making sure that none remain inside the machine When you have finished clearing the paper jam printing is resumed from the state before the paper jam occurred If a paper jam occurred during copying tap on Start Copying is resumed from the state before the paper jam occurred Note Clear the paper jams while the machine is on 1 Open the Cover 2 Remove the jammed paper When Indicator E1...

Страница 58: ...e to the right 1 turn knob 2c counter clockwise 2 and remove the jammed paper 3 3 Return lever 2e 4 If you have difficulty in removing the papers open lever 2f to the right 1 turn knob 2c counterclockwise 2 and remove the jammed paper 3 5 Return lever 2f 6 Return the Tri Fold Output Tray 2d to the original posi tion 3 Close the cover 4 Check the curl direction of the jammed paper and correct the c...

Страница 59: ...ce indicator top lamp blinks first of all perform the paper jam operation 3 Booklet output button When the button is pressed paper output in the Booklet Tray is moved to the collecting position Note When the Square Back Fold Trimmer is equipped pressing of but ton moves to the Booklet Tray removal position of the Square Back Fold Trimmer 4 Top Output Tray Outputs are delivered here 5 Finisher Tray...

Страница 60: ... saddle stitch This unit is used to replace staples for saddle stitch There are two Main Specifications Item Specification Type Top Output Tray Sort Stack Finisher Tray Sort Offset available Stack Offset available Booklet Tray Sort Stack Paper size Top Output Tray Standard size Max SRA3 320 x 450 mm 12 6 x 19 2 320 x 488 mm Min Postcard 100 x 148 mm Custom size mm Width 100 to 330 Length 148 to 48...

Страница 61: ...ize Max A3 11 x 17 Min JIS B5 Paper weight g m2 Uncoated 52 to 300 Coated 72 to 300 Stapled location 1 location 2 locations 4 locations Hole Punch with Punch Unit Paper size Standard size Max A3 11 x 17 Min JIS B5 Paper weight g m2 Uncoated 52 to 220 Coated 72 to 220 Number of punched holes 2 holes 4 holes or 2 holes 3 holes US Specifications Note The number of punched holes that can be processed ...

Страница 62: ...er 87 Punch Unit 6 Banner Print Extension Kit 2 Finisher with Booklet Maker 107 Punch Unit 6 Banner Print Extension Kit 2 Number of Sheets That can be Stapled Approximation Paper weight g m2 Side Stitch Saddle stitch When A4 size or less When exceeding A4 size Uncoated Coated Uncoated Coated Uncoated Coated 52 to 59 100 35 65 35 30 25 60 to 71 30 72 to 80 35 35 25 81 to 90 91 to 105 50 30 50 30 20...

Страница 63: ...Thin coated paper Coated paper with the length of 364 mm or more Long paper A B Pull the Top Output Tray to the right remove it from the lower fixed position A and insert the claws at the front edge of the tray to the upper fixed position B Note Normally set the tray at the lower fixed position If the tray is at the upper fixed position of the exit paper may fall from the Top Output Tray and a pap...

Страница 64: ...4 caps at the front edge of the Top Output Tray 2 Change the angle of the Top Output Tray to the upper fixed position B Note Change the angle to the lower fixed position A for paper with the width of 256 mm or less 3 Insert 2 extension trays until they stop Note Pass them through over the guide at the rear side of the tray until they stop Lightweight paper housing wire When it is difficult to load...

Страница 65: ...d curl correction of Inserter For Interface Decurler Module Inserter set the highest curl correction of Interface Decurler Module and upward curl correction of Inserter If thick paper is curled downward a paper jam may occur For Inserter set the downward curl correction of Inserter For Interface Decurler Module Inserter set the lowest curl correction of Interface Decurler Module and downward curl ...

Страница 66: ... the procedure contact your local representative Paper is not stapled Staple is bent If the staple looks like any of the following images contact your local representative One side of the staple is loose Staple is bent in the wrong direction Staple is collapsed Staple is loose Staple is loose and the center sinks Caution Please be very careful not to hurt your fingers etc when removing the jammed ...

Страница 67: ... to make sure that there is no staple inside of the Finisher 3 Open the cover of the unit and remove the jammed staples 4 Insert the unit into the original position 5 Close the cover Staple Cartridges for Saddle Stitch 1 Confirm that the machine is not operating and open the Cover 2 Pull out Booklet Maker 3 3 Hold the handle of the Staple Cartridge R2 R3 and pull it out ...

Страница 68: ...Cartridge Comes off If the Staple Cartridge comes off from the unit due to fall during operation etc perform the fol lowing steps Caution Please be very careful not to hurt your fingers etc when removing the deformed staples Note Perform the same steps as well when the Staple Cartridge is separated from the unit 1 Open the cover of the unit and remove all the de formed staples 2 Move the handle on...

Страница 69: ... moved position and take out the Staple Cartridge from the unit 4 Remove the staples that stick out from the Staple Cartridge Caution Please be very careful not to hurt your fingers etc when separating staples 5 Insert the Staple Cartridge into the unit ...

Страница 70: ...ng is resumed from the state before the paper jam occurred If a paper jam occurred during copying tap on Start Copying is resumed from the state before the paper jam occurred Note Clear the paper jams while the machine is on Finisher 1 Open the Cover 2 Remove the jammed paper When Indicator E1 is Turned on p 70 When Indicator E2 is Turned on p 71 When Indicator E3 is Turned on p 71 When Indicator ...

Страница 71: ... E3 is Turned on 1 Remove the jammed paper that sticks out from the exit of the Top Output Tray 2 Open and close the cover When Indicator E4 is Turned on 1 Open lever 1d to the right 1 turn knob 1e clock wise 2 and remove the jammed paper 3 2 Return lever 1d When Indicator E5 is Turned on 1 Open lever 1d to the right 1 turn knob 1f counter clockwise 2 and remove the jammed paper 3 2 Return lever 1...

Страница 72: ...ection p 30 Booklet Maker 1 Open the Cover 2 Remove the jammed paper When Indicator E7 is Turned on p 72 When Indicator E8 is Turned on p 73 When Indicator E9 is Turned on p 73 When Indicator E7 is Turned on 1 Open lever 3a to the left 1 and remove the jammed paper 2 2 If you have difficulty in removing the papers pull out Booklet Maker 3 1 and remove the jammed paper 2 3 Open and close the cover ...

Страница 73: ... Turn knob 3b counterclockwise 1 and remove the jammed paper 2 3 Push in the Booklet Maker 3 When Indicator E9 is Turned on 1 Turn knob 3b clockwise 1 and remove the jammed paper that sticks out from the exit of the Booklet Tray 2 3 Close the cover 4 Check the curl direction of the jammed paper and correct the curl Refer Curl Correction p 30 1 2 1 2 ...

Страница 74: ...el to the back is made If Fore Edge Trim is performed a thin press mark parallel to the fore edge may be made In either case a press mark becomes outstanding as a booklet becomes thicker 4 Back Pressing Level Button Press this button to change the roundness of the back of a saddle stitched booklet The higher the indicator the higher the pressing force The lower the indicator the lower the pressing...

Страница 75: ...cording to paper paper type paper weight interleaf cover and body etc the cutting face may be different when papers are put together even if the cutting size is same Square Back Maximum number of sheets of paper sheets Saddle stitch 30 Note Square Back cannot be performed for Single fold and Saddle stitch of less than 5 sheets The number of sheets that can be processed may vary according to the pa...

Страница 76: ...Hold the belt of the waste container and pull it out with both hands Note Do not apply excessive load on the belt by twirling the container as holding the belt etc Otherwise the belt may get broken 3 Dispose all cut pieces Caution Do not collect cut pieces with hands You may get injured with cutting edges 4 Insert the Waste Container into the original position ...

Страница 77: ...he paper jam printing is resumed from the state before the paper jam occurred If a paper jam occurred during copying tap on Start Copying is resumed from the state before the paper jam occurred Note Clear the paper jams while the machine is on 1 Remove the jammed paper When Indicator E1 is Turned on p 77 When Indicator E2 is Turned on p 78 When Indicator E3 is Turned on p 78 Note The left and Righ...

Страница 78: ...d remove the paper 5 Close the Left Cover When Indicator E2 is Turned on 1 Open the Left Cover 2 Remove the jammed paper 3 Close the Left Cover When Indicator E3 is Turned on 1 Open the Right Cover 2 Remove the jammed paper 3 Close the Right Cover ...

Отзывы: