- 3 -
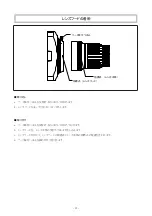
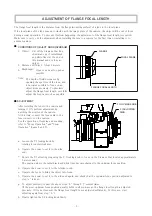
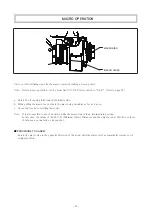
The flange focal length is the distance from the flange (mounting surface) of a lens to the focal plane.
■ CONDITIONS OF OBJECT AND DIAPHRAGM
1. Object: Cut off the Siemens Star (the
chart made up of radial black
and white lines) at the end of
this manual and use it as an
object.
2. Distance of Object: About 3 meters
3. Diaphragm:
■ ADJUSTMENT
After installing the lens to the camera and
turning it ON, perform adjustment by
watching the monitor of the camera.
At this time, connect the lens cable to the
lens connector on the camera.
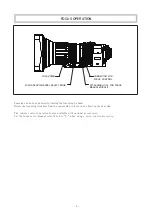
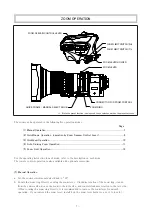
For the operation of focusing and zooming,
refer to “Focus Operation” and “Zoom
Operation” (pages 6 and 7).
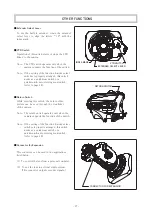
a. Loosen the F.f locking knob by
rotating it counterclockwise.
b. Operate the zoom to set it to the wide
end.
c. Rotate the F.f adjusting ring using the F.f locking knob to focus on the Siemens Star located approximately
3 meters away.
The position where the radial black and white lines become sharpest is the optimum focus position.
d. Operate the zoom to set it to the telephoto end.
e. Operate the focus to bring the object into focus.
f. Operate the zoom to set it to the wide end again, and check that the optimum focus position adjusted in
step ‘c’ is kept.
g. To adjust precisely, repeat the above steps ‘b’ through ‘f’ several times.
(If the most optimum focus position usually holds in all zoom areas, the flange focal length is adjusted
precisely. If it is not focused, the flange focal length is not adjusted sufficiently. In this case, start
adjusting again from step ‘b.’)
h. Finally tighten the F.f locking knob firmly.
If the focal plane of the lens does not coincide with the image plane of the camera, the object will be out of focus
during a zoom operation. To prevent this from happening, the adjustment of the flange focal length is required.
Make sure to carry out the adjustment when installing the lens to a camera for the first time or installing it to
another camera.
Note:
The depth of field decreases by
opening the aperture of the lens, and
it becomes possible to focus on an
object more precisely. To precisely
adjust the flange focal length, carefully
adjust the focus as much as possible.
FLANGE
FOCAL PLANE
FLANGE FOCAL LENGTH
Open or as near to open as
possible.
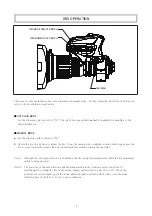
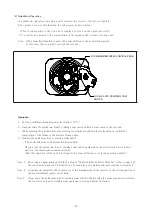
ADJUSTMENT OF FLANGE FOCAL LENGTH
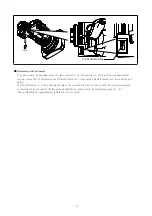
F.f ADJUSTING
RING
F.f LOCKING KNOB
Содержание FUJINON HA14x4.5 BEZD-T58B
Страница 1: ...UA13x4 5BEZD T9 BB00041378 300 LP755A T9 2911...
Страница 2: ......
Страница 3: ...JAPANESE V English version Technical Drawings Technical Drawings ENGLISH...
Страница 4: ......
Страница 5: ......
Страница 6: ......
Страница 7: ...1 1 2 2 3 5 6 7 1 7 2 8 3 10 4 11 5 12 14 1 15 2 15 16 17 18 22 23 24 25 26 28...
Страница 8: ...2 OFF a b c d e...
Страница 9: ...1 2 3 m 3 6 7 a F f b c F f F f 3m d e f c g b f 2 3 b h F f 3 F f F f...
Страница 10: ...4 F f F f c b g...
Страница 11: ...5 A a M b 1 2 A M 19 ON...
Страница 12: ...6 S...
Страница 13: ...5 1 a OFF b 1 6 2 7 3 9 4 10 5 11 W T 7...
Страница 14: ...2 a ON b T W HIGH LOW T W 7 8...
Страница 15: ...ON OFF 20 ON OFF 9...
Страница 16: ...3 a ON b c d 1 18 VTR 2 3 10...
Страница 17: ...4 a ON b c d 18 VTR 3 1 2 3 11...
Страница 18: ...5 ON OFF T W 12...
Страница 19: ...ON OFF OFF ON 3 T 1 3 W 1 a b c d e OFF ON ON OFF OFF ON T W a b c OFF 1 2 3 4 1 2 ON OFF OFF OFF 13...
Страница 20: ...2 1 14 2 14 14...
Страница 21: ...1 ON OFF 18 ON ON 19 OFF OFF ON a b c a b 2 ON OFF 18 ON ON 19 ON ON S a b c a d b c M 15...
Страница 22: ...a b c 16...
Страница 23: ...2 VTR VTR VTR VTR 18 18 VTR 2 1 2 17...
Страница 24: ...ON OFF ON OFF VTR VTR VTR ON OFF ON OFF ON OFF VTR ON OFF 18...
Страница 25: ...ON OFF ON OFF OFF A M ON OFF ON OFF OFF ON A M ON OFF ON OFF 19...
Страница 26: ...ON OFF ON OFF ON OFF ON OFF No 9 No 4 Normal No 0 W T 0 10 OFF ON OFF ON OFF ON OFF ON OFF ON OFF 20...
Страница 28: ...22...
Страница 29: ...a b a b c d 23...
Страница 30: ...a b 1 1 24...
Страница 32: ...1 1 EPD 4A E12A ERD 10A D01M EPD EBF 1 MCA 06BC ERD EPD 26...
Страница 33: ...2 2 SA 206D 005 27...
Страница 67: ...Technical Drawings ENGLISH English version...
Страница 68: ...SJ T11364 GB T26572 GB T26572 10...
Страница 69: ......
Страница 70: ......
Страница 71: ...1 1 2 2 3 5 6 7 1 7 2 8 3 10 4 11 5 12 14 1 15 2 15 16 17 18 22 23 24 25 26 28...
Страница 72: ...2 a b c d e...
Страница 73: ...3 1 2 3 3 6 7 a b c 3 d e f c g b f b h...
Страница 74: ...4 c b g...
Страница 75: ...5 A a M b 1 2 A M 19...
Страница 76: ...6 S...
Страница 77: ...7 1 a OFF b 1 7 2 8 3 10 4 11 5 12 T W...
Страница 78: ...8 2 a ON b T W HIGH LOW T W 7...
Страница 79: ...9 ON OFF ON OFF OFF 20 ON OFF...
Страница 80: ...3 a ON b c d 1 18 VTR 2 3 10...
Страница 81: ...4 a ON b c d 18 VTR 1 2 3 11...
Страница 82: ...5 12 ON OFF T W...
Страница 83: ...13 ON OFF OFF 1 2 3 4 1 2 OFF ON ON OFF OFF ON T W a b c ON OFF OFF ON 3 T 1 3 W 1 a b c d e...
Страница 84: ...14 1 15 2 15 ON MEMO...
Страница 86: ...16 a b c M O D ON OFF OFF 12...
Страница 87: ...17 2 2 2 VTR VTR VTR VTR VTR 18 18 VTR 2 1 2...
Страница 88: ...18 ON OFF ON OFF OFF VTR VTR VTR ON OFF ON OFF ON OFF VTR ON OFF...
Страница 89: ...19 ON OFF ON OFF OFF A M ON OFF ON OFF OFF ON A M ON OFF ON OFF...
Страница 90: ...ON OFF ON OFF ON OFF ON OFF 10 OFF ON OFF ON OFF ON OFF ON OFF ON OFF No 9 No 4 No 0 W T 0 20...
Страница 92: ...22...
Страница 93: ...23 a b a b c d...
Страница 94: ...24 a b...
Страница 96: ...26 1 1 EPD 4A E12A ERD 10A D01M EPD EBF 1 EPD ERD MCA 06BC...
Страница 97: ...27 2 2 SA 206D 005...
Страница 99: ...TECHNICAL DRAWINGS Technical Drawings ENGLISH...
Страница 101: ...SS00002038 00 mm UNLESS OTHERWISE SPECIFIED UNIT mm Outline drawing UA13 X 4 5BEZD T9 Fig 1 1...
Страница 102: ......
Страница 103: ...MEMO...
Страница 104: ...MEMO...
Страница 105: ...SIEMENS STAR...
Страница 106: ......
Страница 107: ......
Страница 108: ......

