Loading Paper
109
P
a
pe
r an
d
Ot
h
e
r M
e
di
a
3
7
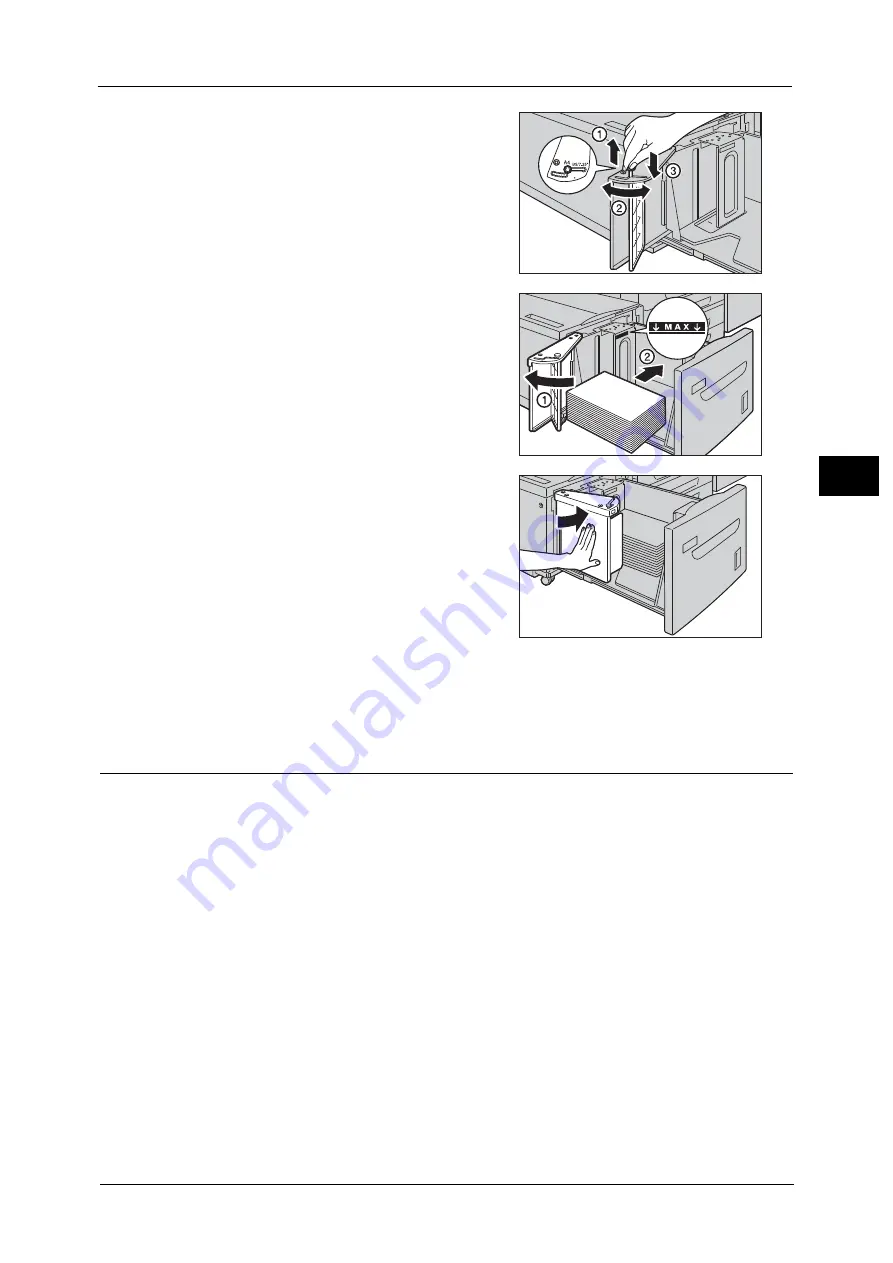
Pull up the lever of the end guide (1). Move the
lever along the slot, and set it at the position
corresponding to the paper size (2). Then, press
the lever down (3).
Important •
Adjust the end guide accordingly with the
size of paper. If the end guide is not adjusted
correctly, the machine cannot feed the paper
properly, resulting in a paper jam.
Note
•
The slot on the left of 8.5” is not used.
8
Open the end guide (1). With the side to be
copied or printed on facing up, load and align
the edge of the paper against the right edge of
the tray (2).
Important •
Do not load paper exceeding the maximum
fill line ("MAX" in the right figure). It may
cause paper jams or machine malfunctions.
9
Close the end guide tightly.
10
Push the tray in gently until it stops.
Loading Paper in Tray 6 (HCF B1-S)/Trays 6 and 7 (High Capacity Feeder C3-
DS)
The following describes how to load paper in the High Capacity Feeder C3-DS (Tray 6) as an
example. The procedure is the same as for the HCF B1-S (Tray 6) and the High Capacity
Feeder C3-DS (Tray 7).
Important •
When you load non-standard size paper whose length (Y) is 100.0 to 181.9 mm for the HCF B1-S, or
98.0 to 181.9 mm for the High Capacity Feeder C3-DS, make sure that the Post Card Kit is attached
to the tray. If the Post Card Kit is not attached, a paper jam occurs. When you load standard size
paper other than postcards, or non-standard size paper whose length (Y) is 182 mm or more in Tray
6 or 7, make sure that the Post Card Kit is not attached to the tray. If the Post Card Kit is attached,
remove the kit from the tray. Otherwise, a paper jam occurs.
For information on how to attach and remove the Post Card Kit, refer to "Loading Postcards"
(P.115).
Note
•
Carefully fan the paper before loading it in a tray. Otherwise, paper jams may occur or multiple
sheets may be fed to the machine simultaneously.
•
When loading heavyweight paper in the HCF B1-S or the High Capacity Feeder C3-DS, the weight
switch buttons need to be adjusted. For more information, refer to "About Weight Switch Buttons"
(P.121).
8.5
Содержание Versant 80 Press
Страница 1: ...User Guide Versant 80 Press ...
Страница 18: ...18 Index 1007 ...
Страница 159: ...Image Quality 159 Copy 4 2 Select a button to adjust the color tone ...
Страница 214: ...4 Copy 214 Copy 4 ...
Страница 304: ...5 Scan 304 Scan 5 ...
Страница 382: ...11 Job Status 382 Job Status 11 ...
Страница 562: ...14 CentreWare Internet Services Settings 562 CentreWare Internet Services Settings 14 ...
Страница 580: ...16 E mail Environment Settings 580 E mail Environment Settings 16 ...
Страница 618: ...18 Encryption and Digital Signature Settings 618 Encryption and Digital Signature Settings 18 ...
Страница 916: ...22 Problem Solving 916 Problem Solving 22 ...
Страница 980: ...23 Appendix 980 Appendix 23 11 Click Reboot Machine After rebooting the machine the setting will be enabled ...
Страница 1018: ...1018 Index ...
Страница 1019: ...Versant 80 Press User Guide ME6843E2 2 Edition 1 September 2014 Fuji Xerox Co Ltd Copyright 2014 by Fuji Xerox Co Ltd ...


