Using the Operator Panel Menus
170
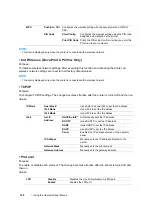
• Host Access List
Purpose:
To control the access from the specified IP addresses. The change becomes effective after the printer
is turned off and then on.
Values:
• Reset Defaults
Purpose:
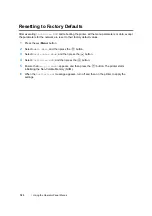
To initialize wired network data stored in Non-Volatile Memory (NVM). After executing this function and
rebooting the printer, all wired network settings are reset to their default values.
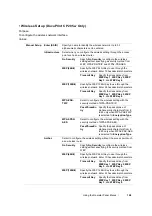
• Wireless LAN (DocuPrint CP205 w Only)
Purpose:
To enable the wireless connection.
Values:
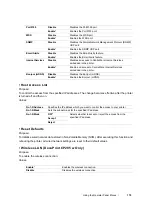
Port9100
Disable
Disables the Port9100 port.
Enable
*
Enables the Port9100 port.
WSD
Disable
Disables the WSD port.
Enable
*
Enables the WSD port.
SNMP
Disable
Disables the Simple Network Management Protocol (SNMP)
UDP port.
Enable
*
Enables the SNMP UDP port.
Email Alerts
Disable
Disables the Email Alerts feature.
Enable
*
Enables the Email Alerts feature.
InternetServices
Disable
Disables an access to CentreWare Internet Services
embedded in the printer.
Enable
*
Enables an access to CentreWare Internet Services
embedded in the printer.
Bonjour (mDNS)
Disable
Disables the Bonjour (mDNS).
Enable
*
Enables the Bonjour (mDNS).
No.1-5/Address
Specifies the IP address which you want to control the access to your printer.
No.1-5/Mask
Sets the subnet mask for the specified IP address.
No.1-5/Mode
OFF*
Selects whether to accept or reject the access from the
specified IP address.
Accept
Reject
Enable
*
Enables the wireless connection.
Disable
Disables the wireless connection.
Содержание DocuPrint CP205 w
Страница 1: ...DocuColor C1190 FS User Guide User Guide DocuPrint CP205 CP205 w Edition 1 December 2008 ME4326E2 1 ...
Страница 25: ...Product Features 24 ...
Страница 41: ...Basic Operation 40 ...
Страница 111: ...Network Basics 110 ...
Страница 118: ...117 Printing Basics Usable Print Media The types of print media that can be used on this printer are as follows ...
Страница 163: ...Printing Basics 162 ...
Страница 185: ...Using the Operator Panel Menus 184 ...
Страница 192: ...191 Troubleshooting 4 Lower the levers to their original position 5 Close the rear door ...
Страница 194: ...193 Troubleshooting 4 Lower the levers to their original position 5 Close the rear door ...
Страница 237: ...Troubleshooting 236 ...
Страница 242: ...241 Maintenance 11 Replace the other three toner cartridges as well 12 Close the toner access cover ...
Страница 263: ...Maintenance 262 5 Push the PSI in 6 Slide the slide bar backward until it stops 7 Close the front cover ...
Страница 265: ...Maintenance 264 ...
Страница 269: ...Contacting Fuji Xerox 268 ...

