background image

6.1 Clearing Paper Jams

225

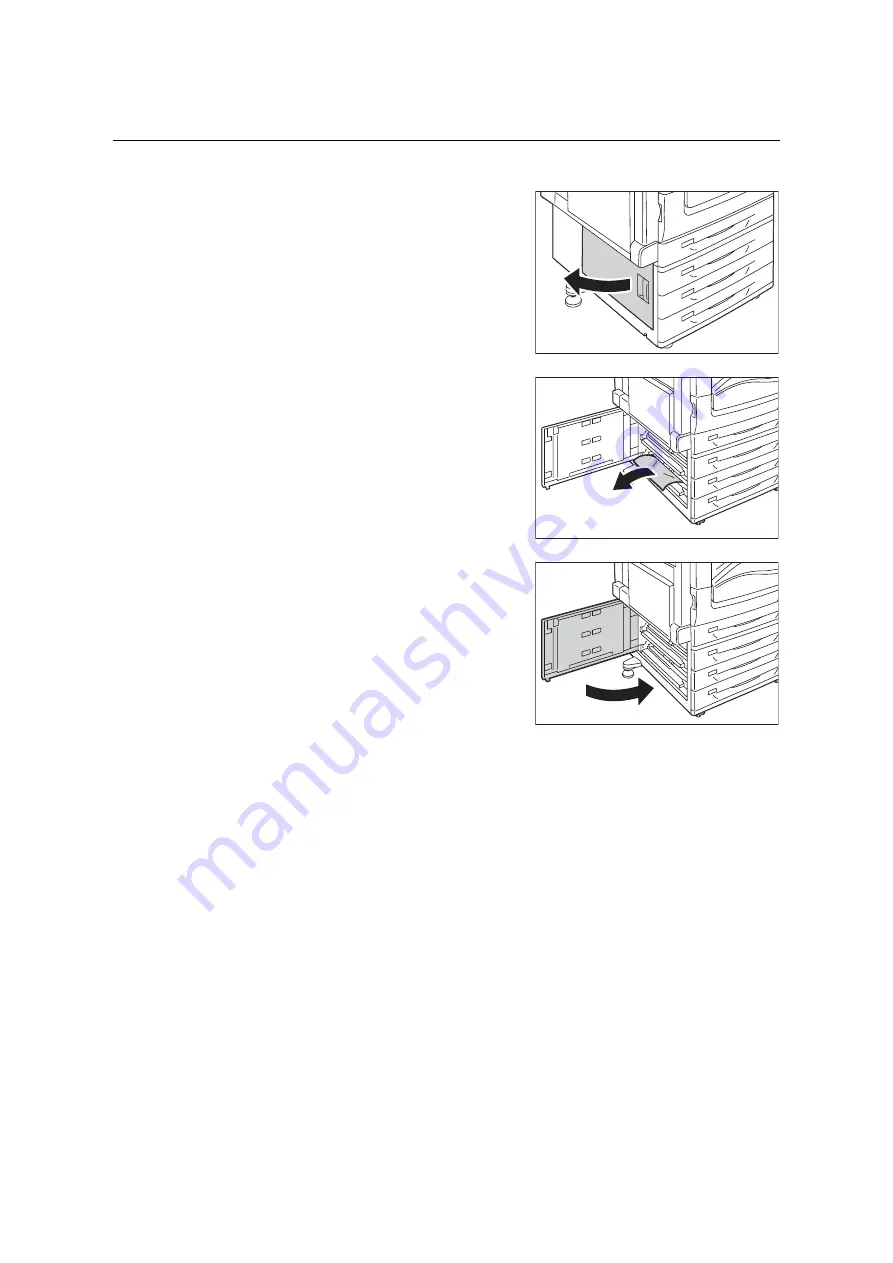
Paper Jams in Bottom Left Cover C

The following describes how to clear paper jams occurring in the bottom left cover C.

1.

Gently open the bottom left cover C while 
pulling the release lever. 

2.

Remove the jammed paper.

Note


• If the paper is torn, make sure no piece of paper 

remains inside the machine.

• Paper may be jammed in the hidden area 

on the upper 

position. Check inside thoroughly.

3.

Close the bottom left cover C gently.

Содержание DocuPrint C5005 d

Страница 1: ...User Guide DocuPrint C5005 d...

Страница 2: ...be a legal offence to print currency notes certificates of stocks and securities or any other documents of similar nature regardless of whether they will be used The data saved in the hard disk of the...

Страница 3: ...ow the printer with the 3 Tray Module installed These illustrations are current as of November 2010 however the machine and its specifications may be changed without notice Fuji Xerox shares the globa...

Страница 4: ...t following authentication by password entry on the control panel or by smart card This feature is ideal for printing confidential documents Prevent data leakage by removing the accumulated data on th...

Страница 5: ...ine Help 45 1 7 Installing a Print Driver 46 2 Basic Operation 47 2 1 Main Components and Functions 47 Main Unit 47 Control Panel 54 Control Panel Display 56 2 2 Switching On Off the Power 57 Switchin...

Страница 6: ...ge Print 94 Configuring Private Charge Print Settings 94 Printing with Private Charge Print 95 Deleting Print Job 95 3 9 Charge Print 96 Charge Print 96 Configuring Charge Print Settings 96 Printing w...

Страница 7: ...Left Cover C 225 Paper Jams in Top Left Cover D 226 Paper Jams in Duplex Module Cover B 228 Paper Jams in Finisher B1 229 Paper Jams in Finisher C1 with Booklet Maker 231 6 2 Stapler Faults 240 Staple...

Страница 8: ...Notification Service 337 Configuring the E mail Notification Service 337 7 7 Checking Machine Serial Number 340 7 8 Enabling a RAM Disk 341 7 9 Security Features 343 Security Feature Overview 343 Con...

Страница 9: ...HDD Extension Kit 410 Installation procedure 410 A 7 Installing the Feature Enhance Kit 413 Installation Procedure 413 A 8 Installing the Parallel Port Kit 417 Installing the Parallel Port Kit 417 Rem...

Страница 10: ...er Guide PDF This guide Describes how to get ready to print and set various print features It also covers control panel menus troubleshooting tips and maintenance information This guide is on the Driv...

Страница 11: ...per types and how to load paper in the printer 5 Control Panel Settings Describes control panel menus and how to configure them 6 Troubleshooting Contains procedures that help to resolve problems such...

Страница 12: ...r computer screen or the printer s control panel display These brackets also are used for the names of reports and lists output from the printer Indicates key cap text for keys on your computer keyboa...

Страница 13: ...if not followed strictly can lead death or severe or fatal injuries and the possibility to do it is comparatively high Used for items that if not followed strictly can lead to severe or fatal injuries...

Страница 14: ...of dust The dusty and damp environment may bring about minute electric current in a connector It may generate heat and eventually cause a fire accident To avoid the risk of electric shock and a fire a...

Страница 15: ...handholds provided Never lift it by gripping any other areas It will prevent you from dropping the product and getting back ache or injuries Locate this product on the level and sturdy surface that ca...

Страница 16: ...f the product is damaged Do not insert any object into slots or openings of this product Do not place any of the following on the product Liquid container such as flower vases or coffee cups Metal par...

Страница 17: ...utton will be depressed even after the pushing force is released 6 Press the TEST button lightly with a sharp edge such as a pen tip The depressed RESET button will stick out again 7 Press the RESET b...

Страница 18: ...entative for its disposal Fusing Unit Safety Do not remove the Fusing Unit When removing paper jam from the Fusing Unit contact your local Fuji Xerox representative Otherwise it may cause injuries Kee...

Страница 19: ...bels Always follow all warning instructions marked on or supplied with this product To avoid the risk of burn injuries and electric shock never touch the area with the High Temperature or High Voltage...

Страница 20: ...re is no guarantee that interference will not occur in a particular installation If this product does cause harmful interference to radio or television reception which can be determined by turning thi...

Страница 21: ...or promote products derived from this software without specific prior written permission THIS SOFTWARE IS PROVIDED BY THE INSTITUTE AND CONTRIBUTORS AS IS AND ANY EXPRESS OR IMPLIED WARRANTIES INCLUDI...

Страница 22: ...ication are permitted provided that the following conditions are met Redistributions of source code must retain the above copyright notice this list of conditions and the following disclaimer Redistri...

Страница 23: ...so contains materials derived from public sources Additional information about OpenLDAP can be obtained at http www openldap org Portions Copyright 1998 2006 Kurt D Zeilenga Portions Copyright 1998 20...

Страница 24: ...this Software under terms of this license revision or under the terms of any subsequent revision of the license THIS SOFTWARE IS PROVIDED BY THE OPENLDAP FOUNDATION AND ITS CONTRIBUTORS AS IS AND ANY...

Страница 25: ...licensing terms TIFF libtiff LibTIFF Copyright c 1988 1997 Sam Leffler Copyright c 1991 1997 Silicon Graphics Inc ICC Profile Little cms Little cms Copyright C 1998 2004 Marti Maria XPS XML Paper Spe...

Страница 26: ...les of items that may be illegal to copy or print in your country Currency Banknotes and checks Bank and government bonds and securities Passports and identification cards Copyright material or tradem...

Страница 27: ...ection Connecting the printer and a computer using a USB cable default Enabled Parallel connection Connecting the printer and a computer using a parallel cable To use this feature the Parallel Port Ki...

Страница 28: ...Visit our web site for the latest information Refer to For information on how to print PostScript data refer to the manual on the PostScript Driver Library CD ROM Connectivity Local Network Port Name...

Страница 29: ...it CD ROM Refer to the CD ROM Documentation HTML on the CD ROM PostScript Print Driver Installing the print driver is available from the PostScript Driver Library CD ROM Refer to the manual on the Pos...

Страница 30: ...cable Refer to the Manual HTML document in the Driver CD Kit CD ROM for details on how to install the print driver 1 Press the side of the printer s power switch to turn off the power 2 Press the side...

Страница 31: ...Installation is complete Note Message Ready to print IP Address failed may be displayed on the control panel To erase this message set to STATIC in Network Port TCP IP Settings IPv4 Settings Get IP Ad...

Страница 32: ...able or higher for its better signal quality and counter noise characteristic 1000BASE T may not be able to fully deliver its performance despite the Gigabit Ethernet Board Kit installed for it depend...

Страница 33: ...work environment connected 10BASE T environment Off 100BASE T environment Lights in yellow 1000BASE T environment Lights in blue 5 Plug the other end of the network cable into a network device such as...

Страница 34: ...r 6 Plug the other end of the parallel cable into your computer 7 Press the side of the printer s main power switch to turn on the main power and then close the front cover 8 Press the side of the pri...

Страница 35: ...ations are unnecessary if you are using an English operating system 1 Press the Settings button to display the menu screen 2 Press the button until Language is displayed Note If you went past the desi...

Страница 36: ...nd configure the address Note For information on how to print the Configuration Report refer to 7 2 Printing Reports Lists P 326 The printer can also obtain its IP address by using a BOOTP or RARP ser...

Страница 37: ...utton until TCP IP Settings is displayed 6 Press the or OK button to select IP Mode is displayed 7 Press the button until IPv4 Settings is displayed 8 Press the or OK button to select Get IP Address i...

Страница 38: ...Back button and proceed to Step 18 If you want to finish configuring the settings proceed to Step 25 To Set the Subnet Mask Gateway Address 18 Press the button until Subnet Mask is displayed 19 Press...

Страница 39: ...network an IPv6 address is automatically set Print the Configuration Report to verify the IPv6 address Note When setting the fixed IPv6 address on the printer use CentreWare Internet Services to manu...

Страница 40: ...e or OK button to select LPD is displayed Note Parallel appears only when the Parallel Port Kit optional is installed 5 Press the button until the desired protocol is displayed Example IPP 6 Press the...

Страница 41: ...Ware Internet Services cannot be used when the printer is directly connected to the computer via parallel cable or USB cable Supported Operating Environments Supported Web Browsers CentreWare Internet...

Страница 42: ...refer the online help for the web browser Also if CentreWare Internet Services does not operate properly use the following steps to configure your web browser The procedure uses Internet Explorer 6 0...

Страница 43: ...is installed Properties Configuration Overview Displays a button to move between pages showing an overview of functions on the Properties tab Description Displays the printer s product name and serial...

Страница 44: ...y the printer s port number by printing Configuration Report The port number can be changed under the Properties tab Connectivity Protocols HTTP If you change the port number you must enter a colon an...

Страница 45: ...bout the settings on each screen refer to the online help for CentreWare Internet Services Click Help to display the Help window Important To display the online help for CentreWare Internet Services u...

Страница 46: ...crosoft Windows Server 2008 x64 Editions Microsoft Windows 7 x64 and Microsoft Windows Server 2008 R2 Read Important Information on the download page of our web site before using these drivers Uninsta...

Страница 47: ...e facing down 4 Power switch Switches the printer on off Press the side of the power switch on the printer to turn it on and press the side to turn it off Refer to 2 2 Switching On Off the Power P 57...

Страница 48: ...in Trays 1 to 4 Used for loading not only plain paper but also non standard paper such as envelope This tray can be extended in 2 levels if necessary 11 Left top tray side tray optional Prints are de...

Страница 49: ...nter from toppling over Move the printer to its installation site and then rotate this adjuster in clockwise direction until it touches a floor 6 RESET button Automatically switches the printer off wh...

Страница 50: ...ays switch the power off before switching the main power off Refer to 2 2 Switching On Off the Power P 57 4 Waste toner bottle R5 Contains a waste toner bottle to collect waste toner 5 Drum cartridges...

Страница 51: ...replacing the booklet staple cartridge 4 Booklet staple cartridge R2 R3 Contains staples Remove this cartridge when replacing or adding staples or removing jammed staples 5 Top cover Open this cover...

Страница 52: ...e tray attachment from the rear of the right middle tray 2 Install the tray attachment onto the middle of the right middle tray as shown in the diagram 13 US 2 3 Hole Punch Kit US standard or 2 4 Hole...

Страница 53: ...puts are delivered here 5 Staple cartridge R1 Contains staples 6 Right bottom tray Documents are delivered here when folding is selected for the Booklet Creation feature 7 Booklet drawer 4 Folds and s...

Страница 54: ...e when the display message changes to Ready to print It displays authenticated user ID for about 2 seconds when card authentication is used Nothing will be displayed during Energy Saver Mode even if t...

Страница 55: ...g down either button cycles through available settings at high speed To display a setting s default value press and at the same time 12 OK button Pressed to confirm the menu option selected on the men...

Страница 56: ...tion button while the mark is on the display shows detailed information Print Screen Shows the status of the printer The following screens are used to indicate when the printer is in stand by state or...

Страница 57: ...ard disk and the memory or cause a machine malfunction 1 Open the front cover 2 Press the side of the printer s main power switch to turn on the main power Note The Main Power lamp lights up on the co...

Страница 58: ...the display reads Please wait on the control panel Do not switch the power off during printing Doing so can cause paper jams Switching off the power may erase any print data that remains in the printe...

Страница 59: ...mory or cause a machine malfunction Switch the main power off first when unplugging the power cord Unplugging the power cord with the main power on may damage the hard disk and the memory or cause a m...

Страница 60: ...isk of electric shock If you have any problems with the circuit breaker contact our Customer Support Center or your dealer The following describes how to check the circuit breaker 1 Press the side of...

Страница 61: ...ote The depressed RESET button will stick out again 6 Press the RESET button back to the depressed position 7 Press the side of the printer s main power switch to turn off the main power Note The Main...

Страница 62: ...er before entering to the Energy Saver Modes the power distribution time gets longer as well It may cause an early replacement of the fusing unit of the printer For more information contact our Custom...

Страница 63: ...e Internet Services Refer to CentreWare Internet Services help for details Canceling a Print Job being Printed Received on the Printer Press the Cancel Job button on the control panel Note that the pa...

Страница 64: ...Ware Internet Services Checking the Job Status on Windows 1 Double click the printer icon on the task bar at the lower right corner of your monitor 2 On the displayed window check Status Checking the...

Страница 65: ...matically for each print job Note This function is not available when the printer is directly connected to the computer via parallel cable or USB cable In this case configure settings of the applicabl...

Страница 66: ...iver Proceed to step 9 If no printer information is imported to the print driver Search Printer appears Proceed to step 5 5 Select Specify Address 6 Click Next 7 Enter printer name or IP address in Pr...

Страница 67: ...print driver screen is displayed during print job 1 On the Start menu select Printers and Faxes Select Printer or Devices and Printers depending on OS and display the properties of the printer being...

Страница 68: ...Printers and Faxes Select Printer or Devices and Printers depending on OS and display the properties of the printer being used 2 Click the Configuration tab 3 Click Bi Directional Setup 4 Select Off i...

Страница 69: ...2 6 Importing Printer Information to a Print Driver 69 6 Click Installable Options 7 Set items necessary in Items 8 Click OK to close the dialog box 9 Click OK 6 7 8...

Страница 70: ...Print 2 Use the Select Printer box to select the printer and then display the Properties dialog box In Windows XP WordPad click Preferences to display the dialog box 3 Click the desired tab and confi...

Страница 71: ...for manual printing from the control panel Sample Set Allows printing of a proof copy of a multi set job After the proof copy is checked the remainder of the job can be printed from the control panel...

Страница 72: ...have any exposed adhesive when the flaps are closed have deckle edges or creased corners are wrinkled rough or are glued have adhesive flaps open Envelopes can be printed using the bypass tray only N...

Страница 73: ...varies depending on the application being used Refer to the documentation for the application 1 On the File menu select Print 2 Select the printer from the Select Printer list box and then click Pref...

Страница 74: ...ginal Document Size 6 If the output paper size is different from the file size choose Automatically Scale for Scale Options and then select output paper size for Output Paper Size 7 Click OK to close...

Страница 75: ...C5 click v beside the Paper to display the options and then select Mixed Sizes to display the Mixed Sizes dialog box Select Portrait and Landscape for envelopes for Image Rotation 180 Degrees and the...

Страница 76: ...prints can leave marks on the printing surface of long size paper Take care to avoid getting marks on the long size paper when loading it For information about loading other custom size paper refer to...

Страница 77: ...ading custom size paper in tray 1 2 3 or 4 use the control panel to configure the paper size settings For information on how to configure settings on the control panel refer to Setting the Paper Sizes...

Страница 78: ...78 3 Printing 2 Click the Device Settings tab 3 Click Custom Paper Size...

Страница 79: ...put or the and keys to specify the lengths Even if the Width setting is within the allowable range you cannot specify a value that is greater than the Length setting Conversely even if the Length sett...

Страница 80: ...ing used Refer to the documentation of the application 1 On the File menu select Print 2 Select the printer from the Select Printer list box and then click Preferences 3 The Paper Output tab appears C...

Страница 81: ...For information on how to load the settings into the print driver refer to 2 6 Importing Printer Information to a Print Driver P 65 The following procedures use Windows XP WordPad as an example Automa...

Страница 82: ...6 Set the Original Document Size 7 If the output paper size is different from the file size choose Automatically Scale for Scale Options and then select output paper size for Output Paper Size 8 Clic...

Страница 83: ...Whether or not to delete a Secure Print job after printing it can be specified when you print it from the control panel For more information refer to Control Panel Operations P 85 Secure Print output...

Страница 84: ...ic characters 7 For Job Name select Enter Job Name or Use Existing Name If you selected Enter Job Name name the document by entering up to 12 single byte characters into New Job Name If you selected U...

Страница 85: ...password appears 5 Enter your password using the and buttons Use the button to move the cursor Note Enter the password you specified for Secure Print Passcode on the Secure Print dialog box of the pri...

Страница 86: ...printer after printing press the button display Print Save and proceed to Step 9 of this procedure 9 Press the or OK button to select A screen to enter the number of copies appears 10 Enter the numbe...

Страница 87: ...delete Sample Set jobs that have accumulated on the printer without printing them refer to Control Panel Operations P 89 Printing Using Sample Set The following explains how to use Sample Set to print...

Страница 88: ...Name If you selected Enter Job Name name the document by entering up to 12 single byte characters into New Job Name If you selected Use Existing Name the document name will be the name of the document...

Страница 89: ...ton until the desired document name appears Note The document name is the name of up to 12 bytes specified for Job Name on the Sample Set dialog box of the print driver When more than one document is...

Страница 90: ...print start confirmation screen appears Note The initial number of copies is one less than the number preset in the print driver because one copy has already been printed 10 Press the OK button to pr...

Страница 91: ...f jobs which can be executed held at the same time is 100 jobs or less Important Do not turn off the printer power while a Delayed Print job is pending If the printer power is turned off before the sp...

Страница 92: ...time that the document will be printed is used for the name 7 Click OK 8 On the Paper Output tab click OK 9 Click Print on the Print dialog box to start printing Printing will start when the specifie...

Страница 93: ...ediately or to delete the job without printing appears Note If you want to delete the job without printing press the button to display Delete press the button and then press the OK button 6 To print t...

Страница 94: ...external authentication server Contact your dealers for information about using the Authentication feature If IC Card Reader is connected print job data for Secure Print and Sample Set already stored...

Страница 95: ...int Job The following explains how to delete print job stored in the printer in Private Charge Print 1 On the control panel press the Print Menu button 2 Press button until Del PteChgePrint appears 3...

Страница 96: ...d CentreWare Internet Services Mail Print etc can be saved The IC Card Reader may not be supplied with the printer in some regions Contact your dealers for details The Authentication feature includes...

Страница 97: ...ayed Press button until the desired user ID appears Note Select No User ID for user ID if printing documents with no Billing ID set 5 Select with or OK button The screen shown to the right appears if...

Страница 98: ...ument in the printer after printing press the button display Print Save and proceed to Step 10 10 Select with or OK button A screen to enter the number of copies appears 11 Enter the number of copies...

Страница 99: ...s transparent object is supported PDF output may take longer time due to its complexity of the rendering process It does not support the settings for embedding OpenType font in Adobe Acrobat 7 PDF1 6...

Страница 100: ...mand PDF files can be sent directly to the printer using commands such as lpr When printing with commands the following items are printed according to PDF settings on the control panel Refer to PDF P...

Страница 101: ...ty is a software by Fuji Xerox to send files from a computer directly to the printer for printing The ContentsBridge Utility is on the Driver CD Kit CD ROM To use ContentsBridge Utility refer to the m...

Страница 102: ...g on the control panel becomes invalid If you do not specify the number of copies using the lpr command the printer assumes 1 set The following is an example of printing DocuWorks files from a compute...

Страница 103: ...rd disk fails we recommend you to back up the hard disk data on your computer Note The following documents are available as an attachment TIFF PDF JPEG JFIF XML Paper Specification XPS XDW DocuWorks d...

Страница 104: ...Default value Selected Check box is selected Cleared No Check box is selected Item Setting Description Available Settings Receiving Protocol SMTP POP3 Description Administrator s E mail Address Speci...

Страница 105: ...rred DNS Server Alternate DNS Server 1 2 Specify the IPv4 IPv6 DNS server address IPv4 xxx xxx xxx xxx IPv6 IPv6 addr format Dynamic DNS Registration IPv4 IPv6 Select the Enabled check box to update t...

Страница 106: ...P address of the POP3 server for receiving e mail the IPv6 addr format or FQDN Fully Qualified Domain Name Specify the port number used by the POP3 server Alphanumeric characters plus period and hyphe...

Страница 107: ...ing E mail Specify the port number used by the SMTP server for sending e mail 1 65535 Port Number for receiving E mail Specify the port number used by the SMTP server for receiving e mail 1 65535 SMTP...

Страница 108: ...mail from a computer to the printer 1 Use your e mail software to create the e mail and attach any XML Paper Specification XPS file Connectivity Protocols SMTP Server Login Credentials for the Machin...

Страница 109: ...etting PDF File Attachment PDF when PDF Bridge is selected for PDF Process Mode on the control panel current PostScript setting for Memory Settings under CentreWare Internet Services Language Emulatio...

Страница 110: ...Services Precautions When Connecting the Printer with an Internet Provider If your Internet provider does not bill you at a flat rate or if you do not have full time access to the Internet you will be...

Страница 111: ...ong settings can cause paper jams Moisture such as water rain and humidity can cause print images to come off from paper For more information contact our Customer Support Center or your dealers Note R...

Страница 112: ...nded Supported Paper Specifications If using general paper commercially available paper make sure that it meets the following specifications To achieve the best print quality however we recommend you...

Страница 113: ...ll and reload it in the tray Professional A4 80 Plain A FKX H A4 80 Plain A Before printing fan the paper well and reload it in the tray FKX H A3 80 Plain A Before printing fan the paper well and relo...

Страница 114: ...oad it in the tray Astro Extra A4 80 Plain A UPM Office MULTIFUNCTION A4 70 Plain B UPM Office MULTIFUNCTION A3 70 Plain B Green Label A4 70 Plain B Premier A4 80 Plain A Performing 2 sided printing m...

Страница 115: ...lus A3 100 Heavy weight A Blue wrap 4Hole Punch A4 80 Plain A Reflex A4 80 Plain A Reflex A3 80 Plain A Paper One A4 80 Plain A Paper One A3 80 Plain A Double A A4 80 Plain A Double A A3 80 Plain A XE...

Страница 116: ...A3 80 Plain A N000 A4 80 Plain A Multi Purpose Red White Packaging A4 80 Plain A Multi Purpose Red White Packaging 8 5 11 80 Plain A Multi Purpose Red White Packaging 8 5 14 80 Plain A Symphony Pastel...

Страница 117: ...stack before loading transparencies 24Up A4 Unknown Labels Print one sheet at a time using Tray 5 Do not reuse the used label or partially peeled label 8Up A4 Unknown Labels Print one sheet at a time...

Страница 118: ...Tray 5 Colotech Plus Gloss A4 210 Heavyweight Gloss Print one sheet at a time using Tray 5 Colotech Plus Gloss A3 210 Heavyweight Gloss Print one sheet at a time using Tray 5 Colotech Plus Gloss A3 25...

Страница 119: ...loss Print one sheet at a time using Tray 5 Colotech Plus A4 200 Extra Heavyweight A Print one sheet at a time using Tray 5 When using Tray 5 load the paper with the center slightly curling upward Col...

Страница 120: ...ing guidelines when storing paper Paper Storage Environment Temperature 10 30 C Relative humidity 30 65 Paper Storage Guidelines Re wrap partly used packages of paper and store them in a location away...

Страница 121: ...r than paper on the bypass tray Do not push down the tray or apply an excessive force to the tray 1 Lower the bypass tray Extend the tray as required The extension tray can extend two levels 2 Load th...

Страница 122: ...Custom Paper Size when printing envelopes with keeping the flap open Configure the register paper size in Original Document Size as well as Output Paper Size and then select Portrait and landscape Fo...

Страница 123: ...posed adhesive when the flaps are closed have deckle edges or creased corners are wrinkled rough or are glued have adhesive when flaps are open In cases where you must print on envelopes with adhesive...

Страница 124: ...injuries 1 Pull out the tray until it stops 2 Squeezing 2 top and side guide clips slide them to the positions until they fit to the paper size 3 Load the paper with its print side facing up and its l...

Страница 125: ...t Do not load paper of different types into the tray Doing so can cause paper jams Do not load paper above the maximum fill line the position MAX It may cause paper jams Loading paper into Tray 4 1 Pu...

Страница 126: ...control panel also is required when using coarse paper coarse paper refers to paper having conspicuous transparent characters when held up against the light or some types of thick paper such as busine...

Страница 127: ...for Tray 6 1 Pull out Tray 6 until it stops 2 Remove any paper loaded in the tray 3 Open the end guide 1 and unscrew the screw 2 And then remove the guide from the tray 4 Insert the small protrusions...

Страница 128: ...orresponding to the paper size 2 And then press the lever down 3 Important Adjust the end guide correctly to the size of the paper If the end guide is not adjusted correctly the machine cannot feed th...

Страница 129: ...paper coarse paper refers to paper having conspicuous transparent characters when held up against the light or some types of thick paper such as business card paper Refer to Image Quality P 196 for in...

Страница 130: ...it Example 297 mm 13 After setting the Portrait Y Size set the Landscape X Size Press the or Back button to return to Portrait Y Size 14 Press the button Landscape X Size is displayed 15 Press the or...

Страница 131: ...ng is for plain paper for example try changing it to bond paper or recycled paper Note Refer to Supported Paper Type P 113 for information about setting values appropriate for each paper type 1 On the...

Страница 132: ...e following procedure to change the image quality process if problems with print and image quality often happen 1 On the control panel press the Settings button to display the menu screen 2 Press the...

Страница 133: ...color of the document to be printed This feature is called Auto Tray Selection If there are several appropriate trays for the document the printer applies Paper Type setting specified in the control...

Страница 134: ...names to paper of the same type and configure them as custom paper For example if blue plain paper is loaded in one tray you can name it Plain blue to differentiate it from other plain paper Refer to...

Страница 135: ...until PaperSizeSettings is displayed 13 Press the or OK button to select Tray 1 is displayed 14 Press the button until Tray 5 is displayed 15 Press the or OK button to select The current set value is...

Страница 136: ...ettings Language LanguageEmulation ESCP LanguageEmulation PCL LanguageEmulation KS LanguageEmulation KSSM ESCP extension menu items LanguageEmulation HPGL HPGL extension menu items PDF extension menu...

Страница 137: ...s Lists P 326 Meter Reading Displays the number of printed pages on the control panel Checking the Meter Reading by Output Color Meter P 330 Admin Menu Network Port Sets host interfaces and the settin...

Страница 138: ...nu screen is exited Resetting a Value to Its Default For items to change numeric values with the or button press the and buttons simultaneously to reset a value to its default The value changes to its...

Страница 139: ...n 4 Press the button until System Settings is displayed 5 Press the or OK button to select Move on to the next lower level 6 Press the button until Sleep Mode Timer is displayed 7 Press the or OK butt...

Страница 140: ...Services For the entire list of the common menus shown in a diagram refer to Control Panel Menu Tree P 452 LanguageEmulation The LanguageEmulation menu consists of four submenus ESCP HPGL PDF PCL KS...

Страница 141: ...PDF 2 Sided Printing PDF Print Mode PDF Password PDF Collated PDF Output Size PDF Layout PDF Output Color Setting Description Process Mode Sets the print processing mode for PDF files PDF Bridge defa...

Страница 142: ...Settings DefaultPaperSize Layout Sets the output layout Auto default Automatically selects the output size and calculates the zoom ratio to print the file as large as possible on the output paper 100...

Страница 143: ...ia Selection feature Auto Paper Select default Enables the DMS feature Select Paper Tray Disables the DMS feature and selects a paper tray Default Color Sets the default output color during PostScript...

Страница 144: ...from other print drivers for the printer Off PrintTicket processing is not performed Output is available by setting this option if PrintTicket error occurs when processing of XPS documents created for...

Страница 145: ...r to enable 2 sided printing Off default Disables 2 sided printing Long Edge Flip Prints on both sides of the paper so that the finished document opens like a book Short Edge Flip Prints on both sides...

Страница 146: ...size 2 Pages Up Prints two pages onto one sheet of paper When this is selected the output size will be A4 or 8 5 x 11 depending on the option selected under Admin Menu Printer Settings DefaultPaperSiz...

Страница 147: ...al Setting Description Port Status Sets whether to enable or disable the parallel port at printer start up Enabled Disabled default Important When there is not enough memory either disable unused port...

Страница 148: ...with the Normal protocol TBCP Select this when the communication protocol is both in the ASCII and binary formats and switches between the two using control codes Note Select an appropriate option ac...

Страница 149: ...ssing data language emulation Auto default After receiving data from a computer the printer automatically detects its language emulation and processes the data accordingly See 1 on P 214 PS ESCP HP GL...

Страница 150: ...y by LPD Specify the value from 1 to 10 5 default Print Queue Sets the print data queue Data Process Order default The printer prints print data in the order that it is processed Job Submit Order The...

Страница 151: ...guage HexDump Allows you to view data received from a computer by printing it in ASCII code hexadecimal format See 3 on P 214 PJL Sets whether to enable or disable PJL commands that are sent from the...

Страница 152: ...hod of processing data language emulation Auto default After receiving data from a computer the printer automatically detects its language emulation and processes the data accordingly See 1 on P 214 P...

Страница 153: ...s language emulation and processes the data accordingly See 1 on P 214 PS ESCP HP GL 2 PCL TIFF KS KSSM KS5895 After receiving data from a computer the printer processes the data with the selected pri...

Страница 154: ...er to enable or disable the TBCP filter during processing of PostScript data Disabled default Enabled Network Port EtherTalk Compat EtherTalk Compat Port Status EtherTalk Compat PJL Setting Descriptio...

Страница 155: ...ports or change the memory allocation under Allocate Memory Note To use the Multicast DNS feature set Enabled To use Bonjour to print on the detector printer also enable the LPD port Network Port USB...

Страница 156: ...not been received Set the time with the range 5 to 1275 seconds in 5 second increments See 2 on P 214 Jobs are judged as finished when the next data is not received within the time set here after the...

Страница 157: ...See 1 on P 214 PS ESCP HP GL 2 PCL TIFF KS KSSM KS5895 After receiving data from a computer the printer processes the data with the selected print language HexDump Allows you to view data received fro...

Страница 158: ...nused ports or change the memory allocation under Allocate Memory Port Number Sets the port number from 1 to 65535 See 2 on P 214 80 default Note Set only unique port numbers Note however that Interne...

Страница 159: ...Setting Description Port Status Sets whether to enable or disable the SOAP port at printer start up Enabled default Disabled Important If the printer runs out of memory when the port is enabled the p...

Страница 160: ...ommunications Configure an appropriate certificate on the printer Network Port SNMP SNMP Port Status SNMP TransportProtocol Setting Description Port Status Sets whether to enable or disable the SNMP p...

Страница 161: ...IP Address Sets the method of obtaining the information IP address subnet mask or gateway address required to use the TCP IP protocol DHCP Autonet default Automatically obtains information from a DHC...

Страница 162: ...s only when it must be clearly indicated This setting is not required in environments where the gateway address is automatically set Network Port DNS Server DNS Server Get IP from DHCP DNS Server Serv...

Страница 163: ...wser on your computer Enabled default Disabled Important If the printer runs out of memory when the port is enabled the port is sometimes automatically disabled If this happens either disable unused p...

Страница 164: ...ate EP Proxy Server HTTPS Login Name EP Proxy Server HTTPS Password EP Proxy Server HTTP Server Name EP Proxy Server HTTP Port Number EP Proxy Server HTTP Authenticate EP Proxy Server HTTP Login Name...

Страница 165: ...Get DHCP Address Specifies whether or not to automatically acquire the WINS server IP address required for using WINS Windows Internet Name Service from the DHCP server On Off default Note Consult yo...

Страница 166: ...Mbps Half Dup Uses 100 Mbps half duplex 10 Mbps Full Dup Uses 10 Mbps full duplex 10 Mbps Half Dup Uses 10 Mbps half duplex 1000 Mbps Sets 1000 Mbps Note 1000 Mbps appears when Gigabit Ethernet Board...

Страница 167: ...reception using IP addresses Off default On IP Address Registers IP addresses allowed through the filter for printing Up to ten IP addresses can be registered Set the filter address for registered IP...

Страница 168: ...ize the time of the printer s machine clock with that of the NTP server Off default On Connect Interval Sets the interval used for connecting to the NTP server Specify the value from 1 to 500 hours in...

Страница 169: ...ult Enabled Note This item can be used only when the OS is Windows Vista Windows 7 Windows Server 2008 R2 For information on how to set the menu items see Configuring IPSec for Encryption P 361 Networ...

Страница 170: ...Description Panel Lock Sets whether or not to set a passcode to control access to the menus Off default On Note When On is set the screen for setting the passcode is displayed Enter a 12 digit number...

Страница 171: ...o Clear Setting Description Auto Clear Sets whether or not to automatically clear the menu display within 1 to 30 minutes in 1 minute increments See 2 on P 214 Off default 1 Minutes Later to 30 Minute...

Страница 172: ...r enters the Low Power mode Specify the value from 1 to 240 minutes in 1 minute increments See 2 on P 214 1 Minutes Later default System Settings Sleep Mode Setting Description Sleep Mode Consumes les...

Страница 173: ...history System Settings Set Jobs View Set Jobs View Active Jobs Set Jobs View Completed Jobs Completed Jobs Viewing Options Completed Jobs Access To Completed Jobs Hide Job Detail Setting Description...

Страница 174: ...Settings Banner Settings Banner Settings Banner Sheet Banner Settings Banner Tray Banner Settings Driver Settings Setting Description Banner Sheet Sets whether or not to insert banner sheets Off defau...

Страница 175: ...not to permit printing of Secure Print jobs from the control panel Enabled default Permits users to print Secure Print jobs from the control panel Disabled Does not permit users to print Secure Print...

Страница 176: ...Off Daylight Savings Set by Date Daylight Savings Set by Month Week Setting Description Set Date Sets year month day to match with the format set in Date Format Set Time Sets hours minutes to match w...

Страница 177: ...r configuring the same setting for Start date and End date System Settings Print Speed Setting Description Print Speed Sets whether to set the initial print speed to Color or Black White Color default...

Страница 178: ...hed a message indicating the drum cartridge needs to be replaced soon appears Select whether or not to cancel printing when the drum cartridge has reached its replacement cycle Select whether or not t...

Страница 179: ...s Sets the unit of measure for lengths displayed or entered on the control panel Millimeter mm default Inches System Settings Data Encryption Data Encryption Encryption Data Encryption Encryption Key...

Страница 180: ...ored jobs such as Secure Print and Sample Set documents cannot be used with the Auto Job Promote feature Resume Error Job is not available if Enabled is set System Settings Resume Error Job Setting De...

Страница 181: ...count administration When an Local Accounting is set you can print the Auditron Report Print Jobs instead of the Meter Report Print Jobs Disabled default AuthenticationSrvr Performs account administra...

Страница 182: ...PJLReceiveCommand Charge Print PJL OutputCommand Charge Print Receive Control Charge Print Process Job Login Process Job Login Job Login Success Process Job Login Job Login Failure Process Job Login...

Страница 183: ...ttings P 170 are not recorded Save Remote Account Sets whether or not to save remote accounts Disabled default Enabled Note This item appears when HDD Extension Kit optional is installed and Remote Ac...

Страница 184: ...s installed The IC Card Reader may not be supplied with the printer in some regions Contact your dealer for details When PrivateChargePrint and Save inChargePrint are set secure print sample set or de...

Страница 185: ...cuments are deleted Keep for Days Sets the storage period within 1 to 14 days in 1 day increments 7 Days default Delete at Time Sets the time that documents are deleted 3 00AM or 3 00 default Note Set...

Страница 186: ...enter Tray Installed default Not Installed System Settings Software Options Software Options FeatureEnhance Kit FeatureEnhance Kit Enable Kit Setting Description FeatureEnhance Kit Enables the Feature...

Страница 187: ...ming ImageLog Transfer Assurance Level Setting Description Image Log Control Set whether or not to use the image log control feature Normally the printer is used with this feature set to Off Consult y...

Страница 188: ...iming Sets the timing that image logs are transferred Set Disabled or Enabled for each of the transfer timings Default is all Enabled At end of the job At power On End of selections When max reached A...

Страница 189: ...tting Description EP Diag Repair Sends the Diagnostic or Repair Request to the Remote Center when EP system using the Internet has been used Note EP system may not be available in some regions Contact...

Страница 190: ...ains paper that is one size larger than the size requested and prints documents at 100 zoom ratio Use Closest Size Switches to another paper tray that contains paper of size closest to the size reques...

Страница 191: ...Plain S2 Heavyweight Heavyweight A Heavyweight B Heavyweight C Heavyweight S HW S2 HW A S2 HW B S2 HW C S2 HW S S2 Extra Heavyweight X Heavyweight A X Heavyweight B X Heavyweight C X Heavyweight D X H...

Страница 192: ...is optional The display only shows the tray that is actually installed on the printer 1 Custom 1 to 5 Custom 5 display the names specified under Custom Paper Name Printer Settings Paper Color Paper C...

Страница 193: ...PaperTypePriority Recycled PaperTypePriority Heavyweight PaperTypePriority Heavyweight A PaperTypePriority Heavyweight B PaperTypePriority Heavyweight C PaperTypePriority Heavyweight S PaperTypePrior...

Страница 194: ...ngs PaperTrayPriority PaperTrayPriority Tray 1 PaperTrayPriority Tray 2 PaperTrayPriority Tray 3 PaperTrayPriority Tray 4 PaperTrayPriority Tray 5 PaperTrayPriority Tray 6 Setting Description Tray 1 t...

Страница 195: ...n how to set custom paper sizes refer to Setting the Paper Sizes of Trays P 129 Tray 5 is not displayed if No AutoSwitchOff is specified in Paper Tray Priority Tray 5 Tray 5 Sets the paper size of the...

Страница 196: ...ity Bond Image Quality Plain S2 Image Quality Heavyweight Image Quality HW S2 Image Quality Extra Heavyweight Image Quality X HW S2 Image Quality Letterhead Image Quality Pre Printed Image Quality Oth...

Страница 197: ...coarse paper E G Not used S 5 Custom 5 defaults Quality ideal for gloss paper is 105 gsm or less such as JD coated 104 7 gsm J coated 95 0 gsm Note Coarse paper refers to paper having conspicuous tra...

Страница 198: ...layed under PaperTypePriority Paper Type and Image Quality Up to 8 alphanumeric characters can be used for a name See No 1 2 3 and 4 of 2 and 4 on P 214 Printer Settings Custom Color Name Custom Color...

Страница 199: ...nter tray and shifted slightly to separate it from the previous job This sets the offset function for the center tray Offset per Set Default Offset stacking per set Offset per Job Offset stacking per...

Страница 200: ...ightly to separate it from the previous job This sets the offset function for the center tray Offset per Set Default Offset stacking per set Offset per Job Offset stacking per job print job Off No off...

Страница 201: ...odd numbered document during 2 side printing Off default The side of the final page is printed in the same way as 1 sided printing and paper is not fed again through the Duplex unit as with 2 sided p...

Страница 202: ...ns of sizes that can be automatically detected Note Some size detection modes cannot be used depending on the model of printer you are using For information of paper sizes supported by this printer re...

Страница 203: ...SRA3 X O X X X X O X X X 16 K Taiwan main land China X X X X X X X X X X 16 K Taiwan main land China X X X X X O O X X X 8 K Taiwan main land China X X X X X O X X X X Postcard X X X X X X X X X O Pos...

Страница 204: ...X A3 O O X X X B6 X X X X X B5 O O X X X B5 X X X X X B4 O O X X X 5 5x8 5 O O X X X 5 5x8 5 X X X X O 7 25x10 5 O O O O X 8x10 X X X X X 8x10 X X X X X 8 5x11 O O X X O 8 5x11 O O O O O 215x315mm X...

Страница 205: ...envelopes X X X X O Commercial 10 X X X X O Printer Settings OCR Font Glyphs Setting Description OCR Font Glyphs It allows you to switch Font Glyph Code 0x5c of OCR B in ESC P or PCL emulation mode Ba...

Страница 206: ...gh resolution documents set so that a large buffer size is allocated as print page buffer The actual size of the allocated print buffer can be confirmed by printing the Configuration Report You can al...

Страница 207: ...ing buffer exclusively for LPD from 1024 to 2048 KB in 32 KB increments The default is 1024K When printing on the SMB interface set the memory size of the receiving buffer exclusively for SMB from 64...

Страница 208: ...ibrationChart Prints a calibration chart to check for deviation of the Yellow Magenta and Cyan gradations and reads the adjustment values Enter Value Sets the adjustment values Adjustment values can b...

Страница 209: ...1 Tray 4 PrintChart 2Sided Adjust Paper Regi Tray 5 Adjust Paper Regi Tray 6 Setting Description Adjust Side 1 Adjusts the print position of Side 1 in vertical direction Lead Regi and horizontal direc...

Страница 210: ...Offset Heavyweight Voltage Offset Heavyweight Long Voltage Offset Extra HW Voltage Offset Extra HW Long Voltage Offset Gloss Voltage Offset HeavyweightGloss Voltage Offset Postcard Setting Descriptio...

Страница 211: ...ncrements in between 5 0 mm to 15 0 mm The default value is 10 0 mm B4 or larger Selects the tray settings when using the paper of A3 or 11x17 size You can also adjust the punch position with 0 5mm in...

Страница 212: ...nters Init Delete Data DeleteForm Macro Init Delete Data Delete Font Init Delete Data Secure Print Jobs 1 Setting Description NVM Initializes the NV memory All settings return to the defaults when NV...

Страница 213: ...er Report Print Jobs Data P 332 Job Counters Initializes the job counter and the accumulated job time counter Counter readings return to 0 when job counters are initialized DeleteForm Macro Deletes th...

Страница 214: ...coded characters Characters that are not defined in JIS X0201 are printed as UD 4 Character List 5 When Enabled is set and the print mode is set to HexDump PJL commands are also output by HexDump Whe...

Страница 215: ...utomatically from the point where printing stopped due to the paper jam Alpha numerics indicated in the figure Position of Paper Jams on the Message Paper Jam Solution Referenc e Pages 1 2 3 4 Tray 1...

Страница 216: ...erior components of the printer Doing so can cause defective printing Paper Jam in Tray 5 The following describes how to clear paper jams occurring in Tray 5 1 Inspect the area of the paper tray where...

Страница 217: ...aper tray indicated on the display as the location of the paper jam If multiple trays are indicated make sure the trays from bottom to top Important Do not pull out 2 trays or more at the same time Ot...

Страница 218: ...remains inside the machine 3 Push the tray in gently until it stops Paper Jam in Tray 4 1 Pull out Tray 4 gently 2 Remove the jammed paper Note If the paper is torn make sure no piece of paper remains...

Страница 219: ...6 1 Clearing Paper Jams 219 4 Push the tray in gently until it stops...

Страница 220: ...ng the handle on the top left side of Tray 6 2 Remove the jammed paper Note If the paper is torn make sure no pieces of paper remain inside Tray 6 3 Gently put Tray 6 back into position Important Slid...

Страница 221: ...te If the paper is torn make sure no pieces of paper remain inside Tray 6 4 Close the top cover 5 Gently put Tray 6 back into position Important Slide the tray back slowly If you do it with too much f...

Страница 222: ...the jammed paper Note If the paper is torn make sure no pieces of paper remain inside Tray 6 3 Push Tray 6 in gently until it stops Important Slide the tray back slowly If you do it with too much forc...

Страница 223: ...can reduce print quality There may be some toner on the transfer roller However this does not affect image quality 1 Remove any paper from the Left top tray side tray when the tray is installed 2 Low...

Страница 224: ...224 6 Troubleshooting If paper is jammed in the Fusing Unit Remove the paper by pulling it straight upwards 4 Close the upper left cover A gently...

Страница 225: ...he bottom left cover C 1 Gently open the bottom left cover C while pulling the release lever 2 Remove the jammed paper Note If the paper is torn make sure no piece of paper remains inside the machine...

Страница 226: ...or oil from your hands on the belt can reduce print quality There may be some toner on the transfer roller However this does not affect image quality 1 Remove any paper from the Left top tray side tra...

Страница 227: ...6 1 Clearing Paper Jams 227 5 Gently close the top left cover D 6 Return the upper left cover A to the original position...

Страница 228: ...ccurring in the duplex module cover B 1 Lower the tray 5 1 Next while raising the release lever 2 gently open the duplex module cover B 3 2 Remove the jammed paper Note If the paper is torn make sure...

Страница 229: ...rring in the installed Finisher B1 optional Paper Jams under the Finisher Top Cover 1 Push up the lever on the finisher top cover 2 The finisher top cover opens 3 Remove the jammed paper Note If the p...

Страница 230: ...ams in the Finisher Transport Cover F 1 Open the finisher transport cover F 2 Remove the jammed paper Note If the paper is torn make sure no piece of paper remains inside the machine 3 Gently close th...

Страница 231: ...Finisher C1 with Booklet Maker optional Paper Jams in the Center Tray 1 If you can see the edge of the jammed paper on the center tray gently pull the paper to the right 2 Open the finisher transport...

Страница 232: ...ake sure no piece of paper remains inside the machine 4 Close the finisher transport cover F Paper Jams at 2a in the Finisher 1 If you can see the edge of the jammed paper on the right top tray gently...

Страница 233: ...aper to remove Note If the paper is torn make sure no piece of paper remains inside the machine 6 Return the handle 2a to the original position 7 Close the front door Note If the front door is not com...

Страница 234: ...o eject the jammed paper 4 Remove the jammed paper Note If the paper is torn make sure no piece of paper remains inside the machine 5 Return the handle 2b to the original position 6 Close the front do...

Страница 235: ...n the handle 3 3 Remove the jammed paper Note If the paper is torn make sure no piece of paper remains inside the machine 4 Return the handle 3 to the original position 5 Close the front door Note If...

Страница 236: ...Gently pull the jammed paper to the right to remove Note If the paper is torn make sure no piece of paper remains inside the machine 3 Return the finisher exit cover H to the original position Paper...

Страница 237: ...e sure no piece of paper remains inside the machine 4 Return the booklet drawer 4 to the original position 5 Close the front door Note If the front door is not completely closed a message will appear...

Страница 238: ...awer 4 until it stops 5 Remove all the jammed paper from the upper left side and inside of the drawer Note If the paper is torn make sure no piece of paper remains inside the machine 6 Return the book...

Страница 239: ...and the machine remains paused Paper Jams in the Right Bottom Tray 1 Open the front door 2 Turn the knob 4a clockwise to eject the paper to the right bottom tray 3 Remove the jammed paper 4 Close the...

Страница 240: ...s Also when printouts are not stapled or staples are bent follow the procedures to clear the staple jams Contact our Customer Support Center if the problem persists after you have tried the following...

Страница 241: ...ne is not operating and open the front door 2 Grasp the handle R1 as shown in the illustration to pull out the staple cartridge to the right towards you 3 Move up the staple cartridge and then take it...

Страница 242: ...s 1 and then return the metal part pulled up in step 5 to the original position 2 Important Be careful in removing jammed staples 7 Push the staple cartridge into the machine until it clicks into plac...

Страница 243: ...on both sides of the booklet staple cartridge lift the booklet staple cartridge out of the unit 3 After you take out the booklet staple cartridge check inside of the Booklet Maker Unit for any remain...

Страница 244: ...tridge R1 1 Make sure that the machine is not operating and open the front door 2 Grasp the handle R1 as shown in the illustration to pull out the staple cartridge to the right towards you 3 Take out...

Страница 245: ...es 1 and then return the metal part pulled up in step 5 to the original position 2 Important Be careful in removing jammed staples 7 Push the staple cartridge into the machine until it clicks into pla...

Страница 246: ...the Finisher C1 with Booklet Maker optional 1 Make sure that the machine is not operating and open the front door 2 While pressing the handle to the right take the staple cartridge unit out of the ma...

Страница 247: ...s return the cartridge to the original position and then gently push the cartridge in until it clicks into place 8 Repeat steps from 3 to 7 for the cartridge at the back of the unit 9 Return the unit...

Страница 248: ...th the printer Contact our Customer Support Center or your dealer The printer makes odd noise Is the printer installed on a level surface Install the printer on a level and sturdy surface Are the pape...

Страница 249: ...Settings button to exit the menu screen Are protocols set correctly Confirm that the port being used is enabled Also use CentreWare Internet Services to confirm that the protocol settings are configur...

Страница 250: ...ocate Memory on the control panel to reduce the memory capacity of unused items which increases the capacity of the print page buffer Increasing the buffer capacity can speed up printing Adjust buffer...

Страница 251: ...change the print density settings under Image Settings or Color Balance and then try printing again Refer to Online help for the print driver Change the Paper Type setting and try printing again For e...

Страница 252: ...fusing unit may need replacement Contact our Customer Support Center or your dealer The whole page is printed black A drum cartridge is damaged or has deteriorated Depending on its condition the drum...

Страница 253: ...A developing unit is damaged or has deteriorated Depending on its condition a developing unit may need replacement Contact our Customer Support Center or your dealer White patches appear on output Ton...

Страница 254: ...tting to Color Refer to Online help for the print driver Print density or color reproduction has deteriorated Print the Calibration Chart from the printer compare it with the Color Sample that came wi...

Страница 255: ...ure that the machine is not operating and open the front cover 2 Rotate the release lever of the drum cartridge cover counterclockwise 3 Lower the cover Note You can now see the drum cartridge 4 Slowl...

Страница 256: ...aning bars back and fourth for two or three times respectively 6 Return the cover to the original position Note Push the cover until it clicks into place 7 Rotate the release lever clockwise to lock t...

Страница 257: ...per in a paper tray Adding paper to a paper tray that still contains paper can cause these types of problems Fan the paper loaded in the tray and reload it into the tray Add paper to the tray only whe...

Страница 258: ...nto the Bypass Tray Refer to Loading Paper in the Bypass Tray P 121 Can print in Black Insert Toner X X C M or Y Only monochrome print is available Set the toner cartridge X to be shown for color prin...

Страница 259: ...position of the paper guides Note Pressing the Information button will display detailed information on the control panel Refer to Loading paper into Trays 1 through 4 P 124 Loading Paper into Tray 6...

Страница 260: ...ton will display detailed information on the control panel Refer to Replacing Drum Cartridges P 297 Insert Drum Cartridge X X R1 R2 R3 or R4 Drum cartridge X is not installed Install the indicated dru...

Страница 261: ...F B1 P 126 Lower Finisher Exit Cover H The Lower Finisher Exit Cover H is open Close the cover tightly Lower Finisher Transport Cover F The Lower Finisher Transport Cover F is open Close the cover F t...

Страница 262: ...the printer Open the bottom left cover C and remove the jammed paper If it is unable to remove it pull out the trays 1 to 4 and gently remove the paper Open and close the upper left cover A several ti...

Страница 263: ...er Front Door Lower 3 and remove paper A paper jam occurred in the finisher Open the Finisher Front Door pull the lever 3 downwards and remove the jammed paper Refer to 6 1 Clearing Paper Jams P 215 P...

Страница 264: ...15 Paper Jam Open Finisher Top Cover and remove paper at the rear A paper jam occurred in the finisher Open the Finisher Top Cover and remove the jammed paper Refer to 6 1 Clearing Paper Jams P 215 Pa...

Страница 265: ...Check Paper Guides The specified paper size is unknown Check the tray s Paper Guides Press OK to print Or use Cancel Job After changing the paper size or type for the tray press the OK button to rest...

Страница 266: ...control panel Ready to print There may be something wrong with the printer Switch the power off wait for the display to go out and switch the power back on again If the same error code reappears chec...

Страница 267: ...Close to replace the indicated Drum Cartridge X The rest of printable pages are approximately 2 300 pages 1 until the drum will run out and the machine will stop Prepare the new drum cartridge X duri...

Страница 268: ...of toner Replace the toner cartridge with the new one when printing in color Note Pressing the Information button will display detailed information on the control panel Refer to Replacing Toner Cartr...

Страница 269: ...installed Drum Cartridge X is not supported by this machine Install the appropriate drum cartridge for this machine Note Pressing the Information button will display detailed information on the contro...

Страница 270: ...ed An additional system memory is required to use this function 016 212 016 215 016 217 016 219 016 242 An error occurred in the software Switch off the machine power make sure that the display is bla...

Страница 271: ...obstructing image log transfer to the image log server Perform of the two following steps Check that At power On or End of selections is set to Enabled under Transfer Timing and transfer all non tran...

Страница 272: ...P 187 016 514 An error occurred during processing of an XPS XML Paper Specification document Print from XPS viewer using some other print driver other than this printer s driver 016 515 There was ins...

Страница 273: ...gent is installed Also if the Windows Time Service of the computer on which the ApeosWare Authentication Management or ApeosWare Authentication Agent is installed has stopped start the service Refer t...

Страница 274: ...ting is over register this machine to the ApeosWare Authentication Management or ApeosWare Authentication Agent again 016 562 Multiple entries containing the same smart card information were found in...

Страница 275: ...lowable number of security sample set users has been exceeded Delete unneeded documents accumulated on the printer and Secure Print registered users before trying to print again 016 707 Sample Set pri...

Страница 276: ...isable Skip Blank Pages on the Advanced tab on the print driver or add text to the file if the file is blank 016 728 The TIFF file included an unsupported tag Check the print data 016 729 Printing cou...

Страница 277: ...PDF file and then print by selecting the Print command on the File menu 016 752 A PDF file could not be printed using PDF Bridge because of insufficient memory If ContentsBridge Utility is being used...

Страница 278: ...was specified for the addressee and the SMTP server returned response codes 550 551 or 553 Check the address of the addressee and try sending again If an error occurs again contact your system admini...

Страница 279: ...however in this case the SMTP server s validity is no longer guaranteed 017 717 SSL authentication failure for SMTP server The server certificate is already expired Change the valid SSL certificate f...

Страница 280: ...rectory path does not exist on the NetWare server Check the following The NetWare server is accessible by PC The directory path name Run DSREPAIR at the server console on the NetWare server 018 582 Th...

Страница 281: ...ine is correct The printer s settings for the subnet mask DNS server address and default gateway are correct If the error still is not resolved contact our Customer Support Center 021 503 The address...

Страница 282: ...nicating with the EP server Switch off the machine power make sure that the display is blank and then switch on the machine power If the error still is not resolved contact our Customer Support Center...

Страница 283: ...space Perform one of the following steps In the Print setting dialog box of ContentsBridge Utility change the Print Mode setting as follows When High Quality is selected change the value to Standard o...

Страница 284: ...lication of addresses 027 447 IPv6 addresses are duplicated Change the printer s IPv6 Link Local Address or the network device IPv6 address to eliminate the IP address duplication 027 452 IP address a...

Страница 285: ...nting was performed using PostScript fonts in place of TrueType fonts inside the document Because of this unintended new line operations and hyphens may cause unexpected printing results If this happe...

Страница 286: ...ting Using E mail Mail Print P 103 124 701 The output destination was changed because of the malfunction of the specified output tray left top tray Contact our Customer Support Center You can use any...

Страница 287: ...communication is enabled start the address with https instead of http Also if you changed the SSL TLS port number enter a colon before the port number Example https printer1 example com 80 Is your web...

Страница 288: ...mitted e mail domain Are the SMTP server and POP server running normally Contact your network administrator A PDF file attached with Mail Print does not print Printing may not be possible when memory...

Страница 289: ...k local address Add a scope ID to the link local address When using Internet Explorer 7 with Windows Vista Windows 7 or Windows Server 2008 R2 to specify fe80 203 baff fe48 9010 for access for example...

Страница 290: ...er and specify the destination URL using an FQDN In an IPv6 network environment that does not have a DNS server authentication fails when the computer name is specified in the SMB authentication SMB s...

Страница 291: ...n the Non Genuine mode Also remaining toner cartridge and drum cartridge levels are not displayed Note To disable the Non Genuine mode select Off in Step 4 below 1 On the control panel press the and O...

Страница 292: ...CT201664 Approx 26 000 pages Toner Cartridge Cyan CT201665 Approx 25 000 pages Toner Cartridge Magenta CT201666 Approx 25 000 pages Toner Cartridge Yellow CT201667 Approx 25 000 pages Toner Cartridge...

Страница 293: ...drink water and consult a physician immediately When replacing the drum cartridges and toner cartridges be careful not to spill the toner In case of any toner spills avoid contact with clothes skin ey...

Страница 294: ...ut and the machine will stop Replace Toner X 2 Or use Cancel Job The displayed toner cartridge is empty Replace the toner cartridge with a new one when printing in color Replace Toner Cartridge X 1 3...

Страница 295: ...K indicates Yellow Magenta Cyan and Black respectively 3 Pull out the toner cartridge slowly and slide it out Important Slide out the toner cartridge gently Otherwise toner may spill from the cartridg...

Страница 296: ...296 7 Maintenance 6 Close the front cover Note If the front cover is not completely closed a message will appear and the machine remain paused...

Страница 297: ...is at the end of its life The printer will stop and become unable to print Replace the drum cartridge indicated in the message using the procedure under Replacement Procedure P 297 Ready Replace Drum...

Страница 298: ...d the bottom of the drum cartridge as shown in the illustration and pull it out from the machine Important Be careful not to touch the toner attached to the cartridge 6 Take the new drum cartridge out...

Страница 299: ...of the cartridge and slide it toward the machine while holding the protective cover with one hand 10 Slide the tab until it stops 11 Carefully remove the protective cover 12 Push the drum cartridge st...

Страница 300: ...300 7 Maintenance 14 Rotate the release lever clockwise to lock the cover 15 Close the front cover Note If the front cover is not completely closed a message will appear and the machine remain paused...

Страница 301: ...inthead with the supplied cleaning bar to prevent inconsistencies in density or color in prints 1 Make sure that the machine is not operating and open the front cover 2 Rotate the release lever of the...

Страница 302: ...s R1 R2 R3 or R4 Note Slide out the cleaning bars until you see zzz Important Do not remove the cleaning bars from the housing 5 Slowly slide the cleaning bars back into place Note Clean the four LED...

Страница 303: ...a box 10 While holding the left side of the waste toner bottle push the bottle in until it clicks 11 Close the front cover Note If the front cover is not completely closed a message will appear and t...

Страница 304: ...ance 13 Carefully place the old waste toner bottle into the empty box with both hands Important If you have a used waste toner bottle no longer needed contact your local Fuji Xerox representative for...

Страница 305: ...inisher B1 When the message Staple Cartridge R1 is displayed on the display follow the instruction below to replace the staple cartridge with a new one 1 Make sure that the machine is not operating an...

Страница 306: ...s not completely closed a message will appear and the machine remain paused Replacement Procedure for Booklet Maker Unit for Finisher B1 When the message Staple Cartridge R2 R3 is displayed on the dis...

Страница 307: ...d Replacement Procedure for Finisher C1 with Booklet Maker When the message Staple Cartridge R1 is displayed on the display follow the instruction below to replace the staple cartridge with a new one...

Страница 308: ...the staple cartridge into the finisher until it clicks into place 7 Close the front door Note If the front door is not completely closed a message will appear and the machine remain paused Replacemen...

Страница 309: ...of the finisher 2 3 Hold the tabs on both sides of the staple cartridge 4 Rotate the booklet staple cartridge at an angle 5 Lift the booklet staple cartridge out of the unit 6 With holding the tabs re...

Страница 310: ...310 7 Maintenance 7 Return the unit to the original position 8 Close the front door Note If the front door is not completely closed a message will appear and the machine remain paused...

Страница 311: ...scard all paper chads when emptying the hole punch waste container Not doing so will cause the container to fill up before the message telling you to empty the container appears again and this can cau...

Страница 312: ...nsport door G is not completely closed a message will appear and the machine remain paused Disposal procedure for Finisher C1 with Booklet Maker 1 Make sure that the machine is not operating and open...

Страница 313: ...7 1 Replacing Consumables 313 5 Close the front door Note If the front door is not completely closed a message will appear and the machine remain paused...

Страница 314: ...d then while lifting up the release lever 2 gently open the upper left cover A 3 4 Loosen the screws on both sides of the fusing unit completely Message Action Ready Replace Fuser Assembly soon The fu...

Страница 315: ...the grips on both sides and then place the fusing unit onto the machine Important Hold the fusing unit with both hands so that you do not drop it 8 While holding the fusing unit with one hand tighten...

Страница 316: ...e time This displays the Consumables Menu 2 Press the until Reset Counter appears 3 Press either the or OK button to select so Fuser Assembly is displayed 4 Press either the or OK button to select 5 P...

Страница 317: ...the IBT belt cleaner with both hands and lower it to remove it Important When pulling out the IBT belt cleaner grasp it with both hands so you do not drop it Never stand on end or incline the IBT bel...

Страница 318: ...the film surface of the IBT belt cleaner when installing it Insert the IBT belt cleaner as far as it will go 6 While pressing the knob tighten it to secure the IBT belt cleaner in place 7 Rotate the...

Страница 319: ...Filter 1 Switch off the power Important While the printer is in the Energy Saver mode press the Energy Saver button to exit the mode and then switch off the power Refer to For information on how to s...

Страница 320: ...enance 3 Take out the Suction Filter R12 4 Install a new Suction Filter Important Insert the Suction Filter as far as it will go 5 Return the upper left cover A to the original position 6 Switch on th...

Страница 321: ...Menu 2 Press the until Reset Counter is displayed 3 Press either the or OK button to select so Fuser Assembly is displayed 4 Press the so Trans BeltCleaner is displayed 5 Press either the or OK butto...

Страница 322: ...Energy Saver mode press the Energy Saver button to exit the mode and then switch off the power Refer to For information on how to switch off the power and the main power refer to 2 2 Switching On Off...

Страница 323: ...per Feed Rolls 1 Switch off the power Important While the printer is in the Energy Saver mode press the Energy Saver button to exit the mode and then switch off the power Refer to For information on h...

Страница 324: ...ol panel operations to reset their respective counters When replacing the 200K Maintenance Kit be sure to reset the counter on the control panel 1 On the control panel press the and OK buttons at the...

Страница 325: ...cing Consumables 325 6 Press the OK button 7 This resets the counter for the Paper Feed Rolls 8 Press the Settings button to close the menu Resetting Fuser 2ndBiasTrans Roll Resetcompletedfor 2ndBiasT...

Страница 326: ...the last time data was initialized Refer to 7 3 Checking the Meter Reading P 330 Auditron Report Print Jobs Meter Auditron This report is printed when you select Meter Auditron while the Auditron Adm...

Страница 327: ...L 2 Palette List HP GL 2 Palette 1 Lists color palette settings TIFF JPEG Settings List TIFF JPEG Settings 1 Lists TIFF JPEG print mode settings TIFF JPEG Logical Printers List TIFF JPEG Logical 1 Lis...

Страница 328: ...eated using the Watermark feature Refer to Watermark P 347 Secure Watermark Sample List Secure Watermark Feature Enhance Kit HDD Extension Kit optional Prints samples of secure watermarks created usin...

Страница 329: ...2 Press the button until Print Reports is displayed 3 Press the or OK button to select Job History is displayed 4 Press the button until Configuration is displayed 5 Press the or OK button to select A...

Страница 330: ...rint a job 2 sided depending on the application being used and the print quantity setting the application may insert a blank page into the job In such case the blank page is counted as 1 page and will...

Страница 331: ...ed in the Meter Report Print Jobs Job Owner Name Up to 50 owner names can be printed The print count of the 51st job owner or a user without a job owner name will be listed in the UnknownUser column s...

Страница 332: ...elect A process start confirmation screen is displayed 8 Press the OK button Data is initialized 9 After the process is finished press the Settings button to return to the Ready to print screen Checki...

Страница 333: ...yed Note If you went past the desired item return to the item by pressing the button 3 Press the or OK button to select Network Port is displayed Note If you pressed the or OK button on the wrong item...

Страница 334: ...ton and proceed to Step 14 If you want to finish configuring the settings proceed to Step 21 To change the Subnet Mask Gateway Address 14 Press the button until Subnet Mask is displayed 15 Press the o...

Страница 335: ...the IP address Example 192 168 1 254 and press the OK button to confirm your entry 21 The setup is now complete Press the Settings button to close the menu screen The printer automatically restarts 22...

Страница 336: ...CentreWare Internet Services CentreWare Internet Services also can be used to check the status of consumables and the paper levels of the paper trays Note For information on how to use CentreWare Inte...

Страница 337: ...re ports an e mail server the TCP IP environment and the printer s e mail address Configure the Properties below in accordance with your e mail environment Note After configuring the settings be sure...

Страница 338: ...sign dot hyphen and underline _ up to 128 bytes Mail Notice Status Settings Select the items to be included in notifications Consumables Status Parts Status Paper Tray Status Output Tray Status Jam S...

Страница 339: ...tab click Printing Preferences The Printing Preferences dialog box appears 4 Click the Advanced tab 5 Specify On in Notify Job Completion by E mail 6 In Enter E mail Address enter the notification ma...

Страница 340: ...inter 1 On the control panel press the and OK buttons at the same time This displays the Consumables Menu 2 Press OK button to select Serial number of the printer is displayed 3 Press the Settings but...

Страница 341: ...the button until System Settings is displayed 5 Press the or OK button to select RAM Disk is displayed 6 Press the or OK button to select 7 Press the button 8 Press the OK button Setting on the Print...

Страница 342: ...342 7 Maintenance 3 On the Configuration tab click Installable Options 4 In the Installable Options dialog box select Installed in the RAM Disk 5 Click OK 6 Click OK in the Properties dialog box...

Страница 343: ...optional or enabling the RAM disk is required 3 5 Printing confidential documents Secure Print P 83 Private Charge Print and Charge Print using an Smart card IC Card Reader optional or purchase separa...

Страница 344: ...P 365 Image log Jobs that are executed on the printer are saved as image data and accumulated and stored as logs along with job owner printing time number of copies and other data Note The Feature Enh...

Страница 345: ...ange the display language of CentreWare Internet Services change the display language of your web browser For information on how to change the display language of your web browser refer the online hel...

Страница 346: ...t on all pages of a print job which deters copying of the document and can be used to trace its copy history For more information refer to the online help for CentreWare Internet Services Important Us...

Страница 347: ...he administrator s ID and password enter them and click OK 2 Click the Properties tab 3 On the menu on the left click Security Watermark Watermark The Watermark screen is displayed 4 Configure the set...

Страница 348: ...nter Using CentreWare Internet Services P 41 If you are prompted to enter the administrator s ID and password enter them and click OK 2 Click the Properties tab 3 On the menu on the left click Securit...

Страница 349: ...Device Settings to Override Allow Client Settings to Override Note The setting method applies to both the Watermark and Secure Watermark features Report Specifies whether or not a hidden text string...

Страница 350: ...b 3 On the menu on the left click Security Watermark Universal Unique ID The Universal Unique ID screen is displayed 4 Configure the settings 5 After all the settings are completed click Apply Setting...

Страница 351: ...guring the Printer Using CentreWare Internet Services P 41 If you are prompted to enter the administrator s ID and password enter them and click OK 2 Click the Properties tab 3 On the menu on the left...

Страница 352: ...lick Security Force Annotation Create Text String The Create Text String screen is displayed 4 Enter text string to register Note You can enter up to 64 single byte characters 5 After all the settings...

Страница 353: ...r to output the Audit Log For details about the setting procedure refer to Configuring HTTP Communication Encryption Settings P 358 or the online help for CentreWare Internet Services This feature is...

Страница 354: ...s CentreWare Internet Services refer to 1 6 Configuring the Printer Using CentreWare Internet Services P 41 If you are prompted to enter the administrator s ID and password enter them and click OK 2 C...

Страница 355: ...nformation on end of print job Report Information that the reported is printed Change Reference of Device Settings Change of time settings Information that time setting has been changed within the con...

Страница 356: ...e printer makes it possible to encrypt HTTP communication between the printer and computers over a network Ports that use the printer s HTTP server are the SOAP port Internet service HTTP port and IPP...

Страница 357: ...ertificate on the printer from CentreWare Internet Services Note Refer to the online help for CentreWare Internet Services for information about how to use it to import a certificate issued by another...

Страница 358: ...ironment of MacOS X 10 2 when performing SSL communication using a self signed certificate created on the printer or when the certificate character codes are written with UTF 8 This is because the cer...

Страница 359: ...s and want to reset them to the original values click Undo 6 After updating the settings refresh the web browser 7 From the menu on the Properties tab click Security SSL TLS Settings 8 Select the Enab...

Страница 360: ...ts P 40 Next install a print driver on your computer and specify IPP as the output port The following describes how to install a print driver on your computer The procedure uses Windows XP as an examp...

Страница 361: ...ecting pre shared key requires pre issuance of the pre shared key Contact your administrator After that configure IPSec settings Configuring Certificate Settings After using CentreWare Internet Servic...

Страница 362: ...Machine Digital Certificate Management The Machine Digital Certificate Management screen is displayed 4 Click Upload Signed Certificate 5 On the screen that appears specify the Password and the file n...

Страница 363: ...t Machine The printer reboots and the settings you configured are reflected This sets the certificate for IPSec Next configure IPSec settings Jump to step 3 of the procedure in the next page Configuri...

Страница 364: ...value 9 For DH Group select G1 or G2 10 Selecting the Enabled check box for PFS enables the PFS feature 11 For Specify Destination IPv4 Address or Specify Destination IPv6 Address enter the IP addres...

Страница 365: ...entreWare Internet Services Access Any attempt to access the printer using a web browser displays a login window that requires input of a user ID and password Use of CentreWare Internet Services is li...

Страница 366: ...tron Administration features configure the following settings in Admin Menu on the control panel Set to Local Accounting in System Settings Accounting Accounting Type Set to Local Accounts in System S...

Страница 367: ...uration The Authentication Configuration Step 1 of 2 screen is displayed 4 To enable printing of jobs that do not have user names and passwords select the Enabled check box for Non account Print 5 Cli...

Страница 368: ...ternet Services to register the authorization group to associate with users By registering the authorization group which is allowed to temporarily disable active settings and associating it with users...

Страница 369: ...the Account Number setting and then click Edit 11 In the Add This User to Authorization Group select the authorization group registered in Step 7 and then click Apply Note To discard any changes in t...

Страница 370: ...370 7 Maintenance 3 On the Configuration tab click Accounting 4 On the Accounting dialog box that appears configure each item and then click OK 5 Click OK to close the Properties dialog box...

Страница 371: ...e embedded IC Card Reader of the machine may not support some smart cards Smart Card Settings The system administrator can register smart cards using CentreWare Internet Services Note For details abou...

Страница 372: ...later Also when you click the Decrypt button the information is reset to the default You should backup the smart card information before encryption You can backup the smart card setting using Cloning...

Страница 373: ...act our Customer Support Center or your dealer Setting the density values to 0 does not always return print quality to the level it was at immediately after the printer was installed Using the printer...

Страница 374: ...or OK button to select Network Port is displayed 4 Press the button until Image Quality is displayed 5 Press the or OK button to select Adjust Gradation is displayed 6 Press the or OK button to select...

Страница 375: ...n determining density values also use the instructions provided on the Color Sample Note The factory default setting for the density values of all colors is 0 1 Fold the Calibration Chart along the gu...

Страница 376: ...f it is close the density in between 1 if it is close the density in between 1 if it is close the density in between 3 if it is close the density in between 5 if it is close the density in between 6 i...

Страница 377: ...ty margin values for all the colors enter the values in the appropriate Margin boxes for Computation Table Example cyan 8 Use the Computation Table expressions to calculate adjustment values and write...

Страница 378: ...ress the or OK button to select Network Port is displayed 4 Press the button until Image Quality is displayed 5 Press the or OK button to select Adjust Gradation is displayed 6 Press the or OK button...

Страница 379: ...colors use the Back button to return to Step 9 and repeat the steps from there 15 After you are finished configuring settings press the Settings button to return to the Ready to print screen After cha...

Страница 380: ...on the control panel to display the menu screen 2 Press the button until Admin Menu is displayed 3 Press the or OK button to select Network Port is displayed 4 Press the button until Image Quality is...

Страница 381: ...ply the setting 12 To adjust the transfer voltage for other paper types use the or Back buttons to return to Step 8 and repeat the steps from there 13 When you are finished configuring settings press...

Страница 382: ...d using Tray 2 optional 1 Press the Settings button on the control panel to display the menu screen 2 Press the button until Admin Menu is displayed 3 Press the or OK button to select Network Port is...

Страница 383: ...to select Actual adjusted value in the vertical direction Lead Regi is displayed 18 Specify the value calculated in the step 14 press the OK button Set the plus value for moving the print image downwa...

Страница 384: ...384 7 Maintenance 23 When the setting is over press the Settings button to return to the print screen...

Страница 385: ...witch and the main power switch and unplug it Access to a live machine interior may cause electric shock Cleaning the Exterior of the Printer Clean the exterior of the printer at least once a month To...

Страница 386: ...he tray Important This product weighs 81 2 Kg When moving it always carry it by a team of four persons When moving or lifting the printer always install the handle cover to the printer and move it car...

Страница 387: ...g system Thermal pressure fusing technology using the IH belt Warm up Time 28 seconds or less after powering on at 20 C temperature Important It may take more than 28 seconds for warming up without th...

Страница 388: ...24 7 sheets min B5 8 5 x 11 A4 20 2 sheets min B4 8 5 x 13 8 5 x 14 17 5 sheets min A3 8 5 x 17 2 Sided Color Monochrome 31 7 pages min B5 8 5 x 11 A4 24 7 pages min B5 8 5 x 11 A4 14 6 pages min B4 8...

Страница 389: ...5 8 5 x 11 A4 34 2 sheets min B5 8 5 x 11 A4 29 sheets min B4 8 5 x 13 8 5 x 14 25 sheets min A3 8 5 x 17 1 Sided Monochrome 47 sheets min B5 8 5 x 11 A4 37 6 sheets min B5 8 5 x 11 A4 32 sheets min B...

Страница 390: ...B5 8 5 x 11 A4 9 6 pages min B4 8 5 x 13 8 5 x 14 8 7 pages min A3 8 5 x 17 For Transparency 2 1 Sided Color Monochrome 21 9 sheets min B5 8 5 x 11 A4 17 6 sheets min B5 8 5 x 11 A4 15 1 sheets min B4...

Страница 391: ...dule optional A3 B4 A4 A4 B5 B5 A5 8 5 x 11 8 5 x 11 8 5 x 13 8 5 x 14 11 x 17 SRA3 16K 8K Custom Paper Width 140 320 mm Length 182 457 mm Tandem Tray Module optional A4 B5 8 5 x 11 High Capacity Feed...

Страница 392: ...s 106 169 gsm Gloss S2 HeavyweightGloss 170 256 gsm HW Gloss S2 Tandem Tray Module optional Plain 60 105 gsm Recycled 60 105 gsm Bond 60 105 gsm Plain S2 Heavyweight 106 169 gsm HW S2 Extra Heavyweigh...

Страница 393: ...dard PCL Fonts 82 European language fonts TrueType Fonts 14 European language fonts 2 MM fonts PostScript Fonts 136 European language fonts Korean Fonts Myungio Gothic Round Gothic Kungso Saemul Optio...

Страница 394: ...ing 880W AC220 240V Maximum 2400W During the Sleep mode 2W or less Average During stand by 75W During continuous printing 890W Important Low Power Mode 46W average AC110 120V 48W average AC220 240V Th...

Страница 395: ...sm paper For the center binding folding feature Booklet Maker Unit for Finisher B1 is required Staple Paper size Maximum A3 11 x 17 Minimum B5 Capacity 50 sheets 90 gsm or less Position 1 place front...

Страница 396: ...ay x 1 Sorting Stacking Paper Size Paper Weight Right top tray Maximum 12 6 x 17 7 12 x 19 Minimum B5 55 220 gsm Right middle tray Maximum 12 6 x 17 7 12 x 19 Minimum B5 55 220 gsm Right bottom tray M...

Страница 397: ...1 Paper type 64 90 gsm 2 64 105 gsm center folding 64 220 gsm single folding 1 14 sheets when attaching a cover In the case of center folding the maximum number of sheets can be changed by the custome...

Страница 398: ...ment when connected to the main unit Width 1 046 x Depth 685 mm Main unit Left Top Tray when the bypass tray is fully extended Items Description Paper Size Paper Weight A4 8 5 x 11 B5 55 216 gsm Capac...

Страница 399: ...er Italic Courier Bold Courier Bold Italic Symbol Times New Roman Times New Roman Bold Times New Roman Italic Times New Roman Bold Italic ITC Zepf Dingbats Gold SEMM Gold SAMM Top 4 1 mm Left 4 1 mm B...

Страница 400: ...d Italic Symbol Wingdings Line Printer Times Roman Times Italic Times Bold Times Bold Italic Helvetica Helvetica Oblique Helvetica Bold Helvetica Bold Oblique CourierPS CourierPS Oblique CourierPS Bol...

Страница 401: ...00065 A tray that can load 2 030 sheets of paper When using 80 gsm paper Side Tray EC101477 Delivers output face up Finisher B1 EC101542 Staples output sheets Booklet Maker Unit for Finisher B1 QC1000...

Страница 402: ...ese values due to paper size and type printing environment and other printing conditions such as the frequency of power ups This is because the indicated number of pages are calculated based on estima...

Страница 403: ...y from these values due to paper size and type printing environment and other printing conditions such as the frequency of power ups This is because the indicated number of pages are calculated based...

Страница 404: ...Driver CD Kit CD ROM that comes with the printer To access the web site click Fuji Xerox Web Site on the startup window of the CD ROM The following is the URL of the driver download service page http...

Страница 405: ...fer to the following section Note The amount of memory required depends on the type of print driver being used The memory capacity values shown in the table below are based on the printer s initial fa...

Страница 406: ...5 Standard 1024 MB B5 A4 B4 A3 Long size 297 x 1200 mm Standard 1024 MB 1 5 GB or 2 GB expansion available as needed High Quality A5 Standard 1024 MB B5 A4 B4 A3 Long size 297 x 1200 mm Standard 1024...

Страница 407: ...maximum of 2 GB by installing a Memory 1024 MB card in Slot 2 and replacing the memory card in Slot 1 with a Memory 1 GB card 1 Press the side of the printer s power switch to turn off the power Note...

Страница 408: ...t drop it 7 Aligning the notch in the memory card with the tab in the M2 slot insert the card straight into the slot Important A 1024 MB memory is installed into the M1 Slot as standard Press the memo...

Страница 409: ...wer switch 11 Print the Configuration Report and confirm that the Total Size value of the Memory item in the Print Service Settings section is correct Refer to List printing procedure Printing a Repor...

Страница 410: ...RAM Disk when no HDD Extension Kit optional is installed 2 The IC Card Reader may not be supplied with the printer in some regions Contact your dealer for details To enhance the following installed f...

Страница 411: ...dle on the control board and then carefully pull the control board out of the printer Place the control board on a table top or some other flat surface Important When pulling out the control board hol...

Страница 412: ...he control board in place 11 Connect the power cord to the printer Turn on the printer s main power switch and power switch 12 Print the Configuration Report and confirm that Hard Disk is included for...

Страница 413: ...ure Enhance Kit optional Installation Procedure 1 Press the side of the printer s power switch to turn off the power Note Make sure that there is no indication on the display and Energy Saver button i...

Страница 414: ...raight into the R2 slot with aligning the notch in the ROM with the concavity of the R2 slot Important The slot R1 is for other optional kit Do not insert the Feature Enhance Kit into the slot R1 Pres...

Страница 415: ...it and enable it with the control panel that Feature Enhance Kit is not usable on any other printer 11 Press the Settings button on the control panel to display the menu screen 12 Press the button unt...

Страница 416: ...e appears press the Settings button to return to the print screen Important If the Feature Enhance Kit installed was previously used on another printer the message Serial Number Error appears followed...

Страница 417: ...Gigabit Ethernet Board Kit cannot be installed concurrently If the Gigabit Ethernet Board Kit is installed remove the card by reference to Removing the Gigabit Ethernet Board Kit P 425 Installing the...

Страница 418: ...ontrol board and then carefully pull the control board out of the printer Place the control board on a table top or some other flat surface Important When pulling out the control board hold it with bo...

Страница 419: ...with the handle being folded Press the control board in as far as it will go 11 Tighten the three screws to secure the control board in place 12 Connect the connector conversion cable to the connector...

Страница 420: ...ructions as the similar steps are explained simply 1 Press the side of the printer s power switch to turn off the power Note Make sure that there is no indication on the display and Energy Saver butto...

Страница 421: ...he screws you remove here may be used for securing other optional kit on the control board 8 Remove the Parallel Port Kit from the control board Parallel Port Kit removal is now complete If you need t...

Страница 422: ...r standard network cannot be used when the Gigabit Ethernet Board Kit is installed to the printer Installing the Gigabit Ethernet Board Kit 1 Press the side of the printer s power switch to turn off t...

Страница 423: ...out the control board hold it with both hands so you do not drop it 7 Remove the three screws on the control board and then remove the dummy plate Note Note that you will need the screws you remove he...

Страница 424: ...Note Standard USB port is not available when the Gigabit Ethernet Board Kit is installed It is recommended to put the sticker included with the Gigabit Ethernet Board Kit on the standard USB port 12...

Страница 425: ...steps are explained simply 1 Press the side of the printer s power switch to turn off the power Note Make sure that there is no indication on the display and Energy Saver button is off 2 Open the fron...

Страница 426: ...remove here may be used for securing other optional kit on the control board 8 Remove the Gigabit Ethernet Board Kit from the control board Gigabit Ethernet Board Kit removal is now complete If you ne...

Страница 427: ...side of the printer s power switch to turn off the power Note Make sure that there is no indication on the display and Energy Saver button is off 2 Open the front cover 3 Press the side of the printer...

Страница 428: ...Kit straight into the R1 slot with aligning the notch in the Kit with the concavity of the R1 slot Important The slot R1 is for other optional kit Do not insert the TC SC Additional Fonts Kit Press t...

Страница 429: ...Press the control board in as far as it will go 9 Tighten the three screws to secure the control board in place 10 Connect the power cord to the printer Turn on the printer s main power switch and po...

Страница 430: ...power is switched off Energy Saver button blinks Make sure the Energy Saver button is completely turned off before switching on the printer again When HDD Extension Kit is installed it can be specifi...

Страница 431: ...PostScript Driver Some options such as Poster are not supported by the PostScript driver With the Pages Per Sheet N Up you can specify 2 4 6 9 or 16 pages up and with or without frame borders XPS Dri...

Страница 432: ...Me Windows NT 4 0 Mac OS 8 1 8 5 8 6 Mac OS X 10 3 8 or before Mac OS X 10 4 7 Windows NT Server 4 0 Windows NT Server Terminal Edition PostScript Print Driver for Macintosh Because the print drivers...

Страница 433: ...tall ThinPrint print to Windows Server 2003 or Windows Server 2008 a print Application Server Engine license is required ThinPrint can operate in an IPv4 environment but not in an IPv6 environment Up...

Страница 434: ...ed Consult your network administrator about the settings required for your printer If memory is insufficient when a port is enabled the port is automatically disabled If this happens disable unused po...

Страница 435: ...t data is greater than the remaining capacity of hard disk or memory capacity at the time that receiving the print data receive starts that print data cannot be received Note Some computers may resend...

Страница 436: ...rinting is supported with the following operating system versions only Printing via IPv6 supports the following versions of the operating systems Windows Vista Windows 7 Windows Server 2008 Windows Se...

Страница 437: ...ted If you attempt to use services with a NetBIOS name communication may not be available in some environment IPv6 in IPv4 tunneling in the machine itself is not supported Important If TCP IP Setting...

Страница 438: ...CP IP IPv6 TCP IP DualStack SSDP SMB LPD Port 9100 HTTP IPP Bonjour WSD WSD stands for Web Services on Devices ThinPrint Xerox Standard Accounting Users Limits and Access Group Accounts E mail E mail...

Страница 439: ...les you to encrypt communication data for IPP printing SSL encrypted communication The data is encrypted only on the network but send data itself is not encrypted Image Log Control The Image Log Contr...

Страница 440: ...ne runs out of hard disk space for storing images the machine operates in accordance with the setting of Assurance Level as follows High A job is cancelled Low A job is executed However the warning wi...

Страница 441: ...Ware Authentication Management The remote authentication server that ApeosWare Authentication Agent or ApeosWare Authentication Management can use is Active Directory only Color Access is available bu...

Страница 442: ...ch as print requests from a computer it allows transmission of data such as job status from the printer to the computer BOOTP BOOTstrap Protocol A protocol that allows a client connected to a TCP IP n...

Страница 443: ...lors that can be displayed on your computer screen which is approximately 16 77 million colors Grams per Square Meter gsm The weight in grams of one square meter of paper HTTP A protocol used to commu...

Страница 444: ...ocol network address expressed as four numeric decimal values separated by decimal points IPv6 address A type of TCP IP protocol network address expressed as four numeric hexadecimal values separated...

Страница 445: ...transmitting data on Windows 2000 Windows XP Windows Vista Windows 7 Windows Server 2003 Windows Server 2008 Windows Server 2008 R2 and Mac OS 10 6 This protocol can be used on the standard TCP IP por...

Страница 446: ...perating systems and application software are types of software TCP IP A network protocol developed by DARPANET Defense Advanced Research Project Agency NetWork It is the standard protocol of the Inte...

Страница 447: ...ker side cover 51 Booklet maker unit for Finisher B1 51 243 306 Booklet staple cartridge R2 R3 51 53 246 Bottom left cover C 49 225 Built in Fonts 399 C Calibration Procedure 373 Cancel Job button 55...

Страница 448: ...312 Font List 326 For creating posters etc 71 Force Annotation 344 Force Annotation Feature 351 Front cover 47 Front door 51 53 Front transport door G 51 Fusing unit 50 314 G Gateway Address 38 334 Gi...

Страница 449: ...Paper Size Group 202 Paper Size Settings 195 Paper Tray Priority 194 Paper Type 191 Paper Type Mismatch 190 Paper Type Priority 193 Parallel 147 Parallel interface connector 49 PCL 143 PCL Font List 3...

Страница 450: ...taple cartridge R1 51 53 241 244 Staple cartridge R2 R3 243 Staple Jams 241 Stored File List 327 Stored Jobs 185 Subnet Mask 38 334 Substitute Tray 190 Suction Filter 319 Supported Operating Environme...

Страница 451: ...Index 451 W Waste toner bottle R5 50 301 Watermark 344 346 Watermark Sample List 328 When Jam Occurs 178 WINS Server 165 WSD 28 158 X XDW DocuWorks 145 XeroxStdAccounting 181 XPS 144 XPS Driver 431...

Страница 452: ...ttings button Print Menu button Information button To increase or decrease a value To move between digits or fields To reset a value to the default or button or button and buttons 32 alphanumeric char...

Страница 453: ...otocol TCP IP NetBEUI TCP IP NetBEUI Print Mode Auto PS ESCP HP GL 2 PCL TIFF KS KSSM KS5895 HexDump PJL Disabled Enabled TBCP Filter Disabled Enabled IPP Port Status Disabled Enabled Print Mode Auto...

Страница 454: ...rver IP Address 000 000 000 000 When Obtain DNS Server Address Automatically is set to OFF enter it manually When Obtain DNS Server Address Automatically is set to ON the address is displayed Disabled...

Страница 455: ...Auto 100 Mbps Full Dup 100 Mbps Half Dup 10 Mbps Full Dup 10 Mbps Half Dup 1000 Mbps IPX SPXFrameType Auto Ethernet II Ethernet 802 3 Ethernet 802 2 Ethernet SNAP When Obtain DNS Server Address Autom...

Страница 456: ...Start End Banner Tray Tray 1 Tray 2 Tray 3 Tray 4 Tray 6 Date dd mm yyyy Time Format 12 Hour Clock 24 Hour Clock Time Zone GMT 10 00 Daylight Savings Off Set by Date Set by Month Week Date Format yyyy...

Страница 457: ...and Off On Process Job Login Job Login Success Save in ChargePrint Delete Job Job Login Failure Save in ChargePrint Delete Job Without User ID Receive Control ReferPrintAuditron PrivateChargePrint Sav...

Страница 458: ...ConfirmationScreen Print Off Use Larger Size Use Closest Size Select Tray 5 Plain Recycled Bond Plain S2 Heavyweight Heavyweight A Heavyweight B Heavyweight C Heavyweight S HW S2 HW A S2 HW B S2 HW C...

Страница 459: ...Paper Name 1 Custom 1 5 Custom 5 Custom Color Name 1 Custom 1 5 Custom 5 Print User ID Off Top Left Top Right Bottom Left Bottom Right Odd Page 2 Sided UnregisteredForms Print Data only Do not print D...

Страница 460: ...s the registerd form name Delete Font Delete PCL Fonts Use OK to Delete All PCL Fonts Secure Print Jobs Select User ID 1001 user1 1001 user1 Use OK to delete Adjust Paper Regi Tray 1 Adjust Side 1 Adj...

Страница 461: ...Print Menu button OK button Resetting Fuser Assembly Reset completed for Fuser Assembly Use OK to print Use OK to print Charge Print Use Smart Card to login Select User ID 7001 Select Jobs 1 Taro Doc...

Страница 462: ...DocuPrint C5005 d User Guide Fuji Xerox Co Ltd ME4989E2 1 Edition1 November 2010 Copyright 2010 by Fuji Xerox Co Ltd...

Отзывы: