Warning: Make sure these connections are
correct. Any other connection will not allow
proper operation of the car and its fuel cell
power system. Also ensure the wires are not
touching the wheels and the
tubes are not kinked or
pinching.
Place the front and rear bumpers onto the
bumper frames on the chassis.
ASSEMBLY GUIDE
H-racer 2.0
What do you need?
H-Racer 2.0
AA batteries=2 Units
LR44 batteries=3 Units
Water=25ml
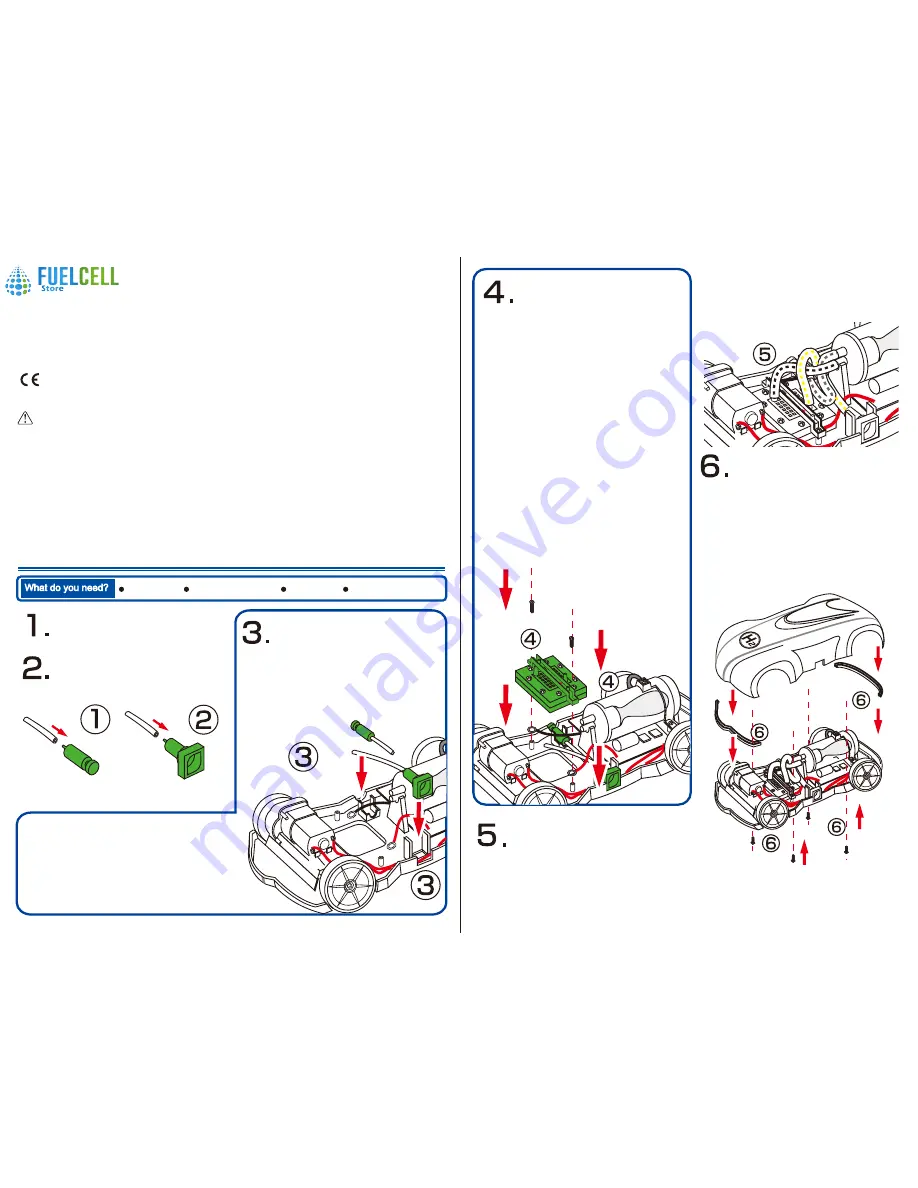
Connect one of the flexible tubes to the small
purging valve. Make sure the tube is inserted
all the way into the base of the purging valve
nozzle.
Connect another flexible tube to the nozzle of
the refueling input valve. Make sure the tube
is inserted all the way into the base of the
nozzle of the refueling input valve.
Position the fuel cell onto the square slot
located in the middle of the car chassis. The
positive mark on the fuel cell should be
positioned on the side with the red cable, and
the negative mark on the side with the black
cable. Push the fuel cell into the chassis.
TIP: To fit the flexible tubes onto the nozzle of the valve, connect the
tube by twisting it against the nozzle, then push the nozzle into the
tube until the tube is snuggly fitted to the base of the nozzle.
Place the refueling input valve above the
opening on the left side of the chassis. Make
sure the red cable is positioned above the
refueling input valve tubing. Slide the refueling
input valve onto its mount located at the
opening on the side of the chassis. With a
downward motion, click the valve into place
ensuring it is smoothly aligned with the outer
surface of the chassis.
H-racer 2.0
ASSEMBLY GUIDE
Model No.: FCJJ-23
To avoid the risk of property damage, serious injury or
death:
This kit should only be used by persons 12 years old and
up, and only under the supervision of adults who have
familiarized themselves with the safety measures
described in the kit. Keep small children and animals away,
as it contains small parts that could be swallowed. The fuel
cell generates gases that are very easily ignited. Read the
instructions before use and have them ready for reference.
Warning
Battery operation instructions:
1. The removing and inserting of batteries is to be
conducted by the adults only.
When inserting the batteries make sure that you are doing
so with the correct polarity (the positive end of the battery
must match up with the “+” and the negative end of the
battery must match up with the “-” indicated on the battery
pack) and then close the battery compartment.
2. Non-rechargeable batteries are not to be recharged.
3. Different types of batteries such as rechargable, alkline
and standard batteries or new and used batteries are not to
be mixed and should be used separately.
4. The two spare red&black cables are not to be inserted
into an AC socket.
5. Exhausted batteries are to be removed from the battery
compartment.
Place the purging valve above the opening on the right side
of the chassis. Slide the purging valve onto its mount
located at the opening on the side of the chassis. Make
sure the refueling valve tube is not in the way of the purging
valve tubing. With a downward motion, click the valve into
the slot on the chassis. Make sure that the whole body of
the purging valve is positioned in the slot on the chassis
and the purging button is positioned outside the edge of the
chassis.
Position the black cable terminal between the fuel cell
holder and the fuel cell end plates, and position the red
cable terminal in the same manner on the opposite side.
Make sure the holes are aligned.
Align the fuel cell holder with the two holes on the car
chassis. Place the screws into the screw holes and make
sure the screws are entered through the cable terminal
holes and straight into the chassis.
*Please note there are two types of screws. The smaller
screws are used for the fuel cell and the larger screws are
used for the car body.
Use a screwdriver to attach the fuel cell end plate and the
red & black cable terminals to the screw holes on the
chassis. Make sure the metal terminals from the cables
are closely touching the fuel cell end plates. Do not
tighten the screws until the two screws are partially
entered into the chassis. Drive the screws into the
chassis making sure all the parts are connected tightly
without moving.
Force is required to drive these
screws into place, to avoid
damage to the kit ask an adult
to drive in the screws.
Connect one end of the flexible tubes to the
lower nozzle on the storage cylinder and the
other end of the flexible tube to the nozzle on
fuel cell located nearest to the motor. Connect
the other end of the flexible tube on the refueling
input valve to the other nozzle located on the fuel
cell. Connect the purging valve tube to the upper
nozzle located on the storage cylinder. Make
sure all tubes are properly positioned as in
diagram.
*Be careful not to place the bumpers upside down. Make
sure the rear bumpers fit correctly onto the frame.
Position the body of the car onto the chassis. Align the
holes on the chassis with the holes on the car body top.
Use a screwdriver (not included) to attach the body to the
chassis using the set of 4 large screws and make sure the
screws are entered straight into the chassis. Do not
tighten the screws until all screws are partially entered into
the chassis. Drive the screws into the chassis until no
gaps are left between the body and the chassis.
Remove the H2 sticker from its backing and
position it on the car accordingly.
SKU: 1061002


