background image

STAR_ATFE_15 | STAR_ATFE_16 | STAR_ATFE_17

STAR_ATFE_18 | STAR_ATFE_19 | STAR_ATFE_20

B E D I E N U N G S A N L E I T U N G

I N S T R U K C J A   O B S Ł U G I 

N Á V O D   K   P O U Ž I T Í

M A N U E L   D ´ U T I L I S A T I O N

I S T R U Z I O N I   P E R   L ‘ U S O

M A N U A L   D E   I N S T R U C C I O N E S

HEIGHT ADJUSTABLE DESK WITH THE TABLE TOP

expondo.de

U S E R   M A N U A L

Содержание STAR ATFE 15

Страница 1: ... E D I E N U N G S A N L E I T U N G I N S T R U K C J A O B S Ł U G I N Á V O D K P O U Ž I T Í M A N U E L D U T I L I S A T I O N I S T R U Z I O N I P E R L U S O M A N U A L D E I N S T R U C C I O N E S HEIGHT ADJUSTABLE DESK WITH THE TABLE TOP expondo de U S E R M A N U A L ...

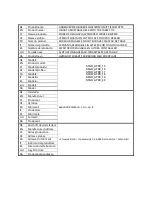
Страница 2: ...RÓASZTAL ÉS ASZTALLAP DA Produktnavn HØJDEJUSTERBART SKRIVEBORD MED BORDPLADE DE Modell STAR_ATFE_15 STAR_ATFE_16 STAR_ATFE_17 STAR_ATFE_18 STAR_ATFE_19 STAR_ATFE_20 EN Product model PL Model produktu CZ Model výrobku FR Modèle IT Modello ES Modelo HU Modell DA Model DE Hersteller expondo Polska sp z o o sp k EN Manufacturer PL Producent CZ Výrobce FR Fabricant IT Produttore ES Fabricante HU Terme...

Страница 3: ...x600 Gewicht kg 30 32 31 Beschreibung des Parameters Wert des Parameters Bezeichnungen des Produktes HÖHENVERSTELLBARER SCHREIBTISCH MIT TISCHPLATTE Modell STAR_ATFE_18 STAR_ATFE_19 STAR_ATFE_20 Versorgungsspannung V Frequenz Hz 230 50 230 50 230 50 Arbeitszyklus 10 maximal 2 Minuten Dauerbetrieb auf 18 Minuten Inaktivität Max zulässige Belastung kg 50 50 50 Geschwindigkeit des Anhebens mm s 25 25...

Страница 4: ...ifikationen in dieser Anleitung sind auf dem neuesten Stand Der Hersteller behält sich das Recht vor Änderungen vorzunehmen um die Qualität zu verbessern Unter Berücksichtigung des technischen Fortschritts und der Möglichkeiten zur Lärmminderung wurde das Gerät so entwickelt und gebaut dass das Risiko durch Lärmemissionen auf ein Minimum reduziert wird Erläuterung der Symbole Das Produkt entsprich...

Страница 5: ...ginalstecker und passende Steckdosen vermindern das Risiko eines Stromschlags b Berühren Sie das Gerät niemals mit nassen oder feuchten Händen c Benutzen Sie das Netzkabel nicht zweckentfremdet Benutzen Sie das Kabel nicht um das Gerät zu transportieren oder den Stecker herauszuziehen Halten Sie das Kabel von Hitze Öl scharfen Kanten und beweglichen Teilen fern Beschädigte oder verwickelte Kabel e...

Страница 6: ... f Bewahren Sie diese Anleitung zum späteren Nachschlagen auf Soll das Gerät an Dritte weitergegeben werden muss auch die Gebrauchsanweisung mit übergeben werden g Bewahren Sie Verpackungsteile und kleine Montageteile außerhalb der Reichweite von Kindern auf h Bei der Verwendung dieses Geräts mit anderen Geräten beachten Sie auch an andere Gebrauchsanweisungen 2 3 Persönliche Sicherheit a Das Gerä...

Страница 7: ...n f Die Reparatur und Wartung der Geräte ist von qualifiziertem Personal unter ausschließlicher Verwendung von Originalersatzteilen durchzuführen Dies gewährleistet eine sichere Verwendung g Um die Funktionstüchtigkeit des Geräts zu gewährleisten dürfen die werksseitig installierten Abdeckungen nicht entfernt und die Schrauben nicht gelöst werden h Beim Transport und dem Tragen des Geräts vom Lage...

Страница 8: ...s darauf geachtet werden dass die verlegten Kabel sowie die Anschlüsse und Stecker die Verwendung des Produkts nicht beeinträchtigen x Während der Einstellung der Schreibtischhöhe muss sichergestellt werden dass die verlegten Kabel ausreichend lang sind Zu kurze Kabel und Anschlüsse können die Höheneinstellung erschweren oder andere Geräte beschädigen y Das Produkt darf nicht verwendet werden wenn...

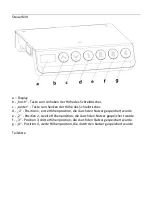
Страница 9: ...ibtisches d 1 Position 1 erste Höhenposition die durch den Nutzer gespeichert wurde e 2 Position 2 zweite Höhenposition die durch den Nutzer gespeichert wurde f 3 Position 3 dritte Höhenposition die durch den Nutzer gespeichert wurde g 4 Position 4 vierte Höhenposition die durch den Nutzer gespeichert wurde Teileliste ...

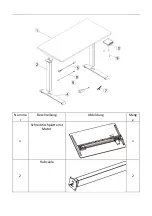
Страница 10: ...Numme r Beschreibung Abbildung Meng e 1 Schreibtischplatte mit Motor 1 2 Hubsäule 2 ...

Страница 11: ...3 Steuerfeld 1 4 Untere Stütze 2 5 Netzkabel 1 6 Netzteil 1 ...

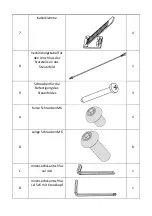
Страница 12: ...bel für den Anschluss des Netzteils an das Steuerfeld 1 9 Schrauben für die Befestigung des Steuerfeldes 3 A Kurze Schrauben M6 4 B Lange Schrauben M6 8 C Innensechskantschlüs sel 4x4 1 D Innensechskantschlüs sel 5x5 mit Kreuzkopf 1 ...

Страница 13: ...t werden kann Vergewissern Sie sich dass die Stromversorgung des Geräts mit den Angaben auf dem Typenschild übereinstimmt ZUSAMMENBAU DES GERÄTS Schritt 1 Montage der Hubsäule Die Hubsäule 2 auf folgende Weise an der Schreibtischplatte 1 befestigen a Den sechskantigen Bolzen der Säule in die Getriebeöffnung einsetzen b Die Säule umdrehen um die Haken auf den Eckteilen der Stütze an den Schrauben d...

Страница 14: ...feld 3 mit den Schrauben 9 befestigen und mit dem Innensechskantschlüssel 5x5 D festziehen Schritt 4 Verbindung der Kabel ACHTUNG Das Netzteil darf nicht an eine Steckdose angeschlossen werden bevor nicht alle anderen Leitungen angeschlossen sind ...

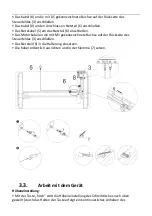
Страница 15: ...ßen Das Motorkabel an die mit M1 gekennzeichnete Buchse auf der Rückseite des Steuerfeldes 3 anschließen Das Netzteil 6 in die Halterung einsetzen Die Kabel ordentlich ausrichten und in der Klemme 7 setzen 3 3 Arbeit mit dem Gerät Höheneinstellung Mit der Taste hoch wird die Höheneinstellung des Schreibtisches nach oben gestellt durch das Halten der Taste erfolgt ein kontinuierliches Anheben des ...

Страница 16: ...tellungen gelöscht 2 Die Taste runter drücken und gedrückt halten um das Gerät zurückzustellen die Taste müssen bis zum Abschluss des Zurücksetzens gedrückt gehalten werden Wenn die Schreibtischplatte auf die niedrigste mögliche Position gefahren wurde wird eine kurze Bewegung nach oben ausgeführt und danach wird auf dem Display wird die Meldung bot angezeigt Das Zurücksetzen wurde beendet Einstel...

Страница 17: ...zeigt werden Die Taste runter drücken und halten um die Einstellungen zurückzustellen Falls keine der oben beschriebenen Tätigkeiten die normale Funktion des Geräts wiederherstellt muss der Kundendienst des Herstellers kontaktiert werden 3 4 Reinigung und Wartung a Der Netzstecker muss gezogen werden bevor Reinigungs Einstellungs oder Auswechselarbeiten des Zubehörs ausgeführt werden oder falls da...

Страница 18: ...ngezeigt ist kenntlich gemacht Die im Gerät verwendeten Materialien können entsprechend ihrer Kennzeichnung wiederverwendet werden Durch die Wiederverwendung die Verwendung von Materialien oder andere Formen der Nutzung gebrauchter Geräte leisten Sie einen wesentlichen Beitrag zum Schutz unserer Umwelt Bei Ihrer örtlichen Verwaltung erhalten Sie entsprechende Informationen über geeignete Stelle fü...

Страница 19: ...TH THE TABLE TOP Model STAR_ATFE_18 STAR_ATFE_19 STAR_ATFE_20 Supply voltage V Frequency Hz 230 50 230 50 230 50 Work cycle 10 Maximum of 2 minutes of continuous operation per 18 minutes of inactivity Maximum permissible load kg 50 50 50 Lifting speed mm s 25 25 25 Height adjustment range mm 730 1230 730 1230 730 1230 Countertop size Width x depth mm 1200x600 1200x600 1200x600 Weight kg 31 31 31 C...

Страница 20: ...ogress and the possibility of reducing noise into account the unit is designed and built in such a way so that risks resulting from noise emissions are reduced to the lowest possible level Explanation of symbols The product complies with applicable safety standards Please read the instructions before use Recyclable product CAUTION or WARNING or REMINDER describing a situation general warning sign ...

Страница 21: ... tangled cords increase the risk of electric shock d If you cannot avoid using the unit in a wet environment use a residual current unit RCD Using an RCD reduces the risk of electric shock e Do not use the unit if the power cord is damaged or shows signs of wear A damaged power cord should be replaced by a qualified electrician or the manufacturer s service department f To avoid electric shock do ...

Страница 22: ...the unit a Do not overload the unit Use tools that are suitable for the application A correctly selected unit will do a better and safer job for which it was designed b Do not use the unit if the ON OFF switch does not function properly does not turn on and off Units that cannot be controlled by the switch are unsafe cannot operate and must be repaired c Unplug the unit before making adjustments c...

Страница 23: ...ersonal injury t Sitting on the desk top is prohibited to prevent serious injury u Do not move or lie under the desk structure during adjustment Do not sit or stand on the desk frame Use extreme caution when making adjustments v Check regularly whether the adjustment mechanism of the desk is working properly and remove any obstacles which may block the smooth adjustment of the desk w Make sure tha...

Страница 24: ...ncreasing the desk height c down button decreasing the desk height d 1 position 1 the first height position saved by the user e 2 position 2 the second height position saved by the user f 3 position 3 the third height position saved by the user g 4 position 4 the fourth height position saved by the user Parts list ...

Страница 25: ...Number Description of the Drawing Quantity 1 Worktop with motor 1 2 Lifting column 2 ...

Страница 26: ...3 Control panel 1 4 Bottom support 2 5 Power cord 1 6 Power supply 1 ...

Страница 27: ...clamp 4 8 Connection cable between the power supply and the control panel 1 9 Screws for mounting the control panel 3 A Short M6 screws 4 B Long M6 screws 8 C Allen key 4x4 1 D Allen key 5x5 with a cross head 1 ...

Страница 28: ... any time Ensure that the power supply to the unit corresponds to that specified on the identification plate ASSEMBLY OF THE UNIT Step 1 Installing the lifting column Install the lifting column 2 to the tabletop 1 as follows a Insert the hexagonal stem of the column into the gear hole b Rotate the column to engage the hooks on the corners of the support with the rack screws c Use an Allen key C to...

Страница 29: ...g the control panel Mount the control panel 3 with screws 9 and tighten with a 5x5 Allen key D Step 4 Connecting the wires CAUTION Do not connect the power supply to the power outlet before connecting all other cables ...

Страница 30: ...6 Connect the motor cable to the port marked M1 on the back of the control panel 3 Insert the power supply 6 into the holder Arrange the wires and place them in the terminal 7 3 3 Working with the unit Height adjustment Press the up button to increase the height of the desk holding the button raises it continuously When the highest level is reached the display will show top ...

Страница 31: ...display will show bot The reset is now complete Collision avoidance settings A function to avoid collision and damage to the desk If the desk encounters resistance during height adjustment the motors will stop and reverse the desk position Press and hold the up and down buttons for 3 seconds at the same time to switch the sensitivity level The available levels are A 0 function off A 1 low sensitiv...

Страница 32: ...it in water f Do not get the electrical parts of the unit wet g Perform regular inspections of the unit checking technical fitness and any damages h Use a soft cloth for cleaning DISPOSAL OF USED UNITS At the end of its useful life this product should not be disposed of with normal household waste but should be taken to a collection point for the recycling of electrical and electronic equipment Th...

Страница 33: ...IURKO Z REGULACJĄ WYSOKOŚCI WRAZ Z BLATEM Model STAR_ATFE_18 STAR_ATFE_19 STAR_ATFE_20 Napięcie zasilania V Częstotliwość Hz 230 50 230 50 230 50 Cykl pracy 10 maksymalnie 2 minuty ciągłej pracy na 18 minut bezczynności Maksymalne dopuszczalne obciążenie kg 50 50 50 Prędkość unoszenia mm s 25 25 25 Zakres regulacji wysokości mm 730 1230 730 1230 730 1230 Wielkość blatu Szerokość x głębokość mm 120...

Страница 34: ...ega sobie prawo dokonywania zmian związanych z podwyższeniem jakości Uwzględniając postęp techniczny i możliwość ograniczenia hałasu urządzenie zaprojektowano i zbudowano tak aby ryzyko jakie wynika z emisji hałasu ograniczyć do najniższego poziomu Objaśnienie symboli Produkt spełnia wymagania odpowiednich norm bezpieczeństwa Przed użyciem należy zapoznać się z instrukcją Produkt podlegający recyk...

Страница 35: ...ce gniazda zmniejszają ryzyko porażenia prądem b Nie wolno dotykać urządzenia mokrymi lub wilgotnymi rękoma c Nie należy używać przewodu w sposób niewłaściwy Nigdy nie używać go do przenoszenia urządzenia lub do wyciągania wtyczki z gniazda Trzymać przewód z dala od źródeł ciepła oleju ostrych krawędzi lub ruchomych części Uszkodzone lub poplątane przewody zwiększają ryzyko porażenia prądem d Jeśl...

Страница 36: ...użytkowania tego urządzenia wraz z innymi urządzeniami należy zastosować się również do pozostałych instrukcji użytkowania 2 3 Bezpieczeństwo osobiste a Urządzenie nie jest przeznaczone do tego by było użytkowane przez osoby w tym dzieci o ograniczonych funkcjach psychicznych sensorycznych i umysłowych lub nieposiadające odpowiedniego doświadczenia i lub wiedzy chyba że są one nadzorowane przez os...

Страница 37: ...a do miejsca użytkowania należy uwzględnić zasady bezpieczeństwa i higieny pracy przy ręcznych pracach transportowych obowiązujących w kraju w którym urządzenia są użytkowane i Należy unikać sytuacji gdy urządzenie podczas pracy zatrzymuje się pod wpływem dużego obciążenia Może spowodować to przegrzanie się elementów napędowych i w konsekwencji uszkodzenie urządzenia j Nie wolno dotykać części lub...

Страница 38: ...czynić się do uszkodzenia pozostałych urządzeń y Nie używać produktu jeśli skrzynka sterownicza wydaje hałas lub nieprzyjemny zapach Niedozwolone są samodzielne modyfikacje zasilacza i skrzynki sterowniczej UWAGA Pomimo iż urządzenie zostało zaprojektowane tak aby było bezpieczne posiadało odpowiednie środki ochrony oraz pomimo użycia dodatkowych elementów zabezpieczających użytkownika nadal istni...

Страница 39: ...urka d 1 pozycja 1 pierwsza pozycja wysokości zapisana przez użytkownika e 2 pozycja 2 druga pozycja wysokości zapisana przez użytkownika f 3 pozycja 3 trzecia pozycja wysokości zapisana przez użytkownika g 4 pozycja 4 czwarta pozycja wysokości zapisana przez użytkownika Lista części ...

Страница 40: ...Numer Opis Rysunek Ilość 1 Blat z silnikiem 1 2 Kolumna podnosząca 2 ...

Страница 41: ...3 Panel sterowania 1 4 Podpora dolna 2 5 Przewód zasilający 1 6 Zasilacz 1 ...

Страница 42: ...o przewodów 4 8 Przewód łączący zasilacz z panelem sterującym 1 9 Śruby do montażu panelu sterującego 3 A Krótkie śruby M6 4 B Długie śruby M6 8 C Klucz imbusowy 4x4 1 D Klucz imbusowy 5x5 z końcówką krzyżakową 1 ...

Страница 43: ... sposób by w dowolnej chwili można się było dostać do wtyczki sieciowej Należy pamiętać o tym by zasilanie urządzenia energią odpowiadało danym podanym na tabliczce znamionowej MONTAŻ URZĄDZENIA Krok 1 Instalacja kolumny podnoszącej Zamontować kolumnę podnoszącą 2 do blatu 1 w następujący sposób a Włożyć sześciokątny trzpień kolumny w otwór przekładni b Obrócić kolumnę aby zaczepić haki na narożni...

Страница 44: ... kontrolnego Zamontować panel kontrolny 3 za pomocą śrub 9 i dokręcić kluczem imbusowym 5x5 D Krok 4 Podłączenie przewodów UWAGA Nie podłączać zasilacza do gniazda sieciowego przed podłączeniem wszystkich innych przewodów ...

Страница 45: ...łączyć przewód silnika do portu oznaczonego M1 z tyłu panelu sterującego 3 Włożyć zasilacz 6 do uchwytu Uporządkować przewody i umieścić je w zacisku 7 3 3 Praca z urządzeniem Regulacja wysokości Nacisnąć przycisk w górę aby zwiększyć wysokość biurka trzymanie przycisku powoduje ciągłe podnoszenie Po osiągnięciu najwyższego poziomu wyświetlacz pokaże komunikat top ...

Страница 46: ...minimum wykona krótki ruch w górę po czym wyświetlacz pokaże bot Resetowanie zostało zakończone Ustawienia czułości antykolizyjnej Funkcja umożliwiająca uniknięcie kolizji i uszkodzenia biurka Jeśli podczas regulacji wysokości biurka napotka ono na opór silniki zatrzymają się i cofną pozycję biurka Jednocześnie nacisnąć i przytrzymać przyciski w górę i w dół przez 3 sekundy aby przełączyć poziom c...

Страница 47: ...mieniowaniem słonecznym e Zabrania się spryskiwania urządzenia strumieniem wody lub zanurzania urządzenia w wodzie f Nie dopuścić do zamoczenia części elektrycznych urządzenia g Należy wykonywać regularne przeglądy urządzenia pod kątem jego sprawności technicznej oraz wszelkich uszkodzeń h Do czyszczenia należy używać miękkiej ściereczki USUWANIE ZUŻYTYCH URZĄDZEŃ Po zakończeniu okresu użytkowania...

Страница 48: ...L SE STOLOVOU DESKOU Model STAR_ATFE_18 STAR_ATFE_19 STAR_ATFE_20 Napájecí napětí V Frekvence Hz 230 50 230 50 230 50 Pracovní cyklus 10 maximálně 2 minuty nepřetržité práce a poté 18 minut klidu Maximální povolené zatížení kg 50 50 50 Rychlost zdvihu mm s 25 25 25 Rozsah nastavení výšky mm 730 1230 730 1230 730 1230 Velikost pracovní desky šířka x hloubka mm 1200 x 600 1200 x 600 1200 x 600 Hmotn...

Страница 49: ...ní navrženo a vyrobeno tak aby bylo riziko vyplývající z emisí hluku omezeno na co nejnižší úroveň Vysvětlení symbolů Výrobek splňuje požadavky příslušných bezpečnostních norem Před použitím se seznamte s pokyny Recyklovatelný výrobek UPOZORNĚNÍ nebo VAROVÁNÍ nebo NEZAPOMEŇTE popisující danou situaci všeobecná výstražná značka UPOZORNĚNÍ Varování před zásahem elektrickým proudem Zařízení II třídy ...

Страница 50: ...i tepla olejem ostrými hranami nebo pohyblivými částmi Poškozené nebo spletené kabely zvyšují riziko zasažení elektrickým proudem d Jestliže se nelze vyhnout použití zařízení ve vlhkém prostředí používejte proudový chránič RCD Použitím RCD snížíte riziko zasažení elektrickým proudem e Zařízení je zakázáno používat je li napájecí kabel poškozený nebo opotřebený Poškozený napájecí kabel nechejte vym...

Страница 51: ...e zařízením hrály c Nepřibližujte vlasy ani oděv k pohyblivým částem zařízení Volný oděv šperky nebo dlouhé vlasy mohou být pohyblivými částmi zachyceny a vtaženy 2 4 Bezpečné používání zařízení a Zařízení nepřetěžujte Používejte nářadí určené k danému účelu Správně vybrané zařízení vykoná práci pro kterou bylo navrženo lépe a bezpečněji b Zařízení nepoužívejte nefunguje li přepínač ON OFF nezapín...

Страница 52: ...ů nebo konstrukce p Zařízení nepoužívejte ani neukládejte v blízkosti zdrojů ohně a tepla q Zařízení nepřetěžujte r Překročení maximálního povoleného zatížení může způsobit poškození výrobku s Nevhodné používání výrobku např sedání na pracovní desku může výrobek poškodit a nebo způsobit zranění t Pro prevenci vážných zranění je zakázáno sedat na pracovní desku stolu u Při nastavování je zakázáno s...

Страница 53: ... za veškeré škody způsobené v důsledku používání které je v rozporu s určením zařízení nese uživatel 3 1 Popis zařízení Ovládací panel a displej b nahoru tlačítko pro zvedání stolu c dolů tlačítko pro spouštění stolu d 1 poloha 1 první poloha výšky uložená uživatelem e 2 poloha 2 druhá poloha výšky uložená uživatelem f 3 poloha 3 třetí poloha výšky uložená uživatelem g 4 poloha 4 čtvrtá poloha výš...

Страница 54: ...Číslo Popis Výkres Počet 1 Pracovní deska s motorem 1 2 Zvedací noha 2 ...

Страница 55: ...3 Ovládací panel 1 4 Dolní podpěra 2 5 Napájecí kabel 1 6 Napájecí zdroj 1 ...

Страница 56: ... spona 4 8 Propojovací kabel napájecího zdroje s ovládacím panelem 1 9 Šrouby pro montáž ovládacího panelu 3 A Krátké šrouby M6 4 B Dlouhé šrouby M6 8 C Inbusový klíč 4x4 1 D Inbusový klíč 5x5 s křížovým koncem 1 ...

Страница 57: ...těte tak aby byl vždy zajištěn přístup k síťové zástrčce Nezapomeňte že napájení zařízení musí odpovídat údajům uvedeným na typovém štítku MONTÁŽ ZAŘÍZENÍ 1 krok Instalace zvedací nohy Zvedací nohu 2 namontujte k pracovní desce 1 takto a Šestihranný trn nohy vložte do otvoru v převodu b Otočte nohou tak aby se háky v rozích podpěry zachytily o šrouby stojanu c Inbusovým klíčem C zašroubujte šrouby...

Страница 58: ...ovládacího panelu Ovládací panel 3 namontujte pomocí šroubů 9 a utáhněte inbusovým klíčem 5x5 D 4 krok Zapojení kabelů UPOZORNĚNÍ Nezapojujte napájecí zdroj do síťové zásuvky dříve než zapojíte všechny ostatní kabely ...

Страница 59: ... motoru připojte k portu s označením M1 v zadní části ovládacího panelu 3 Napájecí zdroj 6 vložte do držáku Kabely uspořádejte a sepněte kabelovou sponou 7 3 3 Práce se zařízením Nastavení výšky Stiskněte tlačítko nahoru pro zvýšení výšky stolu stůl se bude zvedat tak dlouho jak dlouho budete držet tlačítko Po dosažení nejvyšší úrovně se na displeji zobrazí zpráva top ...

Страница 60: ...ání bylo dokončeno Nastavení antikolizní citlivosti Tato funkce umožňuje zabránit kolizi a poškození pracovního stolu Pokud při nastavování výšky pracovní stůl narazí na odpor motory se zastaví a vrátí polohu stolu zpět Pro přepnutí úrovně citlivosti stiskněte a přidržte na 3 vteřiny současně tlačítka nahoru a dolů K dispozici jsou tyto úrovně A 0 funkce je vypnuta A 1 nízká citlivost A 2 střední ...

Страница 61: ...o vody f Nedopusťte aby elektrické části zařízení byly mokré g Zařízení pravidelně kontrolujte z hlediska jeho technické funkčnosti a na jakákoli poškození h K čistění používejte měkký hadřík LIKVIDACE OPOTŘEBOVANÝCH ZAŘÍZENÍ Po skončení životnosti toto zařízení nelikvidujte s normálním komunálním odpadem ale odevzdejte ho do sběrného dvora za účelem recyklace elektrických a elektronických zařízen...

Страница 62: ...00 1200x600 1200x600 Poids kg 30 32 31 Désignation du paramètre Valeur du paramètre Nom du produit BUREAU RÉGLABLE EN HAUTEUR AVEC PLATEAU DE TABLE Modèle STAR_ATFE_18 STAR_ATFE_19 STAR_ATFE_20 Tension d alimentation V Fréquence Hz 230 50 230 50 230 50 Cycle de fonctionnement 10 max 2 minutes de fonctionnement continu 18 minutes au repos Capacité de charge maximale kg 50 50 50 Vitesse de levage mm...

Страница 63: ...s et les spécifications contenues dans ce mode d emploi sont à jour Le fabricant se réserve le droit d apporter des modifications pour améliorer la qualité L appareil est conçu et construit de manière à minimiser les risques liés à l émission de bruit compte tenu des progrès technologiques et de la possibilité de réduction du niveau sonore Signification des symboles Le produit répond aux exigences...

Страница 64: ...les prises correspondantes réduisent le risque d électrisation b Ne touchez pas l appareil avec des mains mouillées ou humides c N utilisez pas le câble à mauvais escient Ne l utilisez jamais pour déplacer l appareil ou pour retirer la fiche de la prise Gardez le câble à l écart des sources de chaleur de l huile des arêtes tranchantes et des pièces mobiles Les fils endommagés ou emmêlés augmentent...

Страница 65: ...uctions d utilisation de ces derniers doivent également être respectées 2 3 Sécurité personnelle a L appareil n est pas destiné à être utilisé par des personnes y compris les enfants aux capacités mentales sensorielles ou intellectuelles réduites ou qui manquent d expérience et ou de connaissances appropriées à moins qu elles ne soient surveillées par une personne responsable de leur sécurité ou q...

Страница 66: ...s le pays où l appareil est utilisé i Évitez les situations où l appareil s arrête sous une forte charge pendant le fonctionnement Cela risque de surchauffer les éléments d entraînement et par conséquent d endommager l appareil j Ne touchez pas les pièces ou les accessoires mobiles sauf si l appareil a été débranché de l alimentation électrique k Il est interdit de faire glisser de déplacer ou de ...

Страница 67: ...l ne faut pas essayer de modifier l alimentation électrique ou le boîtier de commande ATTENTION Bien que l appareil ait été conçu pour fonctionner en sécurité et muni de protections adéquates et d éléments supplémentaires protégeant l utilisateur il existe toujours un petit risque d accident ou de blessure lors de la manipulation de l appareil Soyez donc prudent et raisonnable lors de son utilisat...

Страница 68: ...avail d 1 position 1 premier réglage de hauteur enregistré par l utilisateur e 2 position 2 deuxième réglage de hauteur enregistré par l utilisateur f 3 position 3 troisième réglage de hauteur enregistré par l utilisateur g 4 position 4 quatrième réglage de hauteur enregistré par l utilisateur Liste des pièces ...

Страница 69: ...Numéro Désignation Plan Quantité 1 Plan de travail avec moteur 1 2 Colonne de levage 2 ...

Страница 70: ...3 Panneau de commande 1 4 Support inférieur 2 5 Câble d alimentation 1 6 Alimentation 1 ...

Страница 71: ... 4 8 Câble de connexion entre l alimentation et le panneau de commande 1 9 Vis de fixation pour le panneau de commande 3 A Vis M6 courtes 4 B Vis M6 longues 8 C Clé allen 4x4 1 D Clé allen 5x5 à pointe cruciforme 1 ...

Страница 72: ...surez vous que l alimentation électrique de l appareil correspond aux informations indiquées sur la plaque signalétique ASSEMBLAGE DE L APPAREIL Étape 1 Montage de la colonne de levage Fixez la colonne de levage 2 au plan de travail 1 comme suit a Insérez la tige hexagonale de la colonne de levage dans le trou de l engrenage b Tournez la colonne de manière à ce que les crochets situés aux coins du...

Страница 73: ...de Fixez le panneau de commande 3 avec les vis 9 et serrez à l aide de la clé allen 5x5 D Étape 4 Raccordement des câbles NOTA Ne branchez pas l alimentation électrique sur la prise de courant avant d avoir connecté tous les autres câbles ...

Страница 74: ...le du moteur au connecteur marqué M1 à l arrière du panneau de commande 3 Insérez l alimentation électrique 6 dans le support Rangez les câbles et placez les dans le serre câble 7 3 3 Utilisation de l appareil Réglage de la hauteur Appuyez sur le bouton vers le haut pour relever le plan de travail maintenez le bouton enfoncé pour un levage continu Une fois le niveau le plus élevé atteint l écran a...

Страница 75: ...on la plus basse il remonte légèrement et l écran affiche bot Le processus de réinitialisation est maintenant terminé Réglage de la sensibilité anti collision Cette fonctionnalité permet d éviter les collisions et de prévenir les dommages consécutifs La détection d une résistance lors du réglage de la hauteur entraîne l arrêt et l inversion des moteurs Appuyez simultanément sur les boutons vers le...

Страница 76: ...bstances caustiques c Après chaque nettoyage séchez tous les composants avant de réutiliser l appareil d Conservez l appareil dans un endroit sec et frais à l abri de l humidité et des rayons directs du soleil e Il est interdit de tremper l appareil avec un jet d eau ou de l immerger dans l eau f Faites attention à ne pas mouiller les parties électriques de l appareil g Effectuez des inspections r...

Страница 77: ...0x600 Peso kg 30 32 31 Descrizione del parametro Valore del parametro Nome del prodotto SCRIVANIA REGOLABILE IN ALTEZZA CON PIANO DI LAVORO Modello STAR_ATFE_18 STAR_ATFE_19 STAR_ATFE_20 Tensione di alimentazione V Frequenza Hz 230 50 230 50 230 50 Ciclo di lavoro 10 massimo 2 minuti di funzionamento continuo per 18 minuti di inattività Carico massimo consentito kg 50 50 50 Velocità di sollevament...

Страница 78: ... di questo manuale sono aggiornati Il produttore si riserva il diritto di apportare modifiche per migliorare la qualità Tenendo conto del progresso tecnologico e della possibilità di ridurre il rumore l apparecchio è progettato e costruito in modo tale che il rischio derivante dall emissione di rumore sia ridotto al livello più basso Spiegazione dei simboli Il prodotto soddisfa i requisiti degli s...

Страница 79: ... modo improprio Non utilizzare mai il cavo per trasportare l apparecchio o per tirare o estrarre la spina dal contatto Tenere il cavo lontano da fonti di calore olio bordi taglienti o parti in movimento I cavi danneggiati o aggrovigliati aumentano il rischio di scosse elettriche d Se l uso dell apparecchio in un ambiente umido non può essere evitato è necessario utilizzare un interruttore differen...

Страница 80: ...è destinato ad essere utilizzato da persone compresi i bambini con funzioni mentali sensoriali o intellettuali ridotte o con mancanza di esperienza e o conoscenza a meno che non siano sorvegliati da una persona responsabile della loro sicurezza o abbiano ricevuto istruzioni su come utilizzare la macchina b L apparecchio non è un giocattolo I bambini non devono giocare con l apparecchio c Tenere i ...

Страница 81: ...ionamento Questo può causare il surriscaldamento dei componenti dell unità e di conseguenza danneggiare l unità j Non toccare le parti in movimento o gli accessori se l apparecchio non è stata scollegato dall alimentazione k È vietato muovere spostare o ruotare l apparecchio durante il funzionamento l Non lasciare l apparecchio acceso senza sorveglianza m Pulire regolarmente l apparecchio per evit...

Страница 82: ...icare l alimentazione e la scatola di controllo da soli ATTENZIONE Anche se l apparecchio è stato progettato per essere sicuro sia dotato di adeguate protezioni e nonostante l uso di ulteriori elementi di sicurezza per l utente c è ancora un piccolo rischio di incidente o lesione durante l utilizzo dell apparecchiatura Si consiglia di mantenere la cautela e il buon senso durante l utilizzo 3 Princ...

Страница 83: ...izione di altezza salvata dall utente e 2 posizione 2 seconda posizione di altezza salvata dall utente f 3 posizione 3 la terza posizione di altezza salvata dall utente g 4 posizione 4 la quarta posizione di altezza salvata dall utente Elenco delle parti Numero Descrizione Disegno Quantità 1 Piano del tavolo con motore 1 ...

Страница 84: ...2 Colonna di sollevamento 2 3 Pannello di comando 1 4 Supporto inferiore 2 5 Cavo di alimentazione 1 6 Alimentatore 1 ...

Страница 85: ...Cavo di collegamento tra l alimentatore e il pannello di controllo 1 9 Viti per il montaggio del pannello di controllo 3 A Viti corte M6 4 B Viti lunghe M6 8 C Chiave a brugola 4x4 1 D Chiave a brugola 5x5 con testa a croce 1 ...

Страница 86: ...a in qualsiasi momento Assicurarsi che l alimentazione elettrica dell apparecchio corrisponda ai dati riportati sulla targhetta MONTAGGIO DELL APPARECCHIO Passo 1 Installazione della colonna di sollevamento Montare la colonna di sollevamento 2 sul piano del tavolo 1 come segue a Inserire l albero esagonale della colonna nel foro del cambio b Girare la colonna per agganciare i ganci sugli angoli de...

Страница 87: ...ntrollo Montare il pannello di controllo 3 con le viti 9 e stringere con una chiave a brugola 5x5 D Passo 4 Collegamento dei cavi ATTENZIONE Non collegare l alimentatore alla presa di corrente prima di aver collegato tutti gli altri cavi ...

Страница 88: ... il cavo del motore alla porta marcata M1 sul retro del pannello di controllo 3 Inserire l alimentatore 6 nel supporto Disporre i cavi e metterli nella fascetta 7 3 3 Lavoro con l apparecchio Regolazione dell altezza Premere il pulsante su per aumentare l altezza della scrivania tenendo premuto il pulsante la si alza continuamente Quando viene raggiunto il livello più alto il display mostrerà top ...

Страница 89: ...assa al minimo farà un breve movimento verso l alto dopo di che il display mostrerà bot Il reset è stato completato Impostazioni di sensibilità anticollisione Una caratteristica per evitare collisioni e danni alla scrivania Se la scrivania incontra resistenza durante la regolazione dell altezza i motori si fermano e invertono la posizione della scrivania Tenere premuti contemporaneamente i pulsant...

Страница 90: ... ogni pulizia tutti i componenti devono essere asciugati bene prima di utilizzare nuovamente l apparecchio d Conservare l apparecchio in un luogo asciutto e fresco al riparo dall umidità e dalla luce solare diretta e È vietato spruzzare l apparecchio con un getto d acqua o immergerlo in acqua f Non permettere che le parti elettriche del dispositivo si bagnino g Eseguire ispezioni regolari dell app...

Страница 91: ...ALTURA CON TABLERO Modelo STAR_ATFE_18 STAR_ATFE_19 STAR_ATFE_20 Voltaje de alimentación V Frecuencia Hz 230 50 230 50 230 50 Ciclo de trabajo 10 2 minutos de funcionamiento continuo como máximo 18 minutos en reposo Carga máxima kg 50 50 50 Velocidad de elevación mm s 25 25 25 Rango de ajuste de altura mm 730 1230 730 1230 730 1230 Dimensiones de la encimera anchura x profundidad mm 1200x600 1200x...

Страница 92: ...es tecnológicos y la capacidad de reducir el ruido el aparato está desarrollado y construido para reducir al mínimo el riesgo relacionado con la exposición al ruido Aclaración de los símbolos El producto cumple con los requisitos de las correspondientes normas de seguridad Antes de utilizar leer atentamente el manual Producto reciclable NOTA o ADVERTENCIA o RECORDATORIO que describe una situación ...

Страница 93: ...lar el equipo ni sacar la clavija tirando del cable Mantener el cable alejado de las fuentes de calor aceites cantos cortantes o piezas móviles Los cables dañados o enredados aumentan el riesgo de descarga eléctrica d Si es inevitable utilizar el equipo en un entorno húmedo se debe utilizar un dispositivo diferencial residual RCD El uso de un RCD reduce el riesgo de descarga eléctrica e Está prohi...

Страница 94: ...ones de uso 2 3 Seguridad personal a El equipo no está destinado a ser utilizado por personas incluidos los niños con funciones mentales sensoriales o intelectuales reducidas o con falta de experiencia y o conocimientos a menos que estén supervisadas por una persona responsable de su seguridad o que ésta les haya dado instrucciones cómo operar el equipo b El dispositivo no es un juguete Los niños ...

Страница 95: ...prevención de riesgos laborales durante la manipulación aplicables en el país donde se utilizan los dispositivos i Evitar situaciones en las que el dispositivo se para durante el funcionamiento por sobrecarga Esto puede provocar que los componentes de accionamiento se sobrecalienten y causen avería j Las piezas o los accesorios móviles no deben tocarse a menos que el equipo se haya desconectado de...

Страница 96: ... olor desagradable No intente modificar la fuente de alimentación o la caja de control ADVERTENCIA Aunque el equipo ha sido diseñado para ser seguro con las protecciones adecuadas y a pesar del uso de elementos de seguridad adicionales para el usuario sigue existiendo un pequeño riesgo de accidente o lesión al manipular el equipo Se recomienda mantener precaución y actuar con sentido común al util...

Страница 97: ...cimera d 1 posición 1 primer ajuste de altura guardado por el usuario e 2 posición 2 segundo ajuste de altura guardado por el usuario f 3 posición 3 tercer ajuste de altura guardado por el usuario g 4 posición 4 cuarto ajuste de altura guardado por el usuario Listado de las piezas ...

Страница 98: ...Número Descripción Figura Cantidad 1 Encimera con motor 1 2 Columna de elevación 2 ...

Страница 99: ...3 Panel de mando 1 4 Soporte inferior 2 5 Cable de alimentación 1 6 Fuente de alimentación 1 ...

Страница 100: ...es 4 8 Cable de unión entre la fuente de alimentación y el panel de mando 1 9 Tornillos de fijación del panel de mando 3 A Tornillos cortos M6 4 B Tornillos largos M6 8 C Llave allen 4x4 1 D Llave allen con punta de cruz 1 ...

Страница 101: ...que la fuente de alimentación del dispositivo coincida con los datos indicados en la placa de características ENSAMBLAJE DEL DISPOSITIVO Paso 1 Montaje de la columna de elevación Una la columna de elevación 2 a la encimera 1 del siguiente modo a Introduzca la punta hexagonal de la columna en el orificio del engranaje b Gire la columna para enganchar los ganchos en las esquinas del soporte en los t...

Страница 102: ...e mando Fije el panel de mando 3 con los tornillos 9 y apriete con la llave allen 5x5 D Paso 4 Conexión de los cables ATENCIÓN No conecte la fuente de alimentación a la toma de corriente antes de conectar todos los demás cables ...

Страница 103: ...ción 6 Conecte el cable del motor al conector marcado M1 en la parte posterior del panel de mando 3 Inserte la fuente de alimentación 6 en el soporte Ordene los cables y colóquelos en la abrazadera 7 3 3 Trabajo con la herramienta Ajuste de altura Presione el botón arriba para elevar la encimera mantenga pulsado el botón para elevar continuamente Una vez alcanzada la altura máxima la pantalla mues...

Страница 104: ...cio ha finalizado Ajuste de la sensibilidad anticolisión Esta función previene las colisiones y los daños derivados de las mismas Al detectar una resistencia durante el ajuste de altura los motores se detienen y retroceden Mantenga pulsados los botones arriba y abajo simultáneamente durante 3 segundos para cambiar el nivel de sensibilidad Niveles disponibles A 0 función desactivada A 1 sensibilida...

Страница 105: ...a o sumergirla en el agua f Tenga cuidado de no mojar los elementos eléctricos del equipo g Se deben realizar inspecciones periódicas del equipo para asegurarse de que está en buen estado de funcionamiento y de que no se ha producido ningún daño h Limpiar con un paño suave ELIMINACIÓN DE DISPOSITIVOS USADOS Al final de su vida útil este producto no debe desecharse con la basura doméstica normal si...

Страница 106: ...mék neve ÁLLÍTHATÓ MAGASSÁGÚ ÍRÓASZTAL ÉS ASZTALLAP Modell STAR_ATFE_18 STAR_ATFE_19 STAR_ATFE_20 Tápfeszültség V Frekvencia Hz 230 50 230 50 230 50 Munkaciklus 10 maximum 2 perc folyamatos használat 18 perc inaktivitás esetén Maximális terhelhetőség kg 50 50 50 Emelkedési sebesség mm s 25 25 25 Magasságbeállítási tartomány mm 730 1230 730 1230 730 1230 Asztallap mérete szélesség x mélység mm 1200...

Страница 107: ...ntartja magának a jogot a termék minőségének javítására módosítására A legújabb műszaki megoldások és a zajcsökkentési technológiák figyelembe vételével a készülék úgy lett megtervezve és megépítve hogy a zajkibocsátásból eredő esetleges kockázat a lehető legalacsonyabb legyen Szimbólummagyarázat A termék megfelel a vonatkozó biztonsági szabványok követelményeinek Használat előtt olvassa el a hasz...

Страница 108: ...d módosítani Az eredeti villásdugók és a megfelelő aljzatok csökkentik az áramütés kockázatát b Ne érintse meg a készüléket vizes vagy nedves kézzel c Ne használja a kábelt rendeltetésétől eltérően Soha ne használja a készülék felemelésére vagy a konnektorból való kihúzásra A kábelt tartsa távol hőtől olajtól éles szegélyektől vagy mozgó alkatrészektől A sérült vagy összegabalyodott vezetékek növe...

Страница 109: ...álati utasítást is 2 3 Személyekre vonatkozó biztonsági szabályok a A készüléket nem használhatják csökkent szellemi érzékszervi és mentális funkciókkal rendelkező személyek beleértve a gyerekeket valamint nem használhatják megfelelő tapasztalattal és vagy ismeretekkel nem rendelkező személyek kivéve ha egy a biztonságukért felelős személy felügyeli munkájukat vagy elmagyarázta hogy hogyan kell ke...

Страница 110: ... a meghajtó alkatrészeinek túlmelegedéséhez és az egység károsodásához vezethet j A mozgó alkatrészeket vagy tartozékokat csak akkor szabad megérinteni ha a készülék le van választva az áramellátásról k Tilos a készüléket működés közben mozgatni áthelyezni vagy forgatni l Ne hagyja felügyelet nélkül a készüléket amíg be van kapcsolva m Rendszeresen tisztítsa meg a készüléket hogy megakadályozza a ...

Страница 111: ...ezérlőegységet önállóan módosítani tilos VIGYÁZAT Annak ellenére hogy a készülék minél biztonságosabbra lett tervezve fel lett szerelve megfelelő biztonsági eszközökkel valamint a felhasználó biztonságát óvó plusz elemek használatának ellenére is fennáll a baleset vagy sérülés veszélye a készülékkel való munka során A termék használata során járjon el óvatosan és a józan ész szabályai szerint 3 Üz...

Страница 112: ...ó a felhasználó által elmentett első pozíció e 2 2 pozíció a felhasználó által elmentett második pozíció f 3 3 pozíció a felhasználó által elmentett harmadik pozíció g 4 4 pozíció a felhasználó által elmentett negyedik pozíció Alkatrészek listája Szám Magyarázat Rajz Mennyiség 1 Asztallap és motor 1 ...

Страница 113: ...2 Emelőoszlop 2 3 Kezelőpanel 1 4 Alsó támasz 2 5 Tápkábel 1 6 Tápegység 1 ...

Страница 114: ...lbilincs 4 8 A tápegységet a vezérlőpanellel összekötő kábel 1 9 Csavarok a vezérlőpanel rögzítéséhez 3 A M6 rövid csavarok 4 B M6 hosszú csavarok 8 C 4x4 imbuszkulcs 1 D 5x5 imbuszkulcs hatszögfejű véggel 1 ...

Страница 115: ...ója bármikor elérhető legyen Ellenőrizni kell hogy a készülék tápellátása megfelel e az adattáblán megadott adatoknak A KÉSZÜLÉK ÖSSZESZERELÉSE 1 lépés Az emelőoszlop felszerelése Rögzítse az emelőoszlopot 2 az asztallaphoz 1 az alábbiak szerint a Helyezze be az oszlop hatszögletű tengelyét a váltó furatába b Forgassa el az oszlopot hogy rögzítse a tartó sarkain lévő horgokat az állványcsavarokkal...

Страница 116: ... Szerelje fel a vezérlőpanelt 3 a csavarokkal 9 és húzza meg 5x5 ös imbuszkulccsal D 4 lépés A vezetékek csatlakoztatása FIGYELEM Ne csatlakoztassa a hálózati adaptert a hálózati aljzathoz ha még nem csatlakoztatta az összes többi kábelt ...

Страница 117: ...torkábelt a kezelőpanel hátulján 3 lévő M1 jelű porthoz Helyezze be a hálózati adaptert 6 a tartóba Rendezze el a vezetékeket és helyezze őket a kapocsba 7 3 3 A készülék használata Magasságbeállítás Nyomja meg a fel gombot az asztal magasságának növeléséhez a gomb folyamatos nyomva tartása folyamatos emelést tesz lehetővé A legfelső szint elérésekor a kijelzőn megjelenik a top felirat ...

Страница 118: ...i a magasságot rövid felfelé mozgást végez és a kijelzőn megjelenik a bot felirat Az újraindítás befejeződött Az ütközésgátló érzékenységének beállításai Az ütközés és az asztal sérülésének elkerülésére szolgáló funkció Ha az asztal ellenállásba ütközik a magasságnak beállításakor a motorok leállnak és az asztal visszaáll az eredeti helyzetbe Nyomja le és tartsa lenyomva egyszerre a fel és a le go...

Страница 119: ...t b A felület tisztítására csak maró anyagoktól mentes tisztítószereket szabad használni c Minden tisztítás után az összes alkatrészt alaposan meg kell szárítani a készülék újbóli használata előtt d A készüléket hűvös és száraz helyen nedvességtől és közvetlen napfénytől védve kell tárolni e Tilos a készüléket vízsugárral fröcskölni vagy vízbe meríteni f Ügyeljen rá hogy a készülék elektromos alka...

Страница 120: ...A helyi hatóságoknál lehet tájékozódni a használt eszközök helyi hulladékkezelő gyűjtőhelyről ...

Страница 121: ...AR_ATFE_18 STAR_ATFE_19 STAR_ATFE_20 Forsyningsspænding V Frekvens Hz 230 50 230 50 230 50 Driftscyklus 10 maksimalt 2 minutters kontinuerlig brug i 18 minutters inaktivitet Maksimal tilladt belastning kg 50 50 50 Løftehastighed mm s 25 25 25 Højdejusteringsområde mm 730 1230 730 1230 730 1230 Bordpladestørrelse Bredde x dybde mm 1200x600 1200x600 1200x600 Vægt kg 31 31 31 OBS Lad apparatet køle a...

Страница 122: ...er i forbindelse med forøgelse af kvaliteten Apparatet er designet og bygget på en sådan måde at risikoen for støjemission begrænses til det laveste niveau Symbolbeskrivelse Produktet opfylder kravene angivet i de relevante sikkerhedsstandarder Læs betjeningsvejledningen inden brug Produktet er genanvendeligt OBS eller ADVARSEL eller HUSK beskriver en given situation generelt advarselsskilt OBS Ad...

Страница 123: ...e ledninger øger risikoen for elektrisk stød d Hvis det er uundgåeligt at bruge apparatet i et fugtigt miljø skal der bruges en fejlstrømsenhed RCD Brug af en RCD reducerer risikoen for elektrisk stød e Det er forbudt at bruge apparatet hvis netledningen er beskadiget eller viser synlige tegn på slid En beskadiget netledning bør udskiftes af en autoriseret elektriker eller producentens kundeservic...

Страница 124: ...paratet c Hold hår og tøj væk fra bevægelige dele Løst tøj smykker eller langt hår kan fanges i bevægelige dele 2 4 Sikker brug af apparatet a Overbelast ikke apparatet Brug værktøjer der er egnede til applikationen Korrekt valgt apparat udfører bedre og sikrere arbejde som den er designet til b Brug ikke apparatet hvis ON OFF kontakten ikke fungerer korrekt den kan ikke tænde eller slukke apparat...

Страница 125: ...metre eller konstruktion p Hold apparaterne væk fra varmekilder og ild q Overbelast ikke apparatet r Hvis den maksimale brugervægt overskrides kan produktet blive beskadiget s Ukorrekt brug af produktet såsom at sidde på bordpladen kan resultere i skade på produktet og eller personskade t Det er forbudt at sidde på skrivebordet for at forhindre alvorlig personskade u Det er forbudt at bevæge sig e...

Страница 126: ... for enhver skade der skyldes brug i modstrid med den tilsigtede anvendelse 3 1 Beskrivelse af apparatet Betjeningspanel a display b op knap til at øge skrivebordshøjde c ned knap til at reducere skrivebordshøjde d 1 position 1 den første højdeposition gemt af brugeren e 2 position 2 den anden højdeposition gemt af brugeren f 3 position 3 den tredje højdeposition gemt af brugeren d 4 position 4 de...

Страница 127: ...Nummer Parameter Figur Antal 1 Bordplade med motor 1 2 Løftestolpe 2 ...

Страница 128: ...3 Betjeningspanel 1 4 Lav støtte 2 5 Strømkabel 1 6 Strømforsyning 1 ...

Страница 129: ...mme 4 8 Kablet der forbinder strømforsyningen med betjeningspanelet 1 9 Skruer til montering af betjeningspanelet 3 A Korte M6 skruer 4 B Lange M6 skruer 8 C 4x4 unbrakonøgle 1 D 5x5 unbrakonøgle med krydshoved 1 ...

Страница 130: ...når som helst kan nås Sørg for at strømforsyningen til apparatet svarer til de data der er angivet på typeskiltet MONTERING AF APPARATET Trin 1 Montering af løftestangen Fastgør løftesøjlen 2 til bordpladen 1 som følger a Indsæt stangens sekskantede aksel ind i gearkassens hul b Drej stangen for at gå i indgreb med krogene på hjørnerne af støtten med stativskruerne c Brug en unbrakonøgle C til at ...

Страница 131: ... af betjeningspanelet Monter betjeningspanelet 3 med skruerne 9 og spænd med 5x5 unbrakonøglen D Trin 4 Tilslutning af ledninger OBS Tilslut ikke strømforsyningen til en stikkontakt før du har tilsluttet alle andre kabler ...

Страница 132: ...ningspanelet 3 Sæt strømforsyningen 6 i holderen Organiser ledningerne og anbring dem i klemmen 7 3 3 Arbejde med apparatet Højderegulering Tryk på op knappen for at øge højden af skrivebordet højden hæves konstant ved at holde knappen Når det øverste niveau er nået displayet viser top Tryk på ned knappen for at sænke højden af skrivebordet højden sænkes konstant ved at holde knappen Når det neder...

Страница 133: ...g af skrivebordshøjden stopper motorerne og skrivebordet bevæger sig tilbage på plads Tryk og hold op og ned knapperne samtidigt i 3 sekunder for at skifte følsomhedsniveau De tilgængelige niveauer er A 0 funktion deaktiveret A 1 lav følsomhed A 2 medium følsomhed fabriksindstilling A 3 høj følsomhed 29V DC strømfunktion Når enheden er tilsluttet strømforsyningen ved det 2 benede stik på bagsiden ...

Страница 134: ... mod fugt og direkte sollys e Det er forbudt at sprøjte apparatet med en vandstrøm eller nedsænke det i vand f Lad ikke enhedens elektriske dele blive våde g Der bør udføres regelmæssig inspektion af apparatet med hensyn til dens tekniske effektivitet og eventuelle skader h Brug en blød klud til rengøring BORTSKAFFELSE AF BRUGTE UDSTYR Ved slutningen af dets levetid må dette produkt ikke bortskaff...

Страница 135: ...enden Möglichkeiten der Rückgabe oder Sammlung von Altgeräten 1 RICHTLINIE 2002 96 EG DES EUROPÄISCHEN PARLAMENTS UND DES RATES ÜBER ELEKTRO UND ELEKTRONIK ALTGERÄTE 2 Gesetz über das Inverkehrbringen die Rücknahme und die umweltverträgliche Entsorgung von Elektro und Elektronikgeräten Elektro und Elektronikgerätegesetz ElektroG UMWELT UND ENTSORGUNGSHINWEISE Utylizacja produktu Produkty elektrycz...

Отзывы: