Frigidaire Full Size Tumble Action Washers Скачать руководство пользователя страница 6


INSTALLATION (CON'T)

5.

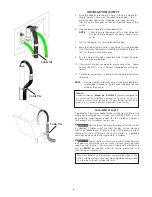
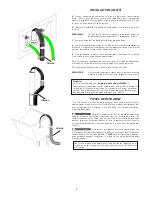
Place the hook end of the drain hose in the drain opening.
Secure the drain hose with the cable tie (provided in the
enclosure package) to the standpipe, inlet hose, laundry
tub, etc. so the hose does not pull out from the force of the
water.

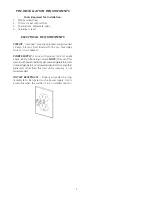
6.    Plug the power cord into a grounded outlet.

NOTE:

Check to ensure the power is off at a circuit breaker/
fuse box before plugging the power cord into an
outlet.

7.    Turn on the power at a circuit breaker/fuse box.

8.

Read the Operating Instructions and Owner’s Guide provided
with the washer. They contain valuable and helpful information
that will save you time and money.

9.

Run the washer through a complete cycle. Check for water
leaks and proper operation.

10. If your washer does not operate, please review the “Avoid

Service Checklist” in your Owner’s Guide before calling for
service.

11. Place these instructions in a location near the washer for future

reference.

NOTE:

A wiring diagram and technical data sheet are located in
an envelope attached to the left hand side panel on the
inside of the washer.

                                  REPLACEMENT PARTS

If replacements parts are needed for your washer, contact the source
where you purchased your washer, call 1-800-944-9044, or visit
our website, www.frigidaire.com, for the Frigidaire Company
Authorized Parts Distributor nearest you.

 Destroy the carton and plastic bags after the washer

is unpacked. Children might use them for play. Cartons covered
with rugs, bedspreads, or plastic sheets can become airtight
chambers causing suffocation. Place all materials in a garbage
container or make materials inaccessible to children.

 The instructions in this manual and all other literature

included with this washer are not meant to cover every possible
condition and situation that may occur. Good safe practice and
caution 

MUST

 be applied when installing, operating and

maintaining any appliance.

Maximum benefits and enjoyment are achieved when all the
Safety and Operating instructions are understood and practiced
as a routine with your laundering tasks.

Cable Tie

Cable Tie

Cable Tie

6

Pedestal

A pedestal accessory, 

Model No.


NLPWD15

, specifically designed for

this washer may be used when elevating the washer for ease of use.
Failure to use accessories certified by the manufacturer could result in
personal injury, property damage or damage to the washer.

Содержание Full Size Tumble Action Washers

Страница 1: ...on Of Your Washer 4 Unpacking 4 Installation 4 6 Replacement Parts 6 Printed in U S A P N 134594900A 0509 For your safety the information in this manual must be followed to minimize the risk of fire or explosion or to prevent property damage personal injury or loss of life Do not store or use gasoline or other flammable vapors and liquid in the vicinity of this or any other appliance WHAT TO DO IF...

Страница 2: ...ed with 15 amp time delay fuse or circuit breaker POWER SUPPLY 2 wire with ground 120 volt single phase 60 Hz Alternating Current NOTE The use of this washerwithpowercreatedbygaspoweredgenerators solar poweredgenerators windpoweredgeneratorsoranyother generator other than the local utility company is not recommended OUTLET RECEPTACLE Properly grounded 3 prong receptacle to be located so the power ...

Страница 3: ...3 ROUGH IN DIMENSIONS NOTE For pedestal or undercounter installation reference page 5 Installation With leveling leg lock nuts removed A A ...

Страница 4: ...ve the carton 5 Carefully move the washer to within 4 feet 122cm of the final location 6 Remove the following from the back panel of the washer 4 packaging bolts 4 spacers 2 metal P clamps 7 Cover the bolt holes with plugs located in the literature bag 8 Using the shipping posts prop up the front of the washer approximatley 2 inches to gain access to the service panel screws 9 Remove the 2 screws ...

Страница 5: ...5 ...

Страница 6: ...PLACEMENT PARTS If replacements parts are needed for your washer contact the source where you purchased your washer call 1 800 944 9044 or visit our website www frigidaire com for the Frigidaire Company Authorized Parts Distributor nearest you Destroy the carton and plastic bags after the washer is unpacked Children might use them for play Cartons covered with rugs bedspreads or plastic sheets can...

Страница 7: ...change 6 Imprimé aux Etats Unis N P 134594900A 0509 Pour votre sécurité suivre les directives données dans le présent guide afin de minimiser les risques d incendie d explosion de dommages matériels de blessures et de mort Ne pas entreposer ni utiliser d essence ou d autres vapeurs ou liquides inflammables à proximité de cette sécheuse ou de tout autre appareil électroménager QUE FAIRE S IL Y A UN...

Страница 8: ...es instructions de la compagnie de gaz S il est impossible de joindre la compagnie de gaz appeler les pompiers L installation et les réparations doivent être effectuées par un technicien qualifié un agent de service ou la compagnie de gaz Imprimé aux États Unis 1 La laveuse DOIT être mise à la terre En cas de mauvais fonctionnement ou de panne la mise à la terre réduit les risques d électrocution ...

Страница 9: ...ivée d eau Côté Arrière po cm po cm po cm po cm po cm po cm po cm po cm po cm po cm Cordon d alimentation Boyau d évacuation Avec niveler des contre écrous de jambe enlevés A A NOTE Pour l installation de piédestal ou d undercounter page 5 de référence installation ...

Страница 10: ...entetoises 2 attaches à pressio dégager cordon du service Enlevez les fixations gaunches et droits de mousse Enlevez les 2 Vis et sous le Panneau de Service 7 Couvrez les trous de boulon de prises situées dans le sac de littérature 8 Utilisant les poteaux d expédition l appui vertical vers le haut de l avant de l approximatley 2 pouces de laveuse s avance petit à petit pour accéder sur les vis de ...

Страница 11: ...5 ...

Страница 12: ... le serre câble fourni dans le paquet de clôture à la colonne le tuyau d admission le baquet de blanchisserie etc ainsi le tuyau ne retire pas de la force de l eau 6 Brancher le cordon d alimentation électrique dans une prise murale mise à la terre REMARQUE S assurer que le courant est coupé à la boîte de fusibles ou de disjoncteurs avant de brancher le cordon dans la prise 7 Remettre le courant à...

Отзывы: