Frigidaire Full Size Tumble Action Washers Скачать руководство пользователя страница 4

4

LOCATION OF YOUR WASHER

DO NOT INSTALL YOUR WASHER:

1.

In an area exposed to dripping water or outside
weather conditions. The ambient temperature should
never be below 60 ° F (15.6 ° C) for proper washer
(detergent breakdown) operation.

2.

In an area where it will come in contact with curtains
or drapes.

3.

In an area (garage or garage-type building) where
gasoline of other flammables are kept or stored
(including automobiles).

4.

On carpet. Floor 

MUST

 be solid with a maximum

slope of 1/2 in. per foot (1.27 cm per 30.5 cm). To
ensure vibration or movement does not occur,
reinforcement of the floor may be necessary.

IMPORTANT
MINIMUM INSTALLATION CLEARANCES
When installed in alcove or closet:

      Sides, Rear = 0 in. (0 cm)
      Top = 0 in. (0 cm)

When installed in closet:

  Front = 1 in. (2.54 cm)

Closet door ventilation required: 2 louvered openings each
60 in

2

 (387 cm

2

), 3 in. (7.6 cm) from top and bottom of

door.

UNPACKING

1.

Cut the shipping carton along the dotted line along
the base of the unit.

2.

While in the carton carefully lay the washer on its
back side.

3.

Remove the styrofoam base.

4.

Carefully return the washer to an upright position
and remove the carton.

5.

Carefully move the washer to within 4 feet (122cm)
of the final location.

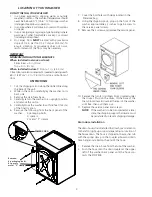
6.

Remove the following from the back panel of the
washer:      4 packaging bolts,

  4  spacers,

                       2 metal "P" clamps,

7.    Cover the bolt holes with plugs located in the
       literature bag.
8.

Using the shipping posts, prop up the front of the
washer approximatley 2 inches to gain access to
the service panel screws.

9.    Remove the 2 screws and remove the service panel.

10. Remove the two (2) styrofoam blocks located under

the drum. Lift up on the drum, tilt the base of the
foam blocks inwards toward the rear of the washer
until free, then pull them out.

11. Replace the service panel and screws.

NOTE:

If the washer is to be transported at a later
date, the shipping support hardware must
be reinstalled to prevent shipping damage.

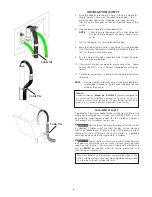
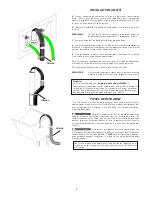
Drain Hose Installation

The drain hose is field installed to allow hose orientation
to the left or right, up or down depending on location of
the house drain. The hose is shipped in the washer tub
with the spring clamp on the coupler elbow and drain
hose hanger installed on the end of the hose.

1.

Remove the drain hose from the tub of the washer.

2.

Push the hose onto the drain coupler at the upper
left of the washer back panel until the hose con-
tacts the STOP RIB.


POWER CORD

Remove:
4 packaging bolts,
4 spacers.
metal "P" clamps,

Содержание Full Size Tumble Action Washers

Страница 1: ...on Of Your Washer 4 Unpacking 4 Installation 4 6 Replacement Parts 6 Printed in U S A P N 134594900A 0509 For your safety the information in this manual must be followed to minimize the risk of fire or explosion or to prevent property damage personal injury or loss of life Do not store or use gasoline or other flammable vapors and liquid in the vicinity of this or any other appliance WHAT TO DO IF...

Страница 2: ...ed with 15 amp time delay fuse or circuit breaker POWER SUPPLY 2 wire with ground 120 volt single phase 60 Hz Alternating Current NOTE The use of this washerwithpowercreatedbygaspoweredgenerators solar poweredgenerators windpoweredgeneratorsoranyother generator other than the local utility company is not recommended OUTLET RECEPTACLE Properly grounded 3 prong receptacle to be located so the power ...

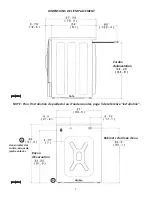
Страница 3: ...3 ROUGH IN DIMENSIONS NOTE For pedestal or undercounter installation reference page 5 Installation With leveling leg lock nuts removed A A ...

Страница 4: ...ve the carton 5 Carefully move the washer to within 4 feet 122cm of the final location 6 Remove the following from the back panel of the washer 4 packaging bolts 4 spacers 2 metal P clamps 7 Cover the bolt holes with plugs located in the literature bag 8 Using the shipping posts prop up the front of the washer approximatley 2 inches to gain access to the service panel screws 9 Remove the 2 screws ...

Страница 5: ...5 ...

Страница 6: ...PLACEMENT PARTS If replacements parts are needed for your washer contact the source where you purchased your washer call 1 800 944 9044 or visit our website www frigidaire com for the Frigidaire Company Authorized Parts Distributor nearest you Destroy the carton and plastic bags after the washer is unpacked Children might use them for play Cartons covered with rugs bedspreads or plastic sheets can...

Страница 7: ...change 6 Imprimé aux Etats Unis N P 134594900A 0509 Pour votre sécurité suivre les directives données dans le présent guide afin de minimiser les risques d incendie d explosion de dommages matériels de blessures et de mort Ne pas entreposer ni utiliser d essence ou d autres vapeurs ou liquides inflammables à proximité de cette sécheuse ou de tout autre appareil électroménager QUE FAIRE S IL Y A UN...

Страница 8: ...es instructions de la compagnie de gaz S il est impossible de joindre la compagnie de gaz appeler les pompiers L installation et les réparations doivent être effectuées par un technicien qualifié un agent de service ou la compagnie de gaz Imprimé aux États Unis 1 La laveuse DOIT être mise à la terre En cas de mauvais fonctionnement ou de panne la mise à la terre réduit les risques d électrocution ...

Страница 9: ...ivée d eau Côté Arrière po cm po cm po cm po cm po cm po cm po cm po cm po cm po cm Cordon d alimentation Boyau d évacuation Avec niveler des contre écrous de jambe enlevés A A NOTE Pour l installation de piédestal ou d undercounter page 5 de référence installation ...

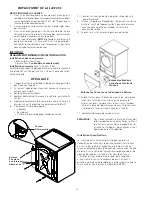
Страница 10: ...entetoises 2 attaches à pressio dégager cordon du service Enlevez les fixations gaunches et droits de mousse Enlevez les 2 Vis et sous le Panneau de Service 7 Couvrez les trous de boulon de prises situées dans le sac de littérature 8 Utilisant les poteaux d expédition l appui vertical vers le haut de l avant de l approximatley 2 pouces de laveuse s avance petit à petit pour accéder sur les vis de ...

Страница 11: ...5 ...

Страница 12: ... le serre câble fourni dans le paquet de clôture à la colonne le tuyau d admission le baquet de blanchisserie etc ainsi le tuyau ne retire pas de la force de l eau 6 Brancher le cordon d alimentation électrique dans une prise murale mise à la terre REMARQUE S assurer que le courant est coupé à la boîte de fusibles ou de disjoncteurs avant de brancher le cordon dans la prise 7 Remettre le courant à...

Отзывы: