background image

GAS COOKTOP INSTALLATION INSTRUCTIONS

1

INSTALLATION AND SERVICE MUST BE PERFORMED BY

A QUALIFIED INSTALLER.

IMPORTANT: SAVE FOR LOCAL ELECTRICAL INSPECTOR'S USE.

READ AND SAVE THESE INSTRUCTIONS FOR FUTURE REFERENCE.

If the information in this manual is not followed exactly, a fire or explosion may result

causing property damage, personal injury or death.

FOR YOUR SAFETY:
— Do not store or use gasoline or other flammable vapors and liquids in the vicinity of this or any other

appliance.

— WHAT TO DO IF YOU SMELL GAS:

Do not try to light any appliance.

Do not touch any electrical switch; do not use any phone in your building.

Immediately call your gas supplier from a neighbor's phone.  Follow the gas supplier's instructions.

If you cannot reach your gas supplier, call the fire department.

— Installation and service must be performed by a qualified installer, service agency or the gas supplier.

Cooktop Dimensions

Cooktop Cutout Dimensions

A

B

C

D

E

30" Min.

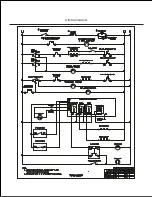
NOTE: Wiring diagrams for these appliances are enclosed in this booklet.

P/N 318201452 (0410) Rev. C

English – pages 1-10

Español – páginas 11-22

Wiring Diagram - pages  24

Recycled paper 

Figure 1

MODEL

A.

 LENGTH

B. 

WIDTH

C. 

DEPTH

CUTOUT DIMENSIONS

D. 

LENGTH

E. 

WIDTH

MIN.

MAX.

MIN.

MAX.

26" Model

25 ¾"

21

 9

/

16

"

3 ½"

25"

25"

20 ½"

20 ½"

30" Model

30"

21 ½"

1

/

8

"

26 

5

/

8

"

26 

7

/

8

"

19"

19 

3

/

8

"

36"Model

36"

18 

5

/

8

"

3 ¼"

34 ¼"

34 

3

/

8

"

16 

5

/

8

"

16  ¾"

Содержание FGC36C4HWD

Страница 1: ...ctrical switch do not use any phone in your building Immediately call your gas supplier from a neighbor s phone Follow the gas supplier s instructions If you cannot reach your gas supplier call the fire department Installation and service must be performed by a qualified installer service agency or the gas supplier Cooktop Dimensions Cooktop Cutout Dimensions A B C D E 30 Min NOTE Wiring diagrams ...

Страница 2: ...p of the Cooking Platform and Unprotected Wood or Metal Cabinet 24 13 Max Depth For Cabinet Installed Above Cooktop Dimension H is the Minimum Clearance Required From Right Side of Top Panel to Adjacent Combustible Surface Dimension K is the Minimum Clearance Required From Left Side of Top Panel to Adjacent Combustible Surface Allow Dimension L Space Below Cooktop for Piping and Electrical Connect...

Страница 3: ... cooktop to reach items To eliminate the need to reach over the surface burners cabinet storage space above the burners should be avoided Adjust surface burner flame size so it does not extend beyond the edge of the cooking utensil Excessive flame is hazardous Never use your cooktop for warming or heating the room Prolonged use of the cooktop without adequate ventilation can be hazardous Do not st...

Страница 4: ...dual shutoff valve must be disconnected from the gas supply piping system during any pressure testing of that system exceeding psig These appliances must be isolated from the gas supply pipping system by closing its individual manual shutoff valve during any pressure testing of the gas supply piping system equal to or less than psig To avoid pilot outage if applicable close all openings in the cab...

Страница 5: ...of manifold pressure or on LP gas at 10 of manifold pressure A convertible pressure regulator is supplied with each surface unit and MUST BE CONNECTED IN SERIES between the supply line and the valve manifold regardless of which type of gas is being used The convertible regulator for the surface units must be located and turned in such manner to allow for easy access to the convertible feature For ...

Страница 6: ... supply line Check alignment of valves after connecting the cooktop to the gas supply to be sure the manifold pipe has not been moved A misalignment could cause the valve knob stem to rub on the control panel resulting in a gas leak at the valve IMPORTANT A pipe joint sealant resistant to the action of LP Gas must be used on all pipe connections IMPORTANT Remove all packing material and literature...

Страница 7: ... the Pressure Regulator from LP Gas to NATURAL Gas see figure 9 A Remove the cap from the pressure regulator B Remove the plunger C Turn the plunger upside down with the enlarge end UP D Replace the plunger inside the regulator The letters NAT or 4 W C should be visible on the exposed end of the plunger E Replace the cap on the pressure regulator Cap Plunger Enlarged end DOWN for LP Gas Figure 9 N...

Страница 8: ...t less than half open for normal flame for LP Gas it may be necessary to rotate the air shutter to a nearly full open setting for a normal flame C Burner Flame Adjustment 1 Proper Air Adjustment figure 15 If the air shutter is properly adjusted flame will be steady relatively quiet and will have approximately sharp blue cones With LP gas this usually occurs when shutters are halfway open 5 Adjust ...

Страница 9: ...egulations Failure to comply with the above could result in a serious shock hazard Note All hookups and adjustment shall be performed by qualified technicians Situations where appliance power cord will be disconnected frequently Do not use an adaptor plug in these situations because disconnecting of the power cord places undue strain on the adaptor and leads to eventual failure of the adaptor term...

Страница 10: ...from the serial plate of your cooktop Your serial plate also tells you the rating of the burners the type of fuel and the pressure the cooktop was adjusted for when it left the factory Improper installation adjustment alteration service or maintenance can cause injury or property damage Refer to this manual For assistance or additional information consult a qualified installer service agency manuf...

Страница 11: ...e pueden causar daños materiales lesiones o la muerte PARA SU SEGURIDAD No almacene o utilice gasolina u otros vapores y liquidos inflamables cerca de éste o cualquier otro artefacto QUE HACER SI HAY FUGAS DE GAS No intente de encender ningún artefacto No toque ningún interruptor eléctrico no utilice ningún aparato téléfonico en su edificio Llame inmediatamente el abastecedor de gas desde el teléf...

Страница 12: ...adera non protegida o armario metálico Dimensiones H este espacio mínimo desde el lado derecho de almacenamiento de combustible Dimensiones K este espacio mínimo desde el lado izquierdo de almacenamiento de combustible No es posible utilisar cajones con esta plancha de cocinar porqué la caja de empalme se extiende de L dimensiones por encima de la superficie del mostrador Figura 2 DESEÑO DEL ARMAR...

Страница 13: ...avas si intentan subirse para alcanzarlos Deberán eliminarse los armarios sobre los quemadores para evitar el contacto entre ambos Grade el tamaño de la llama de modo que no sobrepase el borde del ustensilio de la plancha de cocinar No utilice jamás su plancha de cocinar como calefactor El uso prolongado de la cocina sin la ventilación adecuada puede ser peligroso No guarde o haga uso de gasolina ...

Страница 14: ...Asegúrese de no lastimarse los dedos al cerrar la plancha de cocinar Sujete la plancha con las puntas de los dedos y bájela Importante Por favor lea antes de continuar con la instalacion El aparato y su válvula de apagado deben ser desconectados del sistema de suministro de gas durante cualquier prueba de presión del sistema a una presión de prueba en exceso de 1 2 psig La unidad debe estar aislad...

Страница 15: ... anterior y posterior para fijarla a la mesa del gabinete de cocina vea la figura 4 B Plancha de cocinar 30 Una vez que el aparato está instalado en la apertura del mostrador se tiene que sujetar como se indica Para ajustar el aparato inserte el soporte con el lado desviado en la ranura en cada lodo del aparato El tomillo que se puede girar con los dedos debe entonces de pasar a través del soporte...

Страница 16: ...lador la presión de entrada debe ser de al menos 1 o 3 4 kPa mayor que el ajuste de presión del múltiple del reglador se ajusta a 4 de la presión del múltiple la presión de entrada debe ser de al menos 5 Si el regulador se ajusta a 10 la presión de entrada debe ser de al menos 11 Una valvula de corte manual externa a la unidad debe instalarse en la linea de suministro de gas El proposito de esta v...

Страница 17: ...s para verificar si existen fugas Ajuste todas las conexiones en caso que sea necesario para evitar fugas de gas en la plancha de cocinar o en el tubo de sumininistro de gas Verifique la alineación de las válvulas luego de conectar la plancha de cocinar al suministro de gas para asegurar que no se ha movido la válvula del múltiple Una mala alineación puede inducir la friega del tronco de perilla d...

Страница 18: ... Convertir el regulador de presión de LP a Gas Natural proceda de la siguinte manera vea figura 9 A Remueva la tapa del regulador de presión B Remueva el desatascador C Gire el desatascador hacia arriba con el lado grande hacia ARRIBA D Ponga el desatascador entre el regulador Las letras NAT o 4 WC deberan estar a la vista en la parte expuesta del desatascador E Colique la tapa en el regulador Tap...

Страница 19: ...abieto del venturi y ajusta la capucha de la válvula El obturador esta fijado en su lugar por un tornillo de cabeza tipo Phillips Ajuste de aire Figura 14 En caso de necesitar ajuste el obturador de aire afloje el tornillo cabeza tipo Phillips y rote el obturador de aire para permitir más o menos aire en el quemador según se necesite Para lograr una llama normal usando Gas Natural puede ser necesa...

Страница 20: ... disminuir la posibilidad de peligro de choques eléctricos desde el artefacto Se aconseja al consumidor que un electricista calificado verifique el enchufe de pared y el circuito para asegurar que el enchufe esté conectado a tierra correctamente 2 Demasiado Aire figura 16 Si el obturador de aire está dejando pasar demasiado aire al quemador la llama será inestable posiblemente no habrá llama a tod...

Страница 21: ...miento 8 Verifique la operación Refiera el Manual del usuario que viene con la plancha de cocinar para las instrucciones de funcionamiento y el mantenimiento y la limpieza de su plancha de cocinar No toque a los quemadores Pueden estar suficientemente calientes par causar quemaduras 1 Verifique los dispositivos de encendido algunos modelos La manipulación de los dispositivos de encendido eléctrico...

Страница 22: ... eléctrico Después de desconectar del suministro eléctrico y de gas termine de remover la unidad para su limpieza o mantenimiento Reinstale siguiendo el procedimiento inverso Asegúrese de nivelar la estufa y verificar que no halla escapes en la conexión de gas Vastago agujero de la válvula Figura 19 A Dejar que la cocina se enfríe a temperatura ambiente B Encender todos los quemadores girando cada...

Страница 23: ...23 NOTES NOTAS ...

Страница 24: ...24 WIRING DIAGRAM DIAGRAMA DE LA INSTALACIÓN ALÁMBRICA ...

Отзывы: