background image

NOTE

The exterior walls of the Beverage Center 

may become quite warm as the compressor 

works to transfer heat from the inside. 

Temperatures as much as 30°F warmer 

than room temperature can be expected. 

For this reason it is particularly important in 

hotter climates to allow enough space for air 

circulation around your appliance.

Leveling

The Beverage Center must have all bottom 

corners resting firmly on solid floor. The floor 

must be strong enough to support a fully 

loaded Beverage Center. NOTE: It is very 

important for your appliance to be level in 

order to function properly. If the appliance is 

not leveled during installation, the door may 

be misaligned and not close or seal properly, 

causing cooling, frost, or moisture problems.

To Level Your Beverage Center:

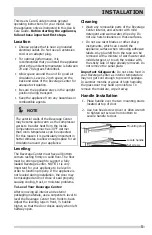
After removing all interior and exterior 

packaging materials, use a carpenter’s level to 

level the Beverage Center from front-to-back. 

Adjust the leveling legs in front, ½ bubble 

higher, so that the door closes easily when left 

halfway open.

Cleaning

•  Wash any removable parts of the Beverage 

Center interior, and exterior with mild 

detergent and warm water. Wipe dry. Do 

not use harsh cleaners on these surfaces.

•  Do not use razor blades or other sharp 

instruments, which can scratch the 

appliance surface when removing adhesive 

labels. Any glue left from the tape can be 

removed with a mixture of warm water and 

mild detergent, or touch the residue with 

the sticky side of tape already removed. Do 

not remove the serial plate.

Important Safeguards

: Do not store food in 

your Beverage Center as interior temperature 

may not get cool enough to prevent spoilage. 

In summer months or areas of high humidity,  

the glass door may build up moisture. To 

remove the moisture, wipe it away.

Handle Installation

 1.  Place handle over the two mounting studs 

located at top of door.

 2.  Use hex head screw driver or Allen wrench 

to tighten set screws from bottom to 

secure handle to door.

� Handle 

 Wooden Shelf Made of Beech 

  Control Panel 

� Glass Door 
� Control Switch of Lamp 
� Adjustable Leg 


Placement of Wine Cooler   

The wine cooler should be placed in dry and ventilated room. The location of 
the wine cooler should not be irradiated by direct sunshine. The wine cooler 
should be far away from heating sources, such as: cooking stove or heating 
radiator. If the wine cooler has to be placed near heating source, please adopt 
proper heating insulation board for insulation or keep the wine cooler at least 
the following minimum distances away from the heating sources: 
For electric stove: 3

.   

For oil or coal stove: 30

.   

Replacement of Door Hinge 

The door hinges of this wine cooler can be interchanged between the left and 

right sides. 

Installation of Handle 

1. Set the handle on the fixation shaft. 


Fixation Shaft of Handle 


Set Handle 


2. Screw down the fixation pins of the handle with screw driver. 

- 7 - 

Mounting stud

Locate handle
Set screws

5

INSTALLATION

This Use & Care Guide provides general 

operating instructions for your model. Use 

the appliance only as instructed in this Use & 

Care Guide. 

Before starting the appliance, 

follow these important first steps.

Location

•  Choose a place that is near a grounded 

electrical outlet. Do Not use an extension 

cord or an adapter plug.

•  For optimal performance, it is 

recommended that you install the appliance 

where the ambient temperature is between 

70 and 78 degrees Fahrenheit. 

•  Allow space around the unit for good air 

circulation. Leave a 2 inch space on the 

back and sides of the Beverage Center for 

adequate circulation.

•  Be sure the appliance stays in the upright 

position during transport.

•  Keep the appliance from any hazardous or 

combustible agents.

Содержание FGBC5334VS

Страница 1: ...ire ca Canada 1 800 265 8352 All about the Use Care of your Beverage Center A15600302 December 2018 Important Safety Instructions 2 Features 4 Installation 5 Energy Saving Tips 8 Temperature Controls 9 Care and Cleaning 10 Before You Call 11 Major Appliance Warranty 14 ...

Страница 2: ...e and caution must be practiced when installing operating and maintaining any appliance Record Your Model and Serial Numbers Record the model and serial numbers in the space provided below The serial plate is located on the upper left wall inside the cabinet Model Number Serial Number Purchase Date WARNING For Your Safety Do not store or use gasoline or other flammable vapors and liquids in the vi...

Страница 3: ...our warranty Do not plug the appliance into an electrical outlet controlled by a wall switch or pull cord to prevent the appliance from being turned off accidentally Proper Disposal of your Beverage Center Risk of child entrapment Child entrapment and suffocation are not problems of the past Junked or abandoned appliances are still dangerous even if they will sit for just a few days If you are get...

Страница 4: ...ce to keep the light on when the door is closed Adjustable Interior Shelves Multi position adjustable interior shelves can be moved to any position for larger or smaller packages The shipping spacers that stabilize the shelves for shipping should be removed and discarded The Beverage Center comes equipped with three glass shelves Handle Control Panel Glass shelves Glass door Light switch Adjustabl...

Страница 5: ... remove the moisture wipe it away Handle Installation 1 Place handle over the two mounting studs located at top of door 2 Use hex head screw driver or Allen wrench to tighten set screws from bottom to secure handle to door Handle Wooden Shelf Made of Beech Control Panel Glass Door Control Switch of Lamp Adjustable Leg Placement of Wine Cooler The wine cooler should be placed in dry and ventilated ...

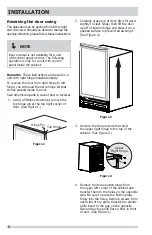
Страница 6: ... screwdriver remove the top hinge pin at the top right corner of door See Figure 1 4 Remove the three button plugs from the upper left corner of the cabinet and transfer them to the holes on the opposite side Be sure to press the button plugs firmly into the holes Remove screws from each side of toe grille transfer the plastic grille insert to the gap on the opposite side and lay toe grille flat o...

Страница 7: ...e three screws removed in Step 6 8 On bottom edge of door transfer door stop bracket and bushing to holes on opposite side See Figure 8 9 Place bottom left hand corner of door onto lower hinge then tilt top of door back to clear edge of top hinge Make sure door is level and it seals properly against cabinet then insert hinge pin through hole in top hinge and into door busing Securely fasten with P...

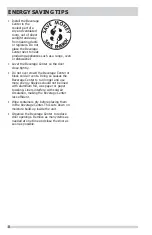
Страница 8: ...Center or block cold air vents Doing so causes the Beverage Center to run longer and use more energy Shelves should not be lined with aluminum foil wax paper or paper toweling Liners interfere with cold air circulation making the Beverage Center less efficient Wipe containers dry before placing them in the Beverage Center This cuts down on moisture build up inside the unit Organize the Beverage Ce...

Страница 9: ...he temperature range MIN and MAX is 33 50 F 1 10 C Temperature display The default temperature for the Beverage Center is 41 F 5 C The temperature after power failure will be the temperature set before the power failure To prolong the life of compressor please wait for at least 5 minutes before the unit is restarted after power failure Failure display If E and F are displayed please contact local ...

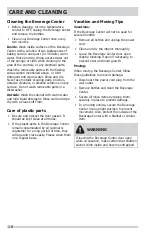
Страница 10: ...t the door gasket It should be kept clean at all times If the plastic parts in the Beverage Center remain contaminated by oil animal or vegetable for a long period of time they will age and crack easily Please clean them on a regular basis Vacation and Moving Tips Vacations If the Beverage Center will not be used for several months Remove all bottles and unplug the power cord Clean and dry the int...

Страница 11: ...y been disconnected for a period of time Door is opened too frequently or too long Door may be slightly open Temperature control is set too low Door gasket is dirty worn cracked or poorly fitted It s normal for the appliance to work harder under these conditions It takes 4 hours for the appliance to cool down completely Warm air entering the appliance causes it to run more Open doors less often Se...

Страница 12: ... Louder sound levels when Beverage Center is on Modern Beverage Centers have increased storage capacity and more stable temperatures They require a high efficiency compressor This is normal When the surrounding noise level is low you might hear the compressor running while it cools the interior Longer sound levels when compressor comes on Appliance operates at higher pressures during the start of ...

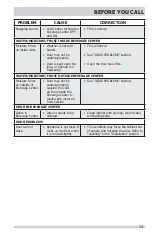
Страница 13: ...OISTURE FROST OUTSIDE BEVERAGE CENTER Moisture forms on outside of Beverage Center Door may not be seating properly causing the cold air from inside the Beverage Center to meet warm moist air from outside See DOOR PROBLEMS section ODOR IN BEVERAGE CENTER Odors in Beverage Center Interior needs to be cleaned Clean interior with sponge warm water and baking soda DOOR PROBLEMS Door will not close App...

Страница 14: ...ectrolux parts or parts obtained from persons other than authorized service companies or external causes such as abuse misuse inadequate power supply accidents fires or acts of God DISCLAIMER OF IMPLIED WARRANTIES LIMITATION OF REMEDIES CUSTOMER S SOLE AND EXCLUSIVE REMEDY UNDER THIS LIMITED WARRANTY SHALL BE PRODUCT REPAIR OR REPLACEMENT AS PROVIDED HEREIN CLAIMS BASED ON IMPLIED WARRANTIES INCLU...

Отзывы: