Содержание FFGH3051VS

Страница 1: ...Range A13080802 Rev A March 2019 TABLE OF CONTENTS Product Record and Registration 2 Important Safety Instructions 3 Cooking Recommendations 10 Before Setting Surface Controls 13 Setting Surface Controls 16 Before Setting Oven Controls 19 Setting Oven Controls 20 Care and Cleaning 29 Before You Call 34 Warranty 37 ...

Страница 2: ...ation Serial plate location open lower oven drawer some models or storage drawer some models PRODUCT RECORD AND REGISTRATION Thank you for choosing Frigidaire Important This Use and Care Guide is part of our commit ment to customer satisfaction and product quality throughout the service life of your new appliance We view your purchase as the beginning of a relationship To ensure our ability to con...

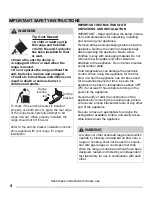
Страница 3: ...rdous situation which if not avoided may result in death or serious injury Indicates a potentially hazardous situation which if not avoided may result in minor or moderate injury Indicates installation operation maintenance or valuable information that is not hazard related Indicates a short informal reference something written down to assist the memory or for future reference WARNING CAUTION IMPO...

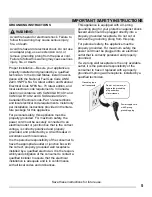
Страница 4: ...Be sure to have an appropriate foam type fire extinguisher available visible and easily acces sible located near the appliance WARNING Tip Over Hazard A child or adult can tip the range and be killed Verify the anti tip device has been installed to floor or wall Ensure the anti tip device is re engaged to floor or wall when the range is moved Do not operate the range without the anti tip device in...

Страница 5: ...acle installed by a qualified electrician It is the respon sibility and obligation of the consumer to contact a qualified installer to assure that the electrical installation is adequate and is in conformance with all local codes and ordinances This appliance is equipped with a 3 prong grounding plug for your protection against shock hazard and should be plugged directly into a properly grounded r...

Страница 6: ...dren should not be left alone or unattended in the area where appliance is in use They should never be allowed to sit or stand on any part of the appliance including the storage drawer lower broiler drawer warmer drawer or lower double oven WARNING WARNING Do not store items of interest to children in the cabinets above the appliance or on the back guards of ranges Children climbing on or near the...

Страница 7: ...reas Do not use towels or other bulky cloths Do not heat unopened food containers Build up of pressure may cause container to burst and result in injury Wear proper apparel Loose fitting or hanging garments should never be worn while using the appliance Do not let clothing or other flammable materials contact hot surfaces Do not touch surface burners or elements areas near these burners or element...

Страница 8: ...e before you remove or replace food in the oven Keep oven vent ducts unobstructed Touching surfaces in this area when the oven is on may cause severe burns Do not place plastic or heat sensitive items on or near the oven vent These items can melt or ignite Placement of oven racks Always place oven racks in desired location while oven is cool If rack must be moved while oven is hot do not let potho...

Страница 9: ...u do not understand Ask your dealer to recommend a qualified techni cian and an authorized repair service Know how to disconnect the power to the appliance at the circuit breaker or fuse box in case of an emer gency Remove the oven door from any unused oven if it is to be stored or discarded Do not touch a hot oven light bulb with a damp cloth Doing so could cause the bulb to break Handle halogen ...

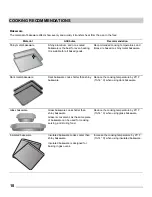
Страница 10: ...keware cooks hotter than shiny bakeware Reduce the cooking temperature by 25 F 13 14 C when using dark bakeware Glass bakeware Glass bakeware cooks hotter than shiny bakeware Glass is convenient as the same piece of bakeware can be used for cooking serving and storing food Reduce the cooking temperature by 25 F 13 14 C when using glass bakeware Insulated bakeware Insulated bakeware cooks cooler th...

Страница 11: ... Reduce amount of baking soda or baking powder in recipe Reduce rising time or punch down dough and allow it to rise twice Cooking Results Small adjustments may fix a problem with food not being as done as you like or more done than you like Result Recommendation Food too light Use the middle to maximum cook time recommended on packaging or recipe Food too dark Use the minimum cook time recommende...

Страница 12: ...h a broil pan insert designed to drain the fat from the food help avoid spatter and reduce smoking The broiler pan will catch grease spills and the insert helps prevent grease splatters If a broiler pan and insert are not supplied with this appliance they may be purchased from www frigidaire com Cooking Tips ...

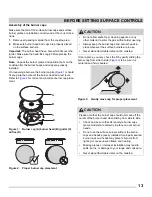
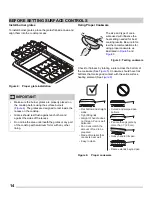
Страница 13: ...om side to side Figure 3 to be sure it is centered and firmly seated Figure 3 Gently move cap for proper placement Figure 1 Burner cap A burner head B ignitor C orifice D A B C D Do not allow spills food cleaning agents or any other material to enter the gas orifice holder opening Always keep the burner caps and burner heads in place whenever the surface burners are in use Never place flammable it...

Страница 14: ...s should rest flush against each other and against the sides of the recess Do not line the area underneath the grates or any part of the cooktop with aluminum foil or with any other lining IMPORTANT The size and type of cook ware used will influence the heat setting needed for best cooking results Be sure to fol low the recommendations for using proper cookware as illustrated in Figure 5 and Figur...

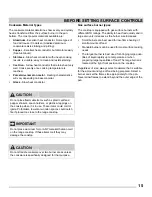
Страница 15: ...r size increases Small burners are best used for low flame heating of small amounts of food Standard burners can be used for most surface cooking needs The largest burner is best used for bringing large quan tities of liquid rapidly up to temperature or when preparing larger quantities of food The large burner is located at the right front position on the cooktop Regardless of size always select c...

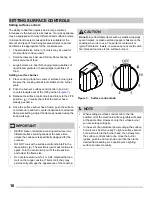
Страница 16: ...b markings NEVER place or straddle a cooking utensil over two different surface cooking areas at the same time unless the cookware is specifically designed for the purpose DO NOT cook with a surface control knob left in the lite position The electronic ignitor will continue to spark Turn the control knob out of the lite position and adjust the flame size Do not place aluminum foil or ANY material ...

Страница 17: ...ool the food will absorb the fat and be greasy If the fat is too hot the food will brown so quickly that the center will be under cooked Do not attempt to deep fat fry too much food at once as the food will neither brown nor cook properly Figure 8 Flame settings Flame size Type of cooking High flame Start most foods bring water to a boil pan broiling Medium flame Maintain a slow boil thicken sauce...

Страница 18: ...eter of the canner does not exceed 1 inch beyond the surface element markings or burner It is recommended to use smaller diameter canners on electric coil and ceramic glass cooktops and to center canners on the burner grates Start with hot tap water to bring water to boil more quickly Use the highest heat setting when first bringing the water to a boil Once boiling is achieved reduce heat to lowes...

Страница 19: ...he rack guides on both sides of oven walls Tilt the front of oven rack upward slightly and slide the oven rack back into place Be sure oven racks are level before using Figure 10 Oven vent Protective Liners Do not use aluminum foil or any other material or liners to line the oven bottom walls racks or any other part of the range Doing so will alter the heat distribution produce poor baking results...

Страница 20: ... or adjusting the clock and minute timer 10 Timer on off Use to set or cancel the minute timer 11 Bake Time Enters the length of baking time desired 12 OFF Use to clear any feature except the time of day and minute timer 13 Start Time Used with Bake to set a delayed starting time 1 2 3 4 5 6 7 8 9 10 11 12 13 Table 1 Minimum and Maximum settings Feature Mode Min Temp Time Max Temp Time Bake 170 F ...

Страница 21: ... lock key for 3 seconds 1 When the lock icon no longer displays the oven control keypad will be available for use Important If a control key is pressed when oven lockout is active the control will triple beep indicating the key action is not available when the oven lockout feature is active Setting the minute timer 1 Press Timer on off 2 Press to increase time in one minute increments Press and ho...

Страница 22: ...e for continuous baking To change the continuous bake setting 1 Press and hold Timer on off for 6 seconds until a tone sounds hr will appear in the display for contin uous cooking The current time of day will return to the display 2 To cancel the continuous bake setting press Timer on off and hold for 6 seconds until a tone sounds 12 hr will appear in display indicating that the control has return...

Страница 23: ...r dull bakeware absorbs more heat than shiny bakeware resulting in dark or overbrowned foods It may be necessary to reduce oven temperature or cook time to prevent overbrowning of some foods Dark pans are recommended for pies shiny pans are recommended for cakes cookies and muffins Do not open oven door often Opening the door will reduce the temperature in the oven and may increase cook time To se...

Страница 24: ...yed start time and to shut off automatically 1 Be sure that the clock displays the correct time of day 2 Place food in the oven 3 Press Bake appears in the display Within 5 seconds press or The display will show 350 F 177 C The temperature can then be adjusted in 5 F 1 C increments 4 Press Bake Time 0 00 will appear in the display 5 Press or until desired baking time appears 6 Press Start Time The...

Страница 25: ... side 8 When broiling is finished press OFF Broil with the oven door closed Should an oven fire occur close the oven door and turn the oven off If the fire continues use a fire extinguisher Do not put water or flour on the fire Flour may be explosive Always use oven mitts Oven racks will become very hot which can cause burns Always pull the oven rack out to the stop position before turning or remo...

Страница 26: ... 170 F 77ºC Well Fish 5 HI 550 F 13 00 170 F 77ºC Well Shrimp 4 HI 550 F 5 00 170 F 77ºC Well Hamburger 1 thick 6 HI 550 F 6 00 5 00 135 F 57 C Rare Hamburger 1 thick 6 HI 550 F 7 00 6 00 145ºF 63ºC Medium Hamburger 1 thick 5 HI 550 F 10 00 8 00 170 F 77ºC Well The U S Department of Agriculture states Rare fresh beef is popular but you should know that cooking it to only 140 F 60 C means some food...

Страница 27: ...leaning cavity 10 To cancel Steam Clean at any time press OFF Important Opening oven door during Steam Clean cycle prevents the water from reaching the temperature needed to clean If the door is left open once Steam Clean starts an alarm will sound alerting you to close the door For best results clean oven immediately after the cycle is complete Steam clean works best for soils on the oven bottom ...

Страница 28: ...ature setting If the oven control has the original factory calibration the display will read 00 4 The temperature can now be adjusted up or down 35 F 19 C in 5 F 1 C increments Press and hold to adjust the temperature higher until the desired amount of offset appears in the display When lowering the oven temperature using a minus sign will appear before the number to indicate that the oven will be...

Страница 29: ...nd water or a 50 50 solution of vinegar and water Do not spray liquids directly on the oven control and display area Do not use large amounts of water on the control panel excess water on the control area may cause damage to the appliance Do not use other liquid cleaners abrasive cleaners scouring pads or paper towels they will damage the finish Control knobs Using a soft cloth clean with mild dis...

Страница 30: ...ng materials on the outside of the oven door Do not clean the oven door gasket The oven door gasket is made of a woven material which is essential for a good seal Do not rub damage or remove this gasket Gas cooktop surface burners See Cleaning the burners on page 31 Gas cooktop surface grates Gas cooktop burner caps Use a non abrasive plastic scrubbing pad and mild abrasive cleanser Do not allow f...

Страница 31: ... the burner head 4 Wipe the burner cap and head clean with a soft clean cloth sponge or scratch free cleaning pad Wipe out burner orifice with a cloth before placing burner head and cap back on The burner assembly must be completely dry before use 5 Make sure the burner caps and heads are placed and seated properly over the ignitor The three mounting legs on burner will align with slots on the ori...

Страница 32: ... or unplug the appliance 2 Remove the interior oven light shield after removing the wire holder by carefully moving the wire to the side of the glass shield The tension from the wire holds the glass shield in place 3 Pull the shield straight out Do not twist or turn 4 Replace the bulb with a new appliance bulb 5 Replace the glass oven light shield Replace wire holder 6 Turn the power back on again...

Страница 33: ...roller pins located on each side of the oven door frame See Figure 22 and Figure 23 The hook of the hinge arms must be fully seated onto the roller pins 3 Fully open the oven door horizontal with floor See Figure 20 4 Push the door hinge locks up towards and into the oven frame on both left and right oven door hinges to the locked position See Figure 21 5 Close the oven door The door is heavy For ...

Страница 34: ...er than recom mended Cakes not done in center Oven too hot Incorrect pan size Pan not centered in oven Glass cookware slow heat conductor Set oven temperature 25 F 13 C lower than recom mended Use pan size suggested in recipe Use proper rack position and place pan so there are at least 2 5 1 cm of space on all sides of pan Reduce temperature and increase cook time or use shiny bakeware Cakes not l...

Страница 35: ...roiling Incorrect setting Follow the Setting Broil instructions on page 25 Meat too close to the broil element or burner Reposition the broil pan to provide proper clearance between the meat and broil element or burner Remove excess fat from meat Cut remaining fatty edges to prevent curling but do not cut into lean Grease build up on oven surfaces Regular cleaning is necessary when broiling freque...

Страница 36: ...correctly on the surface burner heads See Aluminum Foil and Utensils in the Care Cleaning section on page 31 for additional cleaning instructions Incorrect L P conversion Refer to L P conversion kit instructions to correct Surface burner flame is orange Dust particles in main gas line Allow the burner to operate a few minutes until flame turns blue In coastal areas a slightly orange flame is unavo...

Страница 37: ...ersons other than authorized service companies or external causes such as abuse misuse inadequate power supply accidents fires or acts of God CUSTOMER S SOLE AND EXCLUSIVE REMEDY UNDER THIS LIMITED WARRANTY SHALL BE PRODUCT REPAIR OR REPLACEMENT AS PROVIDED HEREIN CLAIMS BASED ON IMPLIED WARRANTIES INCLUDING WARRANTIES OF MERCHANTABILITY OR FITNESS FOR A PARTICULAR PURPOSE ARE LIMITED TO ONE YEAR ...

Отзывы: