background image


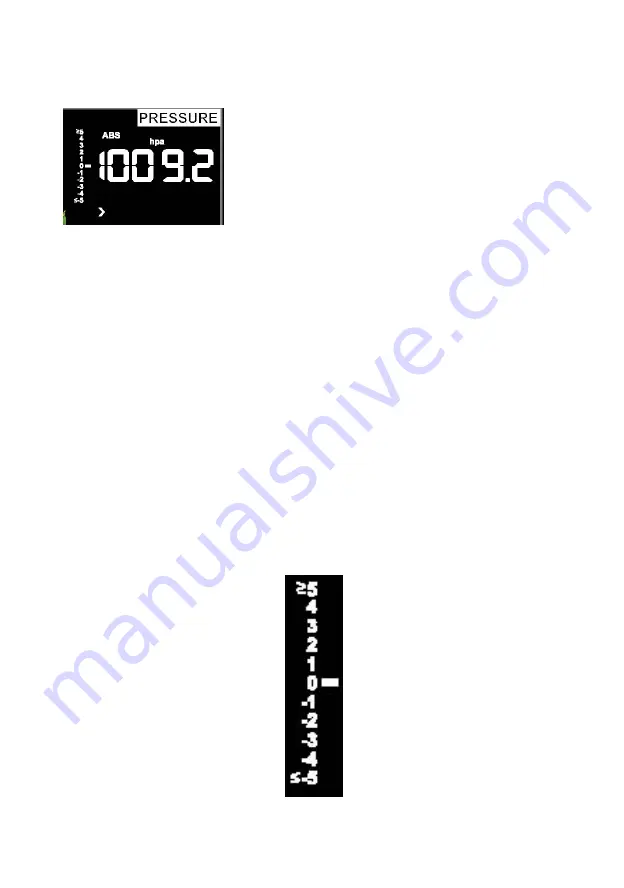
6.4.6 Pressure 

Viewing Absolute vs. Relative Pressure 

bsolute and relative pressure, press and hold the 

ton for two seconds. 

 
Absolute pressure is the measured atmospheric pressure, and is a 
function of altitude, and to a lesser extent, changes in weather 
conditions. 
 

ssure graphic is shown to the left of the 

 between the daily 

). 

3) 

Viewing Pressure History 

Press the [PRESSURE -] button to view the 12 hour, 24 hour, 48 hour 


1

To switch between a
[PRESSURE -] but

Absolute pressure is not corrected to sea-level conditions. 
 
Relative pressure is corrected to sea-level conditions.   
 

2) 

Rate of Change of Pressure Graph 

The rate of change of pre
barometric pressure and signifies the difference
average pressure and the 30 day average (in hPa


 19

Содержание WH2900

Страница 1: ...ed 8 5 2 5 Mount assembled outdoor sensor package 9 5 2 5 1 Before you mount 9 5 2 5 2 Mounting 10 5 2 6 Reset Button and Transmitter LED 11 5 3 Best Practices for Wireless Communication 11 5 4 Display console 12 5 4 1 Vertical Desk Stand 13 6 Display Console Operation 14 6 1 Screen Display 14 6 2 Initial Display Console Set Up 15 6 3 Key function 15 6 4 Setting mode 17 6 4 1 BEEP 17 6 4 2 MAX MIN...

Страница 2: ...Live Internet Publishing 30 8 1 Connecting the Weather Station Console to WiFi 31 8 1 1 Download mobile application 31 8 1 2 Connect the console to Wi Fi 31 8 1 2 1 Android user 31 8 1 2 2 iOs user 39 8 2 Mobile application Device list 45 8 3 Mobile application Check WU weather data and graph 46 8 4 Mobile application Remove or Add WU ID 47 8 5 Mobile application Set Units 48 9 Registering Weather...

Страница 3: ...out and operation on the ground and inside a building or home Only install the weather station on a clear dry day 3 Quick Start Guide Although the manual is comprehensive much of the information contained may be intuitive In addition the manual does not flow properly because the sections are organized by components The following Quick Start Guide provides only the necessary steps to install operat...

Страница 4: ...will allow you to check out all of the functions insure proper operation and familiarize you with the weather station and calibration procedures This will also allow you to test the wireless range of the weather station 4 2 Site Survey Perform a site survey before installing the weather station Consider the following 1 You must clean the rain gauge every few months and change the rechargeable batt...

Страница 5: ...nterference such as PCs radios or TV sets can in the worst case entirely cut off radio communication Please take this into consideration when choosing console or mounting locations Make sure your display console is at least five feet away from any electronic device to avoid interference 5 Setting Started 5 1 Contents QTY Item 1 Display Console 1 Y shape outdoor sensor Thermo hygrometer Rain Gauge ...

Страница 6: ...f the two U Bolts will fit The plate itself is urved profile which will end up hugging the mounting pole Once the e U Bolts and insert both 9 Battery com 10 Reset button 11 LED Indicator light on fo flash once every 16 secon 5 2 1 Install U Installation package o of t receive the U bolt ends holes through whi inserted in a groove on the bottom of the unit opposite side of solar panel Note that one...

Страница 7: ... speed cups later on 5 2 2 Install wind vane Push the wind vane onto the shaft on the top of the sensor unitl it goes further as shown in figure 3 ighten the set screw with a Phi river size PH0 until the easurements Figure 1 Figure 2 lips screwd T wind van cannot be removed from the axle as shown in figure 4 Make sure the wind vane spin freely The wind vane s movement has a small amount of frictio...

Страница 8: ...e directions on the sensor are matching with your real location Permanent wind direction error will be introduced when the wind direction sensor is not positioned correctly during installation 2 3 Install wind speed Figure 5 Figure 6 5 2 4 Install Batteries 5 Push the wind speed into the shaft as shown in figure 5 Tighten the set screw with as shown in figure 5 Make sure the wind speed spin freely...

Страница 9: ...ount section ou may want to skip to setup instructions in section 6 2 and onwards tup is complete and everything is working return here for Note If no LED light up or is lighted permanently make sure the battery is inserted the correct way or a proper reset is happened Do not insta the batteries backwards You can permanently damage the outdoor Before proceeding with the outdoor mounting detailed i...

Страница 10: ... arrow labeled North that you will find on top of the sensor package right next to the light sensor You must rotate the whole sensor package until this arrow points due north To achieve proper alignment it is helpful to use a compass many cell phones have a compass application Once rotated in the correct orientation lightly tighten the bolts a little more use a wrench to prevent further rotation N...

Страница 11: ... s upright on a vertical surface such as a wall Do not lay the sensor flat Wireless communication is susceptible to interference distance walls and metal barriers We recommend the following best practices for trouble free wireless communication E away from computer monitors and TVs Radio Frequency Interference RFI If you have other 433 MHz devices and communication is intermittent try turning off ...

Страница 12: ...low Medium RF Signal Strength Reduction Glass untreated 5 15 Plastics 10 15 Wood 10 40 Brick 10 40 Concrete 40 80 Metal 90 100 5 4 Display console 1 Insert the 5V AC adaptor into the back of the display console Note Place the outdoor sensor array about 5 to 10 feet from the display console and wait several minutes for the remote sensors to synchronize with the display console 2 Insert 3 AAA batter...

Страница 13: ...sections Wind and Rain will show 0 s connected until wind or rain occur or are simulated Note If you only use battery to power up display console you must press LIGHT SNOOZE key to light up the LCD before press any other key 5 4 1 V The In a the console also includes a vertical desk stand to improve the viewing able on a desk as shown in Figure 14 he batterie ed for back up power only The n on ba ...

Страница 14: ...Figure 14 6 Display Console Operation 6 1 Screen Display 1 Time 10 Rain fall 2 Moon phase 11 Outdoor temperature 14 ...

Страница 15: ...MIN Daily 18 DST 6 2 Initial Display Console Set Up Connect the power adapter to power up the display console The unit will show software version number 2 seconds after power reset e LCD for 3 seconds after power reset the unit will start to register the outdoor channel for 3 minutes function eight keys for The unit will turn on all segments of th 6 3 Key The console has easy operation 15 ...

Страница 16: ...nd MAX MIN Press this key to view the MAX MIN value of Temperature Humidity rain rate rain day wind UVI LIGHT Absolute Pressure LIGHT SNOOZE Press this key to adjust LCD backlight brightness HI MID OFF Hold this key to register new transmitter Note 1 When power on press WIND and PRESSURE key to reset the weather station and clear all records memory and clears all user settings to default 2 When po...

Страница 17: ...ON only WWVB Pre gs can key for 2 seconds to select the beep sec ll start flashing press the WIND or PRESSURE ey to sele or OFF BEEP ON wil make the Beep sound on every key press If you do n ound to be heard select B Daily key twice to select the MAX MIN Daily se N OFF digits will start flashing press the WIND or ey to select O 6 4 3 DST daylight saving time Press the SET key third time to select ...

Страница 18: ...ET key seventh time to select the minutes section Press the SET key eighth time to select DD MM or MM DD format Default DD MM format ange minute value second will auto clear to 0 will be updated to internet time automatically 6 4 4 Time zone Press the SE t th 6 4 5 Time Date Press the SET key fifth Press the SET key ninth time to select year Press the SET key tenth time to select month Press the S...

Страница 19: ...s ssure graphic is shown to the left of the between the daily 3 Viewing Pressure History Press the PRESSURE button to view the 12 hour 24 hour 48 hour 1 To switch between a PRESSURE but Absolute pressure is not corrected to sea level conditions Relative pressure is corrected to sea level conditions 2 Rate of Change of Pressure Graph The rate of change of pre barometric pressure and signifies the d...

Страница 20: ...lative pressure measurements less than 29 92 inHg are onsidered low pressure o determine the relative pressure for your location locate an official for real time ometer conditions such as Weather com or Wunderground com official reporting station Press the SET key 14th to select light unit lux fc w m2 default w m2 6 4 8 Temperature t in outdoor temperature unit C or 4 Relative Pre Thu altitude of ...

Страница 21: ...rainfall less In normal model press the TEMP key to view wi Dew Point Temperature Press the TEMP key for 5 second wil new transmitter Note every 60 second the unit will measure indoor temperature indoor humidity and pressure If temperature is to lower th w 6 4 9 Wind speed Press the SET key 16th to select wind speed unit km h mph knots s bft default km h m In normal mode press and release the WIND...

Страница 22: ...6 second 6 4 11 Moon phase 5 1 Display of Alarm value d release ALARM key to display high alarm P Total running total since station was powered up Note the transmitter will send the wind speed wind direction ra e Press the SET key 18th to select Northern or Southern Hemisphere 6 5 Alarm mode 6 1 Press an 2 Press ALARM key again to display low alarm Note ress RAIN key to select display rate or day ...

Страница 23: ... low gered ime back to normal mode or press 6 5 3 Alarm Setting Order 1 Time alarm setting 2 Indoor high temperature setting 3 Indoor low temperature setting 4 Indoor high humidity setting 5 Indoor low humidity setting 6 Outdoor high temperature setting 8 Outdoor high humidity setting 9 Outdoor low humidity setting 10 High wind setting 11 High gust setting 12 Rain rate high setting 13 Rain day hig...

Страница 24: ...w point min hold 2 seconds to view pressure absolute and X MIN button to reset all max or min press MAX MIN key third time back to normal mode or press LIGHT SNOOZE key back to normal mode 6 7 Calibration mode Hold the TEMP and MAX MIN key together for 5 seconds to enter max Press WIND to view wind Press PRESSURE to hold 2 seconds to view pressure absolute relative max P Press TEMP key to view win...

Страница 25: ...es 1 Remove the power from the console by removing the batteries on the screen 4 Press and hold the WIND and PRESSURE keys at the same equence is complete about 5 Press the ALARM key to reset any adjusted value Press the LIGHT SNOOZE key at any time to exit Calibration Order 1 Indoor temperature offset calibrated range 5 C default 0 degrees 2 3 Outdoor temperature offset cal 6 8 1 Factory Reset Cl...

Страница 26: ...y turned on Press the LIGHT SNOOZE key to adjust the brightnes Low and Off 2 Without AC adap To reduce power consumption the display console will automatica enter sleep mode and wi pressed for 15s Hold the LIGHT SNOOZE key in sle in the DC adapter wake up equipment 6 8 4 Tendency indicators Tendency arrows allow you to quickly determine of temper pressure are rising and falling in a three hour upd...

Страница 27: ...conditions for the next 6 hours Please allow at least to learn the barometric pressure over The wireless signal strength displays reception quality If no signal is lost the signal strength indicator will display o Lost the signal Received the signal once 6 8 6 Weather forecast There are six to one month for the weather station time Sunny Partly sunny Cloudy Rainy Snowy 27 ...

Страница 28: ... forecast is a prediction 24 48 hours in advance In most locations this prediction is only 70 accurate and it is a good idea to consult the National Weather Service for more accurate weather forecasts In some locations this prediction may be less or more accurate However it is still an interesting educational tool for learning why the The National Weather Service and other weather services such as...

Страница 29: ...0m Frequency 433 868 MHz option Temperature range 40 C 60 C Accuracy C Resolutio de range y 1m s wind speed 5m s 0 C 50 C show if outside range will sound again LIGHT key to s y key except SNOOZE 1 n 0 1 C Measuring range rel humidity 10 99 Accuracy 5 Rain volume display 0 6000mm show if outsi Accuracy 10 Resolution 0 254mm if rain volume 1000mm 1mm if rain volume 1000mm Wind speed 0 50m s 0 100mp...

Страница 30: ...d Remote power source is the solar panel The batteries provi power when there is limited solar energy 8 Live Internet Publishing Your console is capable of sending your sensor da in the table below Service Weather https www wunderground Undergound com Weather Underground is a ing allows you to send and view your weather and gauges import ta for more detailed analysis and use iPhone iPad and Androi...

Страница 31: ... the WS View e Apple App Store or Google Play store as appropria 8 1 2 Connect the console to Wi Fi Android user tivate the application you have downlo device The following instructions will general to the internet via Wi Fi The console can only operate usin the external power adapter is connected and plugged in Note If you are testing the setup with the outdoor sensor package nearby and indoor yo...

Страница 32: ...press Next Select th have fro list then 2 Operate as per the information tick the box to confirm completed operation press Next 3 Start searching the device If the device i in your WLAN list it will jump to the 4 screen shot The device named EasyWeather WIFI s followed by four characters ...

Страница 33: ...ugh WS iew APP other two registering through the web browser 4 Press Scan and selec you SSID from the lis then ente WiFi nd 5 0 GHz make sure you connect to the 2 4 GHz band otherwise it will fail to connect the weather station to WiFi 5 to connect your weather station IFI ccessfully d creen automatically t t Start phone to the r your password and press Next If you own a dual ba router 2 4 GHz and...

Страница 34: ... you want Press Current GPS Location to get the device current location 2 egister at undergroun nter your valid e mail ddress and assword to obtain the tation ID Station ey from underground co Station a to D Station to load eathercloud net W Key press Save Your tation ID will be added on he WU StationID hen press Next Jump he screen about Up our weather data to s t t t y W If you don t have of Lat...

Страница 35: ...elect OK to fill in the Station ID and Station password key utomatically a Press Save Your statio be added on the WU Station Upload to Wunderg to Setting finish Press Next Jump to the s about Upload your we W Press Back if you don t want upload the data to other web 35 ...

Страница 36: ...he sc we er Ob ervation W If y u don t have W oud ID and Key press Register at W oud net to open yo web browser to activating the Register with W oud net option 1 2 Register at thercloud net it weathercloud net enter a Username Email and Password to sign up validation email from Weathercloud it may take a few utes eathercloud net ut Weathercloud ID athercloud Key press e e v n press Next Jump to t...

Страница 37: ...n how to ogin Now wait for the email to arrive and click the li 1 Upload your weather data to WOW 2 Register at WeatherObservatio esented with a form to fill out nWebsite Choose create a new account you will be pr Input Weathercloud ID Weathercloud Key pres Save s e WOW and Key press r web then press Finish Jump to the Device List home screen If you don t hav ID Register at WeatherObservationWeb s...

Страница 38: ...6 digit number that is used to ensure data is coming from you and not another user Begin setting up a new site by clicking Enter a Site d with a form where you detail your station s location of other settin ou wis fter you complete the set uld see Sites in the navigation bar at the shown its page If you have multiple you will have ne first On this page you will find the site id just On e you are t...

Страница 39: ...t one more time and you will now be on the screen where you will configure WOW On this screen you will fill out Station ID with the WOW Site ID value and Station Key with the WOW Authentication Key you created Press Save to finalize the configuration will indicate your station is off line because it is not yet connected to Wi Fi clicking on Edit Site Figure 33 and filling out the with a 6 digit nu...

Страница 40: ... the 2 4 GHz band otherwise it will fail to connect the weather station to WiFi 2 Select the device you have from the device list then press Next 3 Operate as per the information tick the box to confirm completed operation press Next 1 Tap on the settings icon and select Configure a New Device 40 ...

Страница 41: ... WiFi network from the WLAN list then enter your WiFi password and press Next 6 ect device WiFi The ice named 7 Connection success it will jump to Upload Setting screen 5 Press button Select WiFi to go Sel dev EasyWeather WIFxxxxI and return to WS View App to Wi Fi etting S automatically 41 ...

Страница 42: ...K to continue Upload Setting Your console is capable of sending your sensor data to select internet based weather services Wunderground com Weathercloud net and wow metoffice gov uk User need to register at the select website to get the station ID and password Note User can register Wunderground com directly through WS View APP other two registering through the web browser a Upload your weather da...

Страница 43: ...onID then press Next Jump to the screen about Upload your weather data to Weathercloud net If you don t have Wunderg d Station ID ter to the Register with Wunderground option 2 Register at Wunderground com Enter your valid e mail address and password to obtain the Station ID Station Key from Wunderground com Enter the Station Name you want Press Current GPS Location to get the device current locat...

Страница 44: ...Register at WeatherObservationWebsite The operation is same c Upload your weather data to WeatherObservationWeb WOW Input Weathercloud ID Weathercloud Key press Save Then press Finis Jump to the Device List home screen h on t have WOW ID and Key press Register at I W the Register with WOW option 44 ...

Страница 45: ...ist will bring you to the age where you can change WU registration information If you want to top your console upload data to Wunderground delete your Station ID Mobile application Device List Android 8 2 Mobile application You are able to see you nsole through the De T p s and select Save ...

Страница 46: ...ll you have added multiple WU IDs tap on the WU Station ID to switch Mobile application WU Daseboard Android 8 graph In the mobile application tap Menu choose WU Dashboard and you w be presented with a page listing current conditions for that station If to view data from other IDs 46 ...

Страница 47: ...pping on the settings icon select Delete your console from the list and confirm you wish to delete the station The Station ID will delete from WU Station ID list and will not have the data information on the APP But the data will upload to Wunderground com as usual If you want to add a new weather station to view its data on APP and this device have registered in Wunderground com select Add WU Sta...

Страница 48: ...cation Remove or Add WU ID Androi 8 5 Mob You may want to change the units in which sensor values are reported To do so click on the Configure Units menu after tapping on the settings icon Next tap on the sensor type you wish to change the reporting units for and set the units as desired ...

Страница 49: ...Mobile application Change units Android Mobile application Change units iOs 49 ...

Страница 50: ...ct the Join link at the top of the page Select the Free sign up option 2 Se Click Send Validation Email Respond to the validation email from Wunderground it may take a few minutes 4 Select More Register Your PWS again and enter all of the information requested lect More Register Your PWS 3 50 ...

Страница 51: ... Below figure is an example and your station ID and password will be different Note Your station ID will have the form KSSCCCC where K is for USA station I for international SS is your state CCCC is your city and is the station number in that city In the example above KAZPHOEN424 is in the USA K State of Arizona AZ City of Phoenix PHOEN and 424 Viewing your Data on Wunderground com 51 ...

Страница 52: ...nd Web Browser Visit http www wunderground com personal weather station dashboard ID STATIONID where STATIONID is your personal station ID example KAZSEDON12 WunderStation iPad App Visit http www WunderStation com to download the WunderStation iPad app 52 ...

Страница 53: ...Mobile Apps Visit http www wunderground com download index asp ly you your mobile device s web browser for a complete list of Mobile apps for iOS and Android Alternate can find your data on 53 ...

Страница 54: ...ue to environmental challenges In harsh environments inspect the batteries every 3 months when cleaning the solar panel 4 When replacing the batteries apply a corrosion preventive compound on the battery terminals available at Amazon and most hardware stores 5 In snowy environments spray the top of the weather station with anti icing silicon spray to prevent snow build up 11 ide clean with a damp ...

Страница 55: ...g every 16 seconds Replace the batteries in the outside sensor array If the batteries were recently replaced check the polarity If the sensor is flashing every 16 seconds ference or other location factors or the batteries may have been changed in the sensor array and the console has not been reset The solution may be as simple as powering down and up the console remove AC power and batteries wait ...

Страница 56: ...ave a stable level mounting solution Data not reporting to Wunderground 1 Confirm your password or ey is correct It is the password you registered on Wunderground com Your Wunderground com password cannot begin a 2 Confirm your station ID is correct The station ID is all caps and the most common issue is substituting an O for a 0 or visa versa Example KAZPHOEN11 not KAZPH0EN11 3 Make sure the date...

Страница 57: ... your modem WiFi settings are correct network name and password 3 Make sure the console is plugged into AC e console will not connect to WiFi wered by batteries only 4 The console only supports and connects to 2 4 GHz routers If you own a 5 GHz router and it is a dual band router you will need to disable the 5 GHz band and enable the 2 4 GHz band 5 The console does not support guest networks power...

Отзывы: