

Quick Start Poster
Forcepoint V5000 G4
Forcepoint DLP Appliance
Bezel (faceplate)
Power Cable
Ethernet Cables (4)
2
1
Rack Installation
Contact Forcepoint Technical Support if any items are missing.
4
Connect Input Device & Power On
5
6
7
Installation Steps
Getting the Latest Updates
Configuration Overview
Verify Contents
Install the Forcepoint management server and ensure it is
operational.
The appliance supports the following security modes:
• Protector (can be deployed in monitoring mode)
• Mobile agent
Plan your deployment before setting up the appliance. See the back
of this poster for a deployment overview and reference sheet.
Before you begin...
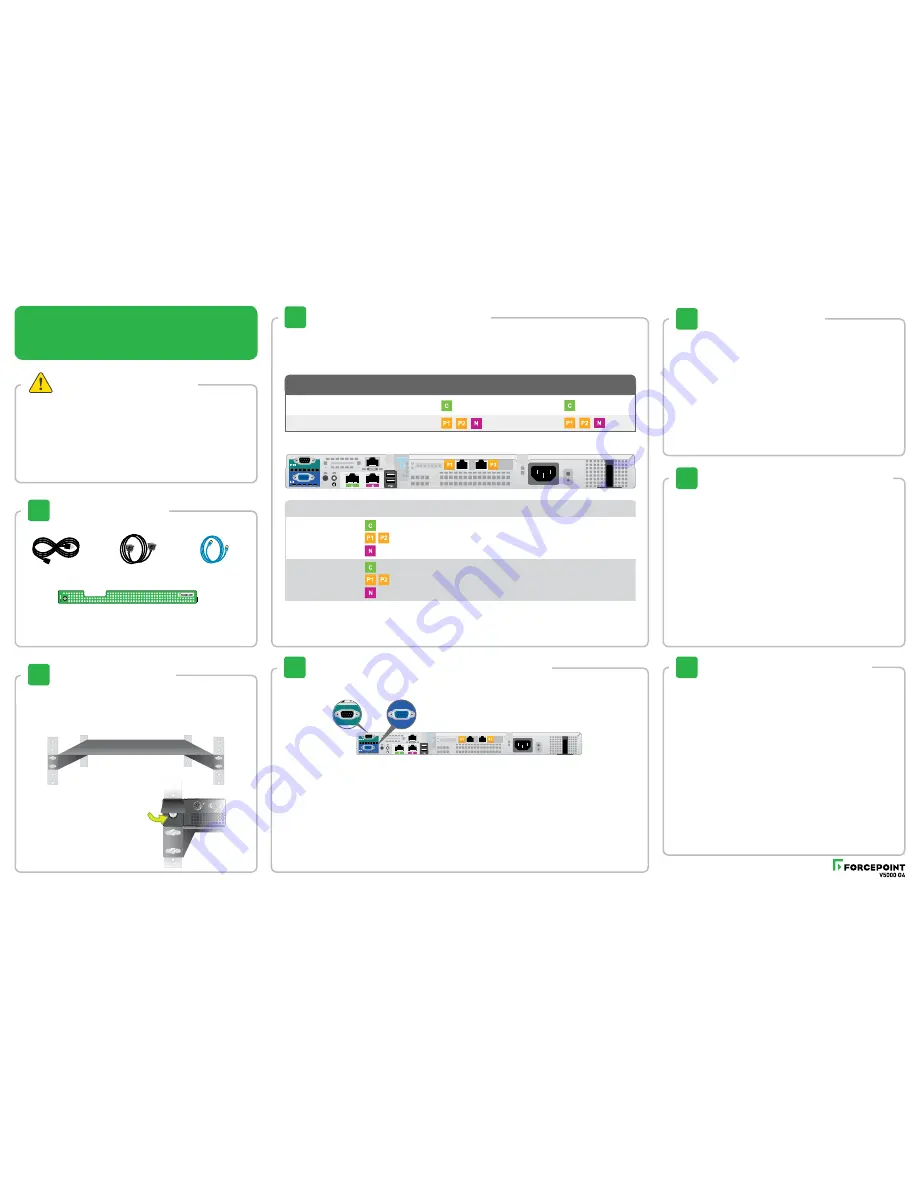
Connect the appliance interfaces required by the security mode for this appliance. The default
configuration is shown below.
Cat 5E cables (or better) are required. Do not use crossover network cables.
Connect a computer to serial port using null modem cable
(provided). Or, connect a terminal server to serial port using a
straight-through cable (not provided). Serial port settings are:
9600 baud, 8 bits, no parity.
Connect a monitor and keyboard to appliance, either directly
or through a KVM (keyboard/video/mouse) switch.
Serial Port Connection
OR
Keyboard/Monitor Connection
* Receives connections from the Forcepoint management server. Provides communication and management for the appliance.
** Although these interfaces are optional, at least one must be configured.
*** Allows mobile devices to access the appliance from internal, hotspot, and home networks.
3
Connect Network Cables
QSGDSS-100_RevB
Null Modem Cable
To rack the V5000 appliance, use a rack tray (not included).
1. Obtain a rack tray and install into desired server rack.
2. Place appliance on tray and
secure to server rack using
mounting screws on front of
appliance.
Required Ports:
Legend: C = em1
N = em2
P1 = p2p2
P2 = p2p1
Optional Ports:
Protector (Monitoring)
Mobile Agent
•
•
•
Optional**. Can monitor separate networks through a TAP.
Required. Management server port.*
•
Required. Management server port.*
Optional**. Can monitor separate networks through a TAP.
• Optional. Can connect to separate networks (LAN, WAN or DMZ)***.
• Optional. Can connect to separate networks (LAN, WAN, or DMZ)***.
Protector
Mobile Agent
Interface
Function
Mode
Power on the appliance and check the following indicators:
Front
• Power button is illuminated.
Rear
• LEDs for connected network interfaces (NICs) are green.
• System status indicator (LED left of power supplies) is solid blue.
Contact Forcepoint Technical Support if any indicators are not illuminated correctly.
1. After the power is on, you are prompted for a user name and
password.
Enter
admin:admin
for the protector.
Enter
root:admin
for the mobile agent.
2. Start the configuration wizard:
An installation wizard starts automatically for the protector.
For the mobile agent, type “wizard” and press
Enter
.
3. Follow the prompts to complete the wizard.
Please refer to the
Deployment and Installation Center
in the
Forcepoint Technical Library for more details.
1. Go to forcepoint.com, log on to My Account, and select the
Downloads page.
2. Download the upgrade script for the latest version of the
Forcepoint DLP Protector and Mobile Agent.
3. Log on to the appliance as
root
.
4. Copy the update script to
/opt/websense/data
.
5. Enter the following command:
chmod +x /opt/websense/data/<update_script_name>
6. Enter the following command:
bash /opt/websense/data/<update_script_name>
7. Enter
Y
, then complete the wizard, accepting the defaults.
1. Log on to the Forcepoint Security Manager:
a. Enter the URL https://<management_server_ip>:9443
b. Enter the user name
admin
.
c. Enter the admin password.
2. If necessary, click
Data
to launch the Data Security module.
3. If prompted, enter your subscription key.
4. Go to the
Main > Status > Dashboard
page. If the Health Alert
Summary lists missing essential configurations, click the link for
details and complete the remaining configurations.
5. Go to the
Settings > Deployment > System Modules
page.
6. Double-click the protector or mobile agent to configure it.
7. Configure Policies.
8. Click
Deploy
.
Refer to the Forcepoint DLP Administrator Help for details.
©2017 Forcepoint LLC. All rights reserved.


