background image

FORCE COMPUTERS

Page 25

SSPARC/CPU-5CE

Installation Guide

1.8

SPARC CPU-5CE Connectors

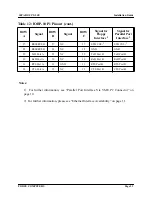
The connectors on the SPARC CPU-5CE are listed in the following table.

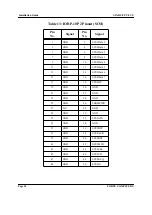
The following pages show the pinouts of the connectors.

Table 7: SPARC CPU-5CE Connectors

Function

Location

Type

Manufacturer Part

Number

Ethernet

Front Panel

15-pin D-Sub

AMP 747845-4

Serial Port A

Front Panel

26-pin Fine Pitch

AMP 749831-2

Serial Port B

Front Panel

26-pin Fine Pitch

AMP 749831-2

Keyboard/Mouse

Front Panel

8-pin Mini DIN

AMP 749232-1

SBus Slot1

P3

96-pin SMD

FUJITSU FCN-234J096-G/V

SBus Slot2

P4

96-pin SMD

FUJITSU FCN-234J096-G/V

VMEbus P1

P1

96-pin VGA

Various

VMEbus P2

P2

96-pin VGA

Various

Содержание SPARC CPU-3CE

Страница 1: ...zed and idle equipment along with credit for buybacks and trade ins Custom engineering so your equipment works exactly as you specify Critical and expedited services Leasing Rentals Demos In stock Rea...

Страница 2: ...mbH All Rights Reserved This document shall not be duplicated nor its contents used for any purpose unless express permission has been granted Copyright by FORCE COMPUTERS SPARC CPU 5CE Installation G...

Страница 3: ...ed Switches 9 1 5 9 Parallel Port or Floppy Interface via VME P2 Connector 10 1 5 10 Ethernet via Front Panel or VME P2 Connector 11 1 6 OpenBoot Firmware 12 1 6 1 Boot the System 12 1 6 2 NVRAM Boot...

Страница 4: ...Table of Contents SPARC CPU 5CE Installation Guide Page ii FORCE COMPUTERS...

Страница 5: ...Parallel Port Interface Via VME P2 Connector 10 Figure 4 Ethernet Interface Availability 11 Figure 5 Diagram of the Front Panel 23 Figure 6 Pinout of theEthernet Cable Connector 26 Figure 7 Serial Por...

Страница 6: ...List of Figures SPARC CPU 5CE Installation Guide Page iv FORCE COMPUTERS...

Страница 7: ...atures of the Front Panel 24 Table 7 SPARC CPU 5CE Connectors 25 Table 8 Ethernet the Connector Pinout 26 Table 9 Serial Ports A and B Connector Pinout for RS 232 27 Table 10 Keyboard Mouse Connector...

Страница 8: ...List of Tables SPARC CPU 5CE Installation Guide Page vi FORCE COMPUTERS...

Страница 9: ...ect board installation and uninstallation can damage circuits or shorten their lifetime Before installing or uninstalling the board read this Installation section Before installing or uninstalling the...

Страница 10: ...l Reference Manual as well as two additional books The SPARC CPU 5CE Technical Reference Manual provides a comprehensive hardware and software guide to your board and is intended for those persons who...

Страница 11: ...FORCE COMPUTERS Page 3 SSPARC CPU 5CE Installation Guide FIGURE 1 Diagram of the CPU 5CE...

Страница 12: ...E 2 Highlighted Diagram of the CPU 5CE SW8 Rotary Switch SW5 SW9 S4 VME SBus Slot 1 at P3 microSPARC II NCR89105 NCR89100 SBus Slot 2 at P4 B3 B1 B2 SW2 USER EPROM RTC NVRAM BOOT EPROM J125 J124 Devic...

Страница 13: ...SW2 4 SW2 3 OFF OFF User Flash EPROM write protection ON disable OFF enable Boot Flash EPROM write protection ON disable OFF enable SW2 2 SW2 1 ON OFF Test Switch must be ON Test Switch must be OFF SW...

Страница 14: ...ON Available OFF Not Available SW4 5 ON CTS on Front Panel Connector for RS 232 or CTS on Front Panel Connector for RS 422 ON Available OFF Not Available SW4 6 OFF RTXC on Front Panel Connector for R...

Страница 15: ...ot set the switches SW4 1 and SW4 2 or SW4 3 and SW4 4 or SW4 5 and SW4 6 to ON at the same time SWITCH 9 SW9 2 SW9 1 ON ON External VMEbus SYSRESET ON VMEbus SYSRESET generates on board RESET OFF VME...

Страница 16: ...SPARC CPU 5CE in a miniforce chassis please first disable the VMEbus System Controller function by setting switch SW5 1 to OFF 1 5 2 VMEbus SYSRESET Switches When the SPARC CPU 5CE is a VMEbus slot 1...

Страница 17: ...a microforce chassis please first disable the SCSI termination by setting switch SW2 6 to OFF 1 5 6 Boot Flash EPROM Write Protection Both Boot Flash EPROMs are write protected via the switch SW2 3 Wh...

Страница 18: ...switch matrix plugged into B2 and B3 This means of course that by default the parallel port interface is not available via the VMEbus P2 connector To enable the parallel port interface via the VME P2...

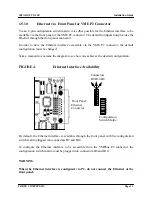
Страница 19: ...uration must be changed Take a moment to examine the diagram to see how one achieves the desired configuration FIGURE 4 Ethernet Interface Availability By default the Ethernet interface is available t...

Страница 20: ...booting the system Booting is the process of loading and executing a stand alone program such as the operating system After it is powered on the system usually boots automatically after it has passed...

Страница 21: ...o be booted filename is relative to the root of the selected device If no filename is specified the boot command uses the value of boot file NVRAM parameter The NVRAM parameters used for booting are d...

Страница 22: ...s espdma esp sd 3 0 First internal disk SCSI ID 3 disk2 iommu sbus espdma esp sd 2 0 Additional internal disk SCSI ID 2 disk1 iommu sbus espdma esp sd 1 0 External disk SCSI ID 1 disk0 iommu sbus espd...

Страница 23: ...nor a filename is supplied the boot command of the Forth Monitor takes the omitted values form the NVRAM configuration parameters If the parameter diag switch is false boot device and boot file are u...

Страница 24: ...table below lists several diagnostic routines Table 4 Diagnostic Routines To check the on board SCSI bus for connected devices type Command Description probe scsi Identify devices connected to the on...

Страница 25: ...are tested When you use the memory testing routine the system tests the number of megabytes of memory specified in the NVRAM configuration parameter selftest megs If the NVRAM configuration parameter...

Страница 26: ...raffic displaying each time it receives a valid packet and displaying X each time it receives a packet with an error that can be detected by the network hardware interface ok watch clock Watching the...

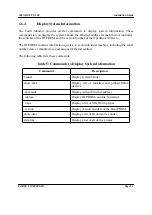
Страница 27: ...fic to each individual machine including the serial number date of manufacture and assigned Ethernet address The following table lists these commands Table 5 Commands to Display System Information Com...

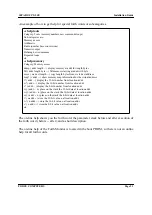
Страница 28: ...pe A list of all available help categories is displayed These categories may also contain subcategories To get help for special forth words or subcategories just type help name An example is shown on...

Страница 29: ...ok ok help memory Category Memory access dump addr length display memory at addr for length bytes fill addr length byte fill memory starting at addr with byte move src dest length copy length bytes f...

Страница 30: ...urn off the power before handling the board or its components Turn off the power before installing the board in a VMEbus rack 1 6 7 2 Replacing the ROMs 1 Remove the existing OpenBoot ROM from socket...

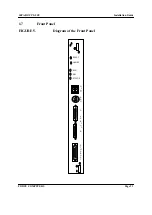
Страница 31: ...FORCE COMPUTERS Page 23 SSPARC CPU 5CE Installation Guide 1 7 Front Panel FIGURE 5 Diagram of the Front Panel RESET ABORT RUN BM STATUS A E T H E R N E T B K B D S E R I A L D I A G...

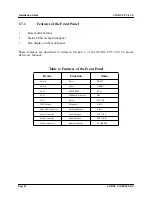
Страница 32: ...in Section 3 of the SPARC CPU 5CE Technical Reference Manual Table 6 Features of the Front Panel Device Function Name Switch Reset RESET Switch Abort ABORT LED RUN RESET RUN LED VMEbus Bus Master BM L...

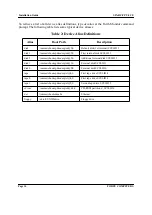
Страница 33: ...onnectors Function Location Type Manufacturer Part Number Ethernet Front Panel 15 pin D Sub AMP 747845 4 Serial Port A Front Panel 26 pin Fine Pitch AMP 749831 2 Serial Port B Front Panel 26 pin Fine...

Страница 34: ...rnet connector The figure below shows the Ethernet connector and pin numbers FIGURE 6 Pinout of theEthernet Cable Connector Table 8 Ethernet the Connector Pinout Pin Function 1 GND 2 Collision 3 Trans...

Страница 35: ...o serial I O ports are independent full duplex channels The table below shows the pinout of serial ports A and B The table is valid for both serial I O connectors A and B FIGURE 7 Serial Ports A and B...

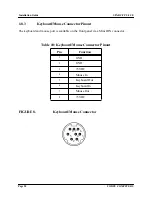
Страница 36: ...nector Pinout The keyboard and mouse port is available on the front panel via a Mini DIN connector FIGURE 8 Keyboard Mouse Connector Table 10 Keyboard Mouse Connector Pinout Pin Function 1 GND 2 GND 3...

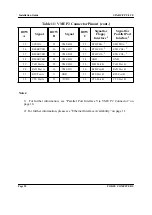
Страница 37: ...R Data 5 8 SCSI Data 7 8 VME A28 8 FPY MOTEN CENTR Data 6 9 SCSI DP 9 VME A29 9 FPY DIR CENTR Data 7 10 GND 10 VME A30 10 FPY STEP CENTR ACK 11 GND 11 VME A31 11 FPY WRDATA CENTR BSY 12 GND 12 GND 12...

Страница 38: ...TH TRA 2 26 RESERVED 26 VME D27 26 ETH COL 2 ETH COL 2 27 RESERVED 27 VME D28 27 ETH COL 2 ETH COL 2 28 RESERVED 28 VME D29 28 GND GND 29 TxD Port A 29 VME D30 29 TxD Port B TxD Port B 30 RxD Port A 3...

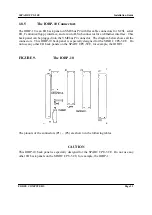
Страница 39: ...connector The diagram below shows all the connectors This IOBP 10 back panel is especially designed for the SPARC CPU 5CE Do not use any other I O back panels on the SPARC CPU 5CE for example the IOBP...

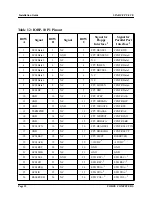
Страница 40: ...NTR Data 6 9 SCSI DP 9 N C 9 FPY DIR CENTR Data 7 10 GND 10 N C 10 FPY STEP CENTR ACK 11 GND 11 N C 11 FPY WRDATA CENTR BSY 12 GND 12 GND 12 FPY WRGATE CENTR PE 13 TERMPWR 13 N C 13 FPY TRACK0 CENTR A...

Страница 41: ...ailability on page 11 27 RESERVED 27 N C 27 ETH COL 2 ETH COL 2 28 RESERVED 28 N C 28 GND GND 29 TxD Port A 29 N C 29 TxD Port B TxD Port B 30 RxD Port A 30 N C 30 RxD Port B RxD Port B 31 RTS Port A...

Страница 42: ...CSI Data 3 9 GND 10 SCSI Data 4 11 GND 12 SCSI Data 5 13 GND 14 SCSI Data 6 15 GND 16 SCSI Data 7 17 GND 18 SCSI DP 19 GND 20 GND 21 GND 22 GND 23 GND 24 GND 25 GND 26 TERMPWR 27 N C 28 GND 29 GND 30...

Страница 43: ...Y EJECT 2 FPY DENSEL 3 GND 4 FPY DENSENS 5 GND 6 N C 7 GND 8 FPY INDEX 9 GND 10 FPY DRVSEL 11 GND 12 N C 13 GND 14 N C 15 GND 16 FPY MOTEN 17 GND 18 FPY DIR 19 GND 20 FPY STEP 21 GND 22 FPY WRDATA 23...

Страница 44: ...5 CENTR Data 1 6 GND 7 CENTR Data 2 8 GND 9 CENTR Data 3 10 GND 11 CENTR Data 4 12 GND 13 CENTR Data 5 14 GND 15 CENTR Data 6 16 GND 17 CENTR Data 7 18 GND 19 CENTR ACK 20 GND 21 CENTR BSY 22 GND 23 C...

Страница 45: ...3 RESERVED 4 RESERVED 5 TxD Port B 6 TxD Port A 7 RxD Port B 8 RxD Port A 9 RTS Port B 10 RTS Port A 11 CTS Port B 12 CTS Port A 13 GND 14 GND Table 17 IOBP 10 Pinout Ethernet Pin Function 1 GND 2 Col...

Страница 46: ...48 bit 6 byte Ethernet address FIGURE 11 The 32 bit 4 byte host ID ok banner 47 40 39 32 31 24 23 16 15 8 7 0 0 0 8 0 4 2 Byte 5 4 3 2 1 0 B 0 X X X X These 3 bytes always remain 0016 8016 4216 Speci...

Страница 47: ...ion of the publication history of this SPARC CPU 5CE Installation Guide Table 18 History of Manual Revision No Description Date 1 First Print July 1994 2 Editorial Changes July 1995 3 BusNet and How t...

Страница 48: ...Installation Guide SPARC CPU 5CE Page 40 FORCE COMPUTERS...

Страница 49: ...uipment Have surplus equipment taking up shelf space We ll give it a new home Learn more Visit us at artisantg com for more info on price quotes drivers technical specifications manuals and documentat...

Отзывы: