Focusrite iTrack Solo Скачать руководство пользователя страница 13

13

Using Direct Monitoring

You will frequently hear the term “latency” used in connection with digital audio systems. In the case 

of the simple recording application described above, latency will be the time it takes for your input 

signals  to  pass  through  your  recording  device  (laptop  or  iPad,  etc.)  and  the  associated  software. 

Latency can be a problem for a performer who wishes to record while monitoring their input signals. 

The iTrack Solo is fitted with a “Direct Monitoring” option, which overcomes this problem.

Setting the front panel DIRECT MONITOR switch to ON will route your input signals directly to the 

iTrack  Solo’s  headphone  and  main  monitor  outputs.  This  enables  you  to  hear  yourself  with  zero 

latency – i.e., in “real time” – along with the computer playback. The input signals to your computer 

are not affected in any way by this setting.

When “Direct Monitoring” is set to ON, ensure that your recording software is not set to route its 

input (what you are currently recording) to its output. If it is, you will hear yourself “twice”, with one 

signal audibly delayed as an echo.

Headphone monitoring

Connect a pair of stereo headphones to the front panel headphones socket to hear both what you 

are recording (your current input signal(s)) and any tracks you’ve already recorded in your laptop or 

iOS device. The pre-recorded tracks will be heard in stereo, and the current input signals in mono – 

central in the stereo image. If you are using both the mic and instrument inputs, the two inputs will 

be summed in mono.

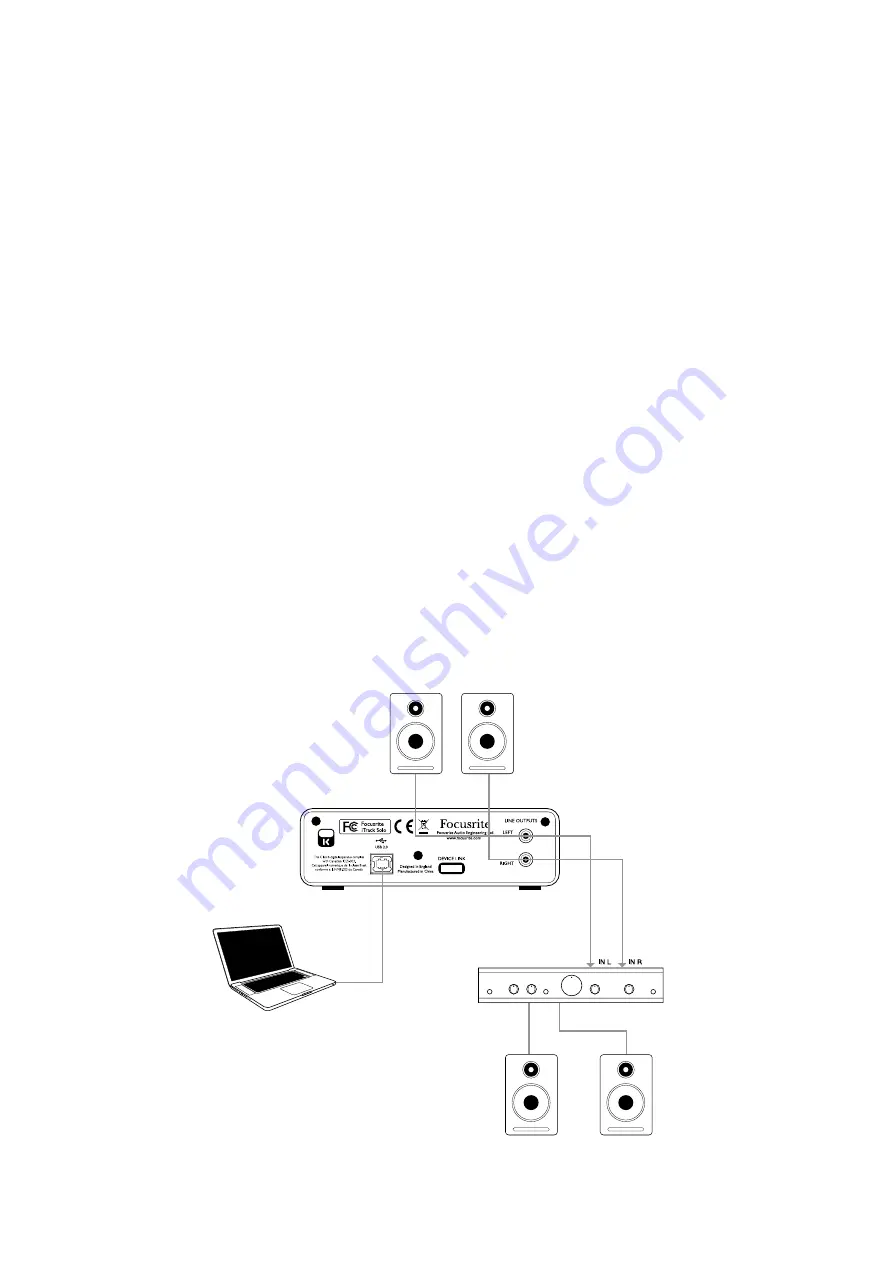
Connecting iTrack Solo to loudspeakers

The phono (RCA) outputs on the rear panel can be used to connect monitoring speakers. Self-powered 

monitors (i.e., typical computer speakers) incorporate internal amplifiers, and may be connected 

directly. Larger, passive loudspeakers will require a separate stereo amplifier; in this case, the rear 

panel outputs should be connected to the amplifier’s inputs.

Содержание iTrack Solo

Страница 1: ...User Guide www focusrite com FA0687 03...

Страница 2: ...is required when the apparatus has been damaged in any way such as power supply cord or plug is damaged liquid has been spilled or objects have fallen into the apparatus the apparatus has been expose...

Страница 3: ...eception which can be determined by turning the equipment off and on the user is encouraged to try to correct the interference by one or more of the following measures Reorient or relocate the receivi...

Страница 4: ...7 Using the iTrack Solo with GarageBand 8 Using the iTrack Solo with a Mac or PC 9 Software Installation 9 Mac OS 9 Windows 10 Connecting your iTrack Solo 10 Audio setup in your DAW 10 Example of use...

Страница 5: ...ted to your audio recording app for example GarageBand It can also be used to route audio to a digital audio workstation referred to throughout this user guide as a DAW running on a laptop or desktop...

Страница 6: ...evices iPad iPad 2 iPad 3rd generation Mac OS Apple Macintosh with a high speed USB 2 0 compliant USB port OS Mac OS X 10 7 or later Lion or Mountain Lion Windows Windows compatible computer with a US...

Страница 7: ...o is powered and connected It is also important to note that when connected in this way the iTrack Solo will not charge the iOS device s internal battery Connections to your iOS device The supplied iO...

Страница 8: ...e screen and select Audio Recorder 3 Tap the jack plug icon to open the Input Settings controls 4 Select Left Channel to route the mic input to the vocal track 5 Switch Monitor OFF and enable Direct M...

Страница 9: ...vers are small software applications which ensure that your laptop computer communicates correctly and efficiently with the iTrack Solo The drivers can be downloaded from www focusrite com downloads N...

Страница 10: ...er It will not operate correctly with USB 1 0 1 1 ports The iTrack Solo will be powered from the computer via the USB connection The iTrack Solo cannot be used with an iOS device and a computer at the...

Страница 11: ...s 1 2 will appear in your DAW s Audio I O preferences Depending on your DAW you may need to enable certain inputs or outputs before use The two examples below show Inputs 1 2 and Outputs 1 2 enabled i...

Страница 12: ...1 uses a standard 3 pin XLR socket and is configured to work with microphones of most types you will probably have a mating XLR male connector on the end of your mic cable Input 2 uses a 2 pole 6 35 m...

Страница 13: ...irect Monitoring is set to ON ensure that your recording software is not set to route its input what you are currently recording to its output If it is you will hear yourself twice with one signal aud...

Страница 14: ...lectronically balanced input via 3 pin XLR socket for microphones 2 GAIN 01 adjust the gain for the microphone signal on input 1 The gain control has a concentric bi colour LED ring to confirm signal...

Страница 15: ...B connector connect to your laptop or desktop with cable supplied You will need to connect this port to an Apple USB Power Supply when using the iTrack Solo with an iOS device 3 DEVICE LINK proprietar...

Страница 16: ...Frequency Response 20 Hz 20 kHz 0 2 dB Gain Range 10 dB to 55 dB THD N 0 002 minimum gain 1 dBFS input with 20 Hz 22 kHz bandpass filter Noise EIN 120 dBu measured at 55 dB gain with 150 ohm terminati...

Страница 17: ...k 10 pin proprietary Front Panel Indicators USB LED green indicates active USB connection Gain controls Colour coded LED rings green 24 dBFS and red 0 dBFS Weight and Dimensions W x H x D 150mm x 45mm...

Отзывы: