


Note
• The laser is enabled by a setting. Select
(
Settings
) >
Device settings
>
Lamp & la-
ser
>
Enable lamp & laser
.
• The symbol
is displayed on the screen when the laser is on.
• The camera can be configured to automatically measure the distance when an image
is saved. Select
(
Settings
) >
Save options & storage
>
Measure distance
. With
this setting, the
Object distance
parameter (see section 18.5
, page 60) in the image data is automatically updated with the meas-
ured distance when an image is saved. (There is no effect on the
Object distance
setting in live mode.)
• If the target reflection is low or if the target is angled from the laser beam, there may
be no return signal, and the distance cannot be measured.
• For large lenses that cover the laser transmitter and receiver, the laser functionality is
disabled.
• The laser distance meter may not be enabled in all markets.
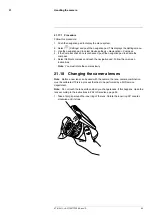
21.11.2
Procedure
Follow this procedure:
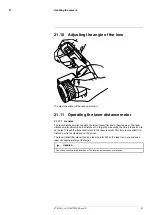
1. To turn on the laser, push and hold the laser button
. The distance to the target is
displayed on the screen.
2. To turn off the laser, release the laser button
.
21.12
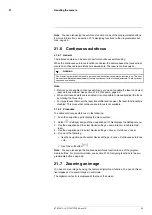
Measuring areas
21.12.1
General
Note
For large lenses that cover the laser transmitter and receiver, the laser functional-
ity is disabled. This means that the area measurement function is not available.
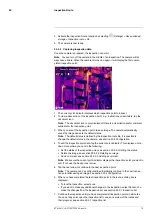
The distance measured by the laser distance meter can be used as the basis for area
calculations. A typical application is to estimate the size of a damp stain on a wall.
To measure the area of a surface, you need to lay out a box or circle measurement tool
on the screen. The camera calculates the area of the surface enclosed by the box or
circle tool. The calculation is an estimate of the surface area, based on the measured
distance to the target.
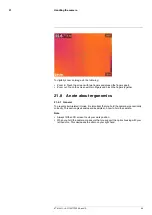
When the laser distance meter is on, you will see a laser dot approximately at the target.
The laser distance meter measures the distance to that target. The camera assumes that
this distance is valid for the entire box or circle tool.
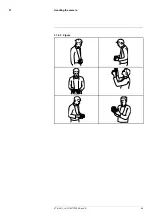
For successful area measurements, keep the following in mind:
• Make sure that the box or circle tool is in the center of the image.
• Adjust the size of the box or circle tool to the size of the target.
• Hold the camera perpendicular to the target.
• Avoid targets with many details at different distances from the camera.
21.12.2
Procedure
Note
This procedure assumes that you have enabled the laser. Select
(
Settings
) >
Device settings
>
Lamp & laser
>
Enable lamp & laser
.
Follow this procedure:
1. Add a box or circle measurement tool, see section 18.2
#T810411; r. AC/70277/70566; en-US
88
Содержание GF7 Series
Страница 1: ...User s manual FLIR GF7x series...
Страница 93: ...Handling the camera 21 21 8 2 Figure T810411 r AC 70277 70566 en US 85...
Страница 119: ...Mechanical drawings 28 See next page T810411 r AC 70277 70566 en US 111...
Страница 124: ...CE Declaration of conformity 29 See next page T810411 r AC 70277 70566 en US 116...
Страница 125: ......


