7
Section 4 - Installation Instructions
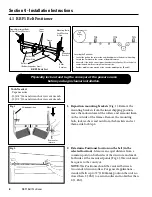
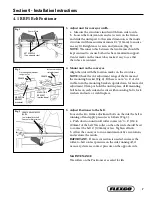
3. Adjust unit for conveyor width.
a. Measure the structure’s inside width from side to side.
b. Loosen the four jam nuts and set screws on the frames
and slide the unit apart to the same dimension as the inside
structure width measurement minus 1/2" (13mm) to ensure
an easy fit. Retighten set screws and jam nuts (Fig. 3).
NOTE: The inner tubes between the two frames should be
kept centered to ensure both sides have maximum support.
Center marks on the inner tubes make it easy to see that
the tubes are centered.
4. Mount unit on the conveyor.
Align the unit with the location marks on the structure.
NOTE: Check the slot adjustment range of the frame and
the mounting bracket (Fig. 4). If there is not 4" to 6" of slot
visible, turn the mounting brackets upside down for more slot
adjustment. Clamp or hold the unit in place, drill mounting
bolt holes on each side and secure with mounting bolts, lock
washers and nuts, or weld in place.
5. Adjust Positioner to the belt.
Loosen the two frame adjustment bolts on the side the belt is
running off and apply pressures as follows (Fig. 5):
a. Push down on unit until roller contacts 6" to 8" (150 to
200mm) of the belt. The roller on the other side should be set
to contact the belt 4" (100mm) or less. Tighten all nuts.
b. Allow the conveyor to run a minimum of five revolutions
and evaluate the results.
IMPORTANT: If more correction is needed, increase the
roller-to-belt contact pressure on the side running off; if
necessary, decrease contact pressure on the opposite side.
Fig. 3
Fig. 5
FRAME ADJUSTMENT
BOLTS
(on inside of bracket)
Loosen for Adjustment
MAINTENANCE
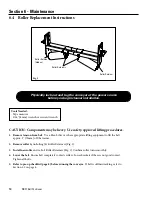
The rollers on the Positioner are sealed for life.
Center Mark
SET SCREWS
(2 on opposite side)
Fig. 4
Not enough adjustment
range in slot
Increased range of
slot adjustment
MOUNTING
BRACKET
(upside-down)
MOUNTING
BRACKET
(standard)
FRAME
FRAME
Structure
4.1 RBP1 Belt Positioner
Содержание RBP1
Страница 1: ...RBP1 Belt Positioner Installation Operation and Maintenance Manual www flexco com www flexco com ...
Страница 17: ...15 Section 8 Specs and CAD Drawings 8 2 CAD Drawing RBP1 Belt Positioner Small ...
Страница 18: ...16 RBP1 Belt Positioner Section 8 Specs and CAD Drawings 8 3 CAD Drawing RBP1 Belt Positioner Medium ...
Страница 19: ...17 Section 8 Specs and CAD Drawings 8 4 CAD Drawing RBP1 Belt Positioner Large ...
Страница 20: ...18 RBP1 Belt Positioner Section 8 Specs and CAD Drawings 8 5 CAD Drawing RBP1 Belt Positioner Extra Large ...
Страница 22: ......


