background image

6


RBP1 Belt Positioner

Section 4 - Installation Instructions

Physically lock out and tag the conveyor at the power source 

before you begin cleaner installation.

Locating the Positioner

A

B

C

•  Look at the belt on the return side and identify where the belt is mistracking.

•  Locate the Positioner in the center of the problem area.

•  Generally, if the belt is correctly positioned at the tail pulley (A) so the belt is 

center loaded, it will run straight on the top side. 

•  Another problem area may be at the counter-weight pulley (B and C).

Tail

Pulley

RBP1 Parts List

Rollers

(Rubber-Lagged or Steel)

Set Screws

& Jam Nuts

Mounting Bolts, 

Lock Washers 

& Nuts

Mounting 

Bracket

Inner

Tubes

Frame Adjustment Bolts, 

(2) Nuts & Lock Washers

Roller 

Retainer

Frame

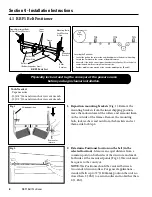
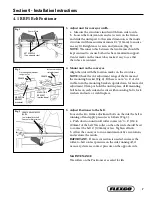
1.  Reposition mounting brackets (Fig. 1). Remove the 

mounting brackets from the inner shipping position, 

move them down toward the rollers, and remount them 

on the outside of the frames. Remove the mounting 

bolts, lock washers and nuts from the brackets and set 

them aside for Step 4.

Move down

Remove for 

later use

Shipping position

Fig. 1

Fig. 2

2.  Determine Positioner location on the belt (in the 

selected location). Measure an equal distance from a 

common point on both sides of the structure and mark 

both sides at the measured points (Fig. 2). The unit must 

be square to the conveyor. 

  NOTE: The Positioner should be centered between 

two standard return rollers. For general applications--

standard belts up to 72" (1800mm): position the unit no 

closer than 3' (.9M) to a return roller and no farther than 

6' (1.8M). 

4.1  RBP1 Belt Positioner

Tools Needed:


- Tape measure 

- (2) 5/8" (16 mm) wrench or crescent wrench

- (2) 1/2" (13 mm) wrench or crescent wrench

Содержание RBP1

Страница 1: ...RBP1 Belt Positioner Installation Operation and Maintenance Manual www flexco com www flexco com ...

Страница 2: ... _____________________________________________________________ Installation Date _____________________________________________________________ Serial number information can be found on the Serial Number Label included in the Information Packet found in the cleaner carton This information will be helpful for any future inquiries or questions about belt cleaner replacement parts specifications or tr...

Страница 3: ...8 5 1 Pre Op Checklist 8 5 2 Test Run the Conveyor 8 Section 6 Maintenance 9 6 1 New Installation Inspection 9 6 2 Routine Visual Inspection 9 6 3 Routine Physical Inspection 9 6 4 Roller Replacement Instructions 10 6 5 Maintenance Log 11 6 6 Maintenance Checklist 12 Section 7 Troubleshooting 13 Section 8 Specs and CAD Drawings 14 8 1 Specs and Guidelines 14 8 2 CAD Drawing RBP1 Small 15 8 3 CAD D...

Страница 4: ...questions or problems that are not covered please visit our web site or contact our Customer Service Department Customer Service 1 800 541 8028 Visit www flexco com for other Flexco locations and products Please read this manual thoroughly and pass it on to any others who will be directly responsible for installation operation and maintenance of this impact bed While we have tried to make the inst...

Страница 5: ...Conveyor Criteria Belt Positioner PTEZ PT Smart PT Pro Heavy Duty PT Pro PT Max Heavy Duty PT Max Super Duty PT Max Top side mistracking No No No No No Yes Yes Yes Return side mistracking Yes Yes Yes Yes Yes Yes Yes Yes Reversing Yes Yes No Yes Yes No No No Belt mistracking to one side Better Better Better Better Better Better Better Better Belt mistracking to both sides Acceptable Better Best Bet...

Страница 6: ...r power source Disengage any takeups Clear the conveyor belt or clamp securely in place Use Personal Protective Equipment PPE Safety eyewear Hardhats Safety footwear Close quarters and heavy components create a worksite that compromises a worker s eyes feet and skull PPE must be worn to control the foreseeable hazards associated with conveyor belt components Serious injuries can be avoided 2 2 Ope...

Страница 7: ...or Belt Lifter The Flexco Flex Lifter makes the job of lifting the conveyor belt easy and safe Using two Flex Lifters the belt can be quickly lifted out of the way to install the PT Smart The Flex Lifter has the highest safe lift rating available at 4000 lbs 1810 kg for Medium and Large 6000 lbs 2750 kg for XL And it s versatile It can also be used to lift topside or return side belt for splicing ...

Страница 8: ...r Frame 1 Reposition mounting brackets Fig 1 Remove the mounting brackets from the inner shipping position move them down toward the rollers and remount them on the outside of the frames Remove the mounting bolts lock washers and nuts from the brackets and set them aside for Step 4 Move down Remove for later use Shipping position Fig 1 Fig 2 2 Determine Positioner location on the belt in the selec...

Страница 9: ...lace drill mounting bolt holes on each side and secure with mounting bolts lock washers and nuts or weld in place 5 Adjust Positioner to the belt Loosen the two frame adjustment bolts on the side the belt is running off and apply pressures as follows Fig 5 a Push down on unit until roller contacts 6 to 8 150 to 200mm of the belt The roller on the other side should be set to contact the belt 4 100m...

Страница 10: ...mistracking too far to one side increase the roller to belt contact pressure on the side running off if necessary decrease contact pressure on the opposite side Recheck that all fasteners are tight Apply all supplied labels Be sure that all installation materials and tools have been removed from the belt and conveyor area 5 1 Pre Op Checklist 5 2 Test Run the Conveyor ...

Страница 11: ...spection should be made to ensure the trainer is performing properly Make adjustments as needed 6 2 Routine Visual Inspection every 2 4 weeks A visual inspection of the RBP1 Belt Positioner can determine If the belt is tracking as required If the main frame is free of material and rolling properly If there is damage to the main frame or other components If the rollers are turning freely and withou...

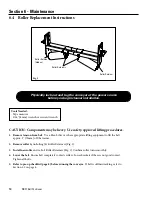
Страница 12: ... smoothly 4 Lower the belt Ensure belt completely contacts rollers Lower brackets if there is not good contact Tighten all bolts 5 Refer to pre op checklist page 8 before running the conveyor If belt is still mistracking refer to Section 5 2 on page 8 CAUTION Components may be heavy Use safety approved lifting procedures Physically lock out and tag the conveyor at the power source before you begin...

Страница 13: ...one by Service Quote Activity Date Work done by Service Quote Activity Date Work done by Service Quote Activity Date Work done by Service Quote Activity Date Work done by Service Quote Activity Date Work done by Service Quote Activity Date Work done by Service Quote Activity ...

Страница 14: ...ppearance Comments Location Comments Maintenance Comments Performance Comments Rate the following 1 5 1 very poor 5 very good Date rollers installed Date rollers inspected Estimated roller life Date rollers installed Date rollers inspected Estimated roller life Good Bent Rusted Roller condition Roller condition Beltline Number Belt Width 18 24 30 36 42 48 54 60 72 84 96 Belt Condition Serial Numbe...

Страница 15: ...it Lower height of unit to provide 1 2 1 13 25mm pressure on belt Unit mis adjusted Go to step 5 of Installation Instructions Buildup on main roller Clean unit Belt not correcting enough Unit mis adjusted Go to step 5 of Installation Instructions Belt moving over too much Unit mis adjusted Go to step 5 of Installation Instructions Roller not turning Buildup on main roller Clean unit Roller bearing...

Страница 16: ...8 24 450 600 24 34 600 850 Medium 30 48 750 1200 34 56 850 1400 Large 54 72 1350 1800 56 83 1400 2075 Extra Large 72 96 1800 2400 72 120 1800 3000 Roller Dimensions Size Length Diameter in mm in mm Small 9 225 5 125 Medium 13 325 5 125 Large 19 475 5 125 Extra Large 21 525 6 150 Roller Specifications Specification Rubber Lagged Steel Material STEEL and 3 8 RUBBER STEEL Durometer 60 N A Rating CEMA...

Страница 17: ...15 Section 8 Specs and CAD Drawings 8 2 CAD Drawing RBP1 Belt Positioner Small ...

Страница 18: ...16 RBP1 Belt Positioner Section 8 Specs and CAD Drawings 8 3 CAD Drawing RBP1 Belt Positioner Medium ...

Страница 19: ...17 Section 8 Specs and CAD Drawings 8 4 CAD Drawing RBP1 Belt Positioner Large ...

Страница 20: ...18 RBP1 Belt Positioner Section 8 Specs and CAD Drawings 8 5 CAD Drawing RBP1 Belt Positioner Extra Large ...

Страница 21: ... 1350 1800 RBPFK L 75524 19 5 Extra Large Frame Kit 1 ea 72 96 1800 2400 RBPFK XL 75525 28 5 2 Mounting Bracket Kit 1 ea RBPMBK 75526 6 0 3 Small Inner Tube 1 ea 18 24 450 600 RBPIT S 75527 3 0 Medium Inner Tube 1 ea 30 48 750 1200 RBPIT M 75528 4 5 Large Inner Tube 1 ea 54 72 1350 1800 RBPIT L 75529 6 5 Extra Large Inner Tube 1 ea 72 96 1800 2400 RBPIT XL 75530 9 0 REF DESCRIPTION ORDERING NUMBER...

Страница 22: ......

Страница 23: ...ted pivot tilt design for superior training action Dual sensor rollers on each side to minimize belt damage Pivot point guaranteed not to freeze or seize up Available for topside and return side belts A belt cleaner for the tail pulley Exclusive blade design quickly spirals debris off the belt Economical and easy to service Available in vee or diagonal models PT Max Belt Trainer Belt Plows Patente...

Страница 24: ...stomers worldwide through superior service and innovation 2525 Wisconsin Avenue Downers Grove IL 60515 4200 USA Tel 630 971 0150 Fax 630 971 1180 E mail info flexco com Visit www flexco com for other Flexco locations and products 2017 Flexible Steel Lacing Company 02 07 17 For Reorder X2510 ...

Отзывы: