INSTRUCTION MANUAL
Biketec GmbH
Luzernstrasse 84
CH-4950Huttwil
T+4162 959 53 00
[email protected]
fit-ebike.com
FIT DISPLAY C
FIT REMOTE BASIC
NETWORKEDCUSTOMISEDINTELLIGENT
500085 | 500092 | 501262
Страница 1: ...NSTRUCTION MANUAL Biketec GmbH Luzernstrasse 84 CH 4950Huttwil T 4162 959 53 00 info biketec ch fit ebike com FIT DISPLAY COMPACT FIT REMOTE BASIC NETWORKED CUSTOMISED INTELLIGENT 500085 500092 501262...
Страница 2: ...RAGE 10 5 1 TRANSPORTATION 10 5 1 1 TRANSPORTING E BIKES 10 5 2 STORAGE 10 5 3 BREAK IN OPERATION 10 5 3 1 CARRYING OUT A BREAK IN OPERATION 10 6 FITTING 11 6 1 FITTING THE FIT DISPLAY COMPACT 11 7 OP...
Страница 3: ...AULT CLEARANCE 40 11 1 1 DRIVE SYSTEM OR DISPLAY DOES NOT START UP 40 11 1 2 ERRORS IN THE ASSISTANCE SYSTEM 40 11 2 REPAIR 41 11 2 1 ORIGINAL PART 41 11 2 2 REPLACING THE LIGHTS 41 11 2 3 ADJUSTING T...
Страница 4: ...ve decided to choose our system Please read through the operating instructions carefully to ensure you use the system safely and get off to a quick start We hope you enjoy discovering the FIT s functi...
Страница 5: ...Declaration of Conformity is available online at fit ebike com en en service declaration 2 4 ON INFORMATION Different markings are used in the operating instructions to make them easier to read 2 5 WA...
Страница 6: ...id Do not use the display as a handle If you use the display to lift your e bike you can damage the display irreparably Do not place the e bike upside down on its handlebars and saddle if the display...
Страница 7: ...rt offering optimum visibility in a small design 4 1 1 DISPLAY AND SETTINGS The following display elements remain the same on all screens and show the key settings and information about the vehicle an...
Страница 8: ...LEDs and the vibration feedback ensure optimum usability even in the dark or while wearing gloves Operating element Description On off button Selector button right left and press Plus minus button Pus...
Страница 9: ...play Compact Product code 500085 Operating temperature C 5 to 40 Storage temperature C 10 to 50 Protection class IPX7 Weight about kg 0 1 4 5 2 FIT REMOTE BASIC Operating element FIT Remote Basic Prod...
Страница 10: ...ected from sun light Do not store outdoors to ensure a long service life The optimum storage temperature for your e bike is between 10 C and 20 C Temperatures under 10 C or over 40 C must generally be...
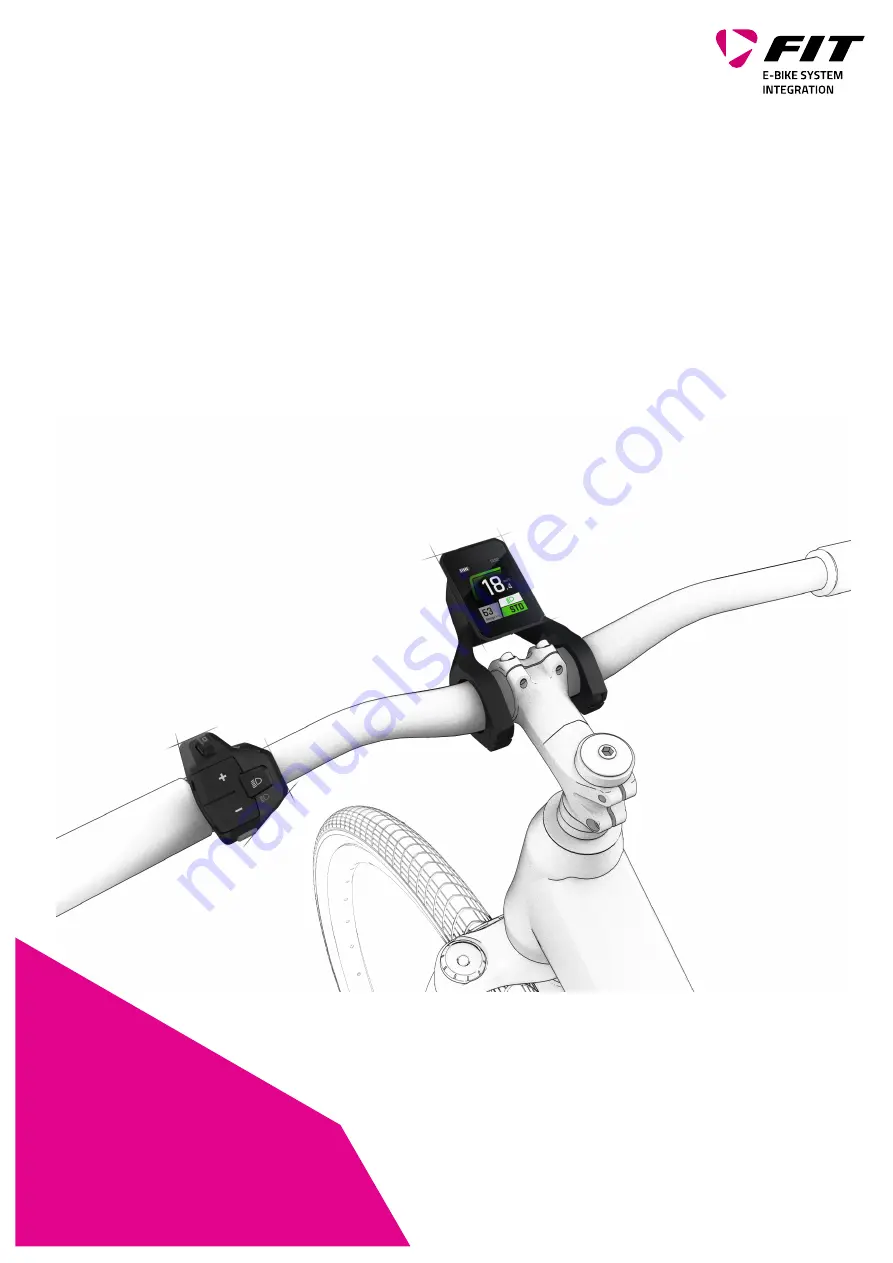
Страница 11: ...ay is fitted into place The display is fitted in the same way on the FIT Display Center Mount FIT Display Universal Mount FIT Display Center Mount Inserting FIT Display Compact 1 Place the lower secti...
Страница 12: ...REMOTE BASIC Removing FIT Display Compact 1 Remove the anti theft securing screw if you have one fitted 2 Press the unlocking mechanism 3 Remove display pulling it upwards FIT_Manual_Display_Compact_R...
Страница 13: ...cess the different main screens right left and their respective sub screens press The settings menu can only be accessed when the e bike is stationary You can use the plus mi nus button to select the...
Страница 14: ...7 2 2 BOOST FUNCTION Assistance mode icon You can use the Boost function to increase motor assistance to HIGH irrespective of the selected level of assistance STD ECO AUTO This function can be switche...
Страница 15: ...duced power for riding assistance This is not an error it is designed to protect the motor Battery protection mode battery charge level and or temperature too low Reduced power for riding assistance T...
Страница 16: ...Odometer total number of kilometres that the e bike has cov ered This value cannot be reset 3 Battery charge level if there is more than one battery they are all displayed and are numbered consecutive...
Страница 17: ...1 Difference in altitude ridden during the current trip 2 Average battery consumption during the current trip TRIP SUB SCREEN 2 1 Maximum speed for the current trip 2 Average speed of the current trip...
Страница 18: ...cted This option depends on the model The system only supports heart rate bracelets featuring Bluetooth 4 and higher or Blue tooth Low Energy 2 Current pedal speed FITNESS SUB SCREEN 1 The rider s cur...
Страница 19: ...REMOTE BASIC AREA MAIN SCREEN 1 Current altitude measured based on the air pressure 2 Current inclination or downward slope as a percentage AREA SUB SCREEN 1 Temperature FIT_Manual_Display_Compact_Re...
Страница 20: ...y you when it is available You will need to have a free update installed at your specialist dealer s to use it Don t want to wait for the release Then connect the FIT E Bike Control app fit ebike com...
Страница 21: ...he last screen which can be accessed by pressing the selector button to the right It can only be accessed when the e bike is stationary 1 Current selected sub menu 2 Scroll bar 1 Current sub menu 2 Cu...
Страница 22: ...G THE SETTINGS The settings menu is the last screen which can be accessed by pressing the selector button to the right It can only be accessed when the e bike is stationary Menu Reset Values You can u...
Страница 23: ...ed settings in this menu Assistance You can custom adjust e bike assistance You can use the selector button to configure the required assistance in the Assistance menu The configured Assistance settin...
Страница 24: ...s only produced with messages Menu Charge You can use the Charge menu to configure the required charge mode and the battery s LONG LIFE mode Charge mode Description Normal Normal Charge Fast Fast char...
Страница 25: ...displayed code A text which indicates the error category is also always displayed 9 2 STATUS LED ON OPERATING ELEMENT AND DISPLAY The operating element and the display each feature a status LED to in...
Страница 26: ...t dealer if the problem persists 0A 07 0B 07 Remote Gear Shift Communication Error 1 Re start the system 2 Contact your specialist dealer if the problem persists 0A 08 0B 08 Errore comun Remote cambio...
Страница 27: ...and socket 4 Wait until the status LED goes out 5 Check plug contacts on the e bike and charger and clean if necessary 6 Plug charger into the socket again 7 Plug charger into the system again and st...
Страница 28: ...if the problem persists 0F 00 Remote Update Error 1 Re start the system 2 Contact your specialist dealer if the problem persists 0F 01 Motor Update Error 1 Re start the system 2 Contact your speciali...
Страница 29: ...Error 1 Re start the system 2 Switch off system 3 Remove display from the mount check contacts and clean if necessary 4 Re insert display and start system 5 Contact your specialist dealer if the prob...
Страница 30: ...and clean if necessary 4 Re insert battery and start system 5 Contact your specialist dealer if the problem persists 15 07 Remote Speednode Pairing Error 1 Re start the system 2 Contact your speciali...
Страница 31: ...l the status LED goes out 5 Check plug contacts on the e bike and charger and clean if necessary 6 Plug charger into the socket again 7 Plug charger into the system again and start system up 8 Contact...
Страница 32: ...ealer if the problem persists 18 00 Remote Starting Error 1 Re start the system 2 Contact your specialist dealer if the problem persists 18 01 Motor Start Error 1 Re start the system 2 Contact your sp...
Страница 33: ...Check that the correct battery has been inserted 36V 48V 2 Re start the system 3 Contact your specialist dealer if the problem persists 1C xx Bluetooth Module Error 1 Re start the system 2 Re start FI...
Страница 34: ...mount check contacts and clean if necessary 4 Re insert display and start system 5 Contact your specialist dealer if the problem persists 18 xx Motor Communication Error 1 Check plug contacts on the...
Страница 35: ...Voltage Error 1 Connect battery to the charger 2 Re start the system 3 Contact your specialist dealer if the problem persists 67 05 67 0A 67 0B 67 11 67 15 Battery Voltage Error 1 Re start the system...
Страница 36: ...4 Contact your specialist dealer if the problem persists 69 13 Battery Temperature Error 1 Start system 2 Contact your specialist dealer if the problem persists 6A xx Battery Software Error 1 Check th...
Страница 37: ...f the problem persists 96 xx Charger Voltage Error 1 Check that the correct battery has been inserted 36V 48V 2 Disconnect charger from system and socket 3 Wait until the status LED goes out 4 Plug ch...
Страница 38: ...Lock Hardware Error 1 Restart system 2 Check lock for damage 3 Contact your specialist dealer if the problem persists 9D xx Lock movement detected 1 Restart system 2 Check lock for damage 3 Contact yo...
Страница 39: ...element will be permanently damaged if water enters them Never immerse the display or operating element in water Never clean with a pressure washer water jet or compressed air Never use cleaning agent...
Страница 40: ...start 11 1 2 ERRORS IN THE ASSISTANCE SYSTEM Symptom Cause Remedy Assistance is not available Is the speed too high 1 Check display screen The motor assistance is only active up to the maximum speed f...
Страница 41: ...ressure 1 Pump up tyres Is the level of assistance set to OFF 2 Set the level of assistance to HIGH STD ECO or AUTO The battery charge might be low 3 Check battery is charged 4 Recharge the battery if...
Страница 42: ...responsible manner Do not dispose of them in the household waste For EU countries only According to the European Directive 2012 19 EU on waste electrical and electronic equipment and its implementati...