Fisher & Paykel HC24PCX1 Скачать руководство пользователя страница 11

11

EN

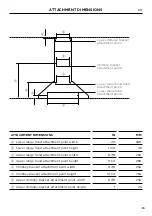
PRODUCT DIMENSIONS – 30" MODELS

PRODUCT DIMENSIONS

HC30

IN 

MM

Maximum overall height of product

38 3/8

975

Minimum overall height of product

25 1/16

636

Overall width of product

29 3/4

755

Overall depth of product

19 11/16

500

Height of product

11 3/4

298

Width of chimney

12 5/8

320

Depth of chimney

11 7/16

290

Distance from center of ducting outlet to back of product

4 5/16

110

Distance from center of ducting outlet to side of chimney

6 5/16

160

Diameter of ducting outlet

7 7/8

200

Distance between center of lights

16 1/4

413

Distance between center of lights and back of product

1 5/8

42

Actual product dimensions may vary by ± 1/16’ (2 mm).

Содержание HC24PCX1

Страница 1: ...INSTALLATION GUIDE US CA WALL RANGE HOOD CHIMNEY PYRAMID CLASSIC HC24PCX1 HC30PCX1 HC30PCB1 HC30PCR1 HC30PCW1 HC36PCX1 HC36PCB1 HC36PCR1 HC36PCW1...

Страница 2: ......

Страница 3: ...Product dimensions 36 models 12 Installation height 14 Attachment dimensions 15 Venting options 16 Prepare range hood 18 Attach brackets and mounting screws 19 Hang range hood 20 Electrical connection...

Страница 4: ...able to the person installing the appliance z Always switch the power off prior to installation servicing or cleaning of the appliance z The room must have adequate ventilation when the range hood is...

Страница 5: ...e plugged into a socket near the appliance The socket must be accessible or have an accessible isolating switch to enable the end user to isolate the appliance from the power for the purpose of intern...

Страница 6: ...6 30 mm Self tapping screw 10 3 8 10 mm Self tapping screw 4 Range hood 1 Power connection box 1 Chimney 1 1 3 4 44 mm Drywall expansion plug 8 Installation guide 1 INSTALLATION GUIDE US CA WALL RANGE...

Страница 7: ...t the area behind the installation surface to be drilled is clear of any electrical cables or pipes etc z The range hood surfaces can be damaged during installation if grazed or knocked by tools Pleas...

Страница 8: ...8 PRODUCT DIMENSIONS 24 MODELS c f e A b g h i d j k l FRONT PROFILE PLAN BOTTOM UL connection box...

Страница 9: ...00 E Height of product 11 3 4 298 F Width of chimney 12 5 8 320 G Depth of chimney 11 7 16 290 H Distance from center of ducting outlet to back of product 4 5 16 110 I Distance from center of ducting...

Страница 10: ...10 PRODUCT DIMENSIONS 30 MODELS c f e A b g h i d j k l FRONT PROFILE PLAN BOTTOM UL connection box...

Страница 11: ...00 E Height of product 11 3 4 298 F Width of chimney 12 5 8 320 G Depth of chimney 11 7 16 290 H Distance from center of ducting outlet to back of product 4 5 16 110 I Distance from center of ducting...

Страница 12: ...12 PRODUCT DIMENSIONS 36 MODELS c f e A b g h i d j k l FRONT PROFILE PLAN BOTTOM UL connection box...

Страница 13: ...00 E Height of product 11 3 4 298 F Width of chimney 12 5 8 320 G Depth of chimney 11 7 16 290 H Distance from center of ducting outlet to back of product 4 5 16 110 I Distance from center of ducting...

Страница 14: ...imum height will improve the efficiency of capturing cooking odours grease and smoke Installation above the minimum height is the users preference it is not recommended to install above the maximum he...

Страница 15: ...e hood attachment point height 11 1 4 286 E Chimney bracket attachment point width 9 7 8 250 F Chimney bracket attachment point height 31 1 4 794 G Upper chimney bracket attachment point width 9 7 8 2...

Страница 16: ...educed noise and increased airflow Flexible metal ducting should only be used as a last resort ie in difficult installations and if used ensure that it is straight smooth and extended as much as possi...

Страница 17: ...Before connecting the range hood to the power supply ensure the voltage and frequency indicated on the rating plate match that of the installation location MODEL FREQUENCY VOLTAGE HC24 HC30 HC36 60 H...

Страница 18: ...ng Failure to install the screws or fixing device in accordance with these instructions may result in an electrical hazards Remove the filters pull the catch and tilt the filter downwards until it dis...

Страница 19: ...on provided in Installation Height Attach the chimney bracket and upper chimney bracket if using the upper chimney Use the 1 3 16 30mm screws and expansion plugs if attaching to masonry Attach the upp...

Страница 20: ...s with 1 16 2mm gap Hang off the keyhole attachment points on the back of the range hood then tighten the screws Attach the lower range hood mounting screws to fix the range hood to the wall Refit the...

Страница 21: ...nnection box on the range hood and secure the power conductor with a strain relief not included 3 Connect the power conductors to the conductors for the range hood black to black and white to white 4...

Страница 22: ...HIMNEY Bend the tabs on the chimney Place chimney around the range hood chassis and hang off the chimney bracket Extend the upper chimney and attach to the upper chimney bracket with 10mm screws 1 2 3...

Страница 23: ...not been crushed or bent in any area s Flexible ducting has been pulled taut and any excess removed if required Power mains switch is accessible to the customer and switched on Operation of the produc...

Страница 24: ...ge at any time The product specifications in this guide apply to the specific products and models described at the date of issue Under our policy of continuous product improvement these specifications...

Отзывы: