


5
SAFETY AND WARNINGS
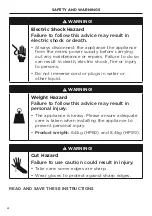
WARNING!
When using this appliance always exercise basic safety precautions including the following:
z
Please read the entire set of instructions before installing or using this appliance.
z
Please make this information available to the person installing the appliance
z
Always switch the power off prior to installation, servicing or cleaning of the appliance.
z
This appliance must be installed and connected to the mains power supply only by a
suitably qualified person according to these installation instructions and in compliance
with any applicable local building and electricity regulations. Failure to install the
appliance correctly could invalidate any warranty or liability claims.
z
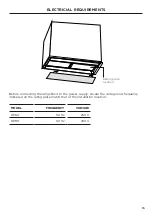
To comply with electrical safety regulations, the appliance must be plugged into
a socket near the appliance. The socket must be accessible, or have an accessible
isolating switch, to enable the end user to isolate the appliance from the power for the
purpose of internal cleaning or maintenance.
z
A power outlet should be within 750 mm of the rangehood and can either be on the
wall or in the ceiling.
z
If the supply cord of this equipment is damaged, it must only be replaced by the
manufacturer, its service agent or similarly qualified person in order to avoid a hazard.
z
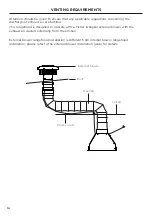
All ducting must comply with local requirements and building codes.
z
Attention should be given to ensure that any applicable regulations concerning the
discharge of exhaust air are fulfilled.
z
Before connecting any pipes, consult municipal ordinances to ensure that any
applicable regulations concerning the discharge of exhaust air are adhered to and
request permission from the person in charge of the building.
z
Exhaust air must not be discharged into an existing flue that is used for exhausting
fumes from appliances burning gas or other fuels.
z
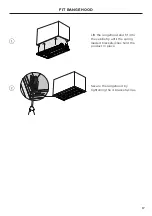
Stainless steel or powdercoat is very easily damaged during installation if abraded or
knocked by tools. It is recommended to protect the top of the appliance with cardboard
or polystyrene during the installation to minimise the risk of damage occurring.
z
o reduce the risk of damage occurring to the cooktop, it is recommended that
the surface of the cooktop is protected with cardboard or a similar object during
installation of the rangehood.
z
In order to avoid a hazard due to inadvertent resetting of the thermal cut-out, this
appliance must not be supplied through an external switching device, such as a timer,
or connected to a circuit that is regularly switched on and off by the utility.
Содержание CONTEMPORARY HP60IDCHEX3
Страница 2: ......
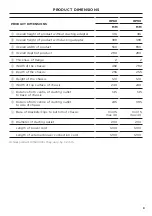
Страница 8: ...8 PRODUCT DIMENSIONS PROFILE FRONT BOTTOM VIEW A b c d i h j k m l f g e PLAN Ducting adapter...
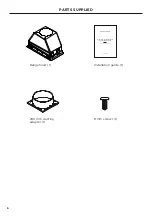
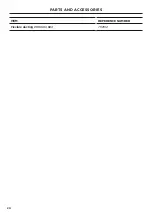
Страница 20: ...20 PARTS AND ACCESSORIES ITEM REFERENCE NUMBER Flexible ducting 200mm 6m 792961...
Страница 22: ......
Страница 23: ......