Fiery X3eTY2 65C-KM Скачать руководство пользователя страница 35

Overview of the Scanning Features

2

Fiery X3eTY2 65C-KM Network Scanner

2-24

2.5

About the Scanner Setting Screen

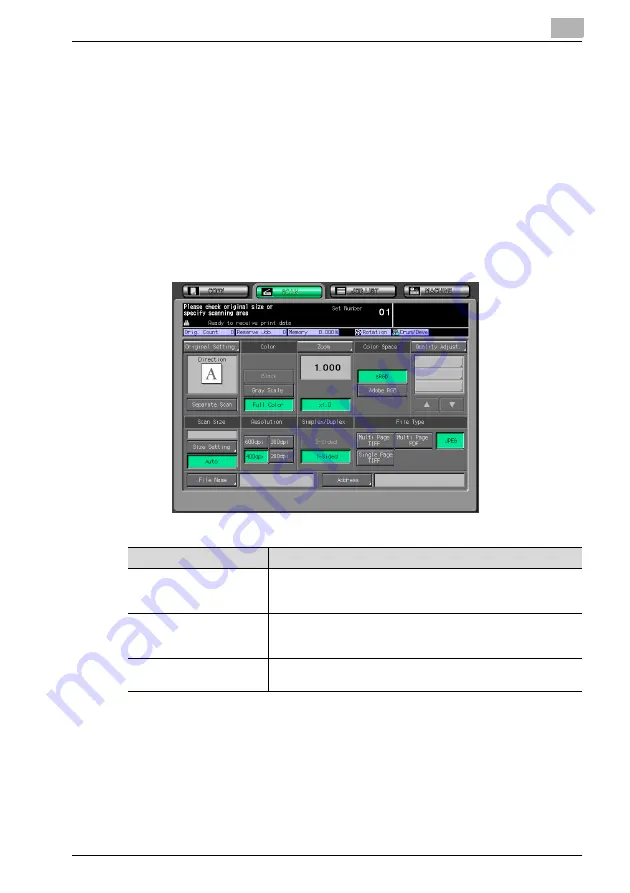
Pressing the [Scan Settings] on the Select Destinations screen displays the 
Scanner Setting screen. On the Scanner Setting screen, such settings as 
original settings and quality settings can be configured.

!

Detail 

Those settings that can be configured on the Scanner Setting screen are 
the features of the copier.

For more information on the settings, refer to the “User's Guide (Copy)”.

Key

Function

File Name

You can input a Fine Name for data you are about to scan. If you 
entered no File Name, the system automatically adds a File 
Name. No use is available when the address is [QUEUE].

Address

The specified destination is displayed. Pressing [Address] returns 
to the Select Destinations screen, thus allowing the destination to 
be changed.

Default Set

Pressing this key recalls the initial settings. This key is displayed 
on the Original Setting screen and the Quality Adjust. screen.

Содержание X3eTY2 65C-KM

Страница 1: ... KM Chapter 1 Introduction Chapter 2 Overview of the Scanning Features Chapter 3 Registration of the destination Chapter 4 Transmission to the registered destination Chapter 5 Utility Menu Chapter 6 Troubleshooting Chapter 7 Appendix ...

Страница 2: ...2 About the Control Panel 2 19 2 3 How to operate the Touch Panel 2 21 2 4 How to Input Characters 2 22 2 5 About the Scanner Setting Screen 2 24 2 6 Setting the Original Document 2 33 3 Registration of the destination 3 1 Registering an E Mail Address 3 1 3 2 Registering the Hard Disk 3 4 3 3 Registering the FTP server 3 7 3 4 Registering the SMB server 3 10 3 5 Registering a Group 3 13 3 6 Chang...

Страница 3: ... Setting 5 5 5 3 E Mail Text Setting 5 7 5 4 To set the Title Text Reply Address of the E Mail 5 9 5 5 To set the initial value of the setting for scanning 5 12 6 Troubleshooting 6 1 Cannot connect to the scanner 6 1 6 2 When an Error Message Appears 6 2 7 Appendix 7 1 Glossary 7 1 7 2 Index 7 4 ...

Страница 4: ... Microsoft Corporation in the United States and or other countries IBM is a registered trademarks of the IBM Corporation Macintosh and PowerMac are registered trademarks or trademarks of Apple Computer Inc in the United States and or other countries Adobe Adobe Logo Acrobat Acrobat Logo PostScript and PostScript Logo are registered trademarks or trademarks of Adobe Systems Inc RC4 is a registered ...

Страница 5: ...enssl core openssl org 5 Products derived from this software may not be called OpenSSL nor may OpenSSL appear in their names without prior written permission of the OpenSSL Project 6 Redistributions of any form whatsoever must retain the following ac knowledgment This product includes software developed by the OpenSSL Project for use in the OpenSSL Toolkit http www openssl org THIS SOFTWARE IS PRO...

Страница 6: ... the following conditions are met 1 Redistributions of source code must retain the copyright notice this list of conditions and the following disclaimer 2 Redistributions in binary form must reproduce the above copyright no tice this list of conditions and the following disclaimer in the documen tation and or other materials provided with the distribution 3 All advertising materials mentioning fea...

Страница 7: ...LUDING NEGLIGENCE OR OTHERWISE ARISING IN ANY WAY OUT OF THE USE OF THIS SOFTWARE EVEN IF ADVISED OF THE POSSIBILITY OF SUCH DAMAGE The licence and distribution terms for any publically available version or de rivative of this code cannot be changed i e this code cannot simply be cop ied and put under another distribution licence including the GNU Public Licence ...

Страница 8: ...TY2 65C KM The explanation here is given of the operation of the SCAN tab on the con trol panel The explanation is also given of the various setting methods of the Network Scanner displayed when pressing Utility Counter on the control panel 2 Reminder Refer to the User s Guide Copy or the User s Guide POD Administrator Reference on how to use other button ...

Страница 9: ...r 3 Registration of the destination This chapter describes destination storage location for the Network Scanner features Chapter 4 Transmission to the registered destination This chapter describes the method for sending a message to the registered destination Chapter 5 Utility Menu This chapter describes the Utility Menu of the Network Scanner function Chapter 6 Troubleshooting This chapter descri...

Страница 10: ...m that combines the above 1 and 2 products this system 4 Microsoft Windows 98 Windows 98 5 Microsoft Windows Me Windows Me 6 Microsoft Windows NT4 0 Windows NT4 0 or Windows NT 7 Microsoft Windows 2000 Windows 2000 8 Microsoft Windows XP Windows XP 9 Microsoft Windows Server 2003 Server 2003 10 Macintosh OS 8 x 9 x Mac OS 9 11 Macintosh OS X v10 2x v10 4x Mac OS X 12 Above OSs Windows 98 Me Window...

Страница 11: ...in which there is a destination you want to search 3 Press the corresponding Search Character The corresponding destination is displayed Detail There are A to Z Others and Common available for the Search Char acter Destinations frequently used can be set to Common For details of the method for setting the destination to Common contact your administra tor This page does not exist in the document Re...

Страница 12: ...er Scanned data saved in the hard disk can be imported by the utility tool to the computer connected to the network Scanned data can be saved in the PDF format as a print job print queue of the print controller Scanned data is transmitted in the following file format Multi Page TIFF Single Page TIFF Multi Page PDF JPEG E Mail Mail server FTP server FTP SMB server SMB Internet Print Controller Hard...

Страница 13: ...D For the method to cre ate a Box on the Web page see User s Guide Printer When using this function the network for this machine must be set in ad vance For details of the network setting contact your administrator Scanned data may be destroyed So be absolutely sure to maintain the backup of the original TIFF and JPEG are saved in the form of being rotated 90 degrees coun terclockwise after scanni...

Страница 14: ...ethod of the destination see Registration of the destination on page 3 1 To make a transmission in E Mail 0 In order to use the Scan to E mail function the network setting of the print controller is required in advance 1 Select SCAN tab 2 Press E Mail 3 Press Address Input Flow of the operations Refer to Operation to attach the scanned data to the E Mail for trans mission p 2 3 Operation to save t...

Страница 15: ... For details of the regis tration of the destination see p 3 1 5 Enter the E mail address of destination and then press OK For more information on how to input character see p 2 22 6 Press OK 7 Press Option Setting as required to set Title Text and Reply Ad dress of the E Mail If you want to erase the history of Option Setting press Reset on Control Panel For detail of Option Setting see p 5 9 ...

Страница 16: ... HDD two or more addresses are displayed Be sure to check the address before starting the scanning of an original Press Address to return to the Select Destinations screen Pressing Clear All releases all of the information of the addresses set For details of the Scanner Setting screen see p 2 24 10 Set the original document For the setting of originals see p 2 33 11 Press Start ...

Страница 17: ...is transmitted Detail After completion of the operation press Reset on Control Panel in the Scanner Setting screen and the Select Destinations screen to release the settings Press Address to get back to the Select Destinations screen When no resetting is made the settings are left as they are until copier is restarted ...

Страница 18: ... in the hard disk 0 In order to use the Scan to HDD function the network setting of the print controller is required in advance 0 It is necessary to access the Web page of the print controller to create a box on the HDD 1 Select SCAN tab 2 Press HDD 3 Press Address Input 4 Press Box Name ...

Страница 19: ...gistered For details of the regis tration of the destination see p 3 4 5 Enter the Box Name and then press OK For more information on how to input character see p 2 22 Enter in advance in Box Name a Box that has been created on the Web page of the print controller For the method for creating a Box on the Web page see User s Guide Printer 6 Press OK 7 Press Scan Settings ...

Страница 20: ... p 2 33 10 Press Start The original is read and the scanned data is saved in the hard disk Detail For the method for importing the scanned data saved in the hard disk into the computer see User s Guide Printer After completion of the operation press Reset on Control Panel in the Scanner Setting screen and the Select Destinations screen to release the settings Press Address to get back to the Selec...

Страница 21: ...Overview of the Scanning Features 2 Fiery X3eTY2 65C KM Network Scanner 2 10 this download the scan data from the specified location within a fixed period of time ...

Страница 22: ...work setting of the print controller is required in advance 1 Select SCAN tab 2 Press FTP 3 Press Address Input 4 Set Host Address Login Name and or Password as required If you want to erase the inputs press Reset on Control Panel However please note that all of the inputs except for Proxy set tings are erased For more information on how to input character see p 2 22 ...

Страница 23: ...stered For details of the regis tration of the destination see p 3 7 5 Press OK 6 Press Scan Settings 7 Make a setting for scanning When an address has been set in other items such as E Mail two or more addresses are displayed Be sure to check the address be fore starting the scanning of an original Press Address to return to the Select Destinations screen Pressing Clear All releases all of the in...

Страница 24: ... see p 2 22 9 Press Start The original is read and the scanned data is transmitted Detail After completion of the operation press Reset on Control Panel in the Scanner Setting screen and the Select Destinations screen to release the settings Press Address to get back to the Select Destinations screen When no resetting is made the settings are left as they are until copier is restarted ...

Страница 25: ...f the print controller is required in advance 1 Select SCAN tab 2 Press SMB 3 Press Address Input 4 Set Host Address Login Name and or Password as required If you want to erase the inputs press Reset on Control Panel However please note that all of the inputs are erased For more information on how to input character see p 2 22 For details of the setting of the SMB server see p 3 10 ...

Страница 26: ...ion see p 3 10 5 Press OK 6 Press Scan Settings 7 Make a setting for scanning When an address has been set in other items such as E Mail two or more addresses are displayed Be sure to check the address be fore starting the scanning of an original Press Address to return to the Select Destinations screen Pressing Clear All releases all of the information of the addresses set For details of the Scan...

Страница 27: ...The original is read and the scanned data is transmitted Detail After completion of the operation press Reset on Control Panel in the Scanner Setting screen and the Select Destinations screen to release the settings Press Address to get back to the Select Destinations screen When no resetting is made the settings are left as they are until copier is restarted ...

Страница 28: ...etting for scanning When an address has been set in other items such as E Mail two or more addresses are displayed Be sure to check the address be fore starting the scanning of an original Press Address to return to the Select Destinations screen Pressing Clear All releases all of the information of the addresses set For details of the Scanner Setting screen see p 2 24 ...

Страница 29: ...tted Detail For details of the printing method of the scanned data saved as a Print Queue see User s Guide Printer After completion of the operation press Reset on Control Panel in the Scanner Setting screen and the Select Destinations screen to release the settings Press Address to get back to the Select Destinations screen When no resetting is made the settings are left as they are until copier ...

Страница 30: ... Reset key Restores machine to the initial settings 3 Interrupt key Stops copying printing scanning in progress to allow a simple copying job 4 Stop key Ceases the copying sequence deletes the stored memo ry 5 Proof Copy key Prints a single set of sample copy to check whether the current settings are specified properly 6 Start key Activates various machine operations 7 Start LED Lights in green wh...

Страница 31: ...ntly made 11 Utility Counter key Displays the Utility Screen or various counters 12 Mode Memory key Registers Recalls the desired copy settings and also re calls previous job settings 13 Accessibility key Adjusts the response time in touch panel control panel key operation 14 Help key Displays the Help Screen that provides information on the currently selected function 15 Power Save key Enables te...

Страница 32: ...es use the Touch Panel of the copier Detail You can select an item by touching keys lightly on the Touch Panel Select a function Touch a function displayed in a key to select the function The selected key is highlighted in green To switch between pages When all items cannot be displayed in a single page touch lightly the key to switch between pages ...

Страница 33: ...ds About keys on the character input screen Keys on the character input screen are described here Key Function This key moves a cursor Delete This key deletes the character on the left of the cursor OK This key determines the characters you input and the charac ter input screen closes Cancel This key cancels the characters you input and the character input screen closes Shift This key switches bet...

Страница 34: ...bout character input The followings describe basic steps to input characters on the character in put screen 1 Press the corresponding key to input the desired character 2 Press OK key The character input screen closes The input characters are displayed on the corresponding column ...

Страница 35: ...en are the features of the copier For more information on the settings refer to the User s Guide Copy Key Function File Name You can input a Fine Name for data you are about to scan If you entered no File Name the system automatically adds a File Name No use is available when the address is QUEUE Address The specified destination is displayed Pressing Address returns to the Select Destinations scr...

Страница 36: ...ft and Top Direction Make a selection from among Normal Left Upside down and Right Special Make a selection from among Normal Mixed and Z Fold ed Thickness Make a selection from among Normal Thick and Thin Separate Scan The originals are scanned continuously Black Scan is made with 2 colors 2 values of white and black Gray Scale The scanning is made in gray scale in 256 gradation Full Color The sc...

Страница 37: ...magnification to be registered Zoom Set the magnification with the input key Selecting causes the magnification to be set with the as pect ratio fixed Selecting allows the vertical magnification only to be set Selecting allows the horizontal magnification only to be set Enlarge Reduce Selected when expanding reducing the fixed size x1 0 The original is read in life size sRGB Selected when setting ...

Страница 38: ...made in 9 steps from Lighter to Darker Ajd Back The setting is made in 9 steps from Lighter to Darker Red The setting is made in 9 steps from Weak to Strong Green The setting is made in 9 steps from Weak to Strong Blue The setting is made in 9 steps from Weak to Strong Sharpness The setting is made in 9 steps from Smooth to Distinct Contrast The setting is made in 9 steps from Weak to Strong ...

Страница 39: ...th and make a selection And then press the numeric keypad or the or key to enter any size A size that can be entered 100 mm to 303 mm in length and 140 mm to 438 mm in width 3 Press OK and a size entered on the Size Setting screen is displayed 4 Press OK to return to the Scan Settings screen Size Setting Set the size for reading Pressing Size Input also allows you to register the size for reading ...

Страница 40: ...size and the registration name registered are overwritten And when Delete is pressed the pop up screen is displayed for the confirmation of deletion Press Yes to delete registered information that has been selected 5 Press Add to display the name entry screen 6 Enter the name and press OK to return to the Size Registration screen 7 Press Close to return to the Size Setting screen 8 Press OK A size...

Страница 41: ...estinations set on the Select Destinations screen is dis played 1 Sided A single sided original is read 2 Sided A double sided original is read For a double sided original to be read the ADF is required to be set to ON in advance in the Scan Initial setting screen Multi Page TIFF Read two or more sheets of originals in the TIFF format of two or more pages Single Page TIFF Read a single sheet of an...

Страница 42: ...be checked 1 Refer to p 2 3 to set a destination and then display the Scanner Set ting screen Pressing Clear All releases all of the information of the addresses set 2 Press Mode Check 3 Check the details of the current setting Pressing Change after pressing the setting item allows the details of the setting to be changed Pressing Next displays the details of the setting of the image qual ity adju...

Страница 43: ...or the setting of originals see p 2 33 6 Press Start The original is read and the scanned data is transmitted Detail After completion of the operation press Reset on Control Panel in the Scanner Setting screen and the Select Destinations screen to release the settings Press Address to get back to the Select Destinations screen When no resetting is made the settings are left as they are until copie...

Страница 44: ...set to the platen glass or ADF 2 Press Start The original is read Direction of the Originals The direction of the image when imported after being scanned varies accord ing to the direction in which the original is set to the platen glass or ADF of the Copier Detail For the setting of the original see User s Guide Copy TIFF and JPEG are saved in the form of being rotated 90 degrees coun terclockwis...

Страница 45: ...tion is made from among the destinations registered in advance It is recommended that a destination to which data is frequently sent is regis tered in advance 3 1 Registering an E Mail Address When using the function to send the scanned data as an E Mail attached file you can register the destination E Mail address in advance The registration is done in the following steps Registering an E Mail Ad...

Страница 46: ...press OK 7 Press Search Character to set the Search Character and then press OK Register Name is entered automatically For more information on how to input character see p 2 22 Register Name entered here is displayed in the Select Destina tions screen The Search Character is used as a search key word when searching a destination For details of the method for setting the Search Char acter to Common...

Страница 47: ...e destination is registered 9 Press Return The destination registered is displayed Detail When a transmission is made to the registered destination select a cor responding destination in the Select Destinations screen For details see Transmission to the registered destination on page 4 1 ...

Страница 48: ...ou want to store the scanned data on the hard disk you need to register boxes on the hard disk The registration is done in the following steps Registering the Hard Disk 0 For E Mail FTP HDD SMB destinations can be registered as many as 500 in sum 1 Select SCAN tab 2 Press HDD 3 Press Register Edit 4 Press Add ...

Страница 49: ...ster Name to enter the register name and then press OK 7 Press Search Character to set the Search Character and then press OK Register Name is entered automatically For more information on how to input character see p 2 22 Register Name entered here is displayed in the Select Destina tions screen The Search Character is used as a search key word when searching a destination For details of the meth...

Страница 50: ...e destination is registered 9 Press Return The destination registered is displayed Detail When a transmission is made to the registered destination select a cor responding destination in the Select Destinations screen For details see Transmission to the registered destination on page 4 1 ...

Страница 51: ...ou want to send the scanned data to the FTP server you can register the destination FTP server The registration is done in the following steps Registering the FTP server 0 For E Mail FTP HDD SMB destinations can be registered as many as 500 in sum 1 Select SCAN tab 2 Press FTP 3 Press Register Edit 4 Press Add ...

Страница 52: ...auto matically Host Address Input an FTP server address File Path Input a file path of the FTP server Login Name Input an account of the FTP server Anonymous Pressing this key inputs Anonymous to the Login Name field You may use this when you login an anonymous FTP server for which an account is unnecessary to login Password Input a Password for the FTP server s are displayed according to the numb...

Страница 53: ... necessary items can be entered When no setting is made press Cancel The destination is registered 7 Press Return The destination registered is displayed Detail When a transmission is made to the registered destination select a cor responding destination in the Select Destinations screen For details see Transmission to the registered destination on page 4 1 ...

Страница 54: ...ou want to send the scanned data to the SMB server you can register the destination SMB server The registration is done in the following steps Registering the SMB server 0 For E Mail FTP HDD SMB destinations can be registered as many as 500 in sum 1 Select SCAN tab 2 Press SMB 3 Press Register Edit 4 Press Add ...

Страница 55: ...Register Name is entered auto matically Host Address Input an SMB server address File Path Input a file path of the SMB server No backslash or slash is required at the end of the File Path Login Name Input an account of the SMB server The operation of the Login Name can be made with the domain us er name or WorkGroup user name However its operation is una vailable only with the user name Password ...

Страница 56: ... necessary items can be entered When no setting is made press Cancel The destination is registered 7 Press Return The destination registered is displayed Detail When a transmission is made to the registered destination select a cor responding destination in the Select Destinations screen For details see Transmission to the registered destination on page 4 1 ...

Страница 57: ...oup If you want to send the scanned data to multiple destinations storage loca tions you can register them as a Group The registration is done in the fol lowing steps Registering the Group 0 At maximum 100 groups can be registered 1 Select SCAN tab 2 Press Group 3 Press Register Edit 4 Press Add ...

Страница 58: ...oup Name to enter the Group Name of the destination and then press OK For more information on how to input character see p 2 22 6 Select a destination you want to register in each group from among E Mail HDD FTP and SMB and then press OK 7 Press Return The group registered is displayed ...

Страница 59: ...egistered in the group press List 9 When there is no problem found with the details of the registration of the group press OK Detail When a transmission is made to the registered group select a corre sponding group in the Select Destinations screen For details see Transmission to the registered destination on page 4 1 ...

Страница 60: ...there is a destination you want to change or delete 3 Press Register Edit 4 When you want to change the details of the registration of the destina tion select the destination and then press Change On the screen displayed press an item you want to change And then change the details of the registration and press OK The details of the registration are changed 5 When deleting the registered destinatio...

Страница 61: ...a tion of the destination 1 Select SCAN tab 2 Press E Mail HDD FTP and SMB in this order to display the Se lect Destinations screen in which there is a destination you want to search 3 Press the corresponding Search Character The corresponding destination is displayed Detail There are A to Z Others and Common available for the Search Char acter Destinations frequently used can be set to Common For...

Страница 62: ...key allows the destination to be narrowed down additionally 1 Select SCAN tab 2 Press E Mail HDD FTP and SMB in this order to display the Se lect Destinations screen in which there is a destination you want to search 3 Press Search 4 When searching E Mail select Normal Search If you want to reset the search results press Reset on Control Panel ...

Страница 63: ...5C KM Network Scanner 3 19 5 Enter the Search Character and then press OK The corresponding destination is displayed Detail For more information on how to input character see p 2 22 If you want to reset the search results press Reset on Control Panel ...

Страница 64: ...ally see p 2 3 To make a transmission in E Mail 1 Select SCAN tab 2 Press E Mail 3 Use the Search Character of a destination to which you want to make a transmission or the Search function to display the destination For details of the method for searching a registered destination see p 3 17 4 Select the destination 5 Press Option Setting as required to set Title Text and Reply Ad dress of the E Ma...

Страница 65: ...scanning Press Address to return to the Select Destinations screen Pressing Clear All releases all of the information of the addresses set For details of the Scanner Setting screen see p 2 24 8 Set the original document For the setting of originals see p 2 33 9 Press Start The original is read and the scanned data is transmitted ...

Страница 66: ...ter completion of the operation press Reset on Control Panel in the Scanner Setting screen and the Select Destinations screen to release the settings Press Address to get back to the Select Destinations screen When no resetting is made the settings are left as they are until copier is restarted ...

Страница 67: ...the hard disk 1 Select SCAN tab 2 Press HDD 3 Use the Search Character of a destination to which you want to make a transmission or the Search function to display the destination For details of the method for searching a registered destination see p 3 17 4 Select the destination 5 Press Scan Settings ...

Страница 68: ...he setting of originals see p 2 33 8 Press Start The original is read and the scanned data is saved in the hard disk Detail For the method for importing the scanned data saved in the hard disk into the computer see User s Guide Printer After completion of the operation press Reset on Control Panel in the Scanner Setting screen and the Select Destinations screen to release the settings Press Addres...

Страница 69: ...n to the FTP server 1 Select SCAN tab 2 Press FTP 3 Use the Search Character of a destination to which you want to make a transmission or the Search function to display the destination For details of the method for searching a registered destination see p 3 17 4 Select the destination 5 Press Scan Settings ...

Страница 70: ...r Setting screen see p 2 24 7 Set the original document For the setting of originals see p 2 33 8 Press Start The original is read and the scanned data is transmitted Detail After completion of the operation press Reset on Control Panel in the Scanner Setting screen and the Select Destinations screen to release the settings Press Address to get back to the Select Destinations screen When no resett...

Страница 71: ...n to the SMB server 1 Select SCAN tab 2 Press SMB 3 Use the Search Character of a destination to which you want to make a transmission or the Search function to display the destination For details of the method for searching a registered destination see p 3 17 4 Select the destination 5 Press Scan Settings ...

Страница 72: ...r Setting screen see p 2 24 7 Set the original document For the setting of originals see p 2 33 8 Press Start The original is read and the scanned data is transmitted Detail After completion of the operation press Reset on Control Panel in the Scanner Setting screen and the Select Destinations screen to release the settings Press Address to get back to the Select Destinations screen When no resett...

Страница 73: ...a transmission to the Group 1 Select SCAN tab 2 Press Group 3 Select Group which you want to make a transmission When checking the list of destinations registered in the group press List 4 Press Scan Settings 5 Make a setting for scanning Press Address to return to the Select Destinations screen ...

Страница 74: ...nal document For the setting of originals see p 2 33 7 Press Start The original is read and the scanned data is transmitted Detail After completion of the operation press Reset on Control Panel in the Scanner Setting screen and the Select Destinations screen to release the settings Press Address to get back to the Select Destinations screen When no resetting is made the settings are left as they a...

Страница 75: ...register a job The details of a job can be saved and invoked To use the function to register a job 1 Select a destination to be registered as a job and make a setting for reading 2 Press Mode Memory 3 Press Store Pressing Pre Job Recall allows the details of the preceding job to be recalled Mode Memory Mode Memory ...

Страница 76: ...Transmission to the registered destination 4 Fiery X3eTY2 65C KM Network Scanner 4 13 4 Check the details of the setting and press OK 5 Press the job No you want to register and then press OK ...

Страница 77: ...65C KM Network Scanner 4 14 6 Enter the Job Name and then press OK 7 Check the job to see if it has been registered and then press OK With a job selected pressing Job Check allows the details of the job to be checked The Scanner Setting screen will be restored ...

Страница 78: ...smission 1 Press Mode Memory 2 Select a job you want to invoke and press OK 3 With a destination set press Scan Settings Pressing Clear All releases all of the information of the addresses set 4 Check the details of the setting for reading 5 Set the original document For the setting of originals see p 2 33 6 Press Start Mode Memory Mode Memory ...

Страница 79: ...data is transmitted Detail After completion of the operation press Reset on Control Panel in the Scanner Setting screen and the Select Destinations screen to release the settings Press Address to get back to the Select Destinations screen When no resetting is made the settings are left as they are until copier is restarted ...

Страница 80: ...nu the following settings are available for the network scanner function Setting Add Edit Delete of the Scanner address Setting of the Title of the E Mail Setting of the Text of the E Mail Setting of the initial value of the setting for reading Entering Utility Menu 1 Press Utility Counter on the control panel Utility Menu screen appears Utility Utility Counter Counter ...

Страница 81: ...Utility Menu 5 Fiery X3eTY2 65C KM Network Scanner 5 2 Exiting Utility Menu 1 Press Exit on the Utility Menu screen Utility Menu screen is closed ...

Страница 82: ...iery X3eTY2 65C KM Network Scanner 5 3 5 1 Address Edit The destination of the scanned data can be added changed deleted 1 Press Utility Counter on the control panel 2 Press 01 Scan Send Address 3 Press 01 Address Edit ...

Страница 83: ...estinations registered The method for registering editing and deleting a destination is the same as the operation made from the Select Destinations screen For details see Registration of the destination on page 3 1 5 Press Return and then press Exit Utility Menu screen is closed ...

Страница 84: ...E Mail Setting the Title allows a set title to be selected from Option Setting as dis played in the Select Destinations screen of the E Mail 0 The registration of up to 5 E Mail Titles is available 1 Press Utility Counter on the control panel 2 Press 01 Scan Send Address 3 Press 02 E Mail Title Setting ...

Страница 85: ...Network Scanner 5 6 4 Press the number of the Title of the E Mail that you want to register 5 Enter the Title of E Mail and then press OK The Title of the E Mail is registered 6 Press OK and then press Exit Utility Menu screen is closed ...

Страница 86: ... E Mail Setting the Text allows a set text to be selected from Option Setting as dis played in the Select Destinations screen of the E Mail 0 The registration of up to 5 E Mail Text is available 1 Press Utility Counter on the control panel 2 Press 01 Scan Send Address 3 Press 03 E Mail Text Setting ...

Страница 87: ...M Network Scanner 5 8 4 Press the number of the Text of the E Mail that you want to register 5 Enter the Text of E Mail and then press OK The Text of the E Mail is registered 6 Press OK and then press Exit Utility Menu screen is closed ...

Страница 88: ... 5 4 To set the Title Text Reply Address of the E Mail The Title and the Text of the E Mail registered in the Utility Menu can be se lected while in the transmission 1 Press SCAN tab 2 Press E Mail 3 Set the destination 4 Press Option Setting 5 Press Title ...

Страница 89: ... Text 8 Select a Text that has been registered and then press OK When entering a Text on a case by case basis while in the trans mission press Manual Input to enter a Text and then press OK 9 Press Reply Address as necessary and press OK When setting a Reply address press Reply Address When Reply Address is pressed select a reply address on the screen displayed or press Address Input to enter an a...

Страница 90: ...er Setting screen see p 2 24 12 Set the original document For the setting of originals see p 2 33 13 Press Start The original is read and the scanned data is transmitted Detail After completion of the operation press Reset on Control Panel in the Option Setting screen and the Address Input screen to release the set tings Press Address to get back to the address selection screen When no resetting i...

Страница 91: ...ue of the setting for scanning Set the initial value of the Select Destinations screen or the Scanner Setting screen To set the initial values of the File Type and Select Destinations screen 1 Press Utility Counter on the control panel 2 Press 02 User Setting 3 Press 05 Scan Setting ...

Страница 92: ...file type of the FTP from among Pack aged TIFF Divided TIFF Packaged PDF and JPEG File Form Default SMB Select the initial value of the file type of the SMB from among Pack aged TIFF Divided TIFF Packaged PDF and JPEG Default Address Select a destination as displayed when opening the Select Destina tions screen from among E Mail HDD FTP SMB and QUEUE Compress Method Color Gray Select the compressi...

Страница 93: ...ility Menu 5 Fiery X3eTY2 65C KM Network Scanner 5 14 To set the initial value of the Scanner Setting screen 1 Press Utility Counter on the control panel 2 Press 02 User Setting 3 Press 02 Initial Setting ...

Страница 94: ...reen In the Scan Default Setting screen the registered FTP or SMB serv er can be selected as a Default Server Setting the ADF to ON in the Scan Default Setting screen allows the 2 Sided to be set in the Scanner Setting screen For details of other setting functions for scanning see p 2 24 6 Press OK 7 Press Exit to close Utility Menu ...

Страница 95: ...the DOS prompt of the PC you use execute ping to the IP address of the address to which a connection is made to check to see if the connection is made properly e g C ping 192 168 0 1 If the ping test fails check whether the copier s main power is switched on and also check the network cable for proper connection 3 Check whether the IP router is correctly set If it is not correctly set set it corre...

Страница 96: ...ouch panel to see if there is a suf ficient space left in it 2 When there is not a sufficient space left in the memory reduce the number of originals to be scanned or adjust Resolution or divide scan operations for scanning Detail Reducing the number of originals to be scanned or lowering the level of Resolution allows the amount of memory used to be reduced However please note that when the level...

Страница 97: ...age is saved without being compressed Correction of density A function to correct the color tone in the printer dis play or other output devices Default Initial set value Setting which has been selected in advance when the power button is turned ON Or setting which has been selected in advance when some function is turned ON Density Quantity to express the depth of image DPI dpi Abbreviation of Do...

Страница 98: ...nt Photographic Experts Group One of file formats to save image data extension jpg Compression rate is approximately 1 10 to 1 100 The compression system is remarkably effective to compress photos or other natural images LAN Abbreviation of Local Area Network A network con necting computers on the same floor in the same building in the buildings nearby etc Margin Blank on the top bottom right or l...

Страница 99: ...nsors form in line is called the vertical scanning direction SMB Abbreviation of Server Message Block A protocol used mainly to realize sharing of files or printers through the network between Windows SMTP Abbreviation of Simple Mail Transfer Protocol A pro tocol to transmit or transfer the electronic mails TCP IP Abbreviation of Transmission Control Protocol Inter net Protocol Substantially the s...

Страница 100: ... Mode Check 2 31 Mode Memory 4 12 Multi Page PDF 2 1 Multi Page TIFF 2 1 Q QUEUE 2 17 R Registering an E Mail Address 3 1 Registering the FTP server 3 7 Registering the Hard Disk 3 4 Registering the SMB server 3 10 S Scanner Setting Screen 2 24 Search Character 3 17 Single Page TIFF 2 1 SMB 2 14 4 8 T Text 5 7 Title 5 5 Touch Panel 2 21 Troubleshooting 6 1 U Utility Menu 5 1 Utility Counter 5 1 ...

Страница 101: ...Copyright 2006 2006 9 Fiery_X3eTY2_65C_KM_E_v10 ...

Отзывы: