Fetco CBS-5000H Series Скачать руководство пользователя страница 7

Go to fetco.com for the latest versions of all information        


Page 7                 

P183   March 2019


Operating Procedures 


1.  Turn brewer on/off switch (

E

) to the on position  


The power switch will illuminate to indicate that the brewer has power and is 

operating.  


When the 

ready light


(F) 

illuminates, the brewer is fully up to temperature.  

The amount of time required to gain full operating temperature will vary 

depending on the electrical configuration that was ordered, and the 

temperature of the incoming water.  

2.  Pre-heat the dispensers.


This step is very important to the overall success of the brewing operation.  

FETCO avoids the damaging affects of heat on fresh brewed coffee by using 

highly insulated dispensers.  The dispenser must be pre-heated with hot water 

from the brewer.  This preheating process ensures that the coffee in the first 

brew starts out hot.  Significant heat loss will occur when brewing coffee into a 

cold dispenser.  Preheating is not required for subsequent brews unless the 

dispenser remains empty for an extended period of time and has cooled down.  


Slide the empty brew basket(s) 

(D) 

into their rails and put the empty 

dispenser(s) in position under the basket for preheating.  Select the half batch 

mode, 

(A) 

if you have this option. 


When the ready light illuminates, start a brew cycle by rotating the brew lever 

(B) 

to the brew position. This starts clean hot water flowing into the brew 

basket and then into the dispenser. 


Stop the cycle when each dispenser is approximately 1/2 full by moving the 

brew lever to the off position.  This interrupts the brew cycle and resets the 

brewer. 


Let the dispensers stand 10-15 minutes, or until use, to allow the heat from 

the water to be absorbed by the dispensers. 

3.  Remove the brew baskets from the brewer when you are certain that the flow of hot water has stopped 

from the bottom of the basket. 


H model brewers will have a safety bar 

(C) 

in front of the brew basket to make removing the brew basket a 

2-handed operation.  This was done to help draw attention to the basket so the operator will notice any 

residual hot water or coffee. 


Place a paper filter in each basket to be used.  Pour into the paper filter the appropriate amount of pre-

measured, ground coffee.  The amount of coffee used will depend on your personal tastes and the 

recommendation of your roaster. 


Slide the brew basket back into the rails on the brewer. Insure the latch is outside of the basket. 

4.   Carefully drain any coffee or preheating water from the dispensers through the faucets before starting 

a coffee brewing cycle.  


Overflowing of the dispensers may result if the dispensers are not completely empty when the brew cycle 

begins.  Verify by opening the faucet over an appropriate container or drain.  The last several cups cannot be 

seen in the sight gauge tube. 


CAUTION: 

both the coffee or water may still be hot enough to cause burns, so be careful when draining the 

dispensers 

5.   Place the thermal dispenser(s) in position under the brew baskets. 


Ensure that the brew funnel is in place, the dispenser is empty, and the faucet is closed.  If you are using 

TPD-1.5 dispensers, also make sure the vent cap on the sight gauge is open. 


The twist lock cover (TPD-1.5 dispensers) is for transporting the dispenser only.  It must be removed before 

placing the dispenser under the brew basket. 

6.  Start the brew cycle in the same manner used to start the water used to preheat the dispensers. 


It will not be necessary to interrupt the cycle while brewing coffee.  The brewer will return to the stopped and 

ready status automatically. 


It is normal for the ready light to go out after the start of the brew cycle.  On twin brewers, there is enough 

hot water in the brewer to support a second brew, even if the ready light is off.  After brewing on both sides, 

you must wait for the ready light to come back on. 


The electrical configuration and the electrical power connected to the brewer will determine how long before 

the ready light comes back on for the next brew. 


(Continued on next page) 
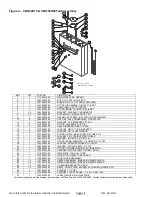


Legend: 

A-

Full/half batch switch


B-

Brew lever 

C-

Safety bar 

D-

Brew basket


E-

On/off switch


F-

Ready light


G-

 Brew light


H-

 Hot water faucet 

Содержание CBS-5000H Series

Страница 1: ...ingle1 Gal CBS 51H15 Right Dual 2 Gal CBS 52H20 Contact Information FETCO Food Equipment Technologies Company 600 Rose Road Lake Zurich IL 60047 1560 USA 2008 2019 Food Equipment Technologies Company...

Страница 2: ...lf batch brewing capability Fully automatic with electronic temperature control Iced tea brewing capability Two level tank drain system Total serviceability from the front Can be added at any time Spe...

Страница 3: ...ph 3 ground 6 1 25 8 9 9 22 0 120 208 1 ph 3 ground 6 1 29 6 9 9 22 0 C52026 2 X 4000 watt 120 220 1 ph 3 ground 6 8 31 3 11 5 22 0 120 240 1 ph 3 ground 8 1 34 1 13 2 22 0 120 208 3 ph 4 ground 6 9...

Страница 4: ...Go to fetco com for the latest versions of all information Page 4 P183 March 2019 Dimensions Utility Connections CBS 51H15 CBS 52H15 CBS 52H20...

Страница 5: ...ing Verify that the brewer will fit in the space intended for it and that the counter or table will support the total weight of the brewer and dispensers when filled 2 The brewer s legs are shipped in...

Страница 6: ...tubes 2 Turn on the incoming power 3 Turn on the brewer s main power switch 4 Within 6 seconds the hot water tank will begin filling until the probe at the top of the tank senses the water 5 The contr...

Страница 7: ...ion This was done to help draw attention to the basket so the operator will notice any residual hot water or coffee Place a paper filter in each basket to be used Pour into the paper filter the approp...

Страница 8: ...never the power switch is turned on voltage will not be supplied to the thermostat until the tank fills and water touches the water level probe During operation when water is dispensed and the water l...

Страница 9: ...cutter controls the rate of flow over the coffee The standard hole in the flow disc is 240 except for the CBS 51H10 which is 219 Other flow discs are available for special situations like high levels...

Страница 10: ...ISPENSE TUBE SHAFT DISPENSE TUBE To remove the dispense tube 1 Unscrew seal locknut and release the drive screw from dispense tube shaft 2 Turn the dispense tube slightly back and forth while pushing...

Страница 11: ...will flash indicating that the display is showing the set point not the actual temperature The dots below the numbers indicate the temp range 0 dots less than 100 F 1 dot between 100 and 200 F 2 dots...

Страница 12: ...is energized Bypass Adjustment The purpose of the bypass valve is to allow a portion of the brewing water to flow between the brew basket and the wire insert directly into the server without coming in...

Страница 13: ...NUT SEAL 7 16 DIA KEEPER 17 2 1031 00033 00 LOCKNUT 3 8 18 NPT THREAD 18 1 1031 00022 00 FITTING ELBOW 3 8 TUBE OD X 3 8 NPT 19 1 1023 00003 00 LOCKNUT MODIFIED THREAD 1 4 18 NPT 20 1 1083 00006 00 WA...

Страница 14: ...Go to fetco com for the latest versions of all information Page 14 P183 March 2019 Figure 2 CBS 51H15 Main Assembly Drawing No 1101 00268 00 CBS 51 H...

Страница 15: ...AMP READY INDICATOR GREEN 220VAC EXPORT ONLY 26 1 1045 00022 00 OVERLAY CONTROL PANEL CBS 51H 27 1 1058 00011 00 LAMP BREW INDICATOR CLEAR 110VAC 27 1 58004 LAMP BREW INDICATOR CLEAR 220VAC EXPORT ONL...

Страница 16: ...Go to fetco com for the latest versions of all information Page 16 P183 March 2019 Figure 3 CBS 52H15 CBS 52H20 Main Assembly Drawing No 1101 00262 00 CBS 52H...

Страница 17: ...SPRAY CUTTER 8 1 075 CENTER 29 2 1012 00004 00 LOCKNUT SPRAY CUTTER 30 2 25001 TUBESILICONE 1 2 x 1 4 ID x 2 7 8 LG 31 2 1112 00041 00 DISPENSE TUBE WELDMENT CBS 50 S 32 1 102010 BREW HANDLE START STO...

Страница 18: ...00024 00 FITTING COMP MALE CONN 3 8 TUBE X 3 8 17 1 1031 00020 00 LOCKNUT 1 8 STRAIGHT PIPE THREAD 18 1 1083 00014 00 WASHER 812 OD X 0 412 ID FLAT 19 1 1031 00032 00 FITTING BARB ELBOW 90 1 4 HOSE ID...

Страница 19: ...BREW BASKET HANDLE BLACK includes magnet 3 1 1082 00040 00 HANDLE SCREW 4 1 1009 00005 00 WIRE INSERT 16 X 6 5 1 1046 00025 00 WARNING LABEL NOT SHOWN F001 PAPER FILTERS 15 X 5 5 500 PER CASE NOT SHO...

Страница 20: ...evels are erratic Water pressure or flow rate is too low or fluctuates too much to support a full brew problem is worse in simultaneous brews Make sure brewer has a dedicated water line Ensure that th...

Страница 21: ...isconnect the outlet side to see if it leaks water to the tank Coffee tastes too strong Incorrect dosage Measure and confirm the correct amount of coffee required Short brew levels See Short brew leve...

Страница 22: ...End of section notes N...

Отзывы: