Solenoid Coil
VACC-S13-11-K4-1-EX4A
II 2G Ex ia IIC T6, T5 Gb
II 2D Ex ia IIIC T80°C, T95°C IP64 Db
Festo AG & Co. KG
Ruiter Straße 82
73734 Esslingen
Deutschland
+49 711 347-0
www.festo.com
Operating conditions EX
(Original instructions)
8070989
1702c
[8070991]
Solenoid coil VACC-S13-11-K4-1-EX4A
English
. . . . . . . . . . . . . . . . . . . . . . . . . . . .
All available documents for the product
è
www.festo.com/pk
Note
Technical data for the product can have different values in other documents.
During operation in an explosive atmosphere, the technical data of this
document always has priority.
1
Certified solenoid coils
Voltage
Type
Part no.
14 … 32 V DC
VACC-S13-11-K4-1-EX4A
562896
Fig. 1
2
Function
When switching on the voltage, the solenoid is energised and the valve is actuated.
A built-in current pulse generator permits operation on low-power electric
networks.
3
Application
The solenoid coil is intended to be used to actuate Festo valves.
Operate the solenoid valve with compressed air only.
The device is not intended to be used with other fluids.
The solenoid coils can be used in combination with the specified solenoid valves
in zones 1 and 2 for potentially explosive gas atmospheres and in zones 21
and22 for potentially explosive dust atmospheres.
Note
Label X: special conditions
Only use specified solenoid valves.
The range of application is dependent on the ambient temperature.
The device must be connected to a certified Ex ia IIC or Ex ib IIC power circuit.
Protect the housing from mechanical impact > 4 years.
Protect the device from electrostatic discharge.
Protect the filling compound from mechanical impact energy.
4
Transport and storage
Observe the following storage conditions: short storage times in cool, dry,
shaded and corrosion-resistant locations.
5
Requirements for product use
Comply with all applicable national and international regulations.
Note
Installation and commissioning should only be carried out by qualified electrical
specialists.
6
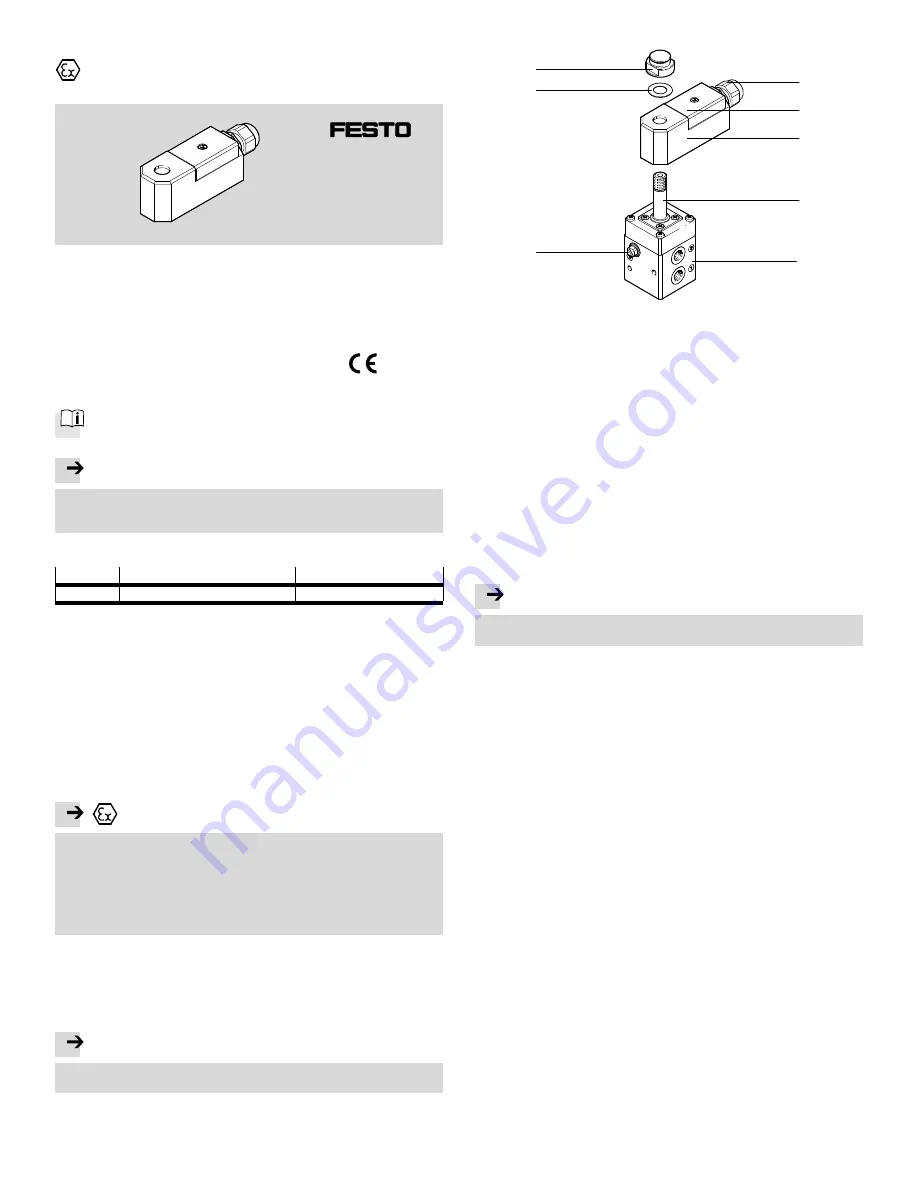
Mounting
7
6
1
2
3
8
5
4
1
Port 12 (only for external pilot air
supply)
2
Ribbed disc
3
Vent screw/retaining nut
4
Cable fitting
(with cap nut)
5
Cover, terminal housing
6
Solenoid coil
7
Armature guide tube
8
Solenoid valve
Fig. 1
6.1 Mechanical
1. Tighten vent screw. Twisting the solenoid coil is no longer possible
(tightening torque 4…6 Nm).
2. Open cover of terminal housing.
3. Connect electrical cables to the terminals. Observe polarity (tightening
torque2…3 Nm).
4. Close the cover of the terminal housing
(tightening torque: 0.6…0.7 Nm).
5. With external pilot air supply, use connection 12.
6. Seal unused openings with blanking plugs or slot covers.
Note
The surface coating of the solenoid valves is electrically non-conductive.
Include the device in the system’s potential equalisation.
6.2 Pneumatic
1. Mount connecting cables and fittings properly. Before commissioning, remove
residue, such as chips, rust and water.
2. Depressurise the compressed air lines.
3. Use only fittings with cylindrical threaded lugs and sealing rings or cutting rings.
4. Do not use PTFE or hemp fibres on the threads.
5. Insert all sealing rings supplied with the NAMUR mounting kit between solenoid
valve and drive or mounting plate.
6. If port 1 with control signal < 2 bar, then supply auxiliary energy > 2 bar to
port 12.
7. Do not use anti-friction coating or lubricant.
8. The dew point of the compressed air must lie below the specified lowest operat
ing temperature of the system.
9. Use filter adapter NPFV-AF-G14-G14-MF or
NPFV-AF-G14-N14-MF.
10.Use exhaust protection VABD-D3-SN-G14.


