background image

Estación de carga de Robotino 4 – Instrucciones de utilización 

62


© Festo Didactic


8134684 


Es necesario montar una clavija de contacto (n.º de art. 8131075) para conectar 
Robotino 4 a la estación de carga. La clavija de contacto se suministra con 
instrucciones para el montaje. 


Los contactos del conector de acoplamiento (8) de la estación de carga permanecen sin tensión siempre que 
Robotino 4 no esté acoplado. El diodo emisor de luz verde (1) en la parte superior de la estación de carga 
indica si los contactos del conector de acoplamiento (8) tienen tensión y si Robotino 4 está acoplado. 
 
La estación de carga proporciona 3 tipos de detección distintos para los programas de inicio: 
1.


Inicio a través del uso de la cámara y de los sensores de distancia del Robotino 4. 

2.


Inicio a través del uso de la cámara y de la detección del marcador. 

3.


Inicio a través del uso de un escáner láser opcional y la detección de reflectores. 


7.2


Poner en funcionamiento 

 
1.


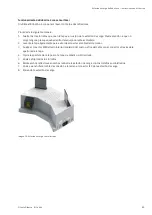
Posicione la estación de carga en el espacio. 

2.


Según el proceso de inicio, monte el marcador iluminado (4) o ambos reflectores (3) en la parte superior 
de la estación de carga. Para ello, utilice el conjunto de montaje incluido en el suministro. 

3.


Enchufe el cable de conexión a la red en el conector IEC (5). 

4.


Encienda la estación de carga con el interruptor de conexión y desconexión (7). 

5.


Monte la clavija de contacto (n.º de art. 8131075) en el muelle de carga del Robotino 4 tal y como se 
describe en el manual de instrucciones, en sentido izquierdo, y cablee la clavija de contacto en la PCB 
de la batería. 


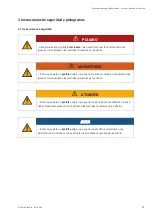
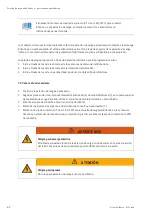
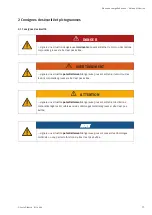
ADVERTENCIA 


Peligro por descarga eléctrica 

El cable de conexión a la red de la estación de carga no debe entrar en la zona de acción 
del robot. Las poleas de accionamiento podrían dañar el cable de conexión. 


ATENCIÓN 


Peligro por tropiezos 

No coloque la estación de carga en la vía de tránsito. 


Содержание 8131016

Страница 1: ...Festo Didactic 8134684 en de es fr zh 11 2019 8131016 8131017 Charging Station Robotino 4 Mobile Robotics Operating instructions Betriebsanleitung Instrucciones de utilizaci n Notice d utilisation...

Страница 2: ...cci n total o parcial de este documento as como su uso indebido y o su exhibici n o comunicaci n a terceros De los infractores se exigir el correspondiente resarcimiento de da os y perjuicios Reservad...

Страница 3: ...bstverst ndlich auch Lehrerinnen Sch lerinnen etc gemeint Die Verwendung nur einer Geschlechtsform soll keine geschlechtsspezifische Benachteiligung sein sondern dient nur der besseren Lesbarkeit und...

Страница 4: ...y s dans les pr sentes instructions de service d signent aussi bien entendu les enseignantes tudiantes etc L emploi d un seul genre ne saurait constituer une discrimination sexuelle mais a simplement...

Страница 5: ...___________________________________________________ 12 5 3 Electrical system __________________________________________________________________ 12 6 Technical data_____________________________________...

Страница 6: ...ssroom and one outside of it The laboratory or classroom must be secured using one or more of the following measures so that the operating voltage and compressed air supply cannot be activated by unau...

Страница 7: ...ere personal injury if not avoided WARNING indicates a potentially hazardous situation which may result in fatal or severe personal injury if not avoided CAUTION indicates a potentially hazardous situ...

Страница 8: ...84 2 2 Pictograms Hazard warning Warning dangerous electric voltage Read and observe the operating and safety instructions prior to commissioning Warning potentially explosive substances Electrostatic...

Страница 9: ...ay be impaired if they are used incorrectly The Festo Didactic learning system has been developed and produced exclusively for education and training in the field of automation technology The training...

Страница 10: ...use of the components and systems In particular the safety instructions must be adhered to by all persons who work with these components and systems Furthermore all pertinent accident prevention rule...

Страница 11: ...d systems Have read and understood the Safety chapter and the warnings in these operating instructions Personnel should be tested at regular intervals to ensure that they are safety conscious in their...

Страница 12: ...5 2 Mechanical components WARNING Switch off the power supply Switch off both the operating power and the control power before commencing work on the circuit Never reach into the setup unless it is at...

Страница 13: ...ocket is available it must always be connected to the protective grounding The protective grounding must always be connected first before the voltage and disconnected last after disconnecting the volt...

Страница 14: ...Watch out for electrostatic discharge ESD NOTE Irreparable damage to the device due to short circuit Device has housing openings for cooling Make sure that no electrically conductive parts penetrate...

Страница 15: ...ort circuit proof overload proof Mains connection IEC 60320 C13 C14 IEC plug Fuse Micro fuse 5x20 mm 5 A 250 V slow blow 2 units Dimensions 535 x 212 x 152 mm Weight Approx 14 kg Housing material Stee...

Страница 16: ...The device may cause radio interference in other environments Avoid operating this device at the same time as sensitive devices The power supply cable must be ordered separately 6 2 Contact assignment...

Страница 17: ...prerequisites for docking the Robotino 4 and charging its batteries without the need for any additional steps The Robotino can still be operated and programmed during charging 1 Green Robotino docked...

Страница 18: ...Start up using the camera and marker sensing 3 Start up using an optional laser scanner and reflector sensing 7 2 Commissioning 1 Place the charging station in the room 2 Depending on which start up p...

Страница 19: ...he charging station Figure 3 Illuminated marker Figure 4 Reflector WARNING Danger of electric shock Prior to commencing any work on the device switch off the charging station and disconnect the power...

Страница 20: ...vided Take care not to pull on the pre connected cable 2 Plug the power supply cable back into the charging station s IEC plug 3 Switch the charging station on The QR code will light up Figure 5 Charg...

Страница 21: ...ing installation 2 Do not remove the cover completely as the marker cable is plugged in 3 Detach the M8 plug on the left on the inside of the housing and pull both cable and plug through the opening i...

Страница 22: ...ing Make sure that no small parts fall into the device during installation 2 Do not remove the cover completely The marker cable is plugged in 3 Undo the four screws on the inside of the housing that...

Страница 23: ...onstant voltage ST1 contact plug 1 Yellow SDA 2 Green SCL 3 Brown VDD 4 Black Batt 5 Red Batt ST2 battery pack 1 1 Yellow SDA 2 Green SCL 3 Brown VDD 4 Black Batt 5 Red Batt ST4 battery pack 3 1 Yello...

Страница 24: ...MY SG UA HK AE order no 350363 Plug in acc with AS 3112 for AU NZ CN AR order no 350364 Plug in acc with SEV 1011 for CH order no 350366 Plug in acc with SANS 164 1 for ZA IN PT SG HK GB AE order no...

Страница 25: ...tion and updates to the technical documentation for the Festo Didactic components and systems are available on the following website www ip festo didactic com 11 Disposal Electronic waste contains reu...

Страница 26: ...Robotino 4 Charging Station Operating instructions 26 Festo Didactic 8134684...

Страница 27: ..._____________________________________________ 34 5 3 Elektrik__________________________________________________________________________ 34 6 Technische Daten___________________________________________...

Страница 28: ...rrichtsraums Der Labor oder Unterrichtsraum ist gegen unbefugtes Einschalten der Betriebsspannung bzw der Druckluftversorgung zu sichern z B durch einen Schl sselschalter z B durch abschlie bare Einsc...

Страница 29: ...G weist auf eine m glicherweise gef hrliche Situation hin die zum Tod oder schweren K rperverletzungen f hren kann wenn sie nicht vermieden wird VORSICHT weist auf eine m glicherweise gef hrliche Situ...

Страница 30: ...vor einer Gefahrenstelle Warnung vor gef hrlicher elektrischer Spannung Vor Inbetriebnahme die Betriebsanleitung und Sicherheitshinweise lesen und beachten Warnung vor explosionsgef hrlichen Stoffen E...

Страница 31: ...und Beeintr chtigungen der Komponenten entstehen Das Lernsystem von Festo Didactic ist ausschlie lich f r die Aus und Weiterbildung im Bereich Automatisierung und Technik entwickelt und hergestellt D...

Страница 32: ...d Systeme sicherheitsgerecht zu betreiben Insbesondere die Sicherheitshinweise sind von allen Personen zu beachten die mit diesen Komponenten und Systemen arbeiten Dar ber hinaus sind die f r den Eins...

Страница 33: ...eme eingewiesen sind das Sicherheitskapitel und die Warnhinweise in dieser Betriebsanleitung gelesen und verstanden haben Das sicherheitsbewusste Arbeiten des Personals soll in regelm igen Abst nden b...

Страница 34: ...chanik WARNUNG Energieversorgung ausschalten Schalten Sie sowohl die Arbeitsenergie als auch die Steuerenergie aus bevor Sie an der Schaltung arbeiten Greifen Sie nur bei Stillstand in den Aufbau Beac...

Страница 35: ...orbuchse vorhanden ist muss der Anschluss an Schutzerde stets erfolgen Die Schutzerde muss stets als erstes vor der Spannung kontaktiert werden und darf nur als letztes nach Trennung der Spannung getr...

Страница 36: ...statische Entladung engl electrostatic discharge ESD HINWEIS Ger tezerst rung durch Kurzschluss Ger t enth lt zur K hlung Geh use ffnungen Achten Sie darauf dass keine elektrisch leitf higen Teile ein...

Страница 37: ...chlussfest berlastfest Netzanschluss IEC 60320 C13 C14 Kaltger te Steckanschluss Sicherung Feinsicherung 5x20 mm 5 A 250 V tr ge 2 St ck Ma e 535 mm x 212 mm x 152 mm Gewicht ca 14 kg Geh usematerial...

Страница 38: ...bungen kann das Ger t Funkst rungen verursachen Vermeiden Sie einen zeitgleichen Betrieb dieses Ger tes mit st rempfindlichen Ger ten Die Netzanschlussleitung muss separat bestellt werden 6 2 Kontaktb...

Страница 39: ...um Robotino 4 ohne weitere Handgriffe anzudocken und die Akkus aufzuladen W hrend der Ladephase kann der Robotino weiterhin betrieben und programmiert werden 1 gr ne LED Robotino angedockt 2 blaue LED...

Страница 40: ...urch Nutzung eines optionalen Laserscanners und Erkennung von Reflektoren 7 2 In Betrieb nehmen 12 Positionieren Sie die Ladestation im Raum 13 Montieren Sie je nach Anfahrverfahren den beleuchteten M...

Страница 41: ...ng 12 Beleuchteter Marker Abbildung 13 Reflektor WARNUNG Gefahr durch elektrischen Schlag Schalten Sie die Ladestation vor Arbeiten am Ger t aus und ziehen Sie die Netzanschlussleitung aus dem Kaltger...

Страница 42: ...ereits eingesteckten Kabel zu ziehen 2 Stecken Sie die Netzanschlussleitung wieder in den Kaltger testecker der Ladestation 3 Schalten Sie die Ladestation ein Der QR Code leuchtet Abbildung 14 Ladesta...

Страница 43: ...eben Sie den Deckel nicht vollst ndig ab da das Kabel des Markers eingesteckt ist 3 L sen Sie den M8 Stecker an der linken Innenseite des Geh uses und ziehen Sie das Kabel mit dem Stecker durch die ff...

Страница 44: ...ontage keine Kleinteile in das Ger t fallen 2 Heben Sie den Deckel nicht vollst ndig ab Das Kabel des Markers ist eingesteckt 3 L sen Sie die vier Schrauben auf der Innenseite des Geh uses welche den...

Страница 45: ...Dauerspannung ST1 Kontaktstecker 1 Gelb SDA 2 Gr n SCL 3 Braun VDD 4 Schwarz Akku 5 Rot Akku ST2 Akkupack 1 1 Gelb SDA 2 Gr n SCL 3 Braun VDD 4 Schwarz Akku 5 Rot Akku ST4 Akkupack 3 1 Gelb SDA 2 Gr n...

Страница 46: ...ll Nr 350363 Stecker gem AS 3112 f r AU NZ CN AR Bestell Nr 350364 Stecker gem SEV 1011 f r CH Bestell Nr 350366 Stecker gem SANS 164 1 f r ZA IN PT SG HK GB AE Bestell Nr 350367 9 Wartung und Reinigu...

Страница 47: ...nformationen und Aktualisierungen zur technischen Dokumentation der Komponenten und Systeme von Festo Didactic finden Sie im Internet unter der Adresse www ip festo didactic com 11 Entsorgung Elektron...

Страница 48: ...Robotino 4 Ladestation Betriebsanleitung 48 Festo Didactic 8134684...

Страница 49: ...______________________________________________________ 56 5 3 Sistema el ctrico__________________________________________________________________ 56 6 Especificaciones t cnicas _______________________...

Страница 50: ...adicional fuera de dicha zona El laboratorio o aula donde se impartan las clases deber contar con un sistema de seguridad que impida que personas no autorizadas conecten la tensi n de funcionamiento...

Страница 51: ...a evitarlo ADVERTENCIA indica que existe un posible peligro que puede provocar la muerte o causar lesiones graves si no se adoptan las medidas necesarias para evitarlo ATENCI N indica que existe un po...

Страница 52: ...e un peligro general Advertencia de tensi n el ctrica peligrosa Antes de la puesta en funcionamiento leer y respetar las instrucciones de utilizaci n y las instrucciones de seguridad Advertencia de su...

Страница 53: ...vocar da os en los componentes El sistema de aprendizaje de Festo Didactic se ha creado exclusivamente para la formaci n y el perfeccionamiento profesional en materia de automatizaci n y tecnolog a La...

Страница 54: ...correcto y seguro de los componentes y sistemas Todas las personas que trabajen con los componentes y sistemas deber n respetar en especial las instrucciones de seguridad Adicionalmente deber n respet...

Страница 55: ...ntes y sistemas hayan le do y entendido el cap tulo sobre la seguridad y las advertencias incluidas en estas instrucciones Deber comprobarse peri dicamente si el personal utiliza el equipo respetando...

Страница 56: ...ci n de energ a Antes de trabajar en el circuito desconecte tanto la energ a de trabajo como la energ a de control Manipule los componentes de la estaci n solo cuando est desconectada Tenga en cuenta...

Страница 57: ...ctor de laboratorio verde amarillo siempre deber efectuarse la correspondiente conexi n a tierra de protecci n Esta siempre deber efectuarse en primer lugar antes de conectar la tensi n y siempre debe...

Страница 58: ...ibles descargas electrost ticas ESD por sus siglas en ingl s NOTA Destrucci n del equipo por cortocircuito El equipo tiene aberturas de la carcasa para el enfriamiento Observe que no haya penetraci n...

Страница 59: ...itos y a sobrecargas Conexi n a la red IEC 60320 C13 C14 toma de red del racor de conexi n Fusible Fusible para baja intensidad 5x20 mm 5 A 250 V lento 2 unidades Dimensiones 535 mm x 212 mm x 152 mm...

Страница 60: ...adiofrecuencia en otros entornos Evite el funcionamiento simult neo de este dispositivo con dispositivos sensibles a las interferencias El cable de conexi n a la red tiene que pedirse por separado 6 2...

Страница 61: ...botino 4 y cargar las bater as de forma r pida y sencilla Durante la carga puede seguir usando y programando Robotino 1 Diodo emisor de luz verde Robotino acoplado 2 Diodo emisor de luz azul Tensi n d...

Страница 62: ...l marcador 3 Inicio a trav s del uso de un esc ner l ser opcional y la detecci n de reflectores 7 2 Poner en funcionamiento 1 Posicione la estaci n de carga en el espacio 2 Seg n el proceso de inicio...

Страница 63: ...icio Imagen 21 Marcador iluminado Imagen 22 Reflector ADVERTENCIA Peligro por descarga el ctrica Apague la estaci n de carga antes de realizar los trabajos en el equipo y desenchufe el cable de conexi...

Страница 64: ...enga cuidado de no tirar del cable ya conectado 2 Vuelva a enchufar el cable de conexi n a la red en el conector IEC de la estaci n de carga 3 Encienda la estaci n de carga El c digo QR se ilumina Ima...

Страница 65: ...el montaje 2 Levante la tapa ligeramente para evitar desconectar el cable del marcador 3 Suelte el conector M8 del lado interior izquierdo del cuerpo y tire del cable con el conector a trav s de la a...

Страница 66: ...e atenci n a que no caiga ninguna pieza peque a dentro del equipo durante el montaje 2 Levante la tapa ligeramente para evitar desconectar el cable del marcador 3 Suelte los cuatro tornillos del inter...

Страница 67: ...vija de contacto 1 Amarillo SDA 2 Verde SCL 3 Marr n VDD 4 Negro Bater a 5 Rojo Bater a ST2 conjunto de bater as 1 1 Amarillo SDA 2 Verde SCL 3 Marr n VDD 4 Negro Bater a 5 Rojo Bater a ST4 conjunto d...

Страница 68: ...50363 Conector tipo clavija seg n AS 3112 para AU NZ CN AR n de art 350364 Conector tipo clavija seg n SEV 1011 para CH n de art 350366 Conector tipo clavija seg n SANS 164 1 para ZA IN PT SG HK GB AE...

Страница 69: ...recci n de internet que se indica a continuaci n puede consultar informaci n complementaria y las actualizaciones de la documentaci n t cnica de los componentes y sistemas de Festo Didactic www ip fes...

Страница 70: ...Estaci n de carga de Robotino 4 Instrucciones de utilizaci n 70 Festo Didactic 8134684...

Страница 71: ..._______________________________________________________ 78 5 3 Donn es lectriques_______________________________________________________________ 78 6 Caract ristiques techniques_______________________...

Страница 72: ...imentation pneumatique ne puissent tre activ es par des personnes non autoris es par un interrupteur cl par exemple par des distributeurs de mise en circuit verrouillables par exemple La salle de clas...

Страница 73: ...it e AVERTISSEMENT signale une situation potentiellement dangereuse pouvant entra ner la mort ou des l sions corporelles graves si elle n est pas vit e ATTENTION signale une situation potentiellement...

Страница 74: ...zone dangereuse Avertissement concernant une tension lectrique dangereuse Avant la mise en service lire et observer la notice d utilisation et les consignes de s curit Avertissement concernant les su...

Страница 75: ...ant de l utilisateur ou de tiers ainsi qu affecter l int grit des composants Le syst me didactique de Festo Didactic est exclusivement destin la formation initiale et continue dans le domaine de l aut...

Страница 76: ...osants et syst mes en toute s curit Les consignes de s curit notamment doivent tre respect es par tous ceux qui travaillent sur ces composants et ces syst mes Il convient en outre de respecter les r g...

Страница 77: ...et des syst mes ont lu et compris le chapitre concernant la s curit et les avertissements figurant dans la pr sente notice d utilisation Le respect des consignes de s curit par le personnel doit tre c...

Страница 78: ...EMENT Couper l alimentation en nergie Coupez aussi bien l nergie de service que l nergie de commande avant de travailler sur le montage N intervenez sur la structure qu l arr t Attention les actionneu...

Страница 79: ...ne est disponible cette derni re doit toujours tre raccord e la terre de protection La terre de protection doit toujours tre raccord e en premier avant la mise sous tension et tre d branch e en dernie...

Страница 80: ...e lectrostatique angl electrostatic discharge ESD NOTE Destruction de l appareil par court circuit L appareil contient des ouvertures dans le bo tier pour son refroidissement Veillez ce qu aucune pi c...

Страница 81: ...es Raccordement au r seau IEC 60320 C13 C14 raccord instantan avec broche de terre Fusible Fusible pour faible intensit 5x20 mm 5 A 250 V action retard e 2 pi ces Dimensions 535 mm x 212 mm x 152 mm P...

Страница 82: ...ments l appareil peut causer des interf rences radio vitez d utiliser cet appareil en m me temps que des appareils sensibles aux interf rences Le cordon d alimentation doit tre command s par ment 6 2...

Страница 83: ...ne autre action et pour charger les accumulateurs Vous pouvez continuer utiliser et programmer Robotino pendant la phase de charge 1 diode luminescente verte Robotino amarr 2 diode luminescente bleue...

Страница 84: ...ction de marqueur 3 Mise en marche par l utilisation d un scanner laser en option et la d tection de r flecteurs 7 2 Mise en service 1 Positionnez la station de charge dans le local 2 Selon la m thode...

Страница 85: ...e Illustration 30 marqueur lumineux Figure 31 r flecteur AVERTISSEMENT Danger de choc lectrique Avant de travailler sur l appareil teignez la station de charge et d branchez le cordon d alimentation d...

Страница 86: ...r le c ble d j branch 2 Branchez nouveau le cordon d alimentation dans le connecteur avec broche de terre de la station de charge 3 Allumez la station de charge Le code QR s allume Illustration 32 sta...

Страница 87: ...vez pas le couvercle enti rement car le c ble du marqueur est branch 3 Desserrez le connecteur m le M8 l int rieur gauche du bo tier et tirez le c ble avec le connecteur au travers de l ouverture sur...

Страница 88: ...tit mat riel ne tombe pas dans l appareil en cours de montage 2 Ne soulevez pas le couvercle enti rement Le c ble du marqueur est branch 3 Desserrez les quatre vis sur l int rieur du bo tier qui maint...

Страница 89: ...inue ST1 connecteur 1 Jaune SDA 2 Vert SCL 3 Marron VDD 4 Noir Accumulateur 5 Rouge Accumulateur ST2 pack d accus 1 1 Jaune SDA 2 Vert SCL 3 Marron VDD 4 Noir Accumulateur 5 Rouge Accumulateur ST4 pac...

Страница 90: ...ecteur selon AS 3112 pour AU NZ CN AR r f 350364 Connecteur selon SEV 1011 pour CH r f 350366 Connecteur selon SANS 164 1 pour ZA IN PT SG HK GB AE r f 350367 9 Maintenance et nettoyage Les composants...

Страница 91: ...sants et des syst mes Festo Didactic fait l objet d informations compl mentaires et de mises jour que vous trouverez sur Internet l adresse www ip festo didactic com 11 Mise au rebut Les appareils lec...

Страница 92: ...Station de charge Robotino 4 Notice d utilisation 92 Festo Didactic 8134684...

Страница 93: ..._______________________ 100 5 3 _______________________________________________________________________ 100 6 _______________________________________________________________________ 103 6 1 __________...

Страница 94: ...Robotino 4 94 Festo Didactic 8134684 1 DGUV 3 RCD 30 mA B RCD...

Страница 95: ...Robotino 4 Festo Didactic 8134684 95 2 2 1...

Страница 96: ...Robotino 4 96 Festo Didactic 8134684 2 2...

Страница 97: ...Robotino 4 Festo Didactic 8134684 97 3 Festo Didactic Festo Didactic Festo Didactic Festo Didactic...

Страница 98: ...Robotino 4 98 Festo Didactic 8134684 4 4 1 Festo Didactic...

Страница 99: ...Robotino 4 Festo Didactic 8134684 99 4 2 4 3...

Страница 100: ...Robotino 4 100 Festo Didactic 8134684 5 5 1 5 2 5 3...

Страница 101: ...Robotino 4 Festo Didactic 8134684 101 2 5 m 3x1 mm2...

Страница 102: ...Robotino 4 102 Festo Didactic 8134684 electrostatic discharge ESD...

Страница 103: ...8134684 103 6 6 1 1AC 120 V 10 60 Hz 8131016 1AC 230 V 10 50 60 Hz 8131017 240 W 10 8 18 V 6 A Robotino 24 V Robotino 4 A IEC 60320 C13 C14 5x20 mm 5 A 250 V 2 535 mm x 212 mm x 152 mm 14 kg IP IP20...

Страница 104: ...Robotino 4 104 Festo Didactic 8134684 A 6 2 24 V rd bk GND bu SDA wh SCL gn VDD bn 37...

Страница 105: ...Robotino 4 Festo Didactic 8134684 105 7 7 1 Robotino 4 8101344 Robotino 4 Robotino 1 LED Robotino 2 LED 3 4 5 6 7 8 38 LED 2...

Страница 106: ...Robotino 4 106 Festo Didactic 8134684 Robotino 4 8131075 Robotino 4 Robotino 4 8 LED 1 8 Robotino 4 3 1 Robotino 4 2 3 7 2 1 2 4 3 3 5 4 7 5 8131075 Robotino 4...

Страница 107: ...Robotino 4 Festo Didactic 8134684 107 7 3 39 40...

Страница 108: ...Robotino 4 108 Festo Didactic 8134684 Robotino 4 Robotino 4 1 2 3 41 42 Robotino View 43...

Страница 109: ...Robotino 4 Festo Didactic 8134684 109 Robotino 4 Robotino 4 1 2 3 M8 4 5 6 7 8 44...

Страница 110: ...Robotino 4 110 Festo Didactic 8134684 7 4 1 2 3 4 Robotino 4 5 6 7 8 45 4...

Страница 111: ...Robotino 4 Festo Didactic 8134684 111 7 5 X1 1 0 V 2 24 V ST1 1 SDA 2 SCL 3 VDD 4 5 ST2 1 1 SDA 2 SCL 3 VDD 4 5 ST4 3 1 SDA 2 SCL 3 VDD 4 5 ST2 ST4...

Страница 112: ...VII DE FR NO SE FI PT ES AT NL BE GR TR IT DK IR ID 247661 NEMA 5 15 US CA Central America BR CO EC KR TW TH PH JP 350362 BS 1363 GB IE MY SG UA HK AE 350363 AS 3112 AU NZ CN AR 350364 SEV 1011 CH 35...

Страница 113: ...Robotino 4 Festo Didactic 8134684 113 10 Festo Didactic www ip festo didactic com 11...

Страница 114: ...Robotino 4 114 Festo Didactic 8134684...

Страница 115: ......

Страница 116: ...Festo Didactic SE Rechbergstra e 3 73770 Denkendorf Germany 49 711 3467 0 www festo didactic com 49 711 34754 88500 did festo com...

Отзывы: