background image


FCI Electronics 


Manual Part No. 415988-001 

Issued: (03/12/99) 


Page 5 of 18 

Rev. 05/18/06   EC V06-0481 


Revision C 

Principles of Operation 
 

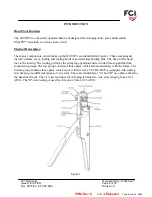
The lever attaches to the lower tooling and provides the mechanical advantage to generate the necessary 
crimping pressure. As the lever is closed, a ratchet mechanism engages to prevent the lever from 
opening until the crimping cycle is complete. When the lever is pulled closed, the lower tooling and 
terminal are pushed up against the upper tooling. The crimp is formed between the wire and insulation 
barrel anvils and the wire and insulation crimpers. Once closed, the ratchet releases and allows a spring 
to pull the lever open. 
 

Specifications  

(See TA-75, TA-146) 
When crimping the Mini PV™ to wires, the following parameters must be met. 
 
Wire Length Requirements: 

• 

Minimum ……………………………………..19.05 mm (0.75 in.)  

• 

Maximum …………………………………….As Required  

 
Insulation Diameters of Wires: 

• 

"A" Side (28-32 AWG) ………………………0.71-1.37 mm (0.028-0.054 in.) Dia. 

• 

"B" Side (22-26 AWG) ………………………0.91-1.52 mm (0.036-0.060 in.) Dia.  

 
Strip Length of Insulation: 

• 

Discrete and Latch  
Housing Applications ……………………….3.81-4.31 mm (0. 150- 0.170 in.) 

• 

Rod Housing  
Applications ………………………………….3.30-3.81 mm (0. 130-0.150 in.) 

  
Wire Barrel Crimp Height: 
 (For All Applications) 

• 

Single Wire 22-26 AWG or  
Two Wires 26-28 AWG ……………………..0.81-0.86 mm (0.032-0.034 in.) 

• 

Single Wire 28-32 AWG or  
Two Wires 30-32 AWG ……………………..0.66-0.71 mm (0.026-0.028 in.) 

  
Insulation Barrel Crimp Height: 

• 

Discrete Application …………………………2.84 mm (0. 112 in.) Max. 

• 

Latch and Rod Housing 
Applications ………………………………….1.75 mm (0.069 in.) Max. 
 

Mini PV™ Receptacles: 

• 

Loose Piece ………………………………….22-32 AWG 


NOTE: 

Loose piece terminals have different part numbers than reeled terminals. 

PDM: Rev:C                 Released                           .

STATUS:                              Printed: Feb  09, 2009

Содержание HT-0095

Страница 1: ...rt No 415988 001 Issued 03 12 99 Page 1 of 18 Rev 05 18 06 EC V06 0481 Revision C HT 0095 Mini PV Receptacles 22 32 AWG Crimping Hand Tool Tool P N HT 0095 FCI MANUAL P N 415988 001 PDM Rev C Released STATUS Printed Feb 09 2009 ...

Страница 2: ...FCI Electronics Manual Part No 415988 001 Issued 03 12 99 Page 2 of 18 Rev 05 18 06 EC V06 0481 Revision C HT 0095 PDM Rev C Released STATUS Printed Feb 09 2009 ...

Страница 3: ...Procedure Anvil Removal 10 Anvil Installation 11 Wire and Insulation Barrel Crimpers and Tonker Removal 12 Wire and Insulation Barrel Crimpers and Tonker Installation 13 Holding Pin Removal 13 Holding Pin Installation 14 Crimp Height Adjustment 15 Spare Parts Parts Ordering Information 16 Hand Tool Repair Policy 17 Recommended Spare Parts 17 Reference Documents Form E 3246 Hand Tool Warranty Form ...

Страница 4: ...l holding pins The heart of the hand tool is the tooling The tooling performs the crimping operation and is divided into top and bottom component groups The top group consists of those parts which remain stationary with the frame The bottom group contains those parts which move with the lever The HT 0095 is equipped with tooling for crimping two different ranges of wire sizes These are identified ...

Страница 5: ...rimping the Mini PV to wires the following parameters must be met Wire Length Requirements Minimum 19 05 mm 0 75 in Maximum As Required Insulation Diameters of Wires A Side 28 32 AWG 0 71 1 37 mm 0 028 0 054 in Dia B Side 22 26 AWG 0 91 1 52 mm 0 036 0 060 in Dia Strip Length of Insulation Discrete and Latch Housing Applications 3 81 4 31 mm 0 150 0 170 in Rod Housing Applications 3 30 3 81 mm 0 1...

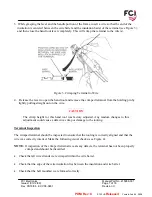
Страница 6: ... WARNING To prevent hand injury keep fingers from between the upper and lower tooling and from between the lever and handle when closing hand tool 1 Hold the hand tool so that the lever is on the left With your index finger push and hold the terminal holder in its forward position see Figure 2 2 Insert the disconnect box portion of the terminal with U shaped barrels up onto the holding pin and aga...

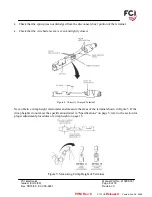
Страница 7: ...aight out on the wire CAUTION The crimp height for this hand tool was factory adjusted Any random changes to this adjustment could cause a defective crimp or damage to the tooling Terminal Inspection The crimped terminal should be inspected to ensure that the tooling is correctly aligned and that the wire was correctly inserted Make the following visual checks see Figure 4 NOTE If inspection of th...

Страница 8: ...l seam is even and tightly closed Figure 4 Correctly Crimped Terminal Next obtain a crimp height micrometer and measure the areas of the terminal shown in Figure 5 If the crimp heights do not meet the specifications listed in Specifications on page 5 refer to the section for proper adjustment procedures of crimp height on page 15 Figure 5 Measuring Crimp Height of Terminal PDM Rev C Released STATU...

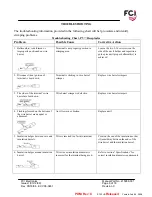
Страница 9: ...of terminal is bent down Terminal is sticking in wire barrel crimper Replace wire barrel crimpers 3 The sides of the terminal s wire barrel are bent down Wire barrel crimper is defective Replace wire barrel crimpers 4 Flashings formed on the bottom of the wire barrel are unequal or abnormal Anvil is worn or broken Replace anvil 5 Insulation bulges between wire and insulation barrels Wire is insert...

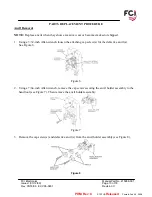
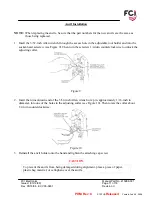
Страница 10: ...ed 1 Using a 3 32 inch Allen wrench loosen the attaching cap screw s for the defective anvil s See Figure 6 Figure 6 2 Using a 7 64 inch Allen wrench remove the cap screw securing the anvil holder assembly to the hand tool see Figure 7 Then remove the anvil holder assembly Figure 7 3 Remove the cap screw s and defective anvil s from the anvil holder assembly see Figure 8 Figure 8 PDM Rev C Release...

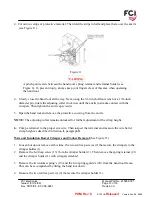
Страница 11: ...Then turn the setscrew 1 4 turn counterclockwise to unlock the adjusting collar Figure 9 2 Insert the turned down end of the 3 32 inch Allen wrench or a pin approximately 1 16 inch in diameter into one of the holes in the adjusting collar see Figure 10 Then rotate the collar about 1 2 turn counterclockwise Figure 10 3 Reinstall the anvil holder onto the hand and tighten the attaching cap screw CAU...

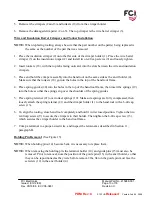
Страница 12: ...d tool and remove the protective covering from the anvils NOTE The adjusting collar remains unlocked for further adjustment of the crimp height 6 Crimp a terminal to the proper size wire Then inspect the terminal and measure the wire barrel crimp height as described in Section II paragraph B Wire and Insulation Barrel Crimpers and Tonker Removal See Figure 15 1 Loosen but do not remove at this tim...

Страница 13: ...20 into the holes in the top of the hand tool frame then insert the springs 19 into the holes so that the springs slip over the shoulder of the spring guides 5 Place spring retainer 21 over tonker springs 19 Make sure springs are fully compressed then loosely attach the spring retainer 21 and the crimper holder 1 to the hand tool with a 6 40 cap screw 13 6 To align the tooling close hand tool comp...

Страница 14: ...he two 2 56 setscrews 12 in the top of the terminal holder 10 can flatten the holding pins 14 making them extremely difficult to remove 1 Install two new holding pins 14 0 025 in square BergPin material 0 430 in long into terminal holder 10 until pins are flush with the extended supports Be sure that a flat side of each pin is at right angles to the two 2 56 setscrew holes on top of the terminal h...

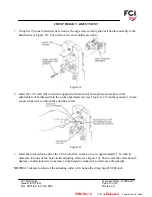
Страница 15: ...ole in the adjustable tool holder and into the socket head setscrew see Figure 13 Turn the setscrew 1 4 turn counterclockwise to unlock the adjusting collar Figure 13 3 Insert the turned down end of the 3 32 inch Allen wrench or a pin approximately 1 16 inch in diameter into one of the holes in the adjusting collar see Figure 14 Then rotate the collar about 5 degrees counterclockwise to increase c...

Страница 16: ...s achieved 6 Remove the anvil holder assembly from the hand tool Next tighten the setscrew in the adjustable tool holder to lock the adjusting collar Then reinstall the anvil holder assembly and tighten the attaching cap screw PARTS Spare Parts These are parts that FCI considers practical for the user to stock for replacement Recommended spare parts for the hand tool are specified in bold type in ...

Страница 17: ... 22 26 AND 28 32 Gauge Wire 1 4 102466 1 ANVIL HOLDER 1 5 104914 1 INSULATION BARREL ANVIL 28 32 Gauge Wire A SIDE 1 6 104914 2 INSULATION BARREL ANVIL 22 26 AWG Wire B SIDE 1 7 104960 1 WIRE BARREL ANVIL 28 32 Gauge Wire A SIDE 1 8 104960 2 WIRE BARREL ANVIL 22 26 AWG Wire B SIDE 1 9 915305 224 SCREW Cap Socket Hd 4 40 NF x 3 8 lg 8 10 102467 5 TERMINAL HOLDER 1 11 A 856 1 TOOL HOLDER Adjustable ...

Страница 18: ...FCI Electronics Manual Part No 415988 001 Issued 03 12 99 Page 18 of 18 Rev 05 18 06 EC V06 0481 Revision C Figure 15 HT 95 Hand Tool Parts PDM Rev C Released STATUS Printed Feb 09 2009 ...

Страница 19: ...Mouser Electronics Authorized Distributor Click to View Pricing Inventory Delivery Lifecycle Information FCI Amphenol HT 0095 ...

Отзывы: