Version 1.0
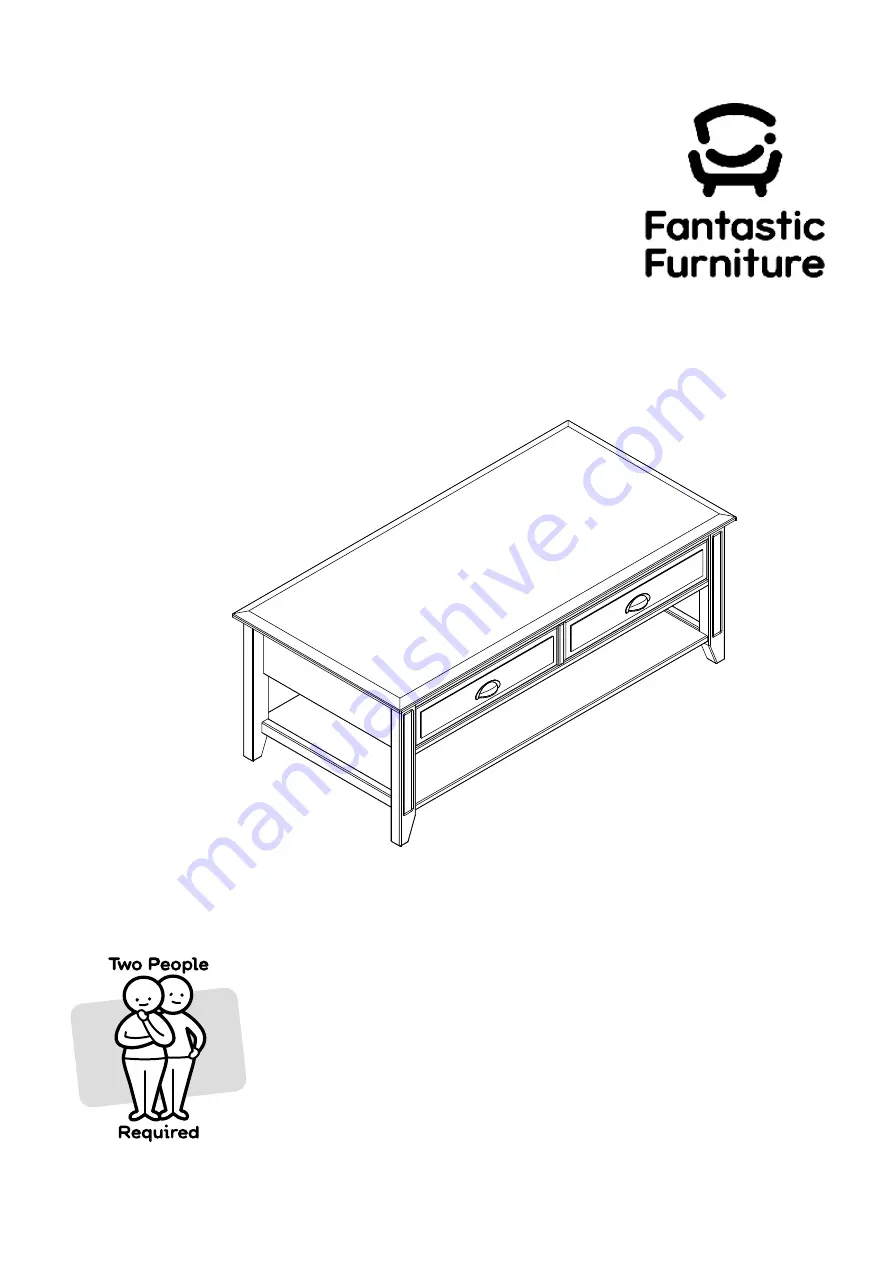
Coffee Table 2 Drawer White Walnut
T
ork
a
y
fantasticfurniture.com.au
Страница 1: ...Version 1 0 Coffee Table 2 Drawer White Walnut Torkay fantasticfurniture com au ...
Страница 2: ...r Fantastic Love it Share it Fantastic buy Share how it looks at home on Instagram for your chance to win a 250 Fantastic Furniture Gift Card fantasticfurniture We re thrilled you ve chosen Fantastic Furniture to help create a home you ll love fantasticfurniture com au ...
Страница 3: ...k to front Always use a soft surface such as carpet or cardboard when assembling your product to avoid scratching or damaging the surface of the product Bulky items such as wardrobes and bunk bed should be assembled in the room they will be used in as they may not fit through a door once assembled Never use any glue until you are certain that the parts belong together Periodically check and re tig...
Страница 4: ...le Foot P9 2 x Fake Drawer Fronts P10 2 x Drawer Fronts P11 2 x Left Drawer Sides P12 2 x Right Drawer Sides P13 2 x Drawer Backs P14 2 x Drawer Bases P15 2 x Drawer Support Rails P16 Page 4 Hardware pack X2 Fake Drawer Front P10 Centre Panel P7 Left Side P2 Fake Drawer Front P10 Right Side P3 Top Panel Rail P4 Top Panel P1 Back Support Rail P6 Front Support Rail P5 Bottom Shelf P8 Middle Foot P9 ...
Страница 5: ...ort rail P5 back support rail P6 and bottom shelf P8 as shown Attach 4 x large cam bolts H1 to back support rail P6 using a phillips head screwdriver Phillips Head Step 2 Step 1 Page 5 Screwdriver fantasticfurniture com au P1 H1 x13 You will need 4 x Large Cam Bolts H1 9 x Wooden Dowels H3 Phillips Head Screwdriver Mallet soft headed 13 x Large Cam Bolts H1 ...
Страница 6: ...ews H7 You will need 6 x Large Cam Bolts H1 1 x Right Runner Track H12 2 x Wooden Dowels H3 Attach 6 x large cam bolts H1 to right side P3 using a phillips head screwdriver Insert 2 x wooden dowels into right side P3 Attach 1 x right runner track H12 using 3 x small screws H7 tightening with a phillips head screwdriver Ensure the screws are inserted through the holes shown in the image above Phill...
Страница 7: ...ith a phillips head screwdriver Ensure the screws are inserted through the holes shown in the image above Turn over the centre panel P7 Attach 1 x left runner track H11 to the centre panel P7 using 3 x small screws H7 tightening with a phillips head screwdriver Ensure the screws are inserted through the holes shown in the image above You will need 4 x Wooden Dowels H3 1 x Left Runner Track H11 6 x...
Страница 8: ...e cam nut so it tightens over the bolt Attach 2 x fake drawer fronts P10 to the back support rail P6 Insert 4 x large cam nuts H2 into the 2 x fake drawer fronts P10 and rotate so the arrows on the cam nuts face the incoming cam bolts Using a phillips head screwdriver turn the large cam nuts H2 clockwise to lock P10 P10 P6 H2 x4 P2 H2 H2 P5 P6 With assistance attach the front support rail P5 and b...
Страница 9: ... bolt Attach top rail panel P4 to left side Insert 1 x large cam nut H2 into top panel rail P4 and rotate so the arrow on the cam nut faces the incoming cam bolt Using a phillips head screwdriver turn the large cam nut H2 clockwise to lock P2 P8 H2 x3 3 x Large Cam Nuts H2 You will need Phillips Head Screwdriver With assistance attach the bottom shelf P8 to left side P2 Insert 3 x large cam nuts i...
Страница 10: ...n the cam nut so it tightens over the bolt With assistance attach right side P3 to the assembled frame Insert 6 x large cam nuts H2 into rails P4 P5 P6 and bottom shelf P8 and rotate the cam nuts so the arrows point towards the incoming cam bolts Using a phillips head screwdriver turn the large cam nuts H2 clockwise to lock H2 x6 P2 P3 Attach middle foot P9 to bottom shelf P8 by turning clockwise ...
Страница 11: ... mouth of the cam nut You then turn the cam nut so it tightens over the bolt You will need 4 x Large Screw H4 Phillips Head Screwdriver Attach top panel P1 to the assemble unit as shown Insert 13 x large cam nuts H2 into side panels P2 P3 and fake drawer fronts P9 ensuring the arrows point towards incoming cam bolts Using a phillips head screwdriver turn the large cam nuts H2 clockwise to lock Att...
Страница 12: ...ensuring the grooves on all panels align Insert 4 x small cam nuts H10 into the drawer sides P12 P13 ensuring the arrow on the small cam nuts H10 faces the incoming cam bolts Using a phillips head screwdriver turn the small cam nuts H10 clockwise to lock Repeat this process for the other drawer You will need Phillips Head Screwdriver 8 x Small Cam Nuts H10 This is how a cam nut works The head of t...
Страница 13: ... The head of the cam bolt goes into the open mouth of the cam nut You then turn the cam nut so it tightens over the bolt H10 Attach drawer support rail P16 to the drawer front P11 Insert 1 x small cam nut H10 into the drawer support rail P16 ensuring the arrow on the small cam nuts H10 faces the incoming cam bolts Using a phillips head screwdriver turn the small cam nut H10 clockwise to lock Repea...
Страница 14: ...l need Phillips Head Screwdriver 12 x Medium Screws H8 Attach 1 x handle H6 to drawer front P10 using 2 x handle screws H5 tightening with a phillips head screwdriver Repeat this process for the other drawer You will need 4 x Handle Screws H5 2 x Handles H6 Phillips Head Screwdriver Step 20 Step 19 Page 14 fantasticfurniture com au X2 P14 P12 P13 H8 x6 H5 x2 H6 X2 ...
Страница 15: ...H7 tightening with a phillips head screwdriver Repeat this process for the other drawer X2 12 xSmall Screws H7 2 x Left Runners H13 2 x Right Runners H14 Phillips Head Screwdriver You will need Slide the 2 x assembled drawers into the coffee table as shown Step 21 Page 15 fantasticfurniture com au H13 H14 P12 H7 x3 H13 P12 Step 22 ...
Страница 16: ...Page 16 fantasticfurniture com au Step 23 ...