Version 2.0
www.fantasticfurniture.com.au
Bookcase lowline
Seaforth
Страница 1: ...Version 2 0 www fantasticfurniture com au Bookcase lowline Seaforth ...
Страница 2: ...S ATTACHED TO AVOID SERIOUS INJURY To avoid any serious or fatal injury this product has been fitted with a wall strap to prevent toppling We strongly recommend that this product is permanently fixed to the wall or other suitable surface Fixing devices are not included since different surface materials require different attachments Please seek professional advice if you are in doubt of what fixing...
Страница 3: ... hardware or getting components back to front Always use a soft surface such as carpet or cardboard when assembling your product to avoid scratching or damaging the surface of the product Bulky items such as wardrobes and bunk beds should be assembled in the room they will be used in as they may not fit through a door once assembled Never use any glue until you are certain that the parts belong to...
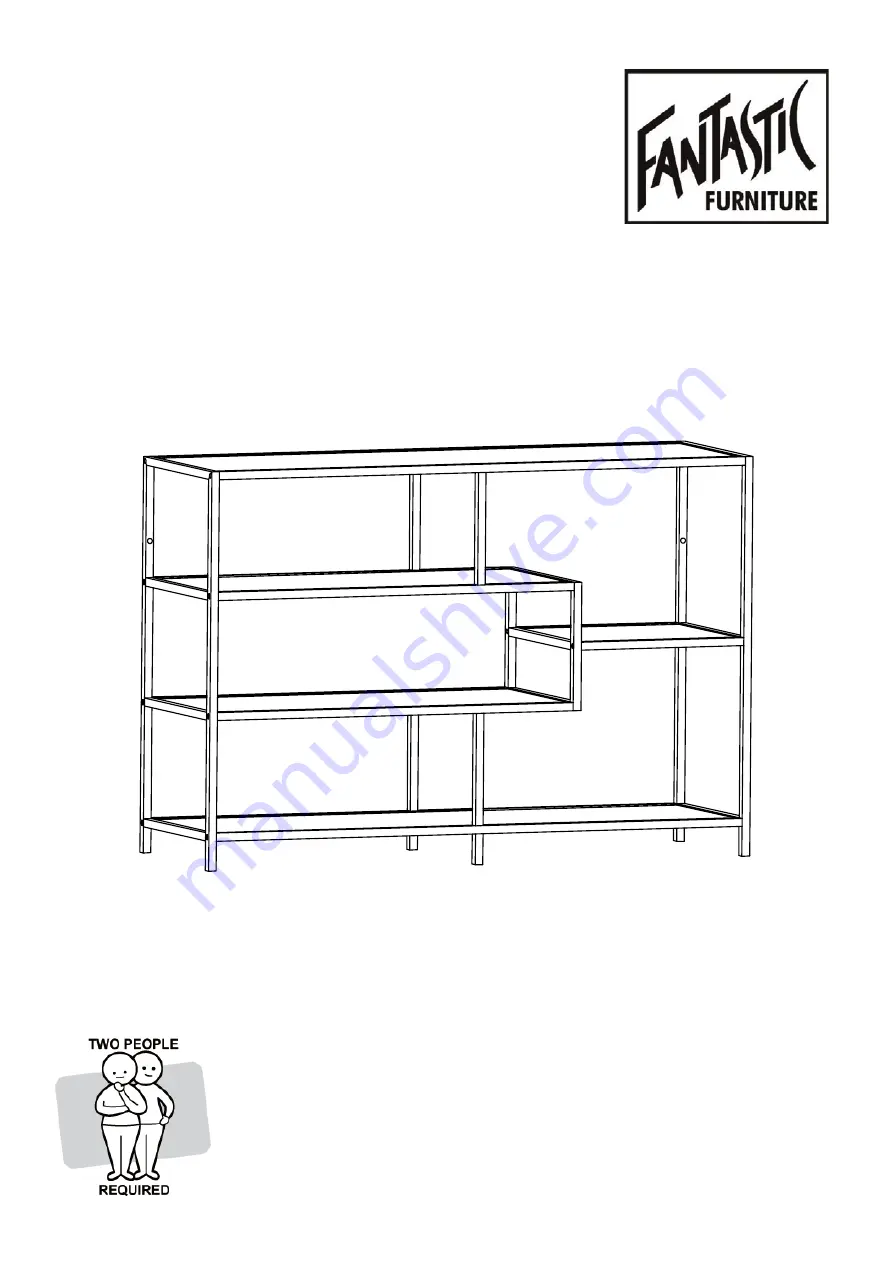
Страница 4: ...Frame Bars P4 x 2 Bottom Middle Front Back Bars P5 P6 Top Middle Front and Back Bars P7 and P8 Square Frame P9 Vertical Frame Bars P10 x 4 Legs P11 x 2 Horizontal Frame Bars P12 x 2 Top and Bottom Shelves P13 x 2 Large shelves P14 x 2 Short shelf P15 Top bottom shelf P13 Top bottom shelf P13 Large shelf P14 Large shelf P14 Short shelf P15 Bottom middle front bar P5 Bottom middle back bar P6 Top mi...
Страница 5: ...H3 Allen key 1 H4 P1 H3 H3 H3 H3 H3 P3 H3 H3 H3 P2 P4 Note Please only tighten the Frame Screws H3 80 when shelves have been added the frame screws H3 can be tightened 100 NOTE Before securing ensure that the protruding metal screw tabs on the Top and bottom frame bars P3 P4 are rotated so the tabs are facing the inside of the bookcase These will be used to secure and support the Top and bottom sh...
Страница 6: ...www fantasticfurniture com au PAGE 6 Step 2 Attach Legs P11 x 2 and Vertical Frame Bars P10 x 2 to Bottom Frame Bars P4 using the Threaded Rods H1 You will need Threaded rod 2 H1 H1 P11 P10 P11 P4 P4 ...
Страница 7: ... Bottom Middle Front and Back Bars P5 and P6 to the Vertical Frame Bars P10 using Frame Screws H3 by tightening with the Allen Key H4 P5 P6 H3 H3 H3 H3 Note Please only tighten the frame screws H3 80 when shelves have been added the frame screws H3 can be tightened 100 P1 P10 NOTE Before securing ensure that the protruding metal screw tabs on the Bottom middle front and back frame bars P5 P6 are r...
Страница 8: ...sure that the protruding metal screw tabs on the Top middle front and back frame bars P7 P8 are rotated so the tabs are facing the inside of the bookcase These will be used to secure and support the Large shelf P13 P1 Attach Top Middle Front and Back Bars P7 and P8 to Left Side Frame P1 using Frame Screw H3 by tightening with the Allen Key H4 Ensure the screw holes on the Frame Bars P7 and P8 are ...
Страница 9: ...tening with the Allen Key H4 Note Please only tighten the frame screws H3 80 when shelves have been added the frame screws H3 can be tightened 100 P9 H3 H3 H3 H3 P8 P7 P5 P6 80 NOTE Before securing ensure that the protruding metal screw tabs on the Square Frame P9 are rotated so the tabs are facing the inside of the book case These will be used to secure and support the Large shelf P13 ...
Страница 10: ...3 and Top Middle Back and Front Frames P7 and P8 using Frame Screw H3 by tightening with the Allen Key H4 Note Please only tighten the frame screws H3 80 when shelves have been added the frame screws H3 can be tightened 100 H3 H3 H3 H3 P10 You will need Frame screw 4 H3 Allen key 1 H4 P3 P8 P7 80 P3 ...
Страница 11: ...Square Frame P9 and Right Side Frame P2 using Frame Screws H3 by tightening with the Allen key H4 P12 H3 H3 H3 H3 Note Please only tighten the frame screws H3 80 when shelves have been added the frame screws H3 can be tightened 100 You will need Frame screw 4 H3 Allen key 1 H4 P9 P2 80 P12 ...
Страница 12: ...d Bottom shelves P13 x 2 into the assembled top and bottom shelving frame Place Short and Large Shelves P14 x 2 and P15 into the remaining shelving frames When shelves P13 x 2 P14 x 2 and P15 have been placed tighten all Screws H3 100 by using the Allen Key H4 P13 P14 P14 P13 P15 100 100 ...
Страница 13: ...ou will need Shelf screw 32 H2 Phillips Head Screwdriver Secure all Shelves P13 x 2 P14 x 2 and P15 to the assembled bookcase frame using Shelf Screws H2 using Phillips Head Screwdriver H2 P2 P1 H2 H2 H2 H2 H2 H2 H2 H2 H2 H2 H2 H2 H2 H2 P14 P14 P15 ...
Страница 14: ...r H7 and Nut H6 to connect the Wall Strap H5 to the Right and Left Frames P1 P2 using the Allen Key H10 and Spanner H9 You will need Wall Strap 2 x H5 Nut 2 x H6 Washer 2 x H7 Wall Strap Screw 2 x H8 Allen Key 1 x H10 Spanner 1 x H9 We strongly advise that you use the wall straps provided to prevent the unit from toppling ...
Страница 15: ...oughtfully Move furniture to its final position then connect the Wall Strap H5 to the wall make sure it is firmly attached and a snug fit Screws and wall plugs are not provided please use appropriate fixtures for your wall Seek advice from a qualified trades person on how to attach this to your specific wall You will need Washer 2 H7 H7 ...