Forbes
Version 1.0
www.fantasticfurniture.com.au
Credenza File Cabinet
Страница 1: ...Forbes Version 1 0 www fantasticfurniture com au Credenza File Cabinet ...
Страница 2: ...Enjoy Your purchase from Australia s Best Value Furniture Store www fantasticfurniture com au PAGE 2 ...
Страница 3: ... the room they will be used in as they may not fit through a door once assembled Never use any glue until you are certain that the parts belong together Periodically check and re tighten all fasteners Check the product care label ot website for product care instructions if you are having any difficulties assembling your product missing any hardware or components please visit our website Help Centr...
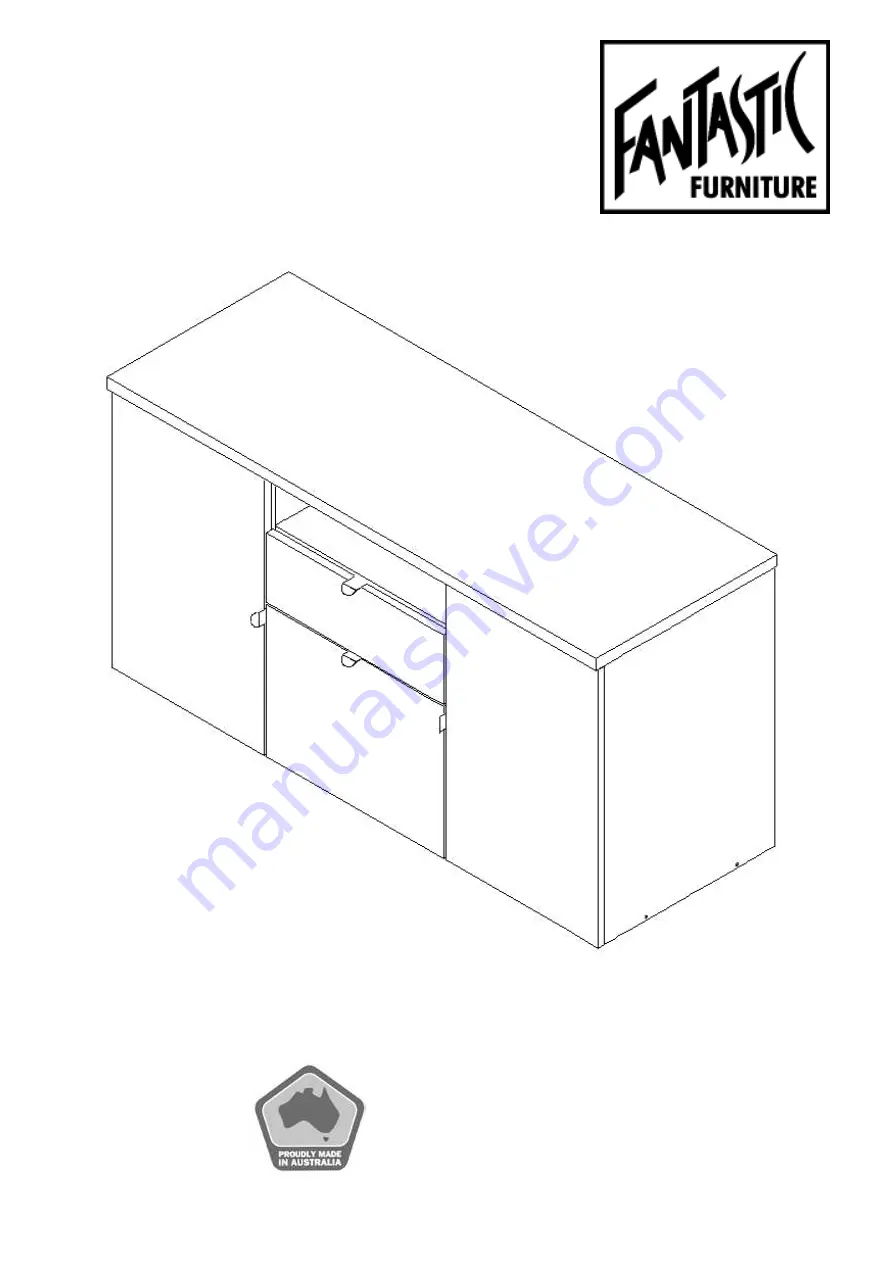
Страница 4: ...t Side Division P5 Left And Right Back Panel P6 Centre Back Panel P7 Adjustable Shelves P8 Fixed Middle Shelf P9 Top Panel P10 Left Right Side Door P11 Small Drawer Front P13 Large Drawer Front P14 Drawer Sides P15 Small Drawer Back P16 Large Drawer Back P17 Drawer Bottoms P18 www fantasticfurniture com au PAGE 4 P8 P8 P6 P9 P10 P11 P13 P14 P15 P16 P17 ...
Страница 5: ...WOODEN DOWELS H5 24 x 13mm C S SCREWS H1 2 x PAIRED DRAWERS RUNNERS H6 2 x FILE RODS H10 8 x EURO SCREWS H7 www fantasticfurniture com au PAGE 5 Hardware 24 x 5 8 PAN HEAD SCREWS H9 6 x CASTER WHEEL H8 8 x SELF SUPPORTS H11 4 x HINGE BLOCK HINGE H12 4 x FORBES HANDLE H13 ...
Страница 6: ... of panels P2 P3 2 Insert the Wooden Dowels H5 into the holes that you have just put glue into and tap in with a mallet 3 Fix the Hinge Blocks H12 to P2 P3 As per picture www fantasticfurniture com au PAGE 6 Raw Edge P2 When attaching the hinge block H12 ensure that it is positioned as shown above FACING FRONT OF UNIT FACING REAR OF UNIT Front Edge Front Edge ...
Страница 7: ... H6 fix Drawer runner to P4 P5 using the Euro Screws H7 NOTE line up the holes on the runner to the holes on P3 P4 from the second 2nd hole from the wheel on the runner and make sure the wheel of the runner is closest to the edged side EURO SCREW S HOLES 2 11 P4 P5 STEP 2 You will need 4 x Drawer runners H6 1 x Glue H4 8 x Euro screws H7 16 x Wooden Dowels H5 www fantasticfurniture com au PAGE 7 P...
Страница 8: ...the holes that you have just put glue into and tap in with a mallet 3 Insert a small amount of glue into the holes provided in panels P4 P5 4 Align dowels on P7 P9 with holes on P4 and bring together 5 Align dowels on P7 P9 with holes on P5 and bring together 6 Using 4 x Confirmat screws H2 fix panels P4 P5 in place 7 Insert Confirmat End Caps H3 into the screws GLUE ALL DOWEL JOINTS P4 P9 P7 www ...
Страница 9: ...the sides of panel P1 2 Insert the Wooden Dowels H5 into the holes that you have just put glue into and tap in with a mallet 3 Insert a small amount of Glue H4 into the larger holes provided in P1 4 Align dowels on P4 P5 with holes on P1 and bring together 5 Using 4 x Confirmat screws H2 fix panels P4 P5 in place through the bottom of P1 www fantasticfurniture com au PAGE 9 ...
Страница 10: ... H5 GLUE ALL DOWEL JOINTS P1 P4 P5 P9 P6 P6 1 Insert a small amount of Glue H4 into the holes provided in the sides of panels P6 2 Insert the Wooden Dowels H5 into the holes that you have just put glue into and tap in with a mallet 3 Align dowels on P6 with holes on P4 P5 and bring together ...
Страница 11: ...t of Glue H4 into the holes provided on panel P2 P3 2 Align dowels on P1 P6 with holes on P2 P3 and bring together 3 Using 4 x Confirmat screws H2 fix panels P2 P3 in place 4 Insert Confirmat End Caps H3 into the screws P6 P2 P3 You will need 1 x Glue H4 4 x Confirmat Screws H2 4 x Confirmat Screw Caps H3 ...
Страница 12: ... H4 GLUE ALL DOWEL JOINTS www fantasticfurniture com au PAGE 12 P1 P10 P4 P5 P9 P6 P6 P2 P3 1 Insert a small amount of Glue H4 into the holes provided on panel P10 2 Align dowels on P2 P3 P4 P5 with holes on P10 and bring together ...
Страница 13: ... 24 x 5 8 Pan Head Screws H9 P1 P2 P3 P10 P5 P4 P9 1 Carefully place the unit onto its back 2 Using the holes provided in the bottom of P1 fix 6 x Castor Wheels H8 onto P1 using the 5 8 Pan Head Screws H9 www fantasticfurniture com au PAGE 13 ...
Страница 14: ...rawer Front P13 and bring together Slide the Drawer Bottom P18 into the groves on the Drawer Sides P15 making sure it finishes in the grove of the Drawer Front P13 3 Align dowels on drawer side P15 with holes on Drawer Back P16 and bring together 2 Using the angled part of the drawer runners H6 fix Drawer runners H6 to base of drawer AS SHOWN using the 13mm C S Screws H1 Drawer Back www fantasticf...
Страница 15: ...o the groves on the Drawer Sides P15 making sure it finishes in the grove of the Drawer Front P14 3 Align dowels on drawer side P15 and File Rod H9 with holes on Drawer Back P17 and bring together 4 Using the angled part of the drawer runners H6 fix Drawer runners H6 to base of drawer AS SHOWN using the 13mm C S Screws H1 You will need 2 x Drawer runners H6 1 x Glue H4 4 x 13mm C S screws H1 2 x F...
Страница 16: ...es provided on the back of both Drawer Fronts fix Forbes Handle H13 to the top of the Drawer Fronts using the 13mm C S Screw H1 2 Using the holes provided in Panels P2 P3 P4 P5 insert the self supports into the holes making sure that you use the corresponding hole on the opposite panel Insert Shelf P8 into unit P1 P10 P4 P14 P9 P8 P8 P2 P3 P13 ...
Страница 17: ...e front of the Hinge Block first then simply click together You will need 4 x Hinge H10 8 x 13mm C S Screw H1 2 x Forbes Handle H13 13mm C S Screw H1 Hinge H10 P11 P12 Adjustment of Doors More information on page 12 Snap On System The hinge arm is positioned on the mounting plate and simply clipped on from front to back It can easily be removed from the mounting plate by pressing the back end of t...
Страница 18: ...STEP 13 www fantasticfurniture com au PAGE 18 ...
Страница 19: ...In the interest of our environment Please dispose of all packaging thoughtfully www fantasticfurniture com au PAGE 19 Your Unit Is Now Complete ...