background image

Ed. 2014

Cod. 110030251 (CAPPE CLASSICHE)

INSTRUCTIONS BOOKLET

BEDIENUNGSSANLEITUNG

LIVRET D’INSTRUCTIONS

MANUAL DE INSTRUCCIONES

àçëíêìäñàü èé ùäëèãìÄíÄñàà

INSTRUKCJE OBS

Ł

UGI 

LIBRETTO ISTRUZIONI

Italiano

English

Deutsc

h

Français

Español

на


русском


языке

P

olska

Содержание 110030251

Страница 1: ...Cod 110030251 CAPPE CLASSICHE INSTRUCTIONS BOOKLET BEDIENUNGSSANLEITUNG LIVRET D INSTRUCTIONS MANUAL DE INSTRUCCIONES INSTRUKCJE OBS UGI LIBRETTO ISTRUZIONI Italiano English Deutsch Fran ais Espa ol...

Страница 2: ......

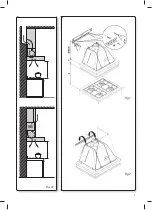
Страница 3: ...1 Fig C1 Fig 2 Fig 1...

Страница 4: ...2 Fig 3 Fig 4...

Страница 5: ...3 Fig 5 Fig 6...

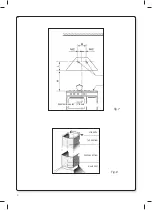
Страница 6: ...4 Fig 7 Fig 8 A FASTENING HOLES B HOB STIRRUP A TOP SECTION CENTER SECTION HOOD UNIT...

Страница 7: ...olo da persone competenti pericoloso modificare o tentare di modificare le caratteristiche di questo impianto In caso di riparazioni o mal funzionamento dell apparecchio non tentare di risolvere da so...

Страница 8: ...ssima della vite di fissaggio del camino fornita dal fabbricante di 10 mm AVVERTENZA l installazione delle viti o dei dispositivi di fissaggio non conforme alle presenti istruzioni pu comportare risch...

Страница 9: ...ono indicare che tali dispositivi di disconnessione devono essere previsti nella rete di alimentazione conformemente alle regole di installazione Il cavo di terra giallo verde non deve essere interrot...

Страница 10: ...i normali la prima velocit per mantenere l aria pulita con bassi consumi di energia elettrica Si consiglia di mettere in funzione la cappa quando si inizia a cuocere e manteneria in fun zione fino all...

Страница 11: ...el convogliatore Per il montaggio sostituzione vedi figura Nel caso di cappa con camera motore il filtro posizionato nella parte inferiore della camera stessa Per il montaggio sostituzione vedi figura...

Страница 12: ...a con una analoga alogena max 20 W 12 Volt attacco G4 d Richiudere i pannello Se il pannello non si richiude correttamente ripetere l operazione al punto b Square halogen light 3 LAMPADA FLUORESCENTE...

Страница 13: ...nte in commercio per la pulizia dell acciaio L utilizzo di sostanze abrasive e panni ruvidi dannegger irreparabilmente il trattamento superficiale dell acciaio Conseguenza diretta del non rispetto di...

Страница 14: ...ppa e fissarlo tramite la vite metrica poste riore A fig 2 FISSAGGIO CAPPA SENZA CAMERA MOTORE 1 Rilevare la distanza L dal fondo della cappa al centro dei fori di fissaggio fig 7 2 Rilevare la distan...

Страница 15: ...ems directly Repairs performed by unqualified persons may cause damage For all repair and other work on the appliance contact an authorised service spare parts centre Always check that all the electri...

Страница 16: ...llers of the range hood The distance between the hob and the lowest part of the rangehood is normally at least 65 cm see figure C1 This distance is measuresd in the lowest part of the rangehood not op...

Страница 17: ...es the fumes and steam outside In this version the charcoal filters if fitted should be removed to do this see the instructions in point F There must be adequate ventila tion of the room when the rang...

Страница 18: ...y pull the handle A until releasing it from the front guide then tilt it slightly downwards and slide it out of the rear guide To reposi tion the filter repeat the operation in the reverse order A 2 C...

Страница 19: ...appliance is disconnected from the mains power supply b Remove by levering with a screwdriver the support ring A for the cover glass c Remove the cover glass B to access the light compartment d Repla...

Страница 20: ...r intervals 2 CHARCOAL FILTERS These trap the odours present in the stream of air that passes through them The air is purified by passing a number of times through the filters and being recirculated i...

Страница 21: ...al and make 2 marks at the ends of the batten where the 2 holes are to be drilled Drill the holes insert the two 8mm screw anchors and fasten the batten using the relevant screws Step 2 Hook the hood...

Страница 22: ...range hood remove the steel grilles for range hoods with tangential motors the entire build in assembly if fitted by unscrewing the screws that secure it to the bot tom 7 To avoid hood unhooking due...

Страница 23: ...ugshaube an der elektrischen Anlage durchgef hrt werden m ssen d rfen ausschlie lich von kompetenten Personen vorgenommen werden Es ist gef hrlich die Eigenschaften dieser Anlage abzu ndern bzw versuc...

Страница 24: ...Gegenst nden und Haustieren ab die auf die Nichteinhaltung der in der vorliegenden Bedienungsanleitung enthaltenen Vorschriften zur ckzuf hren sind und insbesondere die Installation Bedienung und War...

Страница 25: ...e Draht ist f r die Erdung zu benutzen der blaue Draht ist f r den Nullleiter und der braune Draht f r die Phase bestimmt Das Kabel darf auf keinen Fall mit hei en Teilen in Ber hrung kommen ber 70 C...

Страница 26: ...verbrauch sauber zu halten Die Haube sollte bei Kochbeginn eingeschaltet und erst wieder ausgeschaltet werden wenn der Raum vollkommen geruchsfrei ist G ARBEITSWEISE 1 ZWEI SCHALTER STEUERUNG LICHT Sc...

Страница 27: ...nstabzugshauben mit Motorkammer befindet sich der Filter im unteren Kammerteil F r die Montage das Auswechseln siehe Abb Zur Bestellung neuer Karbonfilter bitte an die Vertragshandlung Vertriebsuntern...

Страница 28: ...ie en Wenn sich die Platte nicht korrekt schlie en l sst den in Punkt b beschriebenen Vorgang wiederholen Square halogen light 3 LEUCHTSTOFFLAMPE dem qualifizierten Personal vorbehalten Auswechseln de...

Страница 29: ...kte die Scheuermittel enthalten T cher mit rauher Oberfl che bzw handels bliche T cher f r die Stahlreini gung verwendet werden Die Verwendung von Scheuermitteln und rauhen T chern wird die Oberfl che...

Страница 30: ...estigungsschiene waa gerecht ausge richtet ist und an den Enden der Schiene 4 Bohrl cher an zeichnen Die Dunstabzugshaube mit Hilfe der zwei an der oberen R ckwand befindlichen Langl cher in der gew n...

Страница 31: ...u befestigen wobei die auf der Hinterseite der Abzugshaube vorhandenen Lochungen bzw die Spanneisen am Deckel zu verwenden sind 8 Die Dunstabzugshaube aufh ngen 9 Durch die an der Unterseite befindlic...

Страница 32: ...d essayer de modifier les caract ristiques de cette installation En cas de panne ou de mauvais fonctionnement de l appareil ne pas essayer de r soudre le probl me mais s adresser au Service apr s vent...

Страница 33: ...a longueur maximale des vis de fixation de la chemin e est de 10 mm fournies par le fa bricant AVERTISSEMENT L installation des vis ou du dispositif de fixation de fa on non conforme aux pr sentes ins...

Страница 34: ...ctions doivent indiquer que ces dispositifs de coupure doivent tre pr vus dans le r seau d alimentation conform ment aux r gles d installation Le c ble de terre jaune vert ne doit pas tre interrompu p...

Страница 35: ...r maintenir l air propre en consommant peu d nergie lectrique Il est conseill d allumer la hotte au moment de commencer la cuisson et de la laisser fon ctionner jusqu ce que les odeurs aient disparu G...

Страница 36: ...ont accroch s sur le c t droit et gauche du convoyeur Pour le montage remplacement voir la figure S il s agit d une hotte avec logement pour le moteur le filtre se trouve dans la partie in f rieure de...

Страница 37: ...le panneau jusqu un angle de 90 voir figure en appuyant sur PUSH c Remplacer la lampe par une lampe similaire halog ne max 20 W 12 Volt culot G4 d Refermer le panneau Si le panneau ne se referme pas c...

Страница 38: ...Fasteel en ayant soin de rincer et d essu yer soigneusement Ne pas utiliser de produits contenant des substances abrasives un chiffon r che ni le type de chiffon pour nettoyer l acier que l on trouve...

Страница 39: ...os en haut Fig 5 Fixer les deux vis de s curit C situ es au dos en bas Phase 2 Apr s avoir fix la hotte relier le tuyau flexible au trou d vacuation des fum es et au raccord circulaire du logement du...

Страница 40: ...gler la hauteur de la hotte l aide des vis situ es sur les crochets des chevilles fischer 11 Monter les grilles en acier ou le groupe encastrable 12 Fixation du kit chemin e fig 8 fixer la bride A au...

Страница 41: ...r resolver el problema directamente Las reparaciones efectudas por personas no cualificadas pueden provocar da os Para manipulaciones eventuales dir jase a un Centro de Asistencia T cnica autorizado C...

Страница 42: ...strucciones podr an originarse peligros el ctricos CARACTER STICAS T CNICAS B Los datos t cnicos del electrodom stico est n contenidos en las placas situadas en la parte interior de la campana extract...

Страница 43: ...tierra sea correcta y funcione el equipo de suministro est equipado con una conexi n de tierra eficaz seg n las normas en vigor la toma o el interruptor omnipolar usados sean f cilmente accesibles co...

Страница 44: ...terruptor B Permite encender y regular las velocidades de ejercicio del motor en funci n de las ver siones de 1 a 3 o mediante un variador continuo de velocidad PILOTO C Gema piloto de funcionamiento...

Страница 45: ...m acceda desde el men al desplegable asistencia ILUMINACI N MONTAJE Y SUSTITUCI N I 1 L MPARA PLAF N Para sustituir la l mpara a Aseg rese de que el aparato est desenchufado de la red el ctrica b Dese...

Страница 46: ...ginal 8W 13W 21W 28W seg n el modelo c Volver a conectar el aparato ala red el ctrica MANTENIMIENTO Y LIMPIEZA L Un mantenimiento constante garantiza un buen funcionamiento y un buen rendimiento a lo...

Страница 47: ...l caso de no respetarse estas instruc ciones 4 LIMPIEZA INTERIOR Se proh be limpiar las partes el ctricas o las partes relativas al motor del interior de la campana extractora con l quidos o solventes...

Страница 48: ...da la distancia M existente entre los dos agujeros de fijaci n 3 Haga coincidir la l nea central de la encimera con la de la campana extractora y divida por dos M M 2 4 La posici n en altura de los ag...

Страница 49: ...47 RUS A 1 5 65...

Страница 50: ...48 10 B C 65 C1 10...

Страница 51: ...49 D 70 C 3 E F F 6 F...

Страница 52: ...50 G 1 0 1 1 3 C 2 1 2 3 OFF 1 2 3 OFF H 1 A...

Страница 53: ...51 2 www falmec com I 1 25 A 2 Round halogen light 20 12 G4...

Страница 54: ...52 Round halogen light Square halogen light 90 PUSH 20 12 G4 Square halogen light 3 90 8 13 21 28 L 1 I 2 3 4 H2 3 15...

Страница 55: ...53 Fasteel 4 M N 1 1 X Y 265 2 2 8 2 2 3 3 4 4...

Страница 56: ...54 1 1 4 2 8 2 1 2 2 1 L 7 2 3 M M 2 4 L 650 5 Fischer 6 7 8 9 10 Fischer 11 12 8...

Страница 57: ...lifikowanych elektryk w Niebezpieczne jest modyfikowanie lub pr ba modyfikowania charakterystyk tego systemu W przypadku niesprawno ci lub je eli wymagane s naprawy urz dzenia nie pr bowa rozwi zywa p...

Страница 58: ...kcji a przede wszystkim ostrze e dotycz cych instalowania obs ugi i konserwacji urz dzenia Istnieje ryzyko po aru je eli czyszczenie nie zostanie wykonane zgodnie z zaleceniami UWAGA Dost pne cz ci mo...

Страница 59: ...wiednia dla obci enia kabla zasilania i pod cza j do odpowiedniego gniazdka zasilania Dla urz dze kt re przychodz wyposa one w kabel i wtyczk prosz si upewni e s one w czane do obwodu odpowiedniego dl...

Страница 60: ...G OBS UGA OBS UGA 1 PULPIT STEROWANIA DWUPRZYCISKOWY WIAT O Prze cznik A Po o enie 0 wiat o wy czone Po o enie 1 wiat o w czone PR DKO prze cznik B Jest u ywany do w czania i ustawiania pr dko ci sil...

Страница 61: ...przypadku okapu ze skrzynk silnika filtr jest umieszczony na dolnej cz ci skrzynki silnika Jak zak ada nowe filtry patrz rysunek Aby zam wi nowe filtry w glowe nale y skontaktowa si z dystrybutorem po...

Страница 62: ...o enia 90 patrz rys naciskaj c na PUSH c wymieni wziernik halogenu max 20 W 12 Volt pod czenie G4 d zamkn ramk halogenu Je li ramka nie domknie si odpowiednio powt rzy operacj od punktu b Square halog...

Страница 63: ...e u ywa produkt w kt re zawieraj substancje cierne ostrych cierek lub cierek specjalnie przeznaczonych do czyszczenia stali U ywanie substancji ciernych lub ostrych cierek nieuchronnie uszkodzi wyko c...

Страница 64: ...a Wywierci otwory wstawi 2 ko ki rozporowe o rednicy 8 mm i zamocowa okap w wymaga nym po o eniu u ywaj c 2 wkr t w B wstawionych w dwa pod u ne wyci cia w g rnej tylnej p ycie Rys 1 Wkr ci wkr ty zab...

Страница 65: ...kach pokrywy 8 Zawiesi okap kuchenny 9 Sprawdzi poprzez otw r w dnie czy okap kuchenny jest prawid owo zaczepiony do za czep w typu Fisher 10 Wyregulowa wysoko okapu kuchennego wykorzystuj c wkr ty na...

Страница 66: ...diritto di ottenere a l aggiornamento la rettificazione ovvero quando vi ha interesse l integrazione dei dati b la cancellazione la trasformazione in forma anonima o il blocco dei dati trattati in vio...

Страница 67: ...per la fornitura ed installazione dell apparecchio avvenuta nel solo territo rio italiano Informativa ai sensi dell art 13 dei D Lgs n 196 2003 La scrivente Societ informa che per l instaurazione e l...

Страница 68: ...garanzia all interno CERTIFICATO DI GARANZIA da conservare Modello e codice assolutamente necessario indicare il numero di codice della cappa ri portato sulla targhetta dei dati tecnici posta all int...

Отзывы: