Falcon Dominator Plus Скачать руководство пользователя страница 13

13


Commissioning 

NOTE:

  Prior  to  operation,  ensure  that  ALL  packing  material  has  been  removed.  For 

instructions  on  how  to  use  the  appliance,  see  ‘Operation’  chapter.  For  relevant  figures, 
please see ‘Technical Data’. 

1.  Turn appliance on and ensure Red Neon illuminates. 
2.  Turn water tap on and ensure it is working correctly without any leakage. 
3.  Empty water using the pan tilting handle to lift the pan up. 
4.  Lower  the  pan  and  turn  thermostat  control  knob  to  200°C.  Ensure  Amber  neon 

illuminates. 

5.  Wait  till  Amber  neon  turns  OFF  and  measure  the  temperature  at  the  middle  of  the 

pan. Ensure it reaches around 220°C (±10°C). 

6.  Turn OFF appliance. Red neon should turn OFF. 

If the appliance does not operate correctly please refe

r to the ‘Servicing’ section and rectify 

the problem.  

ENSURE  THAT  KITCHEN  PERSONNEL  UNDERSTAND  THE  CORRECT 
OPERATION  AND  CLEANING  OF  APPLIANCE  AND  THAT  SUCH 
INDIVIDUALS  ARE  AWARE  OF  THE  MAINS  ISOLATING  SWITCH 
LOCATION. 

PLEASE FILL OUT THE INFORMATION TABLE ON THE FRONT COVER   

AFTER COMMISSIONING.  
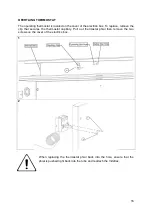


SERVICING 


BEFORE ATTEMPTING ANY SERVICING, ENSURE ISOLATING COCK 
IS  TURNED  OFF  AND  CANNOT  BE  INADVERTENTLY  TURNED  ON. 
AFTER ANY MAINTENANCE TASK, CHECK APPLIANCE TO ENSURE 
THAT  IT  PERFORMS  CORRECTLY  AND  CARRY  OUT  ANY 
NECESSARY ADJUSTMENTS AS DETAILED IN 

‘COMMISSIONING’.  


Symbols on drawings: 

 +


denotes a positive head screw requires to be removed. 


–  

denotes a flat head screw requires to be removes. 


denotes a nut or a hex head bolt requires to be removed. 


Содержание Dominator Plus

Страница 1: ...USERS INSTALLATION AND SERVICING INSTRUCTIONS ELECTRIC BRATT PAN E3800 T100839 Rev 8 DATE PURCHASED MODEL NUMBER SERIAL NUMBER DEALER SERVICE PROVIDER...

Страница 2: ...LS PLEASE READ THIS MANUAL This manual should be read carefully before operating installing or servicing the appliance WARNING Please pay particular attention to sections of the manual which has this...

Страница 3: ...F THE APPLIANCE 8 CLEANING AND MAINTENANCE 9 SPECIFICATION 9 Model Number covered in this group of products 10 Technical Data 10 DIMENSIONS ELECTRICAL CONNECTION LOCATIONS 10 INSTALLATION 10 Unpacking...

Страница 4: ...4 INTRODUCTION This appliance has been CE marked on the basis of compliance with the Low Voltage and EMC Directives for the voltages stated on the data plate as shown below IMPORTANT...

Страница 5: ...d Safety At Work Act Fire Precautions Act TO PREVENT SHOCKS ALL APPLIANCES MUST BE EARTHED This equipment is ONLY FOR PROFESSIONAL USE and shall be operated by QUALIFIED persons It is the responsibili...

Страница 6: ...6 OPERATION...

Страница 7: ...fully lowered using the pan tilting handle OFF Position Variable temperature setting 100 C 300 C Turn handle to lift pan up and down Turn tap to turn water ON and OFF Indicates that the heating elemen...

Страница 8: ...food ensure it does not go over the MAX mark as shown below 6 Turn ON the water tap to top up if necessary 7 To empty the contents of the pan first ensure the thermostat control knob is turned OFF Lif...

Страница 9: ...by warranty BEFORE ANY CLEANING IS UNDERTAKEN ENSURE ISOLATING COCK IS TURNED OFF AND CANNOT BE INADVERTENTLY TURNED ON WARNING DO NOT ATTEMPT TO CLEAN THIS APPLIANCE WITH A JET OF WATER OR STEAM CLEA...

Страница 10: ...p of products E3800 800mm wide manual lift electric Bratt Pan Technical Data DIMENSIONS ELECTRICAL CONNECTION LOCATIONS INSTALLATION E3800 7 7 L1 11 2 L2 11 2 L3 11 2 TECHNICAL DATA TABLE A MODEL NUMB...

Страница 11: ...d handle using fixings supplied and locate water inlet pipe in position in the rear flue at the left hand side Siting Clearances CAUTION If suiting the necessary clearances to any combustible wall MUS...

Страница 12: ...st 3mm in all poles must be installed and wiring executed in accordance with relevant regulations Access to mains terminal block is gained by removing the control panel Water Supply Connection to the...

Страница 13: ...ance Red neon should turn OFF If the appliance does not operate correctly please refer to the Servicing section and rectify the problem ENSURE THAT KITCHEN PERSONNEL UNDERSTAND THE CORRECT OPERATION A...

Страница 14: ...14 REMOVAL OF FRONT FASCIA ACCESS TO ELECTRICS BOX To gain access to the electrics box first the front fascia must be removed 1 2 3 4 5 6...

Страница 15: ...15 7 When removing the front fascia care should be taken not to damage the neon cables NEONS Neons are attached to the front fascia To replace them remove the connections and the nut...

Страница 16: ...To replace remove the clip that secures the thermostat capillary Pull out thermostat phial then remove the two screws on the cover of the electrics box 1 2 When replacing the thermostat phial back int...

Страница 17: ...of the box to reset To replace remove the same clip that s shown in the operating thermostat Pull out phial then remove the two screws When replacing the thermostat phial back into the hole ensure th...

Страница 18: ...d in the electrics box To replace lever it out by using a flat headed screwdriver ELEMENTS Lift Pan fully up to get access to the Element Box To gain access to just the element connections remove the...

Страница 19: ...the element box must be removed as shown When replacing the bottom two elements the thermostat tube must be removed as well They are all attached by hex nuts When replacing the Elements ensure it is...

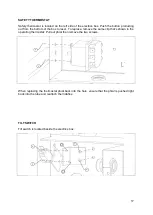
Страница 20: ...20 Ensure Thermostat Tube is attached tightly to the Elements Wiring Diagram 400V 3N Appliance...

Страница 21: ...21...

Страница 22: ...22 Wiring Diagram 440V 3N Appliance...

Страница 23: ...s Slow Poor heating Operating Thermostat out of calibration Replace Operating thermostat Faulty Elements or connections Check each connection to the three elements If any of them are faulty replace SP...

Страница 24: ...ot gain access to a site or a product Repeat commission visits Replacement of any parts where damage has been caused by misuse Engineer waiting time will be chargeable Routine maintenance and cleaning...

Страница 25: ...e Lubrication and adjustment of door catches Cleaning and Maintenance Cleaning of burner jets Poor combustion caused by lack of cleaning Lubrication of moving parts Lubrication of gas cocks Cleaning a...

Отзывы: